This topic describes how to use transit routers to connect a virtual private cloud (VPC) to other networks, such as VPCs in the same region, VPCs in different regions, and data centers. After you connect a VPC to the transit router in the region, the VPC can communicate with other network instances that are also connected to the transit router. For example, you can establish network communication among VPCs in the same region or in different regions, and among VPCs and data centers.
Create a VPC connection
Use an Enterprise Edition transit router
This section describes how to use an upgraded Enterprise Edition transit router to connect VPCs. For more information about how to use a transit router that is not upgraded, see How do I use an unoptimized Enterprise Edition transit router to create a VPC connection?
For more information about how to optimize Enterprise Edition transit routers, see Announcement: Optimization on VPC-connected Enterprise Edition transit routers.
How a VPC connection works
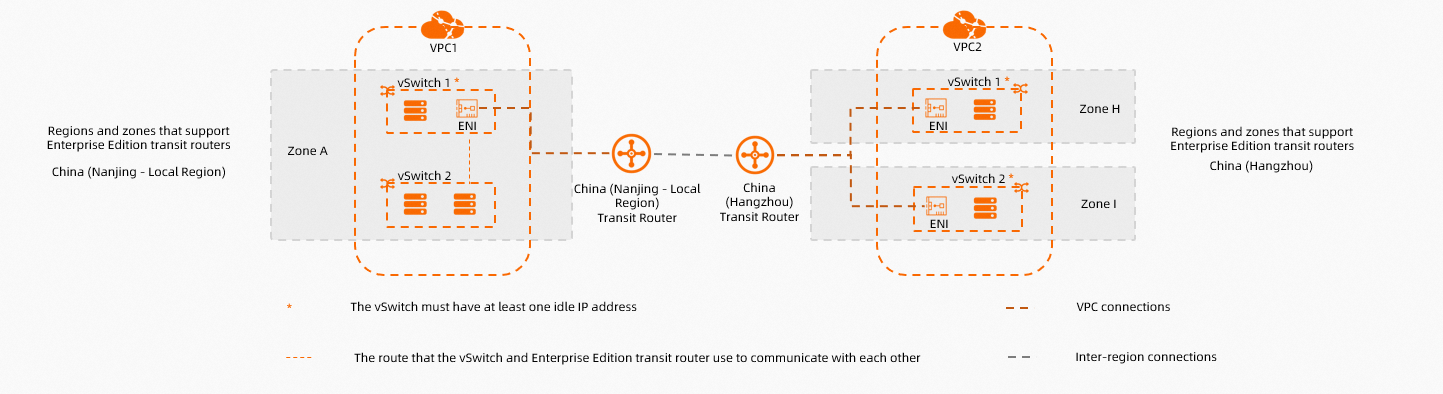
An Enterprise Edition transit router supports one or more zones in a region. For more information, see Regions and zones that support Enterprise Edition transit routers.
If an Enterprise Edition transit router is deployed in a region that supports only one zone, for example, China (Nanjing - Local Region), make sure that the VPC has at least one vSwitch in the zone before you create a VPC connection on the Enterprise Edition transit router. The vSwitch must have at least one idle IP address. When you connect the VPC to the Enterprise Edition transit router, the transit router creates an elastic network interface (ENI) on the vSwitch of the VPC. The ENI occupies one IP address on the vSwitch and forwards network traffic between the VPC and the transit router.
If an Enterprise Edition transit router is deployed in a region that supports multiple zones, for example, China (Shanghai), make sure that the VPC has at least two vSwitches in the zones before you create a VPC connection on the Enterprise Edition transit router. The vSwitches must be deployed in different zones and each vSwitch must have at least one idle IP address. When you connect the VPC to the Enterprise Edition transit router, the transit router creates an ENI in each of the vSwitches. Each ENI occupies one IP address in the vSwitch and forwards network traffic between the VPC and the transit router. The two vSwitches support zone-disaster recovery to ensure uninterrupted data transmission between the VPC and the transit router.
- Note
Ensure that an idle IPv6 address exists when you enable the IPv6 function upon creating a VPC connection. The Enterprise Edition transit router occupies an IPv4 address and an IPv6 address in the VPC when creating an ENI.
If your Enterprise Edition transit router supports multiple zones, we recommend that you create a vSwitch in each of the zones and make sure that each vSwitch has at least one idle IP address for creating VPC connections. This way, the network latency is reduced and the network performance is improved due to shorter data transmission distance. For more information about how network traffic is forwarded between the VPC and the transit router, see the How routes are selected for a VPC connection section in this topic.
How routes are selected for a VPC connection
After a VPC is connected to an Enterprise Edition transit router, network traffic from the VPC is forwarded over the shortest route to reduce network latency. This section describes how an Enterprise Edition transit router selects routes for a VPC connection.
Route selection is performed three times to send a request from the initiator to the acceptor over a VPC connection.

No. | Description |
① | The first routing. When the request is forwarded from the initiator to the Enterprise Edition transit router, it undergoes the first routing process based on the following criteria:
|
② | The second routing. When the request is forwarded from the Enterprise Edition transit router to the acceptor network instance, it undergoes a second routing process based on the following criteria:
|
③ | The third routing. When the request undergoes the third routing process, the system routes it to the acceptor based on the route table associated with the vSwitch that accepts the request.  |


Prerequisites
An Enterprise Edition transit router has been created in the region where the VPC resides. For more information, see Create a transit router.
The VPC has sufficient vSwitches in the zone supported by the Enterprise Edition transit router. Each vSwitch has at least one idle IP address. For more information about how to create a vSwitch, see Create a vSwitch.
If the Enterprise Edition transit router is deployed in a region that supports only one zone, for example, China (Nanjing - Local Region), the VPC must have at least one vSwitch in the zone.
If the Enterprise Edition transit router is deployed in a region that supports multiple zones, for example, China (Shanghai), the VPC must have at least two vSwitches in the zones. The vSwitches must be in different zones.
You can connect an Enterprise Edition transit router to a VPC that belongs to either the same account or different accounts. If the VPC and the transit router belong to different Alibaba Cloud accounts, the transit router must acquire the required permissions from the account to which the VPC belongs. For more information, see Acquire permissions to connect to a network instance that belongs to another account.
To realize IPv6 network communication through the Enterprise Edition transit router, ensure that the IPv6 feature is enabled for the VPC. For more information, see Enable IPv6 for a VPC.
Procedure
Log on to the CEN console.
On the Instances page, click the ID of the CEN instance that you want to manage.
On the tab, find the transit router that you want to manage and click Create Connection in the Actions column.
On the Connection with Peer Network Instance page, set the parameters and click OK. The following table outlines the parameters:
NoteWhen you perform this operation, the system automatically creates the service-linked role AliyunServiceRoleForCEN, which allows the transit router to create an ENI in a vSwitch to forward data between the VPC and the transit router. For more information about service-linked roles, see AliyunServiceRoleForCEN.
Parameter
Description
Instance Type
Select Virtual Private Cloud (VPC).
Region
Select the region where the network instance to be connected is located.
IPv6
Specify whether to enable IPv6 for the VPC connection. This feature is disabled by default.
If the VPC instance requires IPv6 communication through the Enterprise Edition transit router, you must enable this feature.
NoteYou can enable IPv6 for existing VPC connections. For more details, see Enable IPv6 for a VPC Connection.
Transit Router
The system automatically displays the transit routers created in the current region.
Resource Owner ID
Select the Alibaba Cloud account type to which the network instance belongs.
Transit routers support connections to network instances in the same or different accounts:
If the network instance and the transit router instance belong to the same Alibaba Cloud account, select Current Account.
If they belong to different accounts, select Different Account, and enter the account ID (primary account) of the network instance.
Billing Method
The billing method for the transit router is set to Pay-as-you-go by default.
For details about the pay-as-you-go billing rules, see Billing Description.
Attachment Name
Enter a name for the VPC connection.
Network Instance
Select the VPC instance to be connected.
ImportantYou can click Check Route to see whether there are route entries with destination CIDR blocks of 10.0.0.0/8, 172.16.0.0/12, or 192.168.0.0/16. If such entries are found, and Automatically Create Route That Points to Transit Router and Add to All Route Tables of Current VPC has been activated in Advanced Settings, the system will stop automatically advertising routes. This may potentially impact traffic flow between the VPC and transit router. You may have to manually add route entries in the VPC route table for seamless data transfer.
VSwitch
Select vSwitch instances in zones supported by the transit router.
If the Enterprise Edition transit router is deployed in a region that supports only one zone, select a vSwitch in the zone.
If it is deployed in a region that supports multiple zones, select at least two vSwitches that are in different zones for zone-disaster recovery. This ensures uninterrupted data transmission between the VPC and the transit router.
We recommend that you select a vSwitch in each zone to reduce latency and improve network performance because data can be transmitted over a shorter distance.
Advanced Settings
When you create a VPC connection, the system enables the following features in the advanced settings by default:
Associate with Default Route Table of Transit Router
When enabled, the VPC connection is automatically associated with the default route table of the transit router. The transit router forwards traffic based on the default route table.
Propagate System Routes to Default Route Table of Transit Router
After this feature is enabled, the system routes of the VPC are advertised to the default route table of the transit router. The VPC can then communicate with other network instances that are connected to the transit router.
Automatically Create Route That Points to Transit Router and Add to All Route Tables of Current VPC
After this feature is enabled, the system automatically adds the following three routes to all route tables of the VPC: 10.0.0.0/8, 172.16.0.0/12, and 192.168.0.0/16. The next hops of the routes point to the VPC. The routes are used to forward IPv4 traffic from the VPC to the transit router. By default, transit routers do not advertise routes to VPCs.
ImportantIf the VPC instance requires IPv6 communication, after creating the VPC connection, you must enable the route synchronization feature for the VPC connection or manually add IPv6 route entries pointing to the VPC connection in the VPC. Only then can the IPv6 traffic enter the transit router.
You can disable these advanced features by clearing the checkboxes. If you want to customize the connectivity of the VPC instance, you can configure associated forwarding and route learning on the transit router. For specific steps, see Route Management.
Tag
Add tags to the VPC connection.
Tag Key: The tag key can be up to 64 characters in length. It cannot be an empty string or start with
acs:oraliyunor containhttp://orhttps://.Tag Value: The tag value can be an empty string with a maximum length of 128 characters. It cannot start with
acs:oraliyunor containhttp://orhttps://.
You can add multiple tags to a VPC connection. For more information about tags, see Tags.
After the VPC connection is created, you can view the details about the connection on the Intra-region Connections tab. For more information, see View network instance connections.
Related operations
Edit the zone and vSwitch of a VPC connection
Modify the transit router route table associated with a VPC connection
Enable IPv6 for an existing VPC connection
Disable IPv6 for a VPC connection
Use a Basic Edition transit router
The Basic Edition transit router supports connecting VPCs that belong to either the same or different accounts. Before you create a cross-account VPC connection, make sure that you acquire the permissions from the peer VPC account. For more information, see cross-account instance authorization.
Log on to the CEN console.
On the Instances page, click the ID of the CEN instance that you want to manage.
On the tab, find the transit router that you want to manage and click Create Connection in the Actions column.
On the Connection with Peer Network Instance page, configure the network instance information as follows, and then click OK To Create.
Parameter
Description
Instance Type
Select Virtual Private Cloud (VPC).
Region
Select the region where the network instance is deployed.
Transit Router
The transit router instance in the selected region is displayed.
Resource Owner UID
Select the Alibaba Cloud account type to which the network instance belongs.
Transit routers support connections to network instances in the same or different accounts:
If the network instance and the transit router instance belong to the same Alibaba Cloud account, select Current Account.
If they belong to different accounts, select Different Account, and enter the account ID (primary account) of the network instance.
Network Instance
Select the network instance that you want to connect.
After the VPC connection is created, you can view the information about the VPC connection on the Intra-region Connections tab of the transit router instance product page. For more information, see view network instance connections.
Create VPC connections by calling APIs
You can call APIs to create VPC connections using tools such as Alibaba Cloud SDK (recommended), Alibaba Cloud CLI, Terraform, and Resource Orchestration Service. For more information, see the following API references:
CreateTransitRouterVpcAttachment: Create a VPC connection on an Enterprise Edition transit router.
UpdateTransitRouterVpcAttachmentAttribute: Modify the name and description of a VPC connection under an Enterprise Edition transit router.
UpdateTransitRouterVpcAttachmentZones: Modify the zones and vSwitches associated with a VPC connection on an Enterprise Edition transit router.
ListTransitRouterVpcAttachments: Query information about VPC connections on an Enterprise Edition transit router.
AttachCenChildInstance: Create a VPC connection by using a Basic Edition transit router.