Traditional offline data warehouses process changes in batch cycles—typically hourly or daily—which means data consumers always work with stale data, and every update requires partition overwrites that reprocess large volumes of records. This tutorial shows you how to replace that model with a streaming pipeline that uses Data Lake Formation (DLF), Realtime Compute for Apache Flink, and EMR Serverless StarRocks to deliver minute-level data freshness across all warehouse layers.
What you'll build:
An ODS layer that ingests raw changes from a MySQL database using Change Data Capture (CDC)
A DWD layer that joins and denormalizes source tables into a wide table (
dwd_orders) with minute-level changelog propagationA DWS layer with two aggregate metric tables (
dws_usersanddws_shops) built through an intermediate DWM tableStarRocks queries against the DWS and DWD layers: rankings, order details, and category reports
How it works
Flink reads MySQL binlog via CDC and writes records through three Paimon-backed warehouse layers. Each layer emits changelogs that the next layer consumes, so changes propagate end-to-end within minutes.
Flink reads MySQL binlog via CDC and writes raw records to Paimon, forming the ODS layer.
Flink subscribes to ODS changelogs, joins and cleans the data, and writes a wide table to Paimon as the DWD layer.
Flink subscribes to DWD changelogs, aggregates metrics, and writes summary tables to Paimon as the DWS layer.
StarRocks connects to the DLF Paimon catalog and queries the DWD and DWS layers directly.
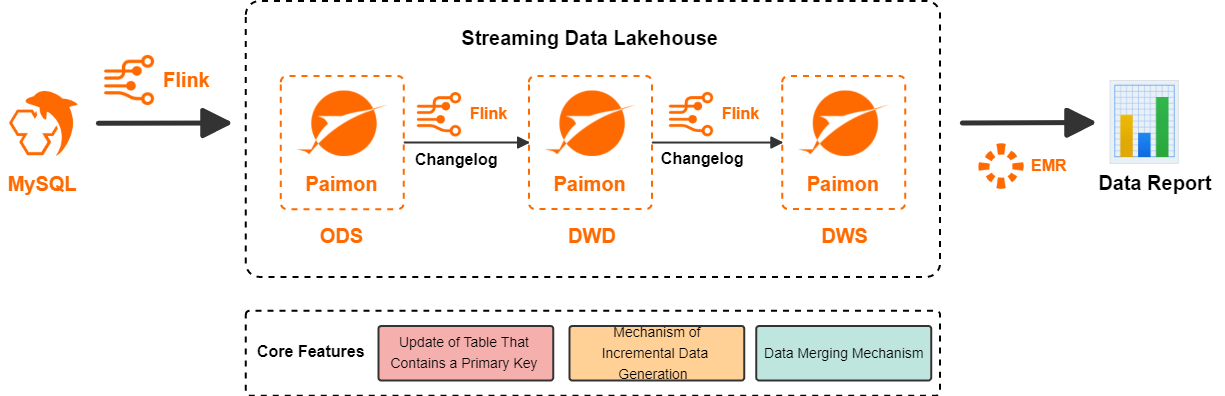
The key enabler is Apache Paimon, which DLF uses as its unified lake storage format. Paimon gives you three capabilities that make this architecture work:
Paimon capability | How it helps |
Primary key table updates | Uses Log-structured Merge-tree (LSM) at the storage layer for efficient upserts. See Primary key table and File layouts. |
Changelog producer | Generates complete |
Merge engine | Merges multiple records with the same primary key using configurable strategies: deduplication, partial-update, or aggregation. See Merge engine. |
Each warehouse layer propagates changes to the next within minutes. Data in each layer is directly queryable and correctable without partition overwrites, and the entire extract, transform, and load (ETL) pipeline is expressed in Flink SQL, which reduces architectural complexity.
For a full description of product benefits, see Benefits.
Prerequisites
Before you begin, make sure you have:
DLF activated. See Get started with DLF.
Realtime Compute for Apache Flink activated. See Activate Realtime Compute for Apache Flink.
EMR Serverless StarRocks activated using the storage-compute separation architecture. See Get started with a Serverless StarRocks instance.
If you are using a Resource Access Management (RAM) user or role, read and write permissions on DLF data. See Manage data permissions.
The StarRocks instance, DLF, and Flink workspace must all be in the same region.
Limitations
Only Ververica Runtime (VVR) 11.1.0 and later support this streaming lakehouse solution.
Step 1: Prepare a MySQL CDC data source
Create a database and three business tables in an ApsaraDB RDS for MySQL instance. This example uses an e-commerce scenario with orders, payment records, and product categories.
Create an ApsaraDB RDS for MySQL instance.
If the RDS instance and your Flink workspace are in different VPCs, configure VPC connectivity first. See How does Realtime Compute for Apache Flink access a service across VPCs?
Create a database and an account. Create a database named
order_dwand a privileged account or a standard account with read and write permissions onorder_dw.Create the three source tables and insert sample data:
CREATE TABLE `orders` (
  order_id bigint not null primary key,
  user_id varchar(50) not null,
  shop_id bigint not null,
  product_id bigint not null,
  buy_fee bigint not null,
  create_time timestamp not null,
  update_time timestamp not null default now(),
  state int not null
);

CREATE TABLE `orders_pay` (
  pay_id bigint not null primary key,
  order_id bigint not null,
  pay_platform int not null,
  create_time timestamp not null
);

CREATE TABLE `product_catalog` (
  product_id bigint not null primary key,
  catalog_name varchar(50) not null
);

-- Insert sample data
INSERT INTO product_catalog VALUES(1, 'phone_aaa'),(2, 'phone_bbb'),(3, 'phone_ccc'),(4, 'phone_ddd'),(5, 'phone_eee');

INSERT INTO orders VALUES
(100001, 'user_001', 12345, 1, 5000, '2023-02-15 16:40:56', '2023-02-15 18:42:56', 1),
(100002, 'user_002', 12346, 2, 4000, '2023-02-15 15:40:56', '2023-02-15 18:42:56', 1),
(100003, 'user_003', 12347, 3, 3000, '2023-02-15 14:40:56', '2023-02-15 18:42:56', 1),
(100004, 'user_001', 12347, 4, 2000, '2023-02-15 13:40:56', '2023-02-15 18:42:56', 1),
(100005, 'user_002', 12348, 5, 1000, '2023-02-15 12:40:56', '2023-02-15 18:42:56', 1),
(100006, 'user_001', 12348, 1, 1000, '2023-02-15 11:40:56', '2023-02-15 18:42:56', 1),
(100007, 'user_003', 12347, 4, 2000, '2023-02-15 10:40:56', '2023-02-15 18:42:56', 1);

INSERT INTO orders_pay VALUES
(2001, 100001, 1, '2023-02-15 17:40:56'),
(2002, 100002, 1, '2023-02-15 17:40:56'),
(2003, 100003, 0, '2023-02-15 17:40:56'),
(2004, 100004, 0, '2023-02-15 17:40:56'),
(2005, 100005, 0, '2023-02-15 18:40:56'),
(2006, 100006, 0, '2023-02-15 18:40:56'),
(2007, 100007, 0, '2023-02-15 18:40:56');
Step 2: Configure metadata in Flink
Create a Paimon catalog
Log on to the Realtime Compute for Apache Flink console.
In the left navigation pane, choose Metadata Management and click Create Catalog.
On the Built-in Catalog tab, click Apache Paimon and then click Next.
Configure the following parameters, select DLF as the storage class, and click OK.
Configuration item
Description
Required
Remarks
metastoreThe metastore type.
Yes
Use
dlf.catalog nameThe name of the DLF data catalog.
Yes
Select an existing catalog. To create one, see Data catalog. This example uses a catalog named
paimoncatalog.Create the
order_dwdatabase in the catalog. In the left navigation pane, choose Data Query > Query Script and click New to open a temporary query. Run:-- Switch to the paimoncatalog data source USE CATALOG paimoncatalog; -- Create the target database CREATE DATABASE order_dw;The following statement has been executed successfully!confirms the database is created.
For more information, see Manage a Paimon catalog.
Create a MySQL catalog
On the Metadata Management page, click Create Catalog.
On the Built-in Catalog tab, click MySQL and then click Next.
Enter the following parameters and click OK. This creates a catalog named
mysqlcatalog.Configuration item
Description
Required
Remarks
catalog nameThe catalog name.
Yes
This example uses
mysqlcatalog.hostnameThe IP address or hostname of the MySQL instance.
Yes
Use the internal network address if the RDS instance and Flink workspace share the same VPC. See View and manage endpoints and port numbers.
portThe MySQL service port. Default:
3306.No
default-databaseThe default MySQL database.
Yes
Use
order_dw.usernameThe MySQL account username.
Yes
The account created in Step 1.
passwordThe MySQL account password.
Yes
The password for the account created in Step 1.
Step 3: Build the ODS layer
The ODS layer ingests all tables from the order_dw MySQL database into Paimon in real time using a Flink CDC pipeline. A single pipeline definition handles all three tables without needing individual source connectors for each.
In the Flink Development Console, choose Development > ETL in the left navigation pane. Click + > New Blank Stream Draft. In the New Draft dialog, enter
odsin the Name field and click Create.In the SQL editor, paste the following pipeline configuration:
Parameter
Description
Required
Example
catalog.properties.metastoreMetastore type. Set to
rest.Yes
restcatalog.properties.token.providerToken provider. Set to
dlf.Yes
dlfcatalog.properties.uriDLF server endpoint. Format:
http://[region-id]-vpc.dlf.aliyuncs.com. See Endpoints.Yes
http://ap-southeast-5-vpc.dlf.aliyuncs.comcatalog.properties.warehouseDLF catalog name.
Yes
paimoncatalogsource: type: mysql name: MySQL Source hostname: rm-bp1e********566g.mysql.rds.aliyuncs.com port: 3306 username: ${secret_values.username} password: ${secret_values.password} tables: order_dw\.\.* # Sync all tables in the order_dw database sink: type: paimon name: Paimon Sink catalog.properties.metastore: rest catalog.properties.uri: http://ap-southeast-5-vpc.dlf.aliyuncs.com catalog.properties.warehouse: paimoncatalog catalog.properties.token.provider: dlf pipeline: name: MySQL to Paimon PipelineReplace the Paimon sink parameters with your actual values: To tune write performance, see Performance optimization.
Click Deploy in the upper-right corner.
In the left navigation pane, choose O&M > Deployments. Find the
odsdeployment and click Start in the Actions column. In the Start Job panel, select Initial Mode and click Start.
Verify the ODS layer: In the left navigation pane, choose Development > Scripts. Click + > New Script. Run the following query to confirm data is flowing from MySQL into Paimon:
SELECT * FROM paimoncatalog.order_dw.orders ORDER BY order_id;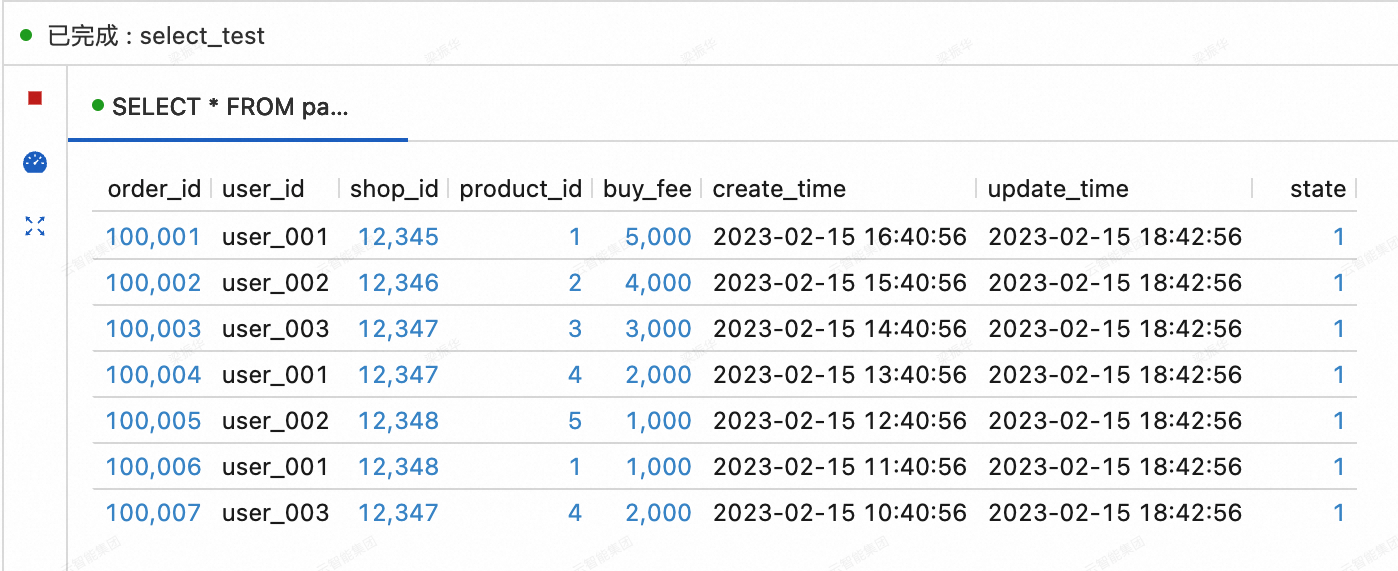
Step 4: Build the DWD layer
The DWD layer merges the orders, orders_pay, and product_catalog tables into a single wide table (dwd_orders). Because these tables arrive as separate streams, the wide table uses the partial-update merge engine: each stream writes only the columns it owns, and Paimon merges partial records with the same order_id into a complete row. The lookup changelog producer then emits update_before/update_after pairs so the DWS layer can consume incremental changes with low latency.
Create the wide table
In the Flink Development Console, choose Development > Scripts. Click + > New Script. Run the following DDL:
CREATE TABLE paimoncatalog.order_dw.dwd_orders (
    order_id BIGINT,
    order_user_id STRING,
    order_shop_id BIGINT,
    order_product_id BIGINT,
    order_product_catalog_name STRING,
    order_fee BIGINT,
    order_create_time TIMESTAMP,
    order_update_time TIMESTAMP,
    order_state INT,
    pay_id BIGINT,
    pay_platform INT COMMENT 'platform 0: phone, 1: pc',
    pay_create_time TIMESTAMP,
    PRIMARY KEY (order_id) NOT ENFORCED
) WITH (
    'merge-engine' = 'partial-update', -- Merge partial records from multiple source streams into one wide row
    'changelog-producer' = 'lookup'    -- Generate low-latency changelogs for downstream consumption
);
Query has been executed confirms the table is created.
Start the DWD streaming job
In the left navigation pane, choose Development > ETL. Click + > New Blank Stream Draft, name the draft dwd, and paste the following SQL. Deploy the draft and start the job deployment with initial states.
The job uses UNION ALL to run two streams concurrently: it joins orders with product_catalog as a dimension lookup, and independently streams orders_pay. Both streams write to dwd_orders, and Paimon's partial-update merge engine assembles the complete wide row when records with the same order_id arrive.
SET 'execution.checkpointing.max-concurrent-checkpoints' = '3';
SET 'table.exec.sink.upsert-materialize' = 'NONE';
SET 'execution.checkpointing.interval' = '10s';
SET 'execution.checkpointing.min-pause' = '10s';

-- Paimon does not allow multiple INSERT statements targeting the same table
-- in the same deployment. Use UNION ALL instead.
INSERT INTO paimoncatalog.order_dw.dwd_orders
SELECT
    o.order_id,
    o.user_id,
    o.shop_id,
    o.product_id,
    dim.catalog_name,
    o.buy_fee,
    o.create_time,
    o.update_time,
    o.state,
    NULL,  -- pay_id (populated by orders_pay stream)
    NULL,  -- pay_platform
    NULL   -- pay_create_time
FROM
    paimoncatalog.order_dw.orders o
    LEFT JOIN paimoncatalog.order_dw.product_catalog FOR SYSTEM_TIME AS OF proctime() AS dim
    ON o.product_id = dim.product_id
UNION ALL
SELECT
    order_id,
    NULL, NULL, NULL, NULL, NULL, NULL, NULL, NULL,  -- order columns (populated by orders stream)
    pay_id,
    pay_platform,
    create_time
FROM
    paimoncatalog.order_dw.orders_pay;
Verify the DWD layer: In the left navigation pane, choose Development > Scripts. Click + > New Script. Run:
SELECT * FROM paimoncatalog.order_dw.dwd_orders ORDER BY order_id;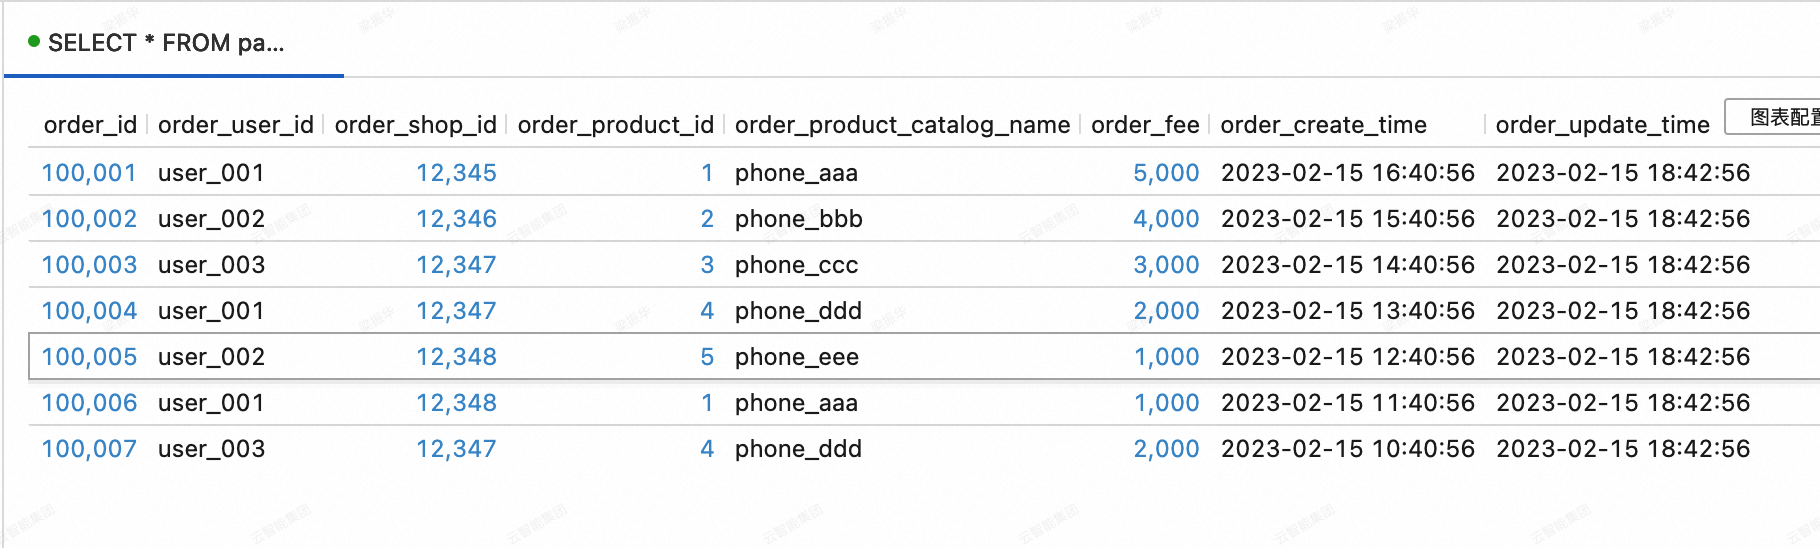
Step 5: Build the DWS layer
The DWS layer computes two aggregate metric tables—per-user totals (dws_users) and per-shop totals (dws_shops)—through an intermediate DWM table (dwm_users_shops). All three tables use the aggregation merge engine, which accumulates incoming values using configured aggregate functions rather than overwriting rows.
The DWS tables are queried by StarRocks at rest and don't need to emit changelogs to downstream streaming consumers, so no changelog-producer is required for them. The intermediate dwm_users_shops table does emit changelogs so that changes propagate to both DWS tables.
Create the DWS and DWM tables
In the left navigation pane, choose Development > Scripts. Click + > New Script. Run the following DDL:
-- User-dimension aggregate metric table
CREATE TABLE paimoncatalog.order_dw.dws_users (
    user_id STRING,
    ds STRING,
    payed_buy_fee_sum BIGINT COMMENT 'Total payment amount completed on the current day',
    PRIMARY KEY (user_id, ds) NOT ENFORCED
) WITH (
    'merge-engine' = 'aggregation',
    'fields.payed_buy_fee_sum.aggregate-function' = 'sum'
    -- No changelog-producer needed: dws_users is queried by StarRocks, not consumed as a stream
);

-- Shop-dimension aggregate metric table
CREATE TABLE paimoncatalog.order_dw.dws_shops (
    shop_id BIGINT,
    ds STRING,
    payed_buy_fee_sum BIGINT COMMENT 'Total payment amount completed on the current day',
    uv BIGINT COMMENT 'Total number of users that made purchases on the current day',
    pv BIGINT COMMENT 'Total number of purchases made on the current day',
    PRIMARY KEY (shop_id, ds) NOT ENFORCED
) WITH (
    'merge-engine' = 'aggregation',
    'fields.payed_buy_fee_sum.aggregate-function' = 'sum',
    'fields.uv.aggregate-function' = 'sum',
    'fields.pv.aggregate-function' = 'sum'
    -- No changelog-producer needed: dws_shops is queried by StarRocks, not consumed as a stream
);

-- Intermediate DWM table: aggregates by (user_id, shop_id) and emits changelogs to both DWS tables
CREATE TABLE paimoncatalog.order_dw.dwm_users_shops (
    user_id STRING,
    shop_id BIGINT,
    ds STRING,
    payed_buy_fee_sum BIGINT COMMENT 'Total amount paid by this user in this shop on the current day',
    pv BIGINT COMMENT 'Number of purchases made by this user in this shop on the current day',
    PRIMARY KEY (user_id, shop_id, ds) NOT ENFORCED
) WITH (
    'merge-engine' = 'aggregation',
    'fields.payed_buy_fee_sum.aggregate-function' = 'sum',
    'fields.pv.aggregate-function' = 'sum',
    'changelog-producer' = 'lookup',  -- Emit changelogs so dws_users and dws_shops can consume incrementally
    'file.format' = 'avro',           -- Row-oriented format for better write throughput on the intermediate table
    'metadata.stats-mode' = 'none'    -- Skip statistical metadata to reduce write cost (no impact on stream processing)
);
Query has been executed confirms the tables are created.
Populate the DWM table from DWD changelogs
In the left navigation pane, choose Development > ETL. Click + > New Blank Stream Draft, name the draft dwm, and paste the following SQL. Deploy and start with initial states.
This job reads from dwd_orders, filters out records without payment data, and accumulates per-user-per-shop metrics into dwm_users_shops.
SET 'execution.checkpointing.max-concurrent-checkpoints' = '3';
SET 'table.exec.sink.upsert-materialize' = 'NONE';
SET 'execution.checkpointing.interval' = '10s';
SET 'execution.checkpointing.min-pause' = '10s';

INSERT INTO paimoncatalog.order_dw.dwm_users_shops
SELECT
    order_user_id,
    order_shop_id,
    DATE_FORMAT(pay_create_time, 'yyyyMMdd') AS ds,
    order_fee,
    1  -- Each input record counts as one purchase
FROM paimoncatalog.order_dw.dwd_orders
WHERE pay_id IS NOT NULL AND order_fee IS NOT NULL;
Populate the DWS tables from DWM changelogs
In the left navigation pane, choose Development > ETL. Click + > New Blank Stream Draft, name the draft dws, and paste the following SQL. Deploy and start with initial states.
Unlike the DWD layer, multiple INSERT statements targeting different Paimon tables are allowed in the same deployment. The dws_shops insert uses a local-merge-buffer-size hint to pre-aggregate records in memory before writing to Paimon, which reduces data skew for high-traffic shops.
SET 'execution.checkpointing.max-concurrent-checkpoints' = '3';
SET 'table.exec.sink.upsert-materialize' = 'NONE';
SET 'execution.checkpointing.interval' = '10s';
SET 'execution.checkpointing.min-pause' = '10s';

BEGIN STATEMENT SET;

INSERT INTO paimoncatalog.order_dw.dws_users
SELECT
    user_id,
    ds,
    payed_buy_fee_sum
FROM paimoncatalog.order_dw.dwm_users_shops;

-- Use local merge to pre-aggregate in memory before writing to Paimon.
-- This reduces data skew for popular shops that receive disproportionately high write volumes.
INSERT INTO paimoncatalog.order_dw.dws_shops /*+ OPTIONS('local-merge-buffer-size' = '64mb') */
SELECT
    shop_id,
    ds,
    payed_buy_fee_sum,
    1,   -- Each input record represents one unique user-shop combination
    pv
FROM paimoncatalog.order_dw.dwm_users_shops;

END;
Verify the DWS layer: In the left navigation pane, choose Development > Scripts. Click + > New Script. Run:
-- Check user aggregate metrics
SELECT * FROM paimoncatalog.order_dw.dws_users ORDER BY user_id;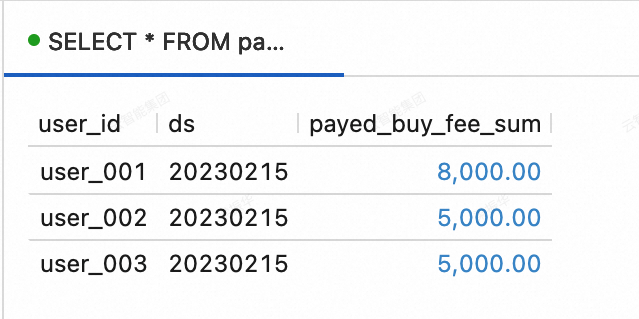
-- Check shop aggregate metrics
SELECT * FROM paimoncatalog.order_dw.dws_shops ORDER BY shop_id;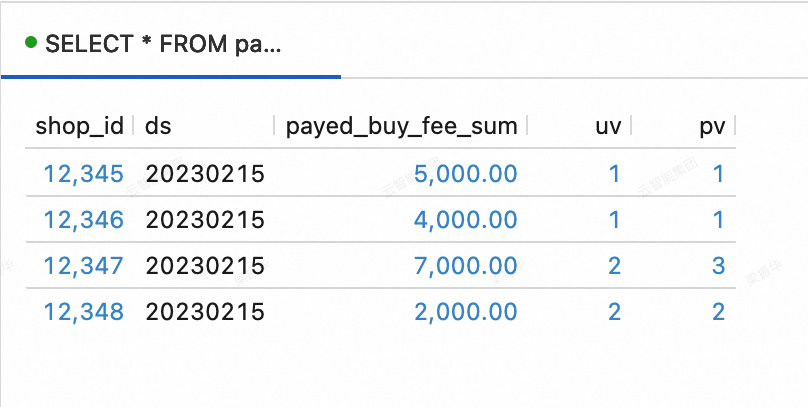
Test change propagation
Insert new records into MySQL and confirm that the changes flow through all layers within minutes.
Insert additional orders into the
order_dwdatabase:INSERT INTO orders VALUES (100008, 'user_001', 12345, 3, 3000, '2023-02-15 17:40:56', '2023-02-15 18:42:56', 1), (100009, 'user_002', 12348, 4, 1000, '2023-02-15 18:40:56', '2023-02-15 19:42:56', 1), (100010, 'user_003', 12348, 2, 2000, '2023-02-15 19:40:56', '2023-02-15 20:42:56', 1); INSERT INTO orders_pay VALUES (2008, 100008, 1, '2023-02-15 18:40:56'), (2009, 100009, 1, '2023-02-15 19:40:56'), (2010, 100010, 0, '2023-02-15 20:40:56');Wait a few minutes for the pipeline to propagate the changes. Then query the DWS tables:
SELECT * FROM paimoncatalog.order_dw.dws_users ORDER BY user_id;SELECT * FROM paimoncatalog.order_dw.dws_shops ORDER BY shop_id;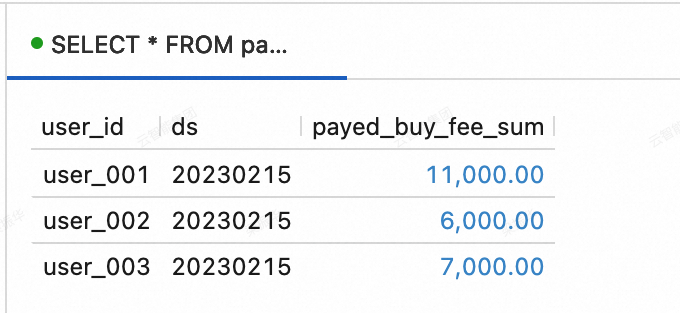
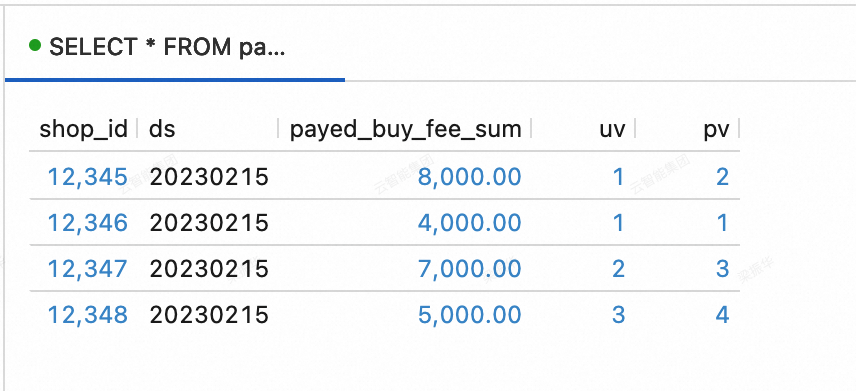
The updated totals for user_001, user_002, and user_003 confirm that end-to-end changelog propagation is working.
Step 6: Connect StarRocks to the lakehouse
Flink has written MySQL data into the DLF Paimon Catalog. StarRocks connects to and queries this data through a Paimon external catalog.
For the complete StarRocks and DLF Paimon Catalog integration steps, see EMR Serverless StarRocks
Step 7: Query the lakehouse using StarRocks
Ranking query
Find the top three shops by transaction volume on February 15, 2023:
SELECT ROW_NUMBER() OVER (ORDER BY payed_buy_fee_sum DESC) AS rn, shop_id, payed_buy_fee_sum
FROM paimoncatalog.order_dw.dws_shops
WHERE ds = '20230215'
ORDER BY rn LIMIT 3;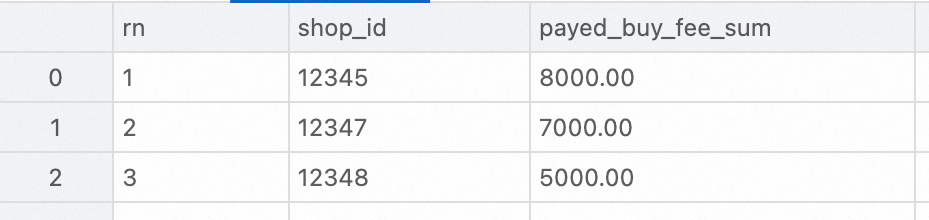
Details query
Retrieve all orders placed by user_001 via mobile (pay_platform = 0) in February 2023:
SELECT * FROM paimoncatalog.order_dw.dwd_orders
WHERE order_create_time >= '2023-02-01 00:00:00' AND order_create_time < '2023-03-01 00:00:00'
AND order_user_id = 'user_001'
AND pay_platform = 0
ORDER BY order_create_time;
Report query
Get the total order count and revenue by product category for February 2023:
SELECT
  order_create_time AS order_create_date,
  order_product_catalog_name,
  COUNT(*),
  SUM(order_fee)
FROM
  paimoncatalog.order_dw.dwd_orders
WHERE
  order_create_time >= '2023-02-01 00:00:00' AND order_create_time < '2023-03-01 00:00:00'
GROUP BY
  order_create_date, order_product_catalog_name
ORDER BY
  order_create_date, order_product_catalog_name;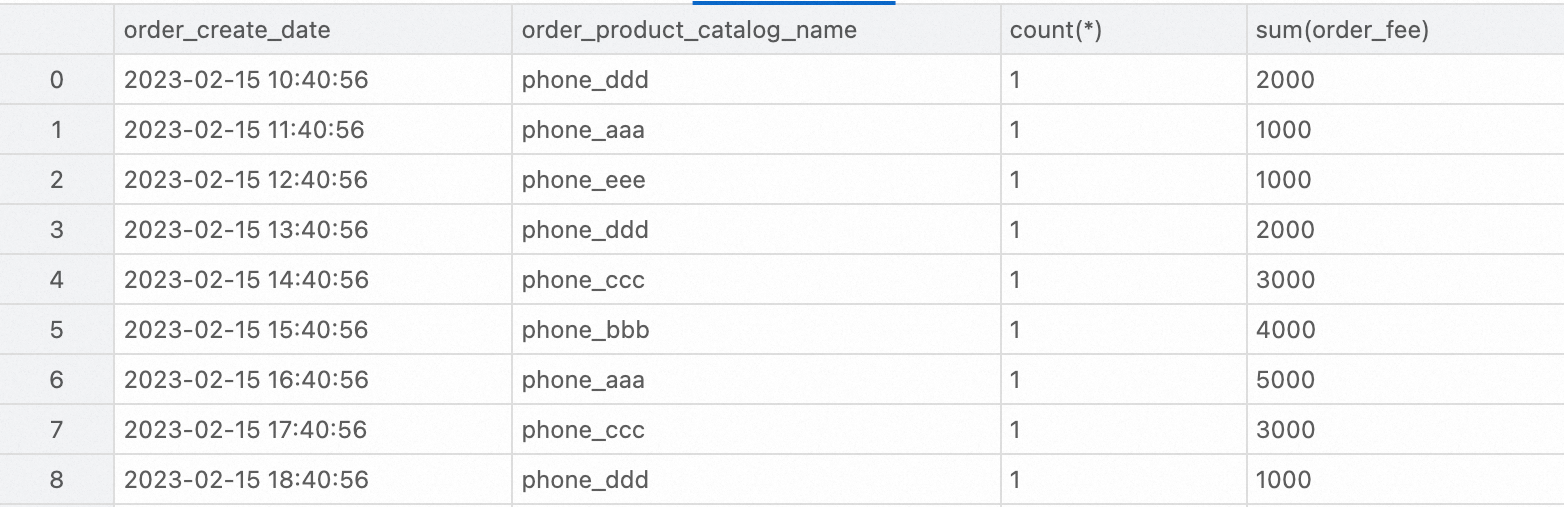
What's next
Performance optimization: Tune Paimon table properties for higher write throughput.
Manage a Paimon catalog: Learn about catalog management operations in Flink.
Changelog producer: Explore other changelog producer strategies beyond
lookup.Merge engine: Learn about the full set of merge strategies available in Paimon.