DataWorks provides multiple MaxCompute node types and flexible scheduling configurations for task development. This topic covers how to create and manage MaxCompute nodes.
Prerequisites
Your account must be added to the workspace with the Development or Workspace Administrator role. The Workspace Administrator role has extensive permissions — grant it with caution. Add workspace members.
Create a MaxCompute node
Log on to the DataWorks console. In the target region, click in the left-side navigation pane. Select a workspace from the drop-down list and click Go to Data Development.
-
Bind a MaxCompute compute resource to the workspace and create a workflow.
In Data Studio, workflows organize development by compute engine. Create a workflow before creating a node.
-
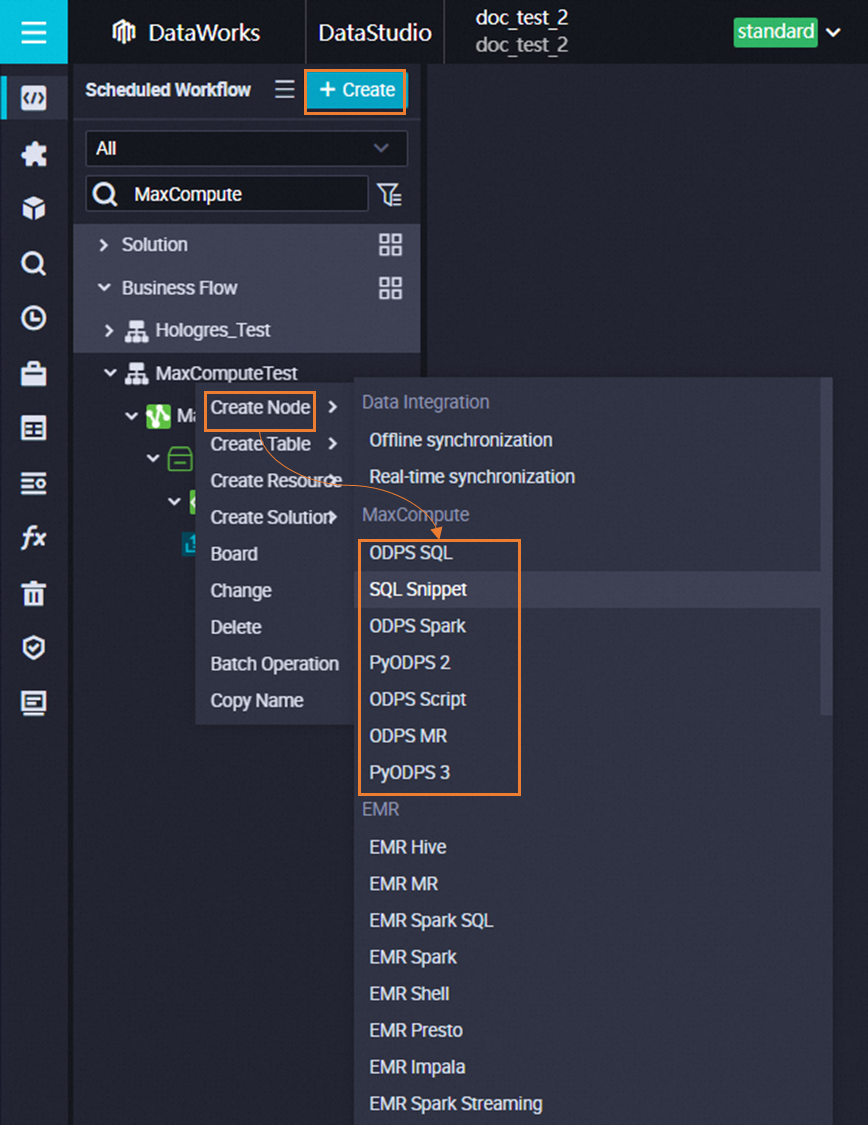
The following example uses an ODPS SQL node.
-
Right-click a workflow and choose . Alternatively, click Create in the top menu bar and follow the prompts.
ImportantIf the option is unavailable, click Computing Resource in the left-side navigation pane to verify that a MaxCompute compute resource is bound. Bind the resource and refresh the page before creating MaxCompute nodes.
-
In the dialog box, enter a node name and click OK. The node editor opens for task development and configuration.
-
Develop MaxCompute tasks
The following table lists the supported MaxCompute node types.
-
Running a MaxCompute task displays a cost estimate. MaxCompute charges this fee, and the actual amount appears on your bill. MaxCompute billing items and methods.
-
A cost estimate error usually means the table does not exist or you lack required permissions. You can ignore the error and address it when the node runs.
|
Type |
Scenario |
Guide |
|
ODPS SQL |
Develops MaxCompute SQL tasks. |
|
|
SQL Snippet |
Develops MaxCompute SQL tasks. When multiple SQL procedures share similar logic but reference different tables with identical or compatible structures, you can abstract the common logic into an SQL Snippet and parameterize the input and output tables for reuse. |
|
|
PyODPS 3 |
Develops MaxCompute PyODPS tasks. The PyODPS 3 node is based on Python 3. |
|
|
PyODPS 2 |
Develops MaxCompute PyODPS tasks. The PyODPS 2 node is based on Python 2. |
|
|
ODPS Spark |
Develops MaxCompute Spark tasks. |
|
|
ODPS Script |
Develops MaxCompute SQL script tasks. |
|
|
ODPS MR |
Develops MaxCompute MapReduce tasks. |
Create tables, resources, and functions
Beyond task development, DataWorks supports tables, resources, and functions for greater efficiency.
-
MaxCompute table capabilities: Use the DataWorks GUI to create, view, and manage tables. Create and use MaxCompute tables and Table management.
-
MaxCompute function and resource capabilities:
-
MaxCompute built-in functions are available directly in DataWorks. Use built-in functions.
-
You can create a UDF as a MaxCompute resource and register it as a function for direct use in tasks. Create and use MaxCompute resources and Create and use user-defined functions.
-
You can upload local resource packages or create resources directly in DataWorks.
Supported resource types include text files, Python code, and compressed packages (.zip, .tgz, .tar.gz, .tar, and .jar). UDFs and MapReduce jobs can read these resources during execution. Create and use MaxCompute resources.
-
Next steps
After development, proceed with the following operations:
-
Scheduling configuration: Configure periodic scheduling properties such as rerun settings and dependencies for tasks that run regularly. Overview of task scheduling configuration.
-
Task debugging: Test and run the node code to verify its logic. Task debugging process.
-
Task deployment: Deploy nodes to run them periodically based on their scheduling configurations. Deploy tasks.