You can create E-MapReduce (EMR) Shell nodes in DataWorks to meet specific business requirements. You can specify custom Shell script and run the script to use features such as data processing, Hadoop component calling, and file management. This topic describes how to configure and use an EMR Shell node in DataWorks to specify and run a Shell script.
Prerequisites
Before developing nodes, if you need to customize the component environment, you can create a custom image based on the official image
dataworks_emr_base_task_podand use the custom image in DataStudio.For example, you can replace Spark JAR packages or include specific
libraries,files, orJAR packageswhen creating the custom image.An Alibaba Cloud EMR cluster is created and registered to DataWorks. For more information, see DataStudio (old version): Associate an EMR computing resource.
(Required if you use a RAM user to develop tasks) The RAM user is added to the DataWorks workspace as a member and is assigned the Develop or Workspace Administrator role. The Workspace Administrator role has more permissions than necessary. Exercise caution when you assign the Workspace Administrator role. For more information about how to add a member, see Add workspace members and assign roles to them.
A serverless resource group is purchased and configured. The configurations include association with a workspace and network configuration. For more information, see Use serverless resource groups.
A workflow is created in DataStudio.
Development operations in different types of compute engines are performed based on workflows in DataStudio. Therefore, before you create a node, you must create a workflow. For more information, see Create a workflow.
A third-party package is installed based on the resource group that you use. The third-party package needs to be referenced when you run a Python script on a DataWorks resource group.
If you use a serverless resource group (recommended), you can use the image management feature to install the third-party package. For more information, see Custom images.
If you use an exclusive resource group for scheduling, you can use the O&M Assistant feature to install the third-party package. For more information, see O&M Assistant.
Limits
This type of node can be run only on a serverless resource group or an exclusive resource group for scheduling. We recommend that you use a serverless resource group. If you need to use an image in DataStudio, use a serverless computing resource group.
If you want to manage metadata for a DataLake or custom cluster in DataWorks, you must configure EMR-HOOK in the cluster first. If you do not configure EMR-HOOK in your cluster, metadata cannot be displayed in real time, audit logs cannot be generated, and data lineages cannot be displayed in DataWorks. EMR governance tasks also cannot be run. For information about how to configure EMR-HOOK, see Use the Hive extension feature to record data lineage and historical access information.
If you commit a node by using spark-submit, we recommend that you set deploy-mode to cluster rather than client.
EMR Shell nodes are run on the resource groups for scheduling of DataWorks rather than in EMR clusters. You can run specific commands supported by EMR components but cannot directly read the information about EMR resources. If you want to reference an EMR resource in an EMR Shell node, you must upload the resource to DataWorks first. For more information, see Create and use an EMR JAR resource.
You cannot use EMR Shell nodes to run Python scripts. To run Python scripts, use Shell nodes.
Step 1: Create an EMR Shell node
Go to the DataStudio page.
Log on to the DataWorks console. In the top navigation bar, select the desired region. In the left-side navigation pane, choose . On the page that appears, select the desired workspace from the drop-down list and click Go to Data Development.
Create an EMR Shell node.
Find the desired workflow, right-click the name of the workflow, and then choose .
NoteAlternatively, you can move the pointer over the Create icon and choose .
In the Create Node dialog box, configure the Name, Engine Instance, Node Type, and Path parameters. Click Confirm. The configuration tab of the EMR Shell node appears.
NoteThe node name can contain only letters, digits, underscores (_), and periods (.).
Step 2: Develop an EMR Shell task
You can use one of the following methods based on your business requirements to develop a Shell task on the configuration tab of the EMR Shell node:
Upload a resource from your on-premises machine to DataStudio and then reference the resource. For more information, see the Method 1: Upload and reference an EMR JAR resource section in this topic. We recommend that you use this method.
Use the OSS REF method to reference an OSS resource. For more information, see the Method 2: Reference an OSS resource section in this topic.
Method 1: Upload and reference an EMR JAR resource
DataWorks allows you to upload a resource from your on-premises machine to DataStudio before you can reference the resource. If the EMR cluster that you want to use is a DataLake cluster, you can perform the following steps to reference an EMR JAR resource. If the EMR Shell node depends on large amounts of resources, the resources cannot be uploaded by using the DataWorks console. In this case, you can store the resources in Hadoop Distributed File System (HDFS) and reference the resources in the code of the EMR Shell node.
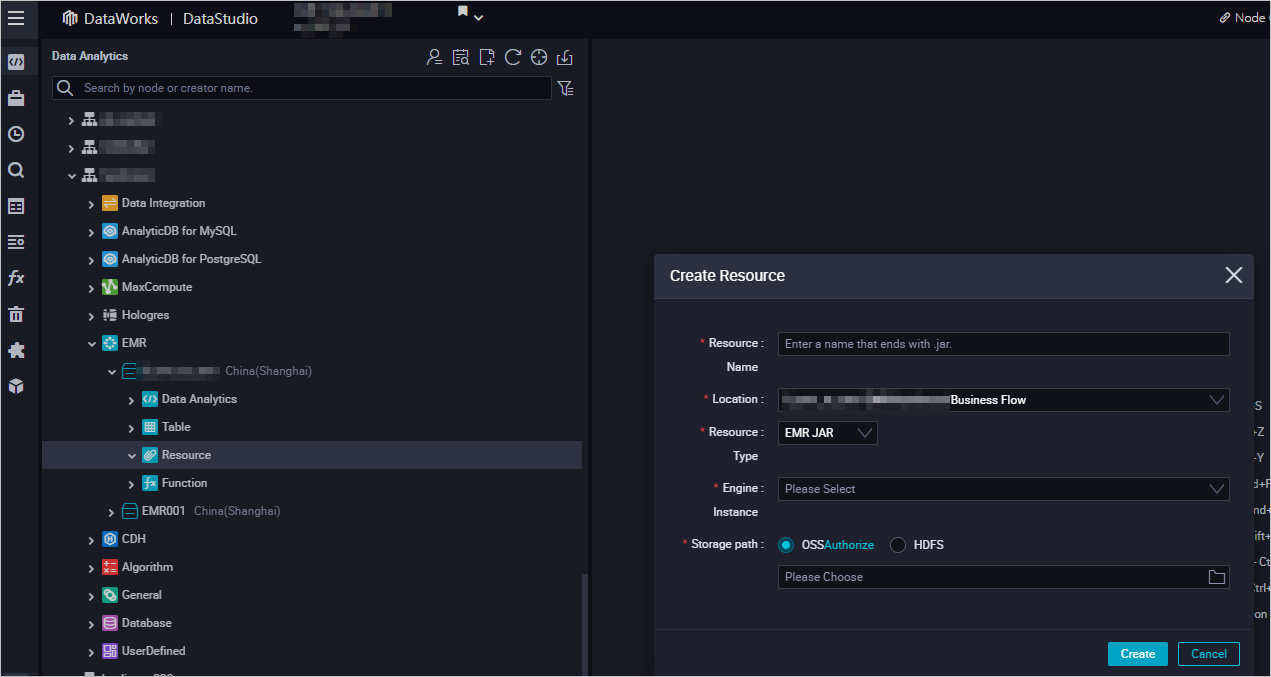
Create an EMR JAR resource.
For more information about how to create an EMR JAR resource, see Create and use an EMR resource. In this example, the JAR package that is generated in the Prepare initial data and a JAR resource package section is stored in the emr/jars directory. The directory is used to store JAR resources. The first time you use an EMR JAR resource, click Authorize to authorize DataWorks to access the EMR JAR resource. Then, click Upload to upload the JAR resource.

Reference the EMR JAR package.
Open the EMR Shell node. The configuration tab of the node appears.
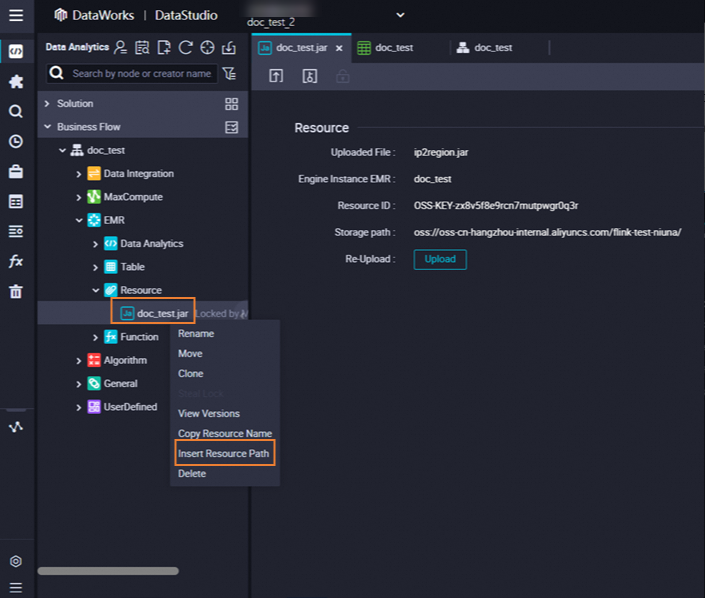
Find the resource that you want to reference below Resource in the EMR folder, right-click the resource name, and then select Insert Resource Path. In this example, the resource is
onaliyun_mr_wordcount-1.0-SNAPSHOT.jar.
If the information in the
##@resource_reference{""}format appears on the configuration tab of the EMR Shell node, the code resource is referenced. Then, run the following code. You must replace the information in the following code with the actual information. The information includes the resource package name, bucket name, and directory.##@resource_reference{"onaliyun_mr_wordcount-1.0-SNAPSHOT.jar"} onaliyun_mr_wordcount-1.0-SNAPSHOT.jar cn.apache.hadoop.onaliyun.examples.EmrWordCount oss://onaliyun-bucket-2/emr/datas/wordcount02/inputs oss://onaliyun-bucket-2/emr/datas/wordcount02/outputsNoteYou cannot add comments when you write code for the EMR Shell node.
Method 2: Reference an OSS resource
Configure scheduling parameters for the EMR Shell node
On the configuration tab of the EMR Shell node, develop node code. You can define variables in the ${Variable} format in the node code and configure the scheduling parameters that are assigned to the variables as values in the Scheduling Parameter section of the Properties tab. This way, the values of the scheduling parameters are dynamically replaced in the node code when the node is scheduled to run. For more information about how to use scheduling parameters, see Supported formats for scheduling parameters. Sample code:
DD=`date`;
echo "hello world, $DD"
## Scheduling parameters are supported.
echo ${var};If you use an EMR DataLake cluster, the following command lines are also supported:
Shell commands: Shell commands under
/usr/binand/bin, such as ls and echo.YARN: hadoop, hdfs, and yarn.
Spark: spark-submit.
Sqoop: sqoop-export, sqoop-import, and sqoop-import-all-tables.
To use the Sqoop service, you must add the IP address of your resource group to the IP address whitelist of the ApsaraDB RDS instance that is used to store the metadata of the EMR cluster.
Run the Shell task
In the toolbar, click the
 icon. In the Parameters dialog box, select the desired resource group from the Resource Group Name drop-down list and click Run. Note
If you want to access a computing resource over the Internet or a virtual private cloud (VPC), you must use the resource group for scheduling that is connected to the computing resource. For more information, see Network connectivity solutions.
If you want to change the resource group in subsequent operations, you can click the
 (Run with Parameters) icon to change the resource group in the Parameters dialog box.
Click the
 icon in the top toolbar to save the Shell scripts.
Optional. Perform smoke testing.
You can perform smoke testing on the node in the development environment when you commit the node or after you commit the node. For more information, see Perform smoke testing.
Step 3: Configure scheduling properties
If you want the system to periodically run a task on the node, you can click Properties in the right-side navigation pane on the configuration tab of the node to configure task scheduling properties based on your business requirements. For more information, see Overview.
You must configure the Rerun and Parent Nodes parameters on the Properties tab before you commit the task.
If you need to customize the component environment, you can create a custom image based on the official image
dataworks_emr_base_task_podand use the custom image in DataStudio.For example, you can replace Spark JAR packages or include specific
libraries,files, orJAR packageswhen creating the custom image.
Step 4: Deploy the task
After a task on a node is configured, you must commit and deploy the task. After you commit and deploy the task, the system runs the task on a regular basis based on scheduling configurations.
Click the
 icon in the top toolbar to save the task.
 Click the
 icon in the top toolbar to commit the task.
 In the Submit dialog box, configure the Change description parameter. Then, determine whether to review task code after you commit the task based on your business requirements.
NoteYou must configure the Rerun and Parent Nodes parameters on the Properties tab before you commit the task.
You can use the code review feature to ensure the code quality of tasks and prevent task execution errors caused by invalid task code. If you enable the code review feature, the task code that is committed can be deployed only after the task code passes the code review. For more information, see Code review.
If you use a workspace in standard mode, you must deploy the task in the production environment after you commit the task. To deploy a task on a node, click Deploy in the upper-right corner of the configuration tab of the node. For more information, see Deploy nodes.
More operations
After you commit and deploy the task, the task is periodically run based on the scheduling configurations. You can click Operation Center in the upper-right corner of the configuration tab of the corresponding node to go to Operation Center and view the scheduling status of the task. For more information, see View and manage auto triggered tasks.
References
For information about how to run Python scripts on EMR Shell nodes by using Python 2 or Python 3 commands, see Use a Shell node to run Python scripts.