DataWorks allows you to create E-MapReduce (EMR) JAR resources or EMR file resources in the DataWorks console. You can upload a file that contains user-defined functions (UDFs) or open source MapReduce code as an EMR resource and commit the resource. Then, you can reference the resource in EMR compute nodes. This topic describes how to create a resource by uploading a file, commit the resource, and reference the resource in EMR compute nodes.
Prerequisites
You can create an EMR resource only based on an EMR DataLake cluster or an EMR Hadoop cluster. The preparations that are required to create a resource vary based on the type of the EMR cluster. You must complete the required preparations on the EMR and DataWorks sides based on your business requirements before you perform operations in this topic. For more information, see the following topics:
DataLake cluster: Configure an EMR data lake cluster and Configure DataWorks
Hadoop cluster: Associate an EMR cluster with a DataWorks workspace as an EMR compute engine instance
Create an EMR resource
Log on to the DataWorks console. In the top navigation bar, select the desired region. In the left-side navigation pane, choose . On the page that appears, select the desired workspace from the drop-down list and click Go to Data Development.
Move the pointer over the
 icon and then choose or .
 You can also find the desired workflow, right-click the workflow name, and then choose or .
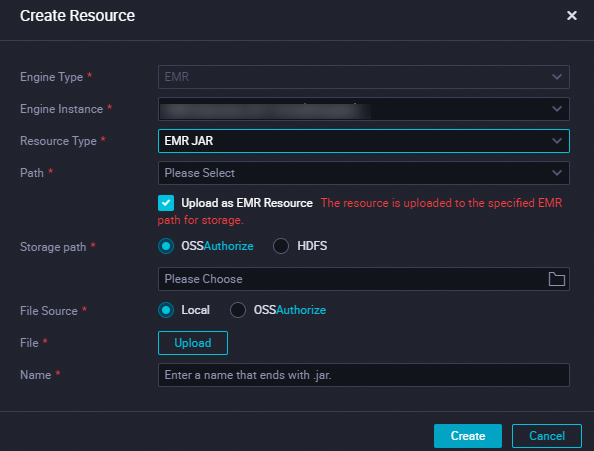
In the Create Resource dialog box, configure the parameters. The following table describes the parameters.

Parameter
Description
Engine Type
The value of this parameter is fixed as EMR. You cannot change the value of this parameter.
Engine Instance
Select a desired compute engine from the drop-down list.
NoteThe drop-down list displays all EMR compute engines that are associated with your workspace.
Resource Type
The resource type. Valid values: EMR File and EMR JAR.
Path
The workflow in which you want to create a resource.
Storage path
The storage path of the resource. Valid values: OSS and HDFS.
If you select OSS, you must click Authorize next to OSS to authorize DataWorks to access Object Storage Service (OSS). Then, select a folder.
NoteYou must use your Alibaba Cloud account to perform authorization.
If you select HDFS, you must enter a storage path.
NoteA JAR package can be stored in the following objects:
Master node of the EMR cluster.
OSS. We recommend that you store a JAR package in OSS. For more information about how to store a JAR package in OSS, see Operations in the OSS console.
File Source
The source of the file that you want to upload. Valid values: Local and OSS.
If you select Local, click Upload in the File field to upload a file from your on-premises machine.
If you select OSS, select an OSS object for Select File or click Create in OSS to create an OSS object.
Name
The name of the EMR resource that you want to create. If you upload a JAR file as a resource, you must add the file name extension .jar to the resource name.
Click Create.
Click the
 and
and  icons in the top toolbar to save and commit the resource to the server for task scheduling and development. Note
You must select a resource group for scheduling when you commit the table. If you use a serverless resource group to commit the table, DataWorks issues a table creation task to a compute engine and displays the run logs. If an error occurs when you commit the table, you can use the run logs to troubleshoot the issue. If no serverless resource groups are available, you can purchase and configure a serverless resource group. For more information, see Create and use a serverless resource group.
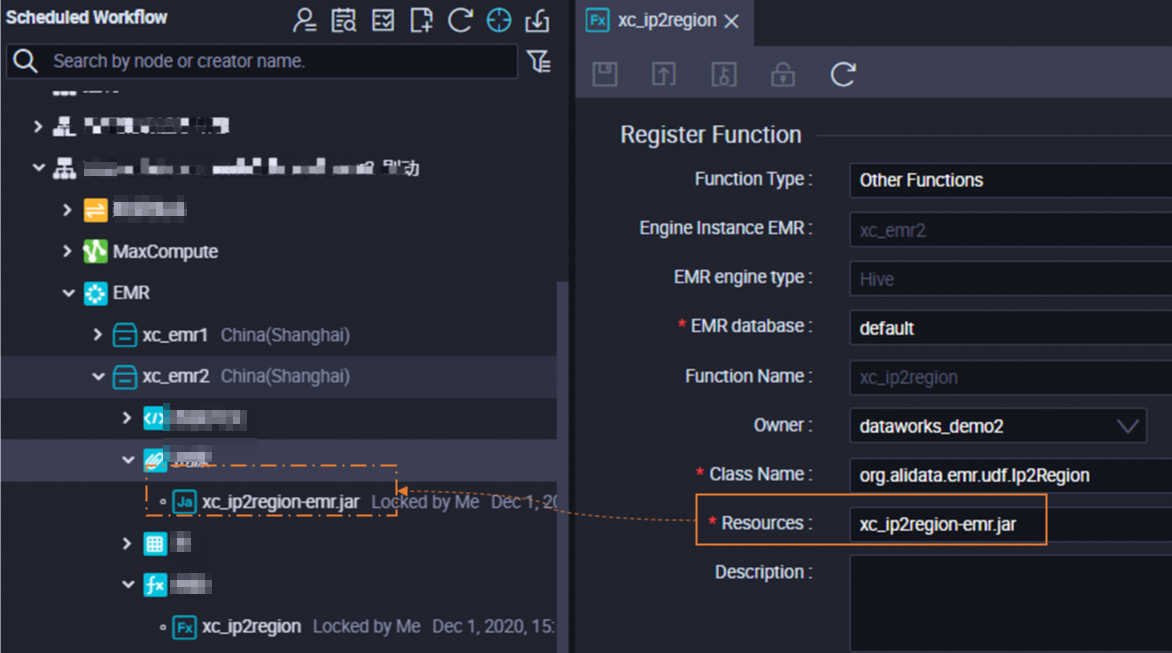
Use a resource to register functions
DataWorks allows you to use a resource to register functions in the DataWorks console. After you upload a resource that is required to register functions to the DataWorks console, you can use the resource when you register functions.
Use a resource in node code
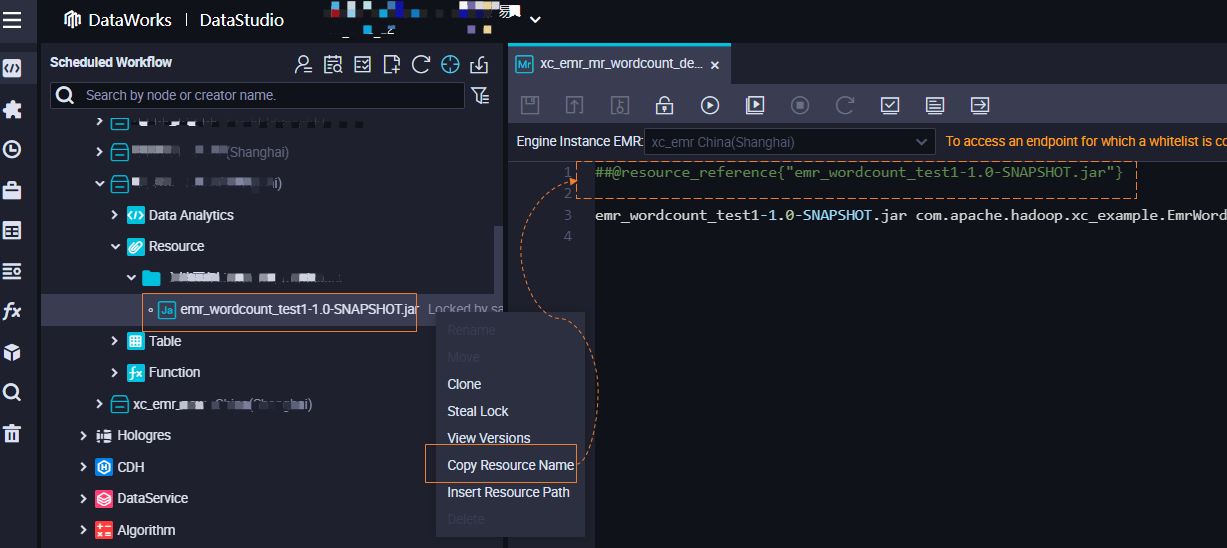
After you create an EMR JAR resource, you can perform the following operations to reference the resource in the code of a node: Find the resource that you created in Resource, right-click the resource name, and then select Insert Resource Path. The following figure shows the reference steps.
After a resource is referenced by a node, the code in the @resource_reference{"Resource name"} format is displayed.
For more information about how to reference a resource, see Create an EMR MR node.
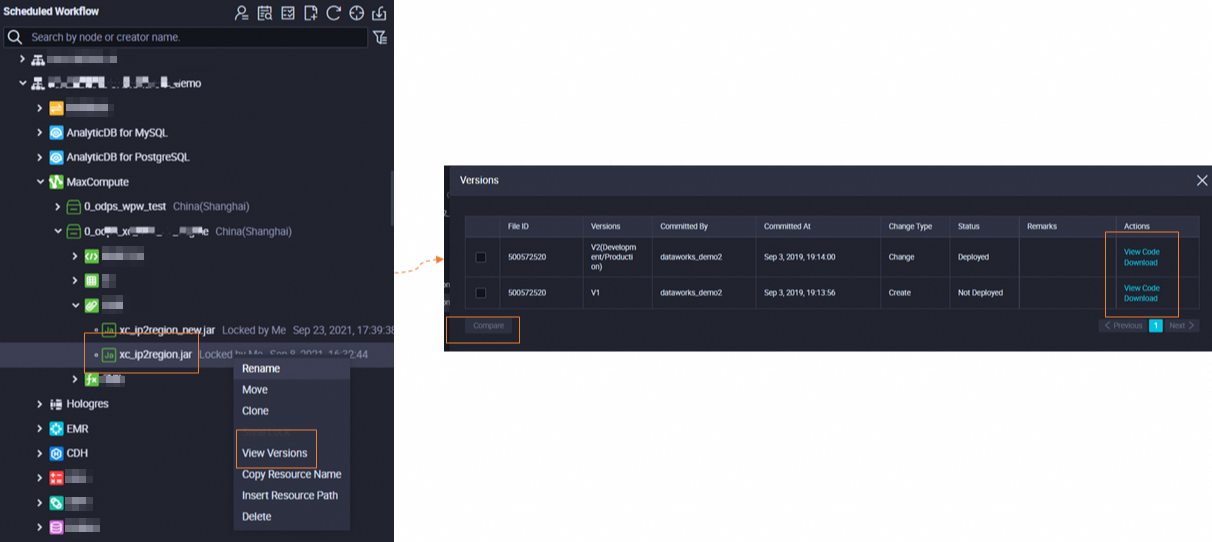
Manage resource versions
Each time you commit a resource, a resource version is generated. You can right-click the resource name and select View Versions to view detailed information or download the resource of a specific version.