Purchase exclusive resource groups for scheduling based on your business requirements. After purchasing, you must configure network bindings and whitelists. This topic describes the complete process of purchasing and using these resource groups.
If you did not activate DataWorks in any region before June 10, 2024, you can only purchase and use serverless resource groups after activation. Legacy resource groups are not supported. If you are an existing DataWorks user and want to switch to serverless resource groups, see Switch from legacy resource groups.
DataWorks no longer recommends exclusive resource groups for scheduling
DataWorks no longer recommends using exclusive resource groups for scheduling. Use Serverless resource groups instead. Serverless resource groups include the core features of earlier resource group types, such as exclusive resource groups for scheduling, exclusive resource groups for Data Integration, exclusive resource groups for DataService Studio, and shared resource groups for scheduling. You can use a single serverless resource group to synchronize data, schedule and run tasks, and call and manage API services.
Prerequisites
Understand the specifications, performance (task concurrency), and billing methods of exclusive resource groups for scheduling. Plan your specifications and subscription duration according to your business needs. For more information, see Billing of exclusive resource groups for scheduling.
Familiarize yourself with the application scenarios for exclusive resource groups for scheduling. For more information, see Use cases.
Precautions
(Optional) If the resource group needs to interact with data sources or other network environments—for example, accessing a self-managed database or an internal address via Shell, or using engines like EMR or CDH—ensure you understand the network connectivity solutions and whitelist requirements. For more information, see Billing of exclusive resource groups for scheduling.
If you do not need to connect to database instances and only want to mitigate task delays caused by resource contention in the shared resource group, you can ignore the network settings in this topic. You can purchase a resource group in any zone without performing network configuration.
By default, DataWorks exclusive resource groups for scheduling have public network access. However, because they use shared bandwidth, the quality of this access is not guaranteed. If you rely heavily on the public network, use Serverless resource groups.
Limitations
Only the Alibaba Cloud account or RAM users with the AliyunBSSOrderAccess and AliyunDataWorksFullAccess permissions can purchase resource groups.
Only workspace administrators can associate resource groups with workspaces or modify workspace ownership.
For more information about resource group interface permissions, see Resource group permission management policy.
For more information about creating custom policies and authorization, see (Optional) Create a custom policy.
The
4c8gexclusive resource group for scheduling supports binding up to2VPCs. Other specifications support binding up to3VPCs.Because exclusive resource groups are being deprecated, new DataWorks users can only purchase and use Serverless resource groups. Legacy resource groups are not available for purchase or use. For more information about the Serverless launch, see Notice on the release of serverless resource groups.
Tasks running on an exclusive resource group for scheduling can create up to
100files by default, and the size of a single file cannot exceed150MB.
Step 1: Purchase a resource group
DataWorks exclusive resource groups are subscription-based and require a separate purchase. To purchase a resource group:
Only users with the AliyunBSSOrderAccess and AliyunDataWorksFullAccess permissions can purchase resource groups.
Log on to the DataWorks Console.
In the left navigation pane, click Resource Group. On the Exclusive Resource Groups tab, click Create Resource Group of Old Version. On the buy page, configure the following parameters:
Parameter
Description
Region
Select the region for the resource group.
NoteExclusive resource groups for scheduling cannot be used across regions. For example, a resource group in the Singapore region can only be used by workspaces in the same region.
Exclusive Resource Type
Select Exclusive Scheduling Resources.
Exclusive Resources for Scheduling
Select the specifications for the exclusive resource group for scheduling. Fees and the maximum concurrent running instances vary by specification. For more information, see Billing of exclusive resource groups for scheduling (subscription).
Resources
The number of machines in the resource group. To ensure high availability in production environments, select 2 or more.
Billing Cycle
Exclusive resource groups are subscription-based. To ensure uninterrupted service, select Auto-renewal. After the resource group is created, you can also go to the Alibaba Cloud Renewal Management page to enable or disable the auto-renewal service. For more information, see Stop billing.
Resource Name
Enter a name for the resource group. The name must be unique within the tenant.
NoteA tenant refers to the Alibaba Cloud account. A tenant can have multiple users (RAM users).
Click Buy Now and complete the payment.
After payment, DataWorks initializes the exclusive resource group. When the status changes to Running, the resource group has been successfully added to the console.
NoteInitialization of the exclusive resource group takes approximately 20 minutes. Wait for the status to change to Running.
After the exclusive resource group is added to the console, you must associate it with a workspace before you can select it for task configuration.
Step 2: Associate a workspace
Only workspace administrators can associate resource groups with workspaces or modify workspace ownership.
You must associate an exclusive resource group to a workspace before you can use it. A single exclusive resource group for scheduling can be assigned to multiple workspaces, but it cannot be used across regions. For example, an exclusive resource group for scheduling in the Singapore region can only be associated with workspaces in the Singapore region. To associate with a workspace:
Log on to the DataWorks Console.
In the Exclusive Resource Groups tab of the Resource Group, click Associate Workspace next to the target resource group.
Click Associate next to the corresponding workspace to associate the exclusive resource group with that workspace.
Step 3: Configure network settings
Bind a VPC
If the resource group needs to interact with data sources or other network environments—for example, accessing a self-managed database or an internal address via Shell, or using engines like EMR or CDH—ensure you understand the network connectivity solutions and whitelist requirements., you must bind a VPC and configure whitelists.
Exclusive resource groups reside in a VPC managed by DataWorks. To connect to data sources, you must bind your own VPC to the resource group.
The 4c8g exclusive resource group for scheduling supports binding up to 2 VPCs. Other specifications support binding up to 3 VPCs.
Log on to the DataWorks Console.
In the Exclusive Resource Groups tab of the Resource Group, click Network Settings next to the target resource group to enter the binding page.
Before binding, use your Alibaba Cloud account (root account) to grant DataWorks permission to access your cloud resources.
Bind a VPC.
Click Add VPC Association in the upper-left corner of the VPC Binding page. In the dialog box, configure the parameters. The configuration instructions for different network environments are as follows.
NoteFor scenarios such as Alibaba Cloud instances or self-managed ECS instances, choose the network connectivity scheme and configuration based on whether the DataWorks workspace and the data source belong to the same Alibaba Cloud account.
Parameter
Same account/region
Different account/region
VPC
If the data source and resource group belong to the same account, select the VPC where the data source resides.
If they are not under the same account, follow the scenario for different regions.
If the data source and resource group are in different regions or accounts, select a VPC in the current account that is connected to the data source network. For example, if the data source is not in an Alibaba Cloud VPC, click Create VPC to create a VPC for the exclusive resource group. After creation, select the new VPC or a VPC that is already connected to the target database network.
NoteIf the DataWorks workspace and data source are in different regions or under different Alibaba Cloud accounts, you must also use VPN Gateway or Express Connect to establish a connection between the VPC bound to the exclusive resource group and the VPC where the data source is located. You must manually add a route to the target database IP to ensure connectivity. For details, see Network connectivity solutions.
Zone
Select the zone where the database is located.
Select a zone that is already connected to the target database network.
vSwitch
If you selected the VPC where the data source resides, we recommend selecting the vSwitch associated with the data source.
NoteBinding any vSwitch in the data source VPC automatically adds a route to the entire VPC CIDR block, ensuring connectivity.
Select a vSwitch that is already connected to the target database network. If no vSwitch is available, click Create vSwitch to create one for the exclusive resource group. After creation, select the created vSwitch here.
Click OK to complete the VPC binding.
NoteIf the data source and exclusive resource group are in different regions or under different Alibaba Cloud accounts, you must bind a VPC and then add route rules pointing to the target database IP address.
Optional:Configure Host.
If your data source is accessed via a domain name rather than an IP address, you must configure the Host. Otherwise, connectivity tests will fail.
Click Hostname-to-IP Mapping. Click Add in the upper-left corner of the page. In the Create Hostname-to-IP Mapping dialog box, configure the parameters. Parameter descriptions are as follows.
Parameter
Description
IP Address
Enter the actual IP address of the data source.
Hostname
Enter the domain name used to access the data source. Add multiple domain names on separate lines.
If you need to add multiple IP addresses, click Add again.
NoteThe IP and domain name must be unique.
In a Host configuration, the relationship between IP and domain name is 1-to-many. An IP can correspond to multiple Host domain names, but a Host domain name can only point to one IP.
Add to whitelist
If the resource group and data source are in the same zone, VPC, and vSwitch but cannot connect, the data source may have whitelist restrictions. Add the following to the data source whitelist:
Internal network connection: Add the CIDR block of the vSwitch (from the VPC bound to the resource group) to the data source whitelist.
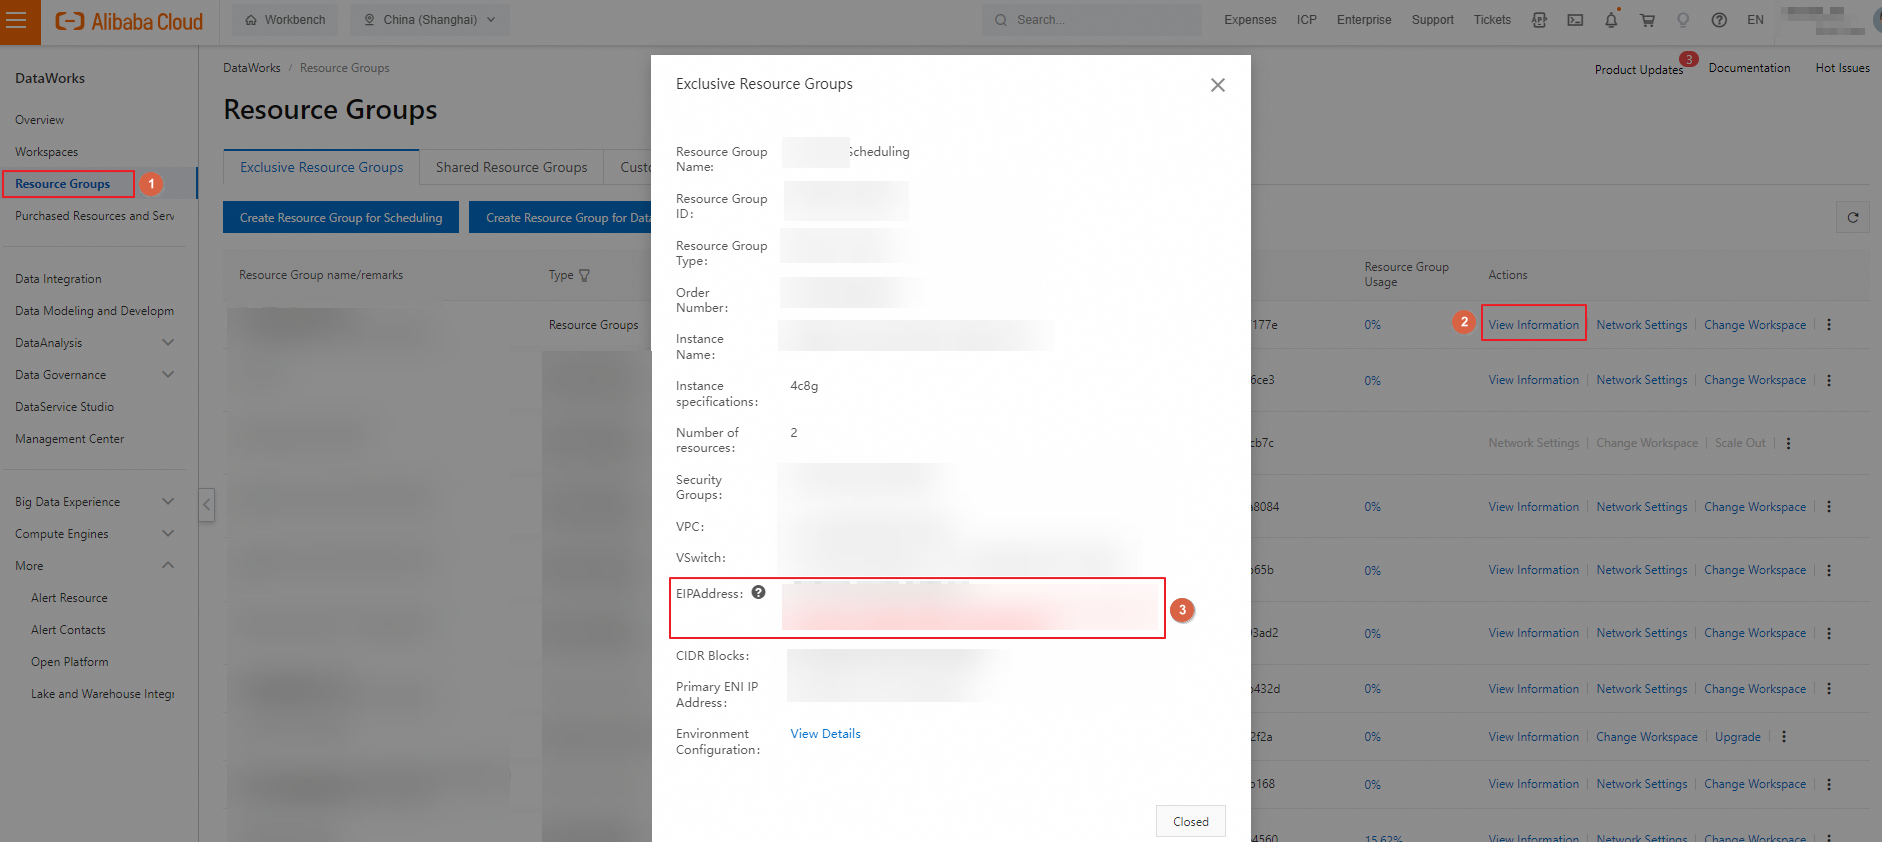
After binding a VPC, go to Network Settings to view the vSwitch CIDR Block on the VPC Binding tab.
Public network connection: Add the EIP Address of the exclusive resource group to the data source whitelist.
Step 4: Test network connectivity
After configuration, test connectivity between the resource group and the data source.
Go to the Data Sources page.
Log on to the DataWorks console. In the top navigation bar, select the desired region. In the left-side navigation pane, choose . On the page that appears, select the desired workspace from the drop-down list and click Go to Management Center.
In the left-side navigation pane of the SettingCenter page, click Data Sources.
Click Edit in the Actions column of the corresponding data source.
On the data source edit page, click Test Network Connectivity next to the resource group. A status of Connected indicates a successful connection.
 Note
NoteThe configuration interface varies by data source type.
If the data source is separated into development and production environments, you must test network connectivity between the resource group and the data source in each environment individually.
For more information about network connectivity between data sources and exclusive resource groups in different network environments, see Network connectivity solutions.
More operations
View resource group usage and monitoring
You can view resource group usage and queuing status in the DataWorks console. You can also use the Smart Monitor feature in Operation Center to monitor usage rates and the number of pending instances. If task execution takes too long, check the resource group usage to see if resources are exhausted. For more information, see View the resource usage of an exclusive resource group. For resource group monitoring, see Create a custom alert rule.
Run commands via O&M Assistant
If you need to execute commands on the exclusive resource group for scheduling during development—for example, to install PyODPS third-party packages—you can use the O&M Assistant. For more information about the usage and entry point of O&M Assistant, see O&M Assistant.
Migrate resource group zones
To migrate the zone of a resource group, follow these steps:
Log on to the DataWorks Console.
In the left-side navigation pane, click Resource Groups. On the Exclusive Resource Groups tab of the Resource Group, find the resource group with Purpose set to Data Scheduling.
Click the
 icon in the Actions column of the resource group and select Change Zone.
In the dialog box, select the Current Zone and Machines of the resource group to be replaced, and then select the New Zone and Number of Machines to Use.
Click OK to complete the zone migration.
Zone migration may require network changes:
Resource Group CIDR Block: The CIDR block will change if the zone changes.
Resource Group Primary ENI IP: The primary network interface IP of the replaced ECS instance will change. A new IP will be allocated from the CIDR block of the target zone.
Elastic ENI Bound to the Resource Group: If the whitelist uses the vSwitch CIDR block, it is not affected. However, if specific elastic network interface (ENI) IPs are configured, you must update the whitelist to ensure connectivity.
Appendix: Switch scheduling resource groups
After reconfiguration, use the following methods to switch the resource groups used by your tasks.
Environment | Switch operations | Entry point |
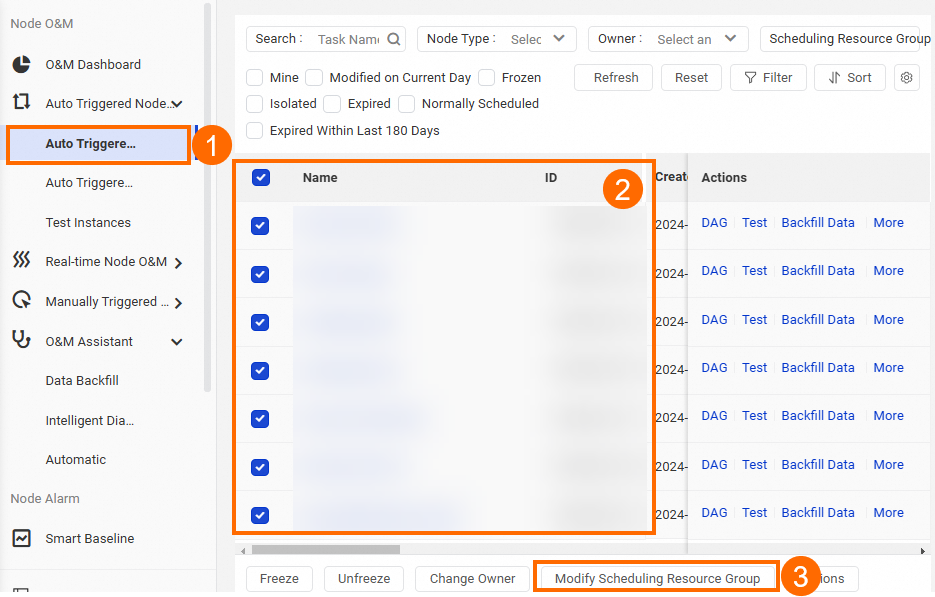
Switch production environment resource groups | Batch switch |
Important Task types such as virtual nodes, business flows, and Platform for AI (PAI) do not support modifying resource groups. Do not select these types. |
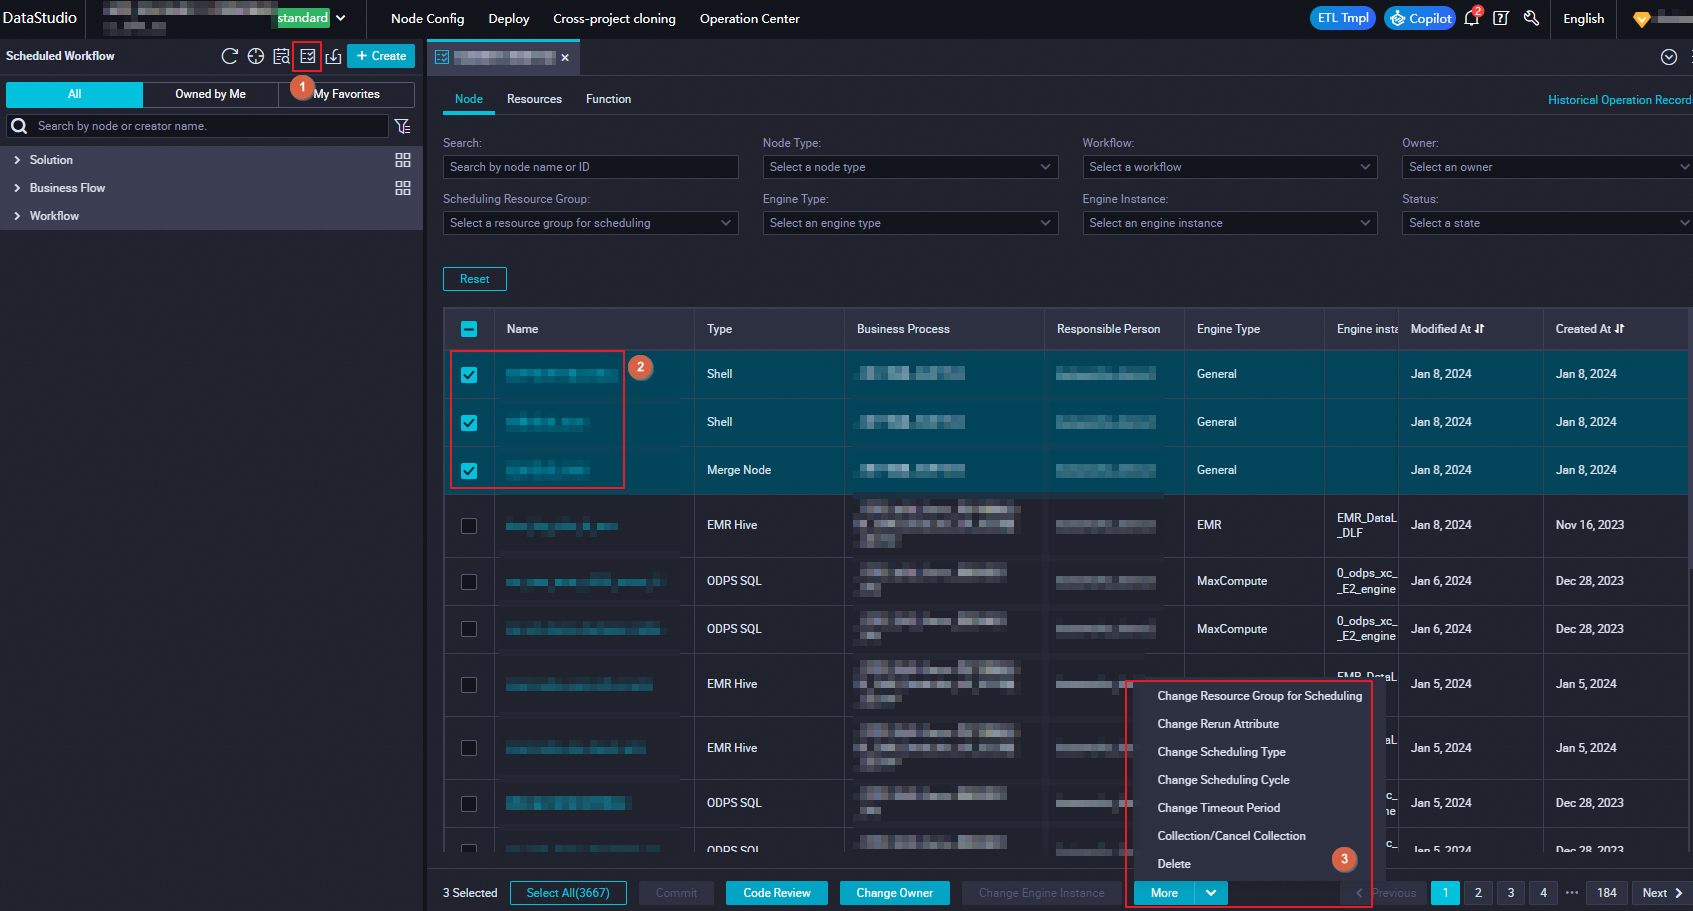
Switch development environment resource groups |
| Go to DataStudio for settings:
|
Switch DataStudio debug resource group | Single task switch | Go to the code editing page for a single node in DataStudio and click the |