|
Area
|
Description
|
|
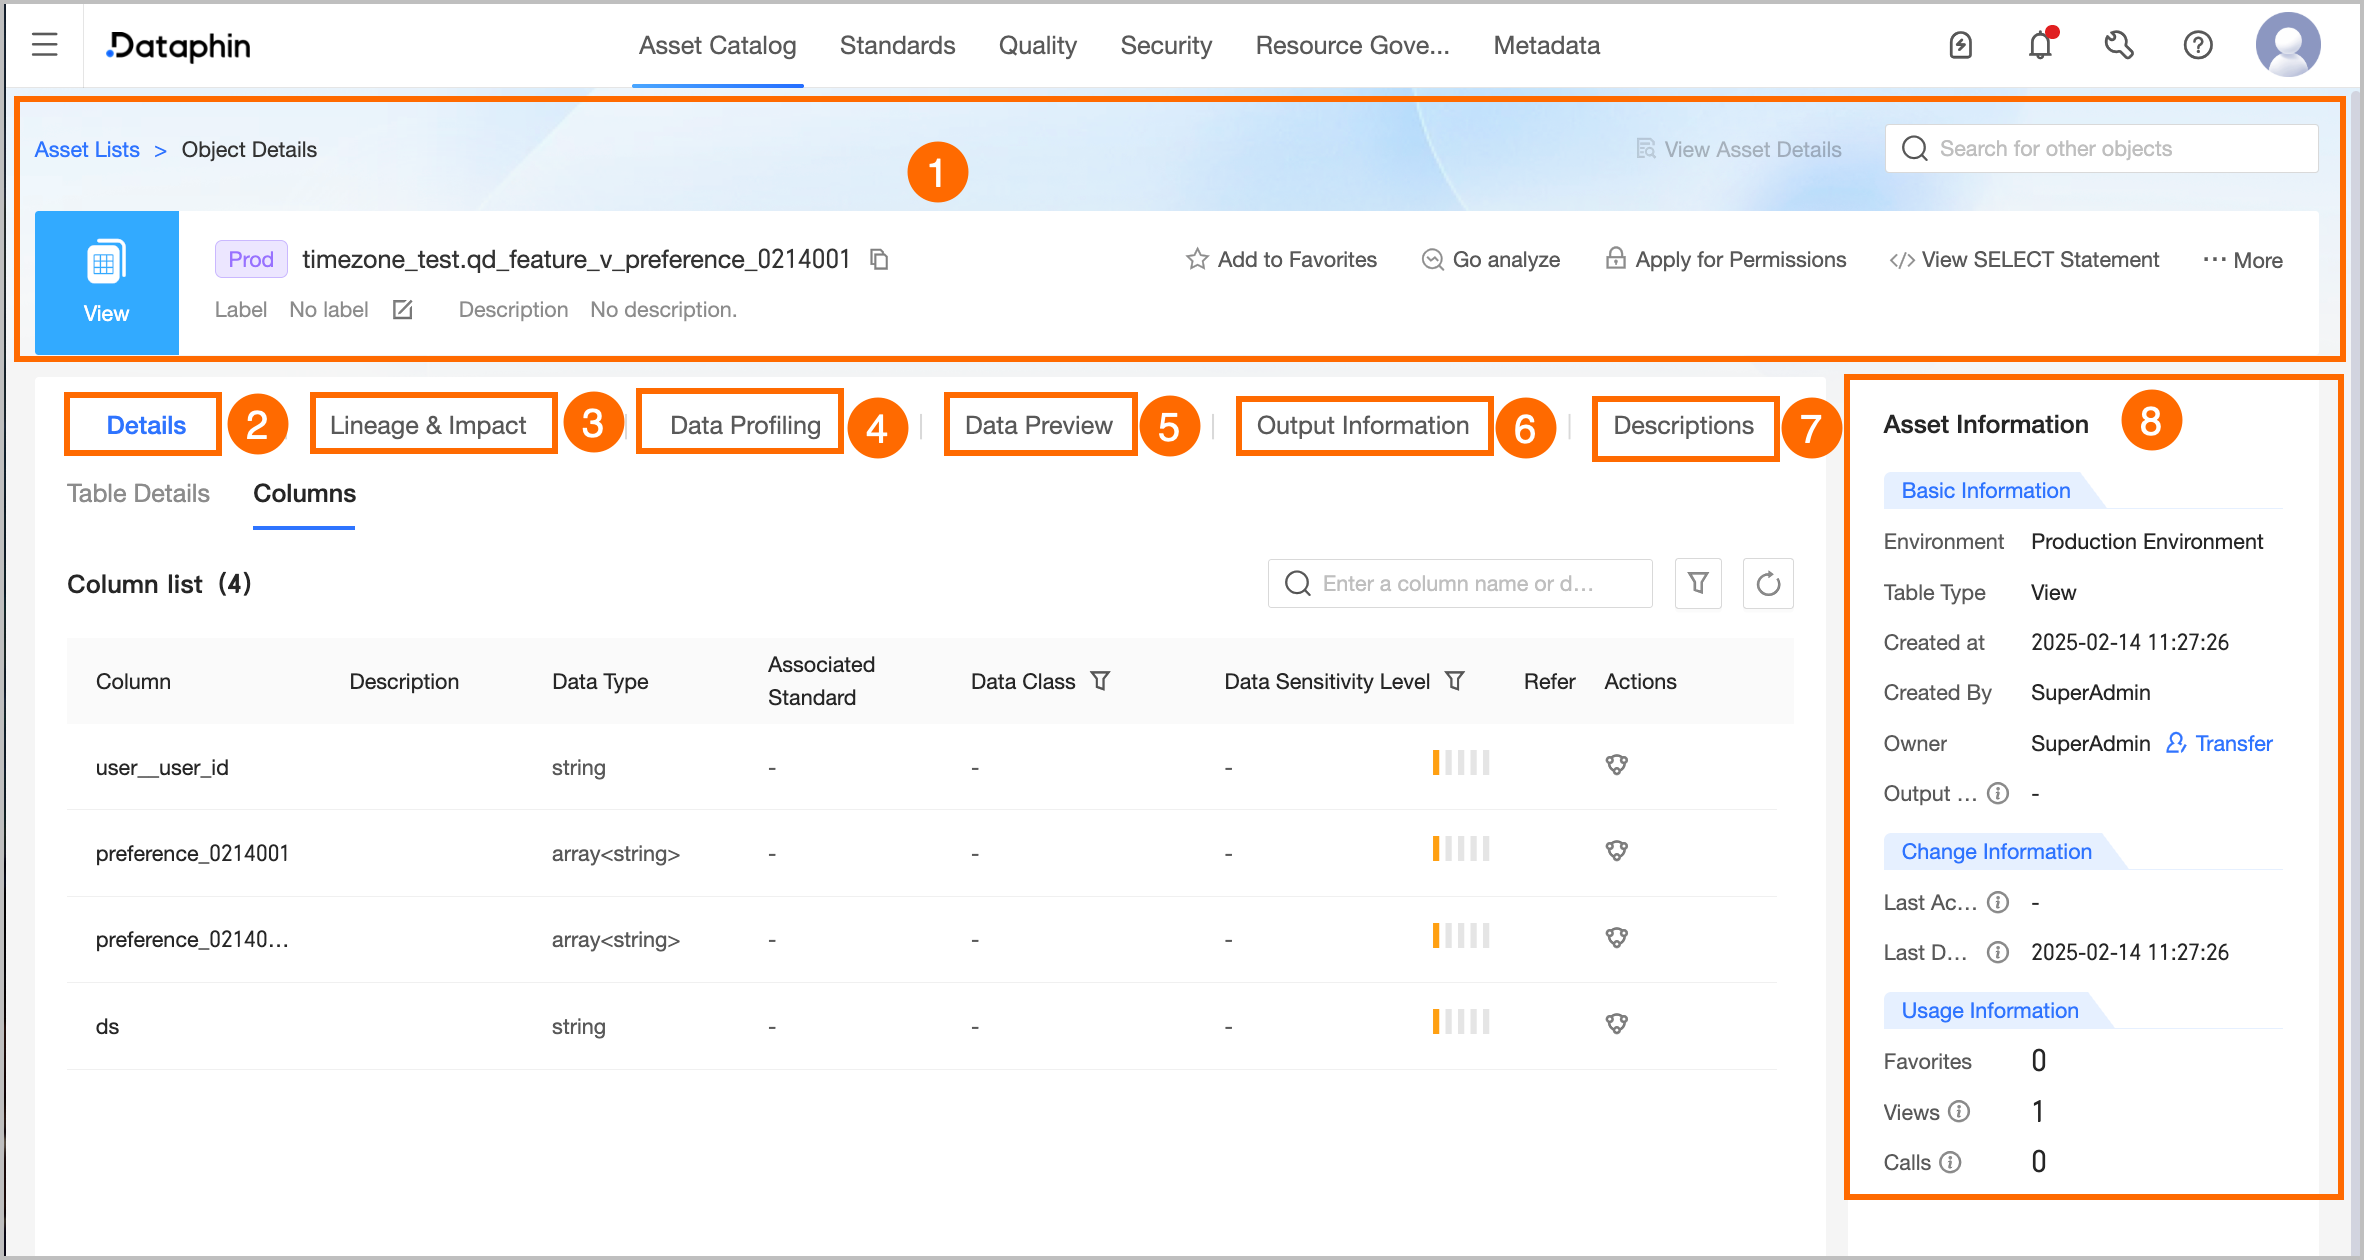
① Overview
|
Displays the table type, environment, name, tags, and description. You can also:
-
Search for other assets: Quickly search for and switch to the details of other assets.
-
View Asset Details: If the current asset has been published to the Asset Catalog, you can navigate to its details page to view the published information.
-
View Production/Development Object: Switch to the details page of the corresponding object in the production or development environment.
-
Tags: Displays the tags for the current asset. To modify tags, click Edit:
-
Each tag value can be up to 128 characters long.
-
You can configure a maximum of 20 tags for each asset.
-
Super administrators can modify tags for all table types, Owners for the tables they own, and project administrators for Physical Views within their managed projects.
-
Favorite: Click to add or remove the asset from favorites. Once favorited, you can find your 30 most recent favorites under Asset Inventory > My History for quick access. You can also view all favorited assets in the Personal Data Center. For more information, see View and Manage My Favorites.
-
Go to Analyze: Navigate to the Notebook page and automatically create a corresponding Notebook task. For more information, see Create a Notebook.
-
Request Permissions: Navigate to the permission request page for the current table. For more information, see Apply for, renew, and release table permissions.
-
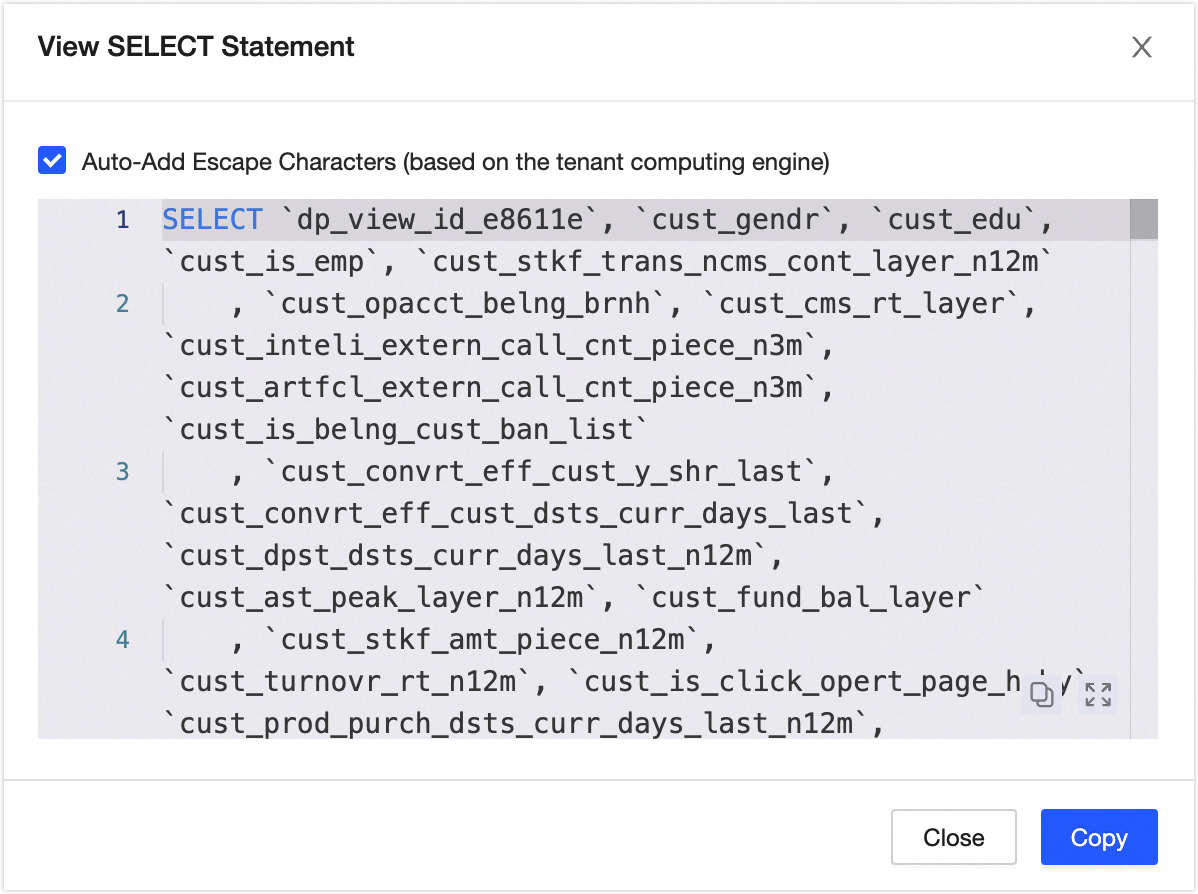
Generate SELECT Statement: Generate a query statement for the current table. You can choose whether to add escape characters, then copy the statement to run on the Ad Hoc Query page or an analysis page.
-
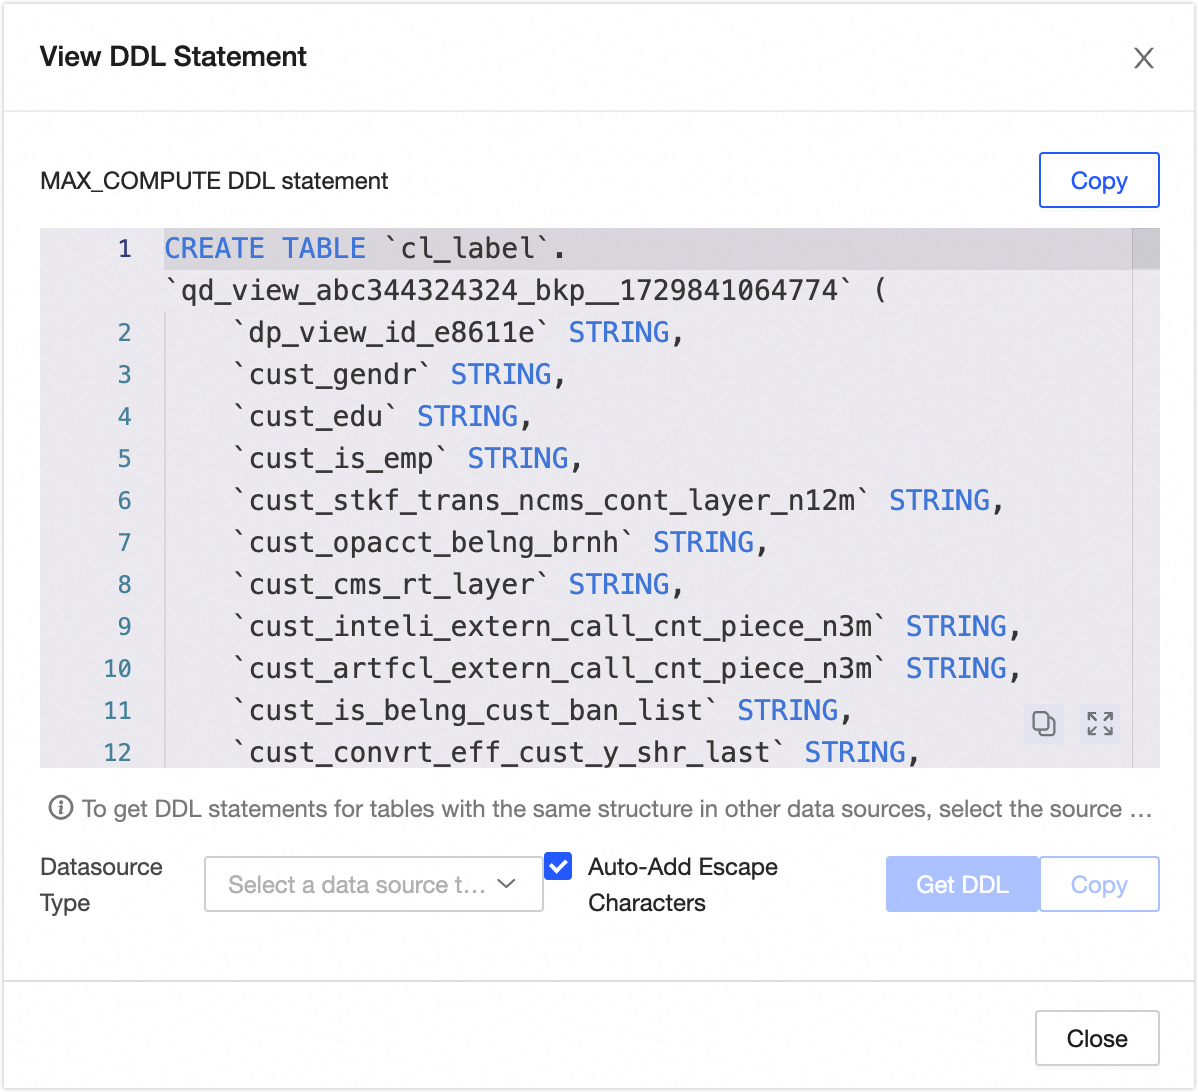
View DDL Statement: Click More in the upper-right corner and select View DDL Statement to view the table's DDL statement in the tenant's Compute Engine. You can also select a Data Source Type and click Generate DDL Statement to create a DDL statement for a table with the same structure in the specified data source. Selecting Automatically Add Escape Characters adds the appropriate escape characters for the selected source type, which helps prevent keyword escaping issues.
-
Export Columns: Click More in the upper-right corner and select Export Columns to export the table's column information in CSV format for analysis by other developers or business users.
-
View Transfer History: Click More in the upper-right corner and select View Transfer History to view the last 100 owner transfer records for the data table.
-
View Permission List: Click More in the upper-right corner and select View Permission List to view the permission information for the data table.
-
Refresh Metadata: Click More in the upper-right corner and select Refresh Metadata. If a table was not created in Dataphin, or if a newly created table is missing due to metadata synchronization delays, click Refresh Metadata to fetch the latest metadata and update it in Dataphin.
Note
Tables on the analysis platform do not support the Go to Analyze, Request Permissions, View Transfer History, or View Permission List actions.
|
|
② Details
|
Displays details about the table, columns, and partitions.
-
Table Details: Displays the technical properties of the table, including Business Unit, Data Domain, Project, Highest Security Level (requires the Data Security feature), whether it is a manually created table on the analysis platform, Storage Type, and Location.
-
Project: The project to which the current table belongs. Click the project name to go to the project's asset details page.
-
Highest Security Level: The highest sensitivity level among the table's columns, which helps you quickly understand the data confidentiality of the table. Data Sensitivity Level ratings range from L1 to L4 (Public to Top Secret), along with custom levels.
-
Storage Type: The storage type of the current table, which can be Managed Table or External Table.
Note
Storage type is not displayed when the Compute Engine is GaussDB (DWS).
-
Location: For external tables of MaxCompute and Hive compute engines only, this shows the storage path of the table, for example, hdfs://node01.exp5:8020/user/hive/warehouse.
-
Column Information: Includes column details, description, data type, Associated Standard (requires the data standards module), Data Classification (requires the security module), Sample Data (displayed only if Data Sampling is enabled), Data Sensitivity Level (requires the security module), and hotspot information. You can also search for, filter, and view the lineage of columns.
-
View Lineage: In the Actions column, click the lineage  icon to view the column-level lineage centered on the specified column. icon to view the column-level lineage centered on the specified column.
-
Search and Filter: You can search for columns by name or description. You can also filter columns by Data Classification or Data Sensitivity Level (requires the Data Security feature).
Note
When the Compute Engine is Amazon EMR, primary key column information is displayed.
-
Partition Info: View the partition information of the data table. Multi-level partitions are displayed as a combination of each level, separated by slashes (/). For example: ds=20221001/pt1=a/pt2=b.
Note
When the Compute Engine is Amazon EMR, partition information is displayed.
|
|
③ Lineage and impact
|
|
|
④ Data Profiling
|
If the data quality feature is enabled, you can configure Data Profiling tasks for data tables to profile the data and assess its usability and potential risks. To enable automatic profiling, configure the settings in Governance > Metadata Center > Profiling and Analysis. For more information, see Create a Data Profiling Task.
Note
The Data Profiling feature is not supported when the Compute Engine is Databricks or GaussDB (DWS).
|
|
⑤ Data Preview
|
Sample data is displayed by default if available; otherwise, a Data Preview is automatically triggered. You can also manually run a query to fetch the latest data.
-
Sample Data: This is displayed when the data sampling switch is on and the data preview switch in the usage configuration is also on. Only sample data for columns that you have column-level permission to view and that do not require masking is queried. The sample data for each column is stored and sorted independently, so complete and accurate rows are not guaranteed.
-
Data Preview: If you have permission to query the data in the current table, you can use the Data Preview feature. It queries and displays results only for columns for which you have SELECT permissions (including column-level and Row-Level Permission). You can preview up to the first 50 rows. To learn how to apply for permissions, see Apply for, renew, and release table permissions.
You can search or filter data by column, view the details of a single row, use auto-fit column width, and transpose rows and columns. You can also click the sort icon next to a column to sort it in Ascending or Descending order, or select No Sort. Double-click a column value to copy it.
|
|
⑥ Output information
|
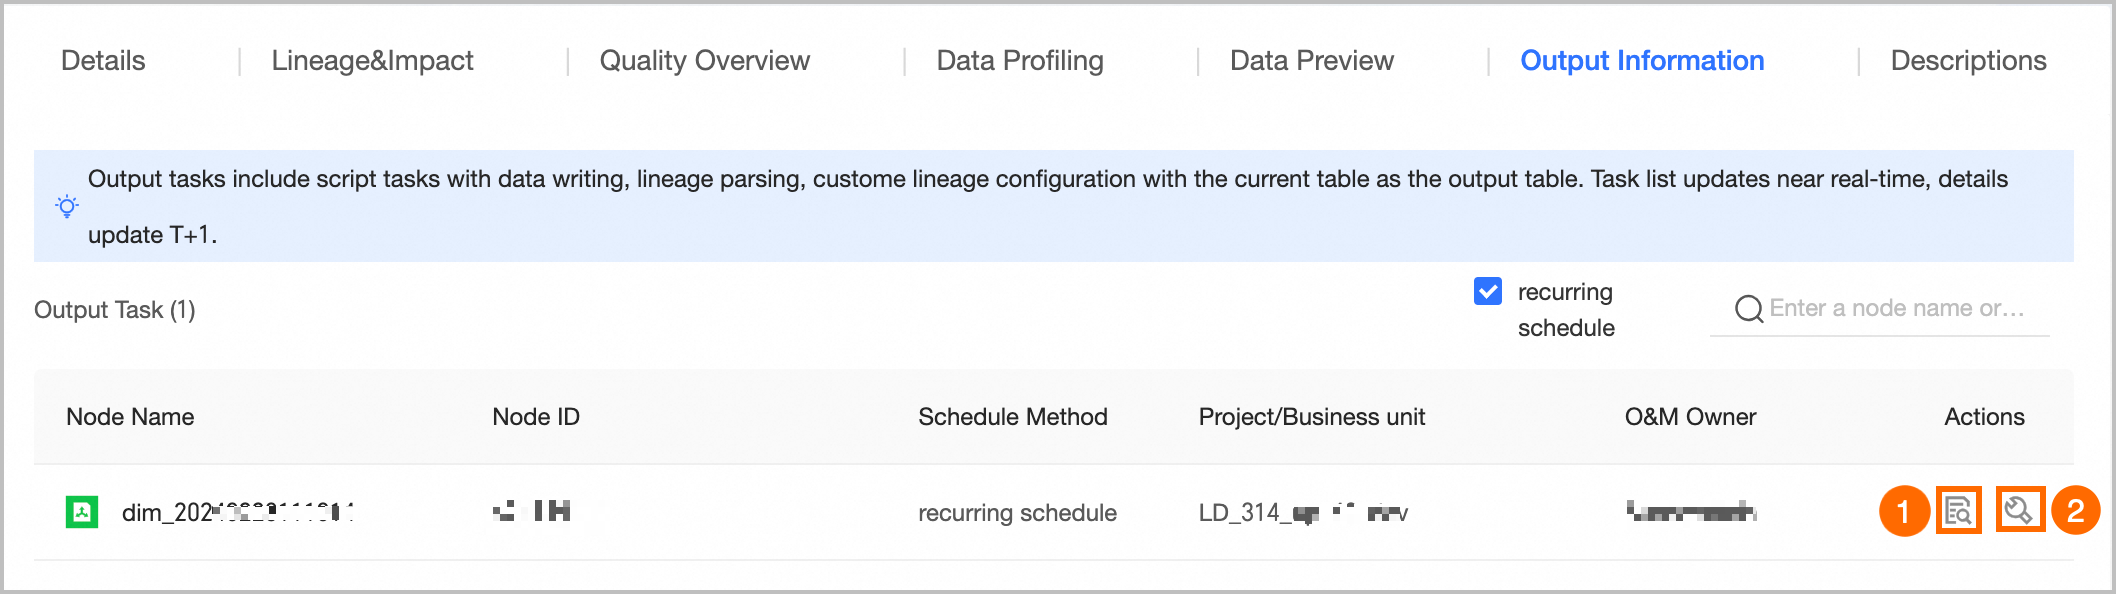
Lists tasks that write to this asset, tasks where this asset is a parsed or configured output, and tasks where the node output name is project_name.table_name.
The list of output tasks is updated in near real time. The output details are updated on a T+1 basis.
-
① View Output Details: You can only view the output details for scheduled tasks. For more information, see Output details.
-
② Go to Operations: Click Go to Operations to go to the task list in the Operations center, where the current task is filtered for you to view more information.
|
|
⑦ Usage guide
|
Add a usage guide for the data table to provide reference information for data browsers and consumers. Click Add Usage Guide, then enter a title and content to create the guide.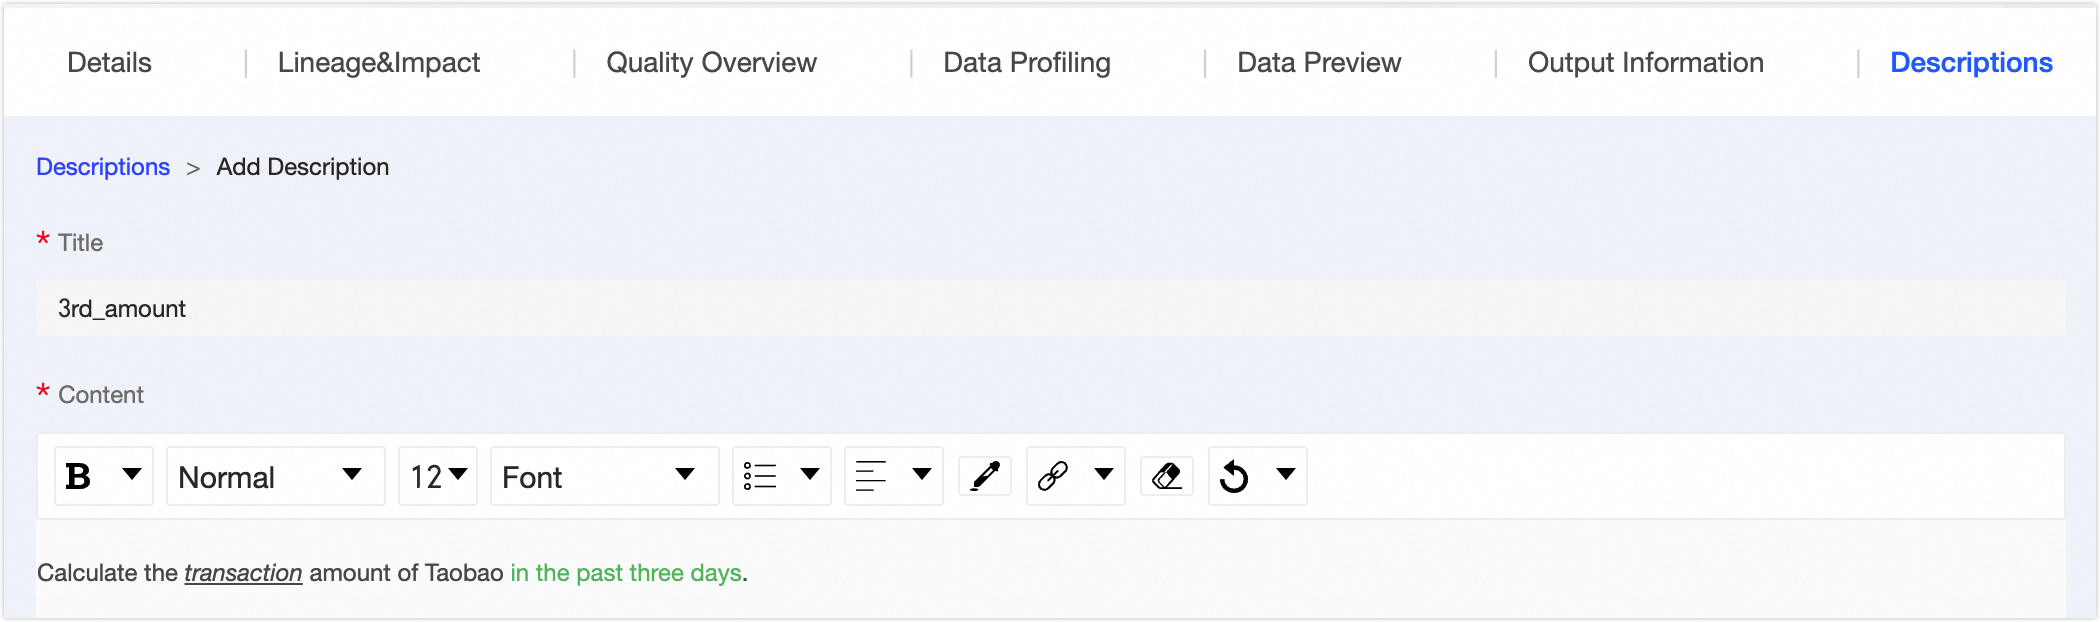
|
|
⑧ Asset information
|
Provides detailed information about the Physical View, including Basic Information, Change Information, and Usage Information.
-
Basic Information: Includes Environment, Table Type, Creation Time, Creator, Owner, and Output Task.
-
Owner: The owner of the current table. You can transfer ownership to another user. In the Transfer Owner dialog box, choose whether to simultaneously transfer ownership in both the development and production environments. Select a Recipient and click OK to complete the transfer. We recommend notifying the recipient afterward. You can view transfer records on the transfer history page. For more information, see View Transfer History.
Note
-
Super administrators can transfer the ownership of all types of tables. A table owner can transfer ownership of the tables they own.
-
Project administrators can transfer ownership of Physical Tables within the projects they manage.
-
Output Task: View the output tasks for the current table, including data-writing tasks, tasks where lineage is parsed or configured with the current table as an output, and tasks where the node output name matches project_name.table_name. Click the name of an output task to go to its operations details page.
Note
You can only view output details for scheduled tasks.
-
Change Information: Includes Last Accessed and DDL Change.
-
Last Accessed: The timestamp of the last SELECT operation (DQL operation) on the table, parsed by Dataphin from SQL. Access from external systems is not counted. This is updated in real time.
-
DDL Change: The timestamp of the last table structure modification (DDL operation), parsed by Dataphin from SQL. Changes from external systems are not counted. This is updated in real time.
-
Usage Information: Includes Favorites, Views, and Access Count.
-
Favorites: The number of users who have added the current table to their favorites. This is updated in real time.
-
Views: The number of page views (PV) for the current data table. The count increases by one each time the page is refreshed. This is updated in real time.
-
Access Count: The number of times this table is referenced by a SELECT operation (DQL) in a Dataphin task, as parsed from SQL. This is updated on a T+1 basis and shows the total access count over the last 30 days.
Note
The access count is not displayed when the Compute Engine is Databricks or Amazon EMR.
|
 icon in the Actions column to open its details page.