The cloud-native AI suite is a Container Service for Kubernetes (ACK) solution powered by cloud-native AI technologies and products. The cloud-native AI suite can help you fully utilize cloud-native architectures and technologies to quickly develop an AI-assisted production system in ACK. The cloud-native AI suite also provides full-stack optimization for AI or machine learning applications and systems. This topic describes the architecture, key features, and use scenarios of the cloud-native AI suite. This topic also describes how to work with the cloud-native AI suite.
Architecture
The cloud-native AI suite uses Container Service for Kubernetes (ACK) as the base. It centrally manages heterogeneous resources and provides standard Kubernetes clusters and APIs to run key components, manage and maintain resources, schedule and scale AI jobs, accelerate data access, orchestrate workflows, integrate big data services, manage the lifecycle of AI jobs, manage AI artifacts, and perform O&M tasks. The cloud-native AI suite also optimizes AI DevOps. It supports AI dataset management, and allows you to develop, train, and evaluate AI models and deploy models as inference services.
You can use key components through the CLI, SDKs for different programming languages, and the console. With the help of these components and tools, you can build, extend, or customize your AI production systems on demand. The cloud-native AI suite also allows you to integrate Alibaba Cloud AI services, open source AI frameworks, and third-party AI capabilities by using the same components and tools.
In addition, the cloud-native AI suite supports seamless integration with Platform for AI to help you develop a high-performance, elastic one-stop AI platform. You can use services such as Data Science Workshop (DSW), Deep Learning Containers (DLC), and Elastic Algorithm Service (EAS) provided by PAI. ACK can greatly improve the elasticity and efficiency of AI model development, training, and inference for the preceding services. The cloud-native AI suite also allows you to deploy Lightweight Platform for AI in ACK clusters with a few clicks to make AI development much easier. You can integrate algorithms and engines that are deeply optimized by PAI based on years of experience into containerized applications to greatly accelerate model training and inference. For more information about Platform for AI, see What is PAI?
The following figure shows the architecture of the cloud-native AI suite.

Key features
The cloud-native AI suite uses Kubernetes as the base, and provides full-stack support and optimization for AI and machine learning applications and systems. The following table describes the key features provided by the cloud-native AI suite. The following table describes the key features provided by the cloud-native AI suite.
Feature | Description | References |
Centralized management of heterogeneous resources |
| |
AI job scheduling |
| |
Elastic scheduling | Elastic scheduling for distributed deep learning jobs: The cloud-native AI suite dynamically scales the number of workers and the number of nodes without affecting the model training and model precision. The cloud-native AI suite adds workers to accelerate training when the cluster has idle resources and releases workers when the cluster cannot provide sufficient resources. This ensures that model training is not affected by resource shortages. This mode greatly improves the overall resource utilization of the cluster and helps avoid node failures. This mode also reduces the waiting time for launching jobs. | |
AI data orchestration and acceleration | Fluid: introduces the dataset concept. It provides training jobs with a data abstraction and provides a data orchestration and acceleration platform to help you manage datasets, enforce access control, and accelerate data access. ack-fluid can ingest data from different storage services and aggregate the data into the same dataset. You can also connect ack-fluid to on-cloud or on-premises storage services in a hybrid cloud environment to manage data and accelerate data access. In addition, ack-fluid can be extended to support a variety of distributed cache services. You can configure a cache service for each dataset and use features such as dataset warmup, cache capacity monitoring, and elastic scaling to greatly reduce the overheads of remotely ingesting data for training jobs and improve the efficiency of GPU computing. | |
AI job lifecycle management |
|
Use scenarios
The cloud-native AI suite is suitable for continuously improving the utilization of heterogeneous resources and efficiently handling heterogeneous workloads such as AI jobs.
Scenario 1: Continuously improve the utilization of heterogeneous resources
The cloud-native AI suite provides an abstraction of heterogeneous resources in the cloud, including computing resources (such as CPUs, GPUs, NPUs, VPUs, and FPGAs), storage resources (OSS, NAS, CPFS, and HDFS), and network resources (TCP and RDMA). You can use the cloud-native AI suite to centrally manage, maintain, and allocate these resources, and continuously improve the resource utilization based on resource scaling and software/hardware optimization.
Scenario 2: Efficiently handle heterogeneous workloads such as AI jobs
The cloud-native AI suite is compatible with mainstream open source engines such as TensorFlow, PyTorch, DeepSpeed, Horovod, Spark, Flink, Kubeflow, Kserve, vLLM, and Triton Inference Server, and also supports self-managed engines and runtimes. The cloud-native AI suite also continuously optimizes training jobs in terms of performance, efficiency, and costs, optimizes the user experience of development and maintenance, and improves the engineering efficiency. The cloud-native AI suite also continuously optimizes training jobs in terms of performance, efficiency, and costs, optimizes the user experience of development and maintenance, and improves the engineering efficiency.
User roles
The cloud-native AI suite defines the following user roles.
Role | Description |
O&M administrator | Responsible for building AI infrastructure and daily administration. For more information, see Deploy the cloud-native AI suite, Manage users, Manage elastic quota groups, and Manage datasets. |
Algorithm engineer and data scientist | Uses the cloud-native AI suite to manage jobs. For more information, see Model training in Kubernetes clusters, Manage models in MLflow Model Registry, and Analyze and optimize models. |
Work with the cloud-native AI suite
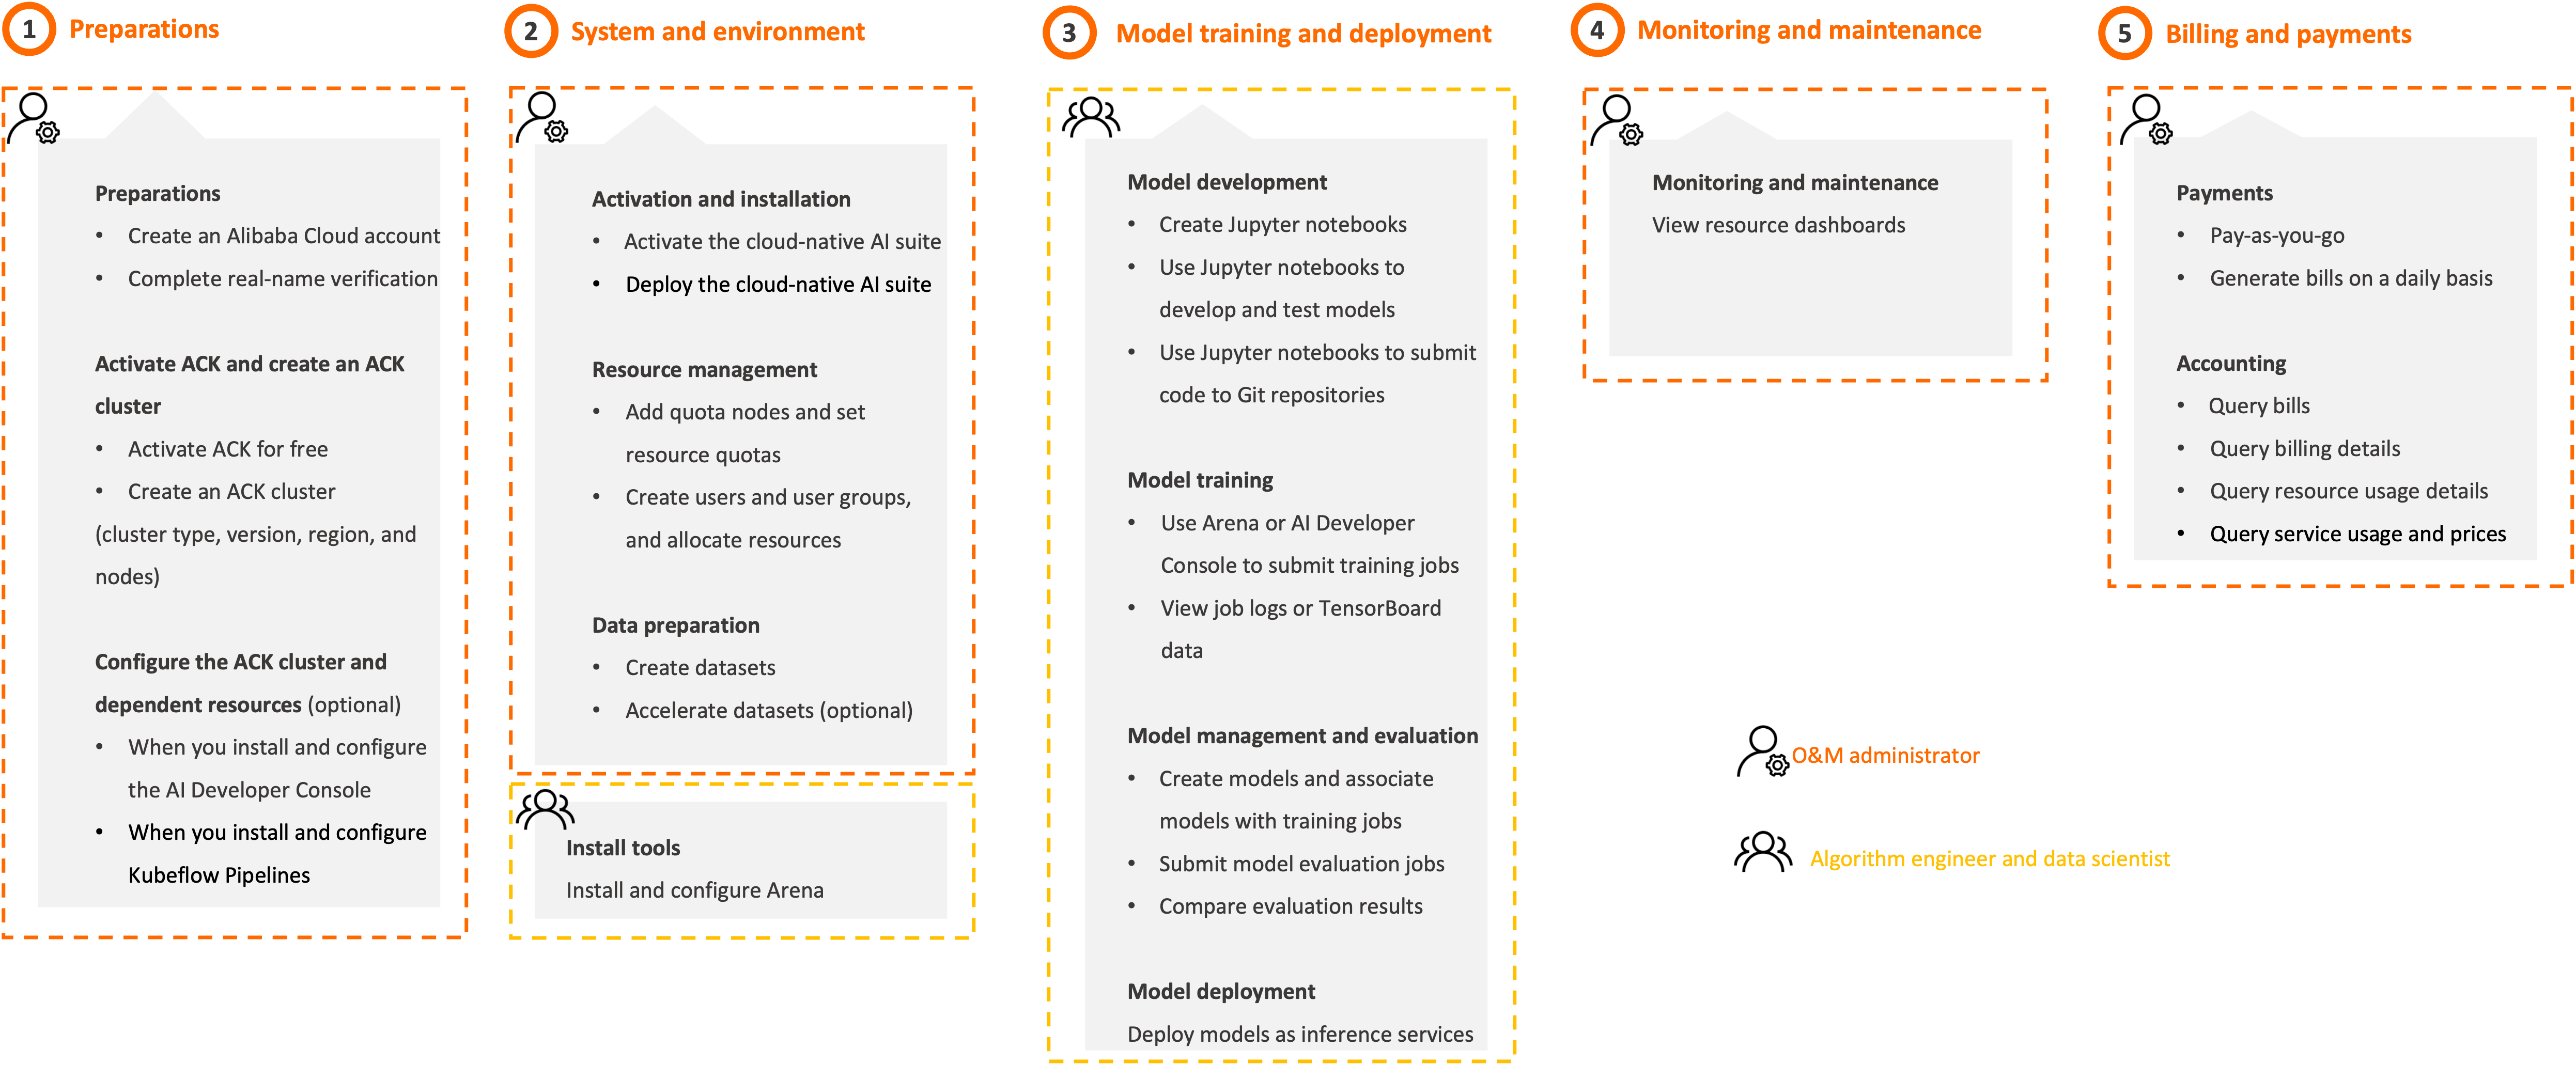
Follow the steps in the following figure to use the cloud-native AI suite based on the user role that you assume.
Step | Description | Console |
1. Preparations (O&M administrator) | Create an Alibaba Cloud account Create an Alibaba Cloud account and complete real-name verification. For more information, see Create an Alibaba Cloud account. | |
Create an ACK cluster Activate ACK and create an ACK cluster. We recommend that you use the following cluster configurations. For more information, see Create an ACK managed cluster.
| ||
(Optional) Configure cluster dependencies and create dependent cloud resources
| ||
2. System and environment (O&M administrator) | Activate and install the cloud-native AI suite
| |
Manage users and quotas
| AI Dashboard and kubectl Note The AI Console (including AI Dashboard and AI Developer Console) provided by Alibaba Cloud was gradually rolled out through a whitelist mechanism starting January 22, 2025.
| |
Prepare data
| ||
(Algorithm engineer and data scientist) | The cloud-native AI suite allows algorithm engineers and data scientists to use Arena, the web console, and AI Developer Console to develop models, train models, deploy inference services, and manage jobs.
| |
3. Model training and deployment (Algorithm engineer and data scientist) | When you use Arena or AI Developer Console, you can perform the following steps to train and deploy models: Develop models
Train models
Manage models
Deploy models Deploy a model as an inference service. For more information, see Deploy AI services. | AI Developer Console and Arena |
Use Lightweight Platform for AI to develop, train, and deploy models. | N/A | |
4. Monitoring and maintenance (O&M administrator) | Monitor and maintain resources View the dashboards of various resources, including clusters, nodes, training jobs, and resource quotas. For more information, see Work with cloud-native AI dashboards. | |
Manage quotas
| ||
Manage users Create, query, update, and delete users or user groups. For more information, see Manage users and Manage user groups. | ||
Manage datasets
| ||
Manage elastic jobs View elastic jobs and job details. For more information, see View elastic jobs. | ||
5. Billing and payments (O&M administrator) | Starting 00:00:00 (UTC+8) on June 6, 2024, the cloud-native AI suite is free of charge. For more information, see Billing of the cloud-native AI suite. | |
Generate bills on a daily basis
|
Billing rules
For more information, see Billing of the cloud-native AI suite.
References
Reference | Description |
Helps you quickly apply the cloud-native AI suite to your development and O&M work through a few practices. | |
Describes the release notes for the cloud-native AI suite. |