Accessing the internet through an Internet NAT Gateway exposes your VPC resources, such as ECS instances, to security risks including unauthorized access, data leaks, and malicious attacks. The NAT Firewall mitigates these risks by using Cloud Firewall to intercept and block unauthorized traffic. This document describes how to configure a NAT Firewall.
This video provides a quick guide to enabling protection for your Internet NAT Gateway.
Introduction
How it works
The NAT Firewall provides one-click activation, asset synchronization, access control configuration for the internet boundary, traffic analysis, and log auditing.
Once enabled, the NAT Firewall inspects all outbound traffic from your VPC (including resources in the same VPC and across different VPCs) that passes through the Internet NAT Gateway. The NAT Firewall matches traffic elements such as the source address, destination address, port, protocol, application, and domain name against your configured access control policies and the built-in threat intelligence library of Cloud Firewall. This process determines whether to allow the traffic, restricting unauthorized outbound internet access.
The following figure shows an example of a protection scenario for the NAT Firewall.

Impact on your services
When you enable or disable the NAT Firewall, Cloud Firewall performs a NAT route switch. This causes a transient disconnection of 1 to 2 seconds for long-lived connections. Short-lived connections are not affected. To minimize the impact on services, perform these operations during off-peak hours.
Creating a NAT Firewall does not affect your services. However, if you choose to enable the firewall during creation, it will cause a transient disconnection of 1 to 2 seconds for long-lived connections. Short-lived connections are not affected.
NoteThe creation time for a NAT Firewall depends on the number of Elastic IP addresses (EIPs) associated with the Internet NAT Gateway. Each additional EIP increases the creation time by approximately 2 to 5 minutes. This process does not affect your services.
Disabling and then deleting a NAT Firewall does not affect your services.
If your service traffic exceeds the purchased traffic processing specification of Cloud Firewall, the product Service Level Agreement (SLA) is not guaranteed. This may trigger downgrade rules. These rules include, but are not limited to, the failure of security features such as access control lists (ACLs), IPS, and log audit, the disabling of the firewall for top assets with excess traffic, and packet loss due to throttling.
If your service traffic is at risk of exceeding the specification, see Pay-as-you-go for burstable traffic of subscription instances.
Limitations
After you enable a NAT Firewall, do not change the routes in the vSwitch where the firewall resides or any route whose next hop is the NAT Firewall. Doing so can cause service disruptions.
To add a new CIDR block for cross-VPC protection after enabling a NAT Firewall, you must manually update the route table of the firewall's vSwitch. Also update the corresponding route in the route table used before the firewall was enabled to prevent routing issues if the firewall is later disabled.
If your Cloud Firewall instance expires and you do not renew it in time, the NAT Firewall is automatically released. Traffic then reverts to the original outbound internet route, which may cause a brief service interruption.
To ensure service availability, we recommend enabling auto-renewal or renewing your subscription in advance. For more information, see Renewal.
If your NAT Firewall was created before **September 1, 2023**, the maximum protection bandwidth for all network connections to the **same tuple** (destination IP and port pair) is **20 Mbps**. If the bandwidth for connections to the same tuple exceeds 20 Mbps, you may experience network jitter. To increase this bandwidth limit, delete and recreate the NAT Firewall.
NAT Firewalls created on or after September 1, 2023, do not have this 20 Mbps bandwidth limit.
The NAT Firewall does not protect IPv6 traffic.
Creating a NAT Firewall automatically adds new SNAT entries. The number of new SNAT entries equals the number of EIPs associated with the Internet NAT Gateway. Do not delete or modify the SNAT entries created by Cloud Firewall.
You can view the specification limits for SNAT entries in NAT Gateway quotas. Ensure you have enough SNAT capacity. The required number of available SNAT entries equals the number of EIPs associated with the Internet NAT Gateway.
Workflow
The following flowchart shows the process of using a NAT Firewall.
Cloud Firewall provides a default number of NAT Firewall licenses. If this number does not meet your requirements, you must purchase more licenses. For more information, see Purchase Cloud Firewall.

Prerequisites
You have activated Cloud Firewall and purchased a sufficient number of NAT Firewall licenses. For more information, see Purchase Cloud Firewall.
You have created an Internet NAT Gateway. For more information, see Internet NAT gateway.
ImportantCurrently, the NAT Firewall only protects Internet NAT Gateways.
The Internet NAT Gateway must meet the following conditions:
The region where the Internet NAT Gateway is deployed supports NAT Firewalls. For a list of supported regions, see Supported regions.
The Internet NAT Gateway is associated with 1 to 10 EIPs. For more information, see Internet NAT gateway.
The Internet NAT Gateway has SNAT entries configured and does not have any DNAT entries. For more information, see Create and manage SNAT entries.
To enable the NAT Firewall for an Internet NAT Gateway, first delete its existing DNAT entries. For more information, see Create and manage DNAT entries.
The VPC where the Internet NAT Gateway resides has a route entry that points 0.0.0.0/0 to the NAT gateway. For more information, see Create and manage a route table.
The VPC must have an available subnet with at least a /28 mask. Secondary CIDR Blocks are supported.
Create and enable a NAT Firewall
Follow these steps to create a NAT Firewall. Each Internet NAT Gateway instance corresponds to one NAT Firewall.
Notes
A newly created Internet NAT Gateway takes 1 to 5 minutes to synchronize to the NAT Firewall service.
New EIPs and SNAT entries for an Internet NAT Gateway take 1 to 2 minutes to synchronize to the NAT Firewall. The EIPs and SNAT entries do not take effect until the synchronization is complete.
Alternatively, you can go to the page and click Synchronize Assets to manually synchronize them.
A new route pointing to an Internet NAT Gateway takes up to 30 minutes to synchronize to the NAT Firewall.
Alternatively, you can go to the page and click Synchronize Assets to manually synchronize the route.
When you create a NAT Firewall, Cloud Firewall performs the following actions:
Adds a 0.0.0.0/0 route that points to the Internet NAT Gateway in the route table of the firewall's vSwitch.
Modifies the 0.0.0.0/0 route entry in the system route table, changing its next hop to the Cloud Firewall elastic network interface (ENI).
NoteCreating a NAT Firewall adds a custom route table to your VPC. If the VPC where you are creating the firewall contains an ACK cluster that uses the Flannel network plugin, you must configure the multi-route-table feature of the Cloud Controller Manager after creating the firewall. Add the VPC system route table to the list of multiple route tables. Otherwise, cluster node scaling may be affected. For more information, see Use the multi-route-table feature of a VPC.
If you are already using the multi-route-table feature of the Cloud Controller Manager, you can ignore this note.
Steps
Log on to the Cloud Firewall console. In the navigation pane on the left, click Firewall Settings.
Click the NAT Firewall tab. In the Actions column for the target Internet NAT Gateway, click Create.
In the Create NAT Firewall panel, click Check Now. After the check passes, click Next.
If you are certain that the Internet NAT Gateway meets all the creation requirements, you can click Skip and start creation now..
Choose a diversion mode that suits your business needs:
Automatically Create vSwitch (Recommended): Suitable for scenarios with sufficient network segments. This mode provides fully automated traffic diversion.
Manually Select vSwitch: Suitable for scenarios where your reserved network segments are limited. This mode requires you to reuse an existing vSwitch CIDR block or manually create a vSwitch. The process is more complex and intended for advanced users.
In the Create NAT Firewall panel, configure the following parameters.
Parameter
Description
Basic Information
Name
Enter a custom name for the NAT Firewall.
Traffic Redirection Configurations
Select Route Table
Select the route table whose original next hop is the Internet NAT Gateway. When the firewall is created, the next hop is automatically changed to the Cloud Firewall route table. This directs outbound traffic from private assets to the NAT Firewall.
vSwitch CIDR block (Automatically Create vSwitch)
or
vSwitch for Traffic Redirection (Manually Select vSwitch)
You can create a new vSwitch or select an existing one.
Rules for configuring a new vSwitch CIDR block:
You must configure a vSwitch CIDR block with at least a /28 mask that does not conflict with your network plan. This is allocated to the NAT Firewall for traffic diversion.
The vSwitch CIDR block must be a subnet of the VPC's CIDR block (secondary CIDR blocks are supported) and must not conflict with existing service network segments. After allocation, Cloud Firewall automatically associates it with a custom traffic diversion route table.
Notes for selecting an existing vSwitch:
The NAT Firewall requires a vSwitch that meets the following requirements. For more information, see Create and manage a VPC.
The vSwitch, Internet NAT Gateway, and NAT Firewall must be in the same VPC.
The vSwitch and the Internet NAT Gateway must be in the same availability zone.
The vSwitch CIDR block must have at least a /28 mask, and the number of available IP addresses must be greater than the number of EIPs on the Internet NAT Gateway.
The vSwitch must not be connected to any other cloud resources.
Create a new route table and associate it with the vSwitch. For more information, see Create and manage a route table.
(Optional) Add custom route entries other than the 0.0.0.0/0 route to the new route table as needed. For more information, see Use custom route tables to manage network traffic.
For example, if your services require cross-VPC communication, you must manually add the return routes for the VPCs to the route table.
NoteIf the target vSwitch does not appear in the vSwitch list or is grayed out, check whether the vSwitch is associated with other cloud resources or a custom route table. After you confirm the vSwitch configuration is correct, go to the NAT Firewall tab and click Synchronize Assets in the upper-right corner.
Engine Mode
Engine Mode
The matching mode for access control policies.
Loose Mode (Default): When an access control policy for an application or domain encounters traffic from an unidentified application or domain, the traffic is allowed to pass. This mode prioritizes service availability.
Strict Mode: When an access control policy for an application or domain encounters traffic from an unidentified application or domain, the traffic is passed to subsequent policies for further matching. If a deny policy matches the unidentified traffic, it is blocked.
Select I have read and confirmed the preceding notes, and then click Enable Firewall.
After creating the NAT Firewall, manually change the Status to Enabled.
After you enable the firewall, traffic is rerouted through Cloud Firewall, allowing it to protect your traffic.
Next steps
After you create a NAT firewall, you can configure access control policies, view access logs, and perform other management tasks to control traffic between your private assets and the internet.
Configure access control policies
If you do not configure any access control policies, Cloud Firewall allows all traffic by default. You can create access control policies for the NAT boundary to finely control outbound internet traffic from your private assets.
Go to the page. In the Actions column for the target NAT Firewall, click the ![]() icon and select Access Control.
icon and select Access Control.
On the page that appears, you can create an access control policy for the NAT boundary. For more information, see Configure an Access Control Policy for a NAT Firewall.
Query audit logs
Go to the page. In the Actions column for the target NAT Firewall, click the ![]() icon and select Log Audit.
icon and select Log Audit.
On the page that appears, you can query traffic logs for private network access to the internet. For more information, see Log analysis.
View network traffic analysis
On the page, in the Actions column for the target NAT firewall, click the ![]() icon and select Traffic Analysis.
icon and select Traffic Analysis.
The page that appears provides the network traffic analysis for the NAT Gateway's Internet access. For more information, see Outbound Connection.
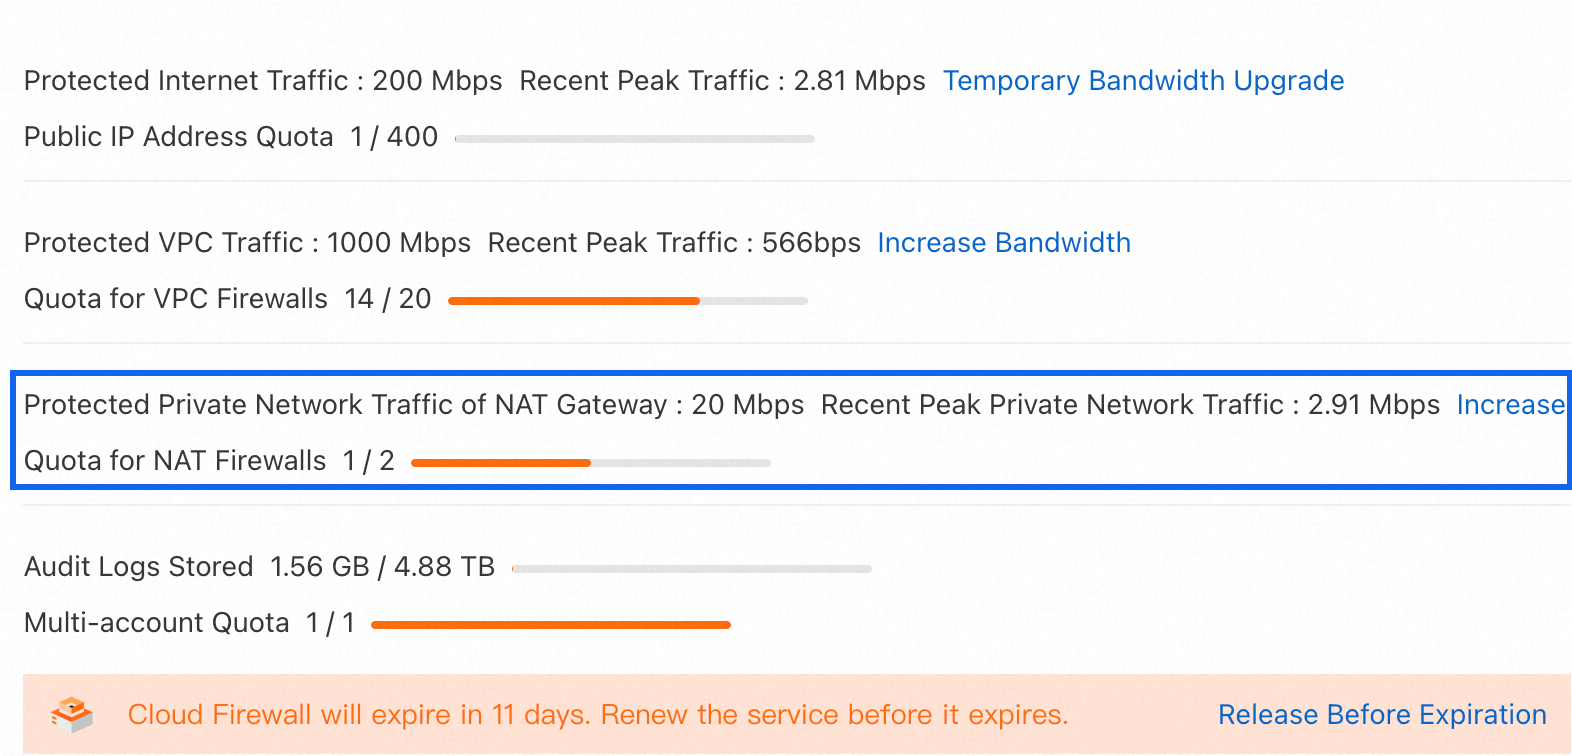
View NAT private network traffic statistics
In the navigation pane on the left, click Overview. Then, on the Overview page, click Purchased Specification Usage in the upper-right corner to view the NAT private network traffic processing capacity, recent traffic peaks, and NAT firewall quota usage.
View the vSwitch list of NAT firewalls
Go to the page. In the upper-right corner of the list of NAT firewalls, click Firewall vSwitch List.
Disable and delete a NAT Firewall
Disabling a NAT Firewall causes a route switch that results in a 1- to 2-second disconnection for long-lived connections. We recommend performing this action during off-peak hours. Deleting a firewall after it has been disabled does not affect your services.
If you delete a NAT Firewall without disabling it first, the system performs both actions simultaneously, which will also cause a 1- to 2-second disconnection for long-lived connections.
Disable a NAT Firewall
Navigate to the page. In the Status column for the target firewall, turn off the switch.
Delete a NAT Firewall
Navigate to the page. In the Actions column for the target firewall, click the
 icon and select Delete.
FAQ
How does enabling or disabling a NAT Firewall impact my services?
Direct Answer: Enabling or disabling a NAT Firewall causes a transient disconnection of 1 to 2 seconds for long-lived connections. Short-lived connections are generally not affected.
Explanation: This interruption occurs because Cloud Firewall modifies VPC route tables to redirect traffic through its Elastic Network Interface (ENI). This route switch is what causes the brief disconnection.
Recommendation: To minimize any potential impact, perform these operations during off-peak business hours.
Why does the NAT Firewall automatically create a new route table and a 0.0.0.0/0 route?
Direct Answer: The NAT Firewall creates these routing resources to transparently intercept and inspect all outbound internet traffic from your VPC without requiring you to manually reconfigure your applications or servers.
How it works:
Traffic Interception: The firewall modifies the
0.0.0.0/0route in your VPC's main route table. The next hop is changed from the Internet NAT Gateway to the firewall's ENI, directing all default outbound traffic to the firewall first.Forwarding after Inspection: The firewall then uses its own, newly created route table, which contains a
0.0.0.0/0route pointing back to the original Internet NAT Gateway. After inspecting the traffic and confirming it's allowed, the firewall uses this route to forward the traffic to the internet.
This mechanism allows the firewall to act as a transparent proxy for all outbound connections, ensuring security without disrupting your network architecture.
What is the policy evaluation order for outbound traffic when Internet, NAT, and DNS Firewalls are all enabled?
Direct Answer: Outbound traffic is evaluated sequentially. The policy evaluation order is: Internet Firewall → NAT Firewall → DNS Firewall.
Explanation:
Traffic is first inspected by the Internet Firewall.
If allowed, it is then passed to the NAT Firewall for evaluation against its policies.
If the traffic is a DNS query and is allowed by the preceding firewalls, it is then evaluated by the DNS Firewall.
Traffic must be explicitly allowed by each firewall in the chain to proceed. If any firewall blocks the request, it is dropped immediately and is not forwarded to the next firewall.
Why is my telnet <IP> <PORT> connection still succeeding after I created a NAT Firewall policy to block a specific domain?
Direct Answer: This is the expected behavior if your firewall is operating in the default Loose Mode and your policy is domain-based.
Explanation: A telnet command connects directly using an IP address and port. It does not generate traffic that would match a domain-based access control policy. In Loose Mode, any traffic that doesn't match a specific application or domain defined in a policy is considered "unidentified" and is automatically allowed by default to prioritize service availability.
Solution: You can resolve this in one of two ways:
Switch to Strict Mode: Change the firewall's engine to Strict Mode. In this mode, unidentified traffic is not automatically allowed. It will be passed to subsequent policies and can be blocked if it matches an IP-based deny policy or a final deny-all rule.
Create an IP-based Policy: Add a new access control policy that explicitly denies traffic to the specific destination IP address and port that you are able to connect to.
Why does some traffic from a Transit Router (TR) bypass the NAT Firewall?
Direct Answer: This typically occurs when a more specific route in your VPC's route table directs traffic to the Transit Router (TR) before the NAT Firewall can intercept it.
Explanation: VPC routing follows the longest prefix match rule. The NAT Firewall intercepts traffic by taking control of the default route (0.0.0.0/0). However, if your route table contains a more specific route (e.g., 10.1.0.0/16 for a peered VPC) that lists the TR as its next hop, any traffic destined for that address range will follow the more specific route. This effectively bypasses the default route managed by the firewall.
How to Fix: To ensure all intended traffic is inspected, review your VPC route tables. Make sure that there are no overly broad or conflicting specific routes that prevent traffic from being directed to the NAT Firewall's ENI as the next hop for internet-bound traffic.