Protect your on-premises servers from data loss caused by accidental deletion or virus attacks. Cloud Backup provides a flexible, policy-based solution to securely back up your files to the cloud, where you can browse and restore them at any time. This topic covers how to back up on-premises files.
Prerequisites
-
You have enabled Cloud Backup. Enabling Cloud Backup is free of charge. However, the following fees are incurred when you use the on-premises file backup feature:
-
File backup software usage fee
This fee is charged based on the number of clients.
-
Backup vault storage capacity
This fee is charged based on the storage capacity used after deduplication and compression, not the raw data size.
-
Outbound traffic over the internet for data restoration
This fee is charged when you restore data over the internet.
-
Cross-region replication traffic fee for backup vaults
This fee is charged when you use a mirror vault.
For more information, see Billing methods and billable items and On-premises file backup fees.
-
-
You have installed a backup client on the server. After you install the backup client, the Client Status is displayed as Activated in the Client List of the Cloud Backup console.
Usage notes
Cloud Backup does not charge any fees if you only install the backup client and do not create a backup plan.
Create a backup plan to periodically back up on-premises files
After a backup plan is created, the first backup job is a full backup. Subsequent jobs are incremental backups by default.
Log on to the Cloud Backup console.
-
In the navigation pane on the left, choose .
-
In the upper-left corner of the top menu bar, select a region.
-
Select the backup client version.
ImportantIf you are not using an old version of the backup client, the Old Version and New Version buttons do not appear in the console. Proceed with the subsequent steps. We recommend that you upgrade older backup clients to the latest version.
-
If you are using an old version of the backup client, on the On-Premises File Backup page, click Old Version.
-
If you are using a new version of the backup client, on the On-Premises File Backup page, click New Version.
-
-
Find the destination client and click Back Up in the Actions column.
-
In the Create Backup Plan panel, configure the parameters as described in the following table and click OK.
Important-
In regions where backup policies are available, backup plans must be created by linking them to a policy. This policy then governs the entire process, automatically running periodic backups of your on-premises files according to its defined schedule.
-
In the navigation pane on the left of the console, click Policy Center to view the regions that support backup policies. For more information, see Create a backup policy.
Parameter
Description
Backup Folder Rule
Specifies the directory to be backed up. Cloud Backup backs up all files and subdirectories in the specified directory. Examples:
D:\work\local_backup_pathand/home/backup_path.Select All Folders or Specified Folders.
-
If you select All Folders, specify whether to enable Exclude System Folders.
-
If you enable Exclude System Folders, the excluded system directories for Windows and Linux are not included in the backup plan.
Click the
 icon to the right of Exclude System Folders to view the details of the excluded system directories.
 -
If you do not enable Exclude System Folders, all directories are included in the backup plan.
-
-
If you select Specified Folders, you must specify a Source Paths.
The source path must follow these rules:
-
If no wildcard character (*) is used, up to eight paths can be entered.
-
If a wildcard character (*) is used, only one path can be entered. Wildcard characters such as
/*/*are supported. -
Each path must be an absolute path. For example, a path must start with
/,\\,C:\, orD:\. -
When you use Volume Shadow Copy Service (VSS), multiple paths, UNC paths, wildcard characters, and file exclusion are not supported.
-
When you use a UNC path, VSS, wildcard characters, and file exclusion are not supported. If the backup source contains a UNC path, Windows Access Control Lists (ACLs) are not backed up.
-
Exclude System Folders
Enable this option to exclude system directories from the backup.
Backup File Type
Select All Types or Specified Type.
If you select Specified Type, you must specify the file types to be backed up in the Select File Type box.
Source Paths
This parameter is required only when you enable the Advanced Rule Mode option and select Specified Folders. A custom source path can be configured.
The source path must follow these rules:
-
If no wildcard character (*) is used, up to eight paths can be entered.
-
If a wildcard character (*) is used, only one path can be entered. Wildcard characters such as
/*/*are supported. -
Each path must be an absolute path. For example, a path must start with
/,\\,C:\, orD:\. -
When you use Volume Shadow Copy Service (VSS), multiple paths, UNC paths, wildcard characters, and file exclusion are not supported.
-
When you use a UNC path, VSS, wildcard characters, and file exclusion are not supported. If the backup source contains a UNC path, Windows Access Control Lists (ACLs) are not backed up.
Backup Rule
This parameter is required only when you enable the Advanced Rule Mode option and select Specified Folders.
-
Include All Files: All files are backed up.
-
Include Files or Exclude Files: In the input file list box, enter a list of files. The files are backed up based on the rule.
Backup Policy
Select a backup policy from the drop-down list.
Cloud Backup automatically backs up the data source based on the backup policy that you configure. A backup policy defines operations such as the encryption method for the backup vault, backup interval, retention period, cross-region replication policy, automatic data archiving, and virus scan for backup points. This helps you flexibly manage your data source assets.
If the default backup policy does not meet your requirements, click Create Backup Policy or Edit Policy to manage backup policies. For more information about the parameters in a backup policy, see Policy center.
Use VSS
Specifies whether to use Windows VSS to define the source path.
NoteWhen you use VSS, multiple paths, UNC paths, wildcard characters, and file exclusion are not supported.
Enable Bandwidth Throttling
Bandwidth throttling helps you control backup traffic during peak hours to prevent impacts on your business.
To use bandwidth throttling, enable this option, select a Time Range (Hour), enter a value for Max Bandwidth (MByte/s), and then click Add.
-
Successful backup
-
Cloud Backup automatically starts the backup job at the scheduled time.
NoteThe displayed backup progress is an estimate. The total data size may change as the scan progresses, so the final job status is the only definitive confirmation of completion.
On the Backup Jobs tab, if the Status of a backup job is Completed, the backup is successful.
View details about the backup job, such as Total Scan, Completed Backups, Written to Vault, and Backup Speed. For more information about these metrics, see the tooltips in the Cloud Backup console.
NoteFor backup jobs completed on or after June 1, 2025, statistics for both data volume and file count are displayed for Total Scanned at Source, Backup Completed, and Data Written to Vault. For backup jobs completed before this date, only data volume statistics are shown for these metrics.
The job list displays only the backup jobs from the last six months. To view older jobs, export them from the Audit Report page.

-
On the Backup Plans tab, click the
 icon in front of the destination client. View the record of each backup job and the generated backup points in the Backup History section. These historical backup points can be used to restore on-premises files.
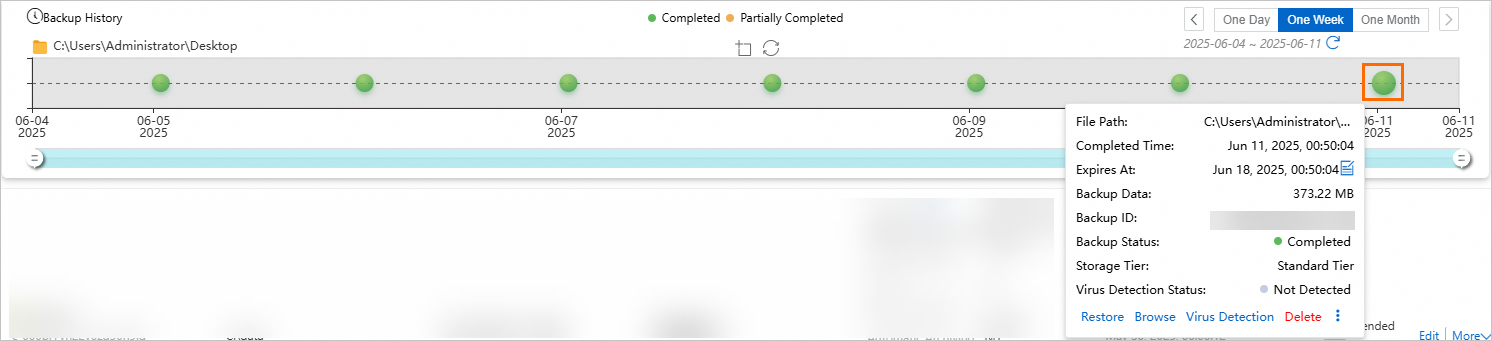
Browse and download backup files
-
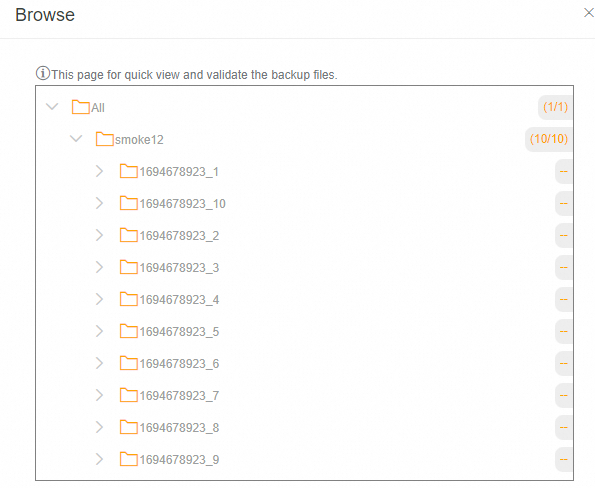
Browse backup files
The Browse feature lets you browse backed-up files. If a virus scan was performed on the backup point that you are browsing, Cloud Backup marks the infected files.
-
On the Backup Plans tab, click the
 icon in front of the destination client.
 -
In the Backup History section, find the backup point for the specified point in time, click the backup point, and then select Browse.
-
-
Download backup files
Directly downloading backup files to a local device is not supported. Instead, retrieve them by restoring the data to a specific local directory. To do this, set Restore Path Type to Specify Path and set the Destination Path, such as
D:\work\local_backup_path_new.You must create this destination directory before initiating the restore, as the job will fail otherwise. Upon successful completion, the files will be available in the specified path.
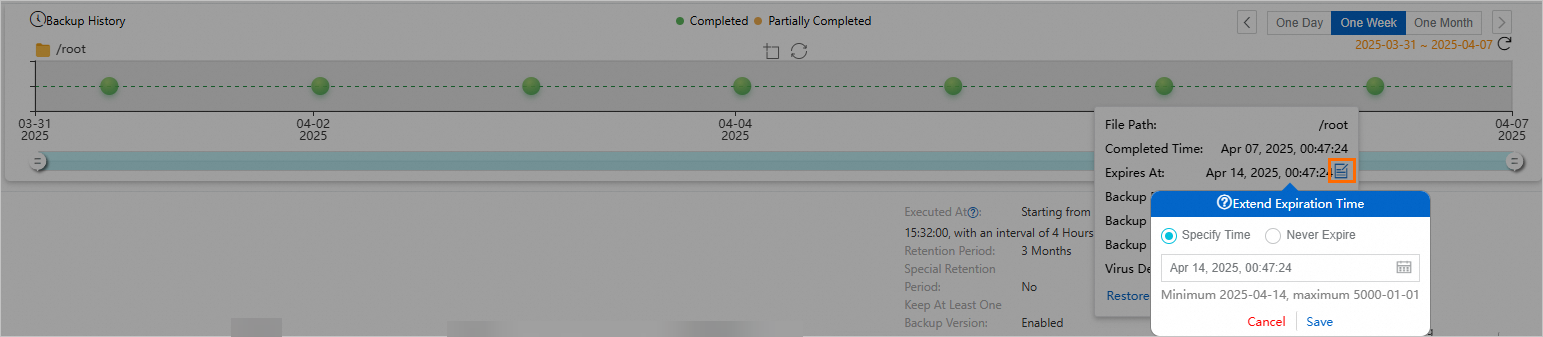
Extend the retention period of a backup point
To retain historical data from on-premises file backups for a longer period, extend the retention period of the backup points.
-
The retention period can be extended, but cannot be shortened.
-
The retention period cannot be extended for a backup point that is set to be permanently retained.
-
On the Backup Plans tab, click the
icon in front of the destination client. -
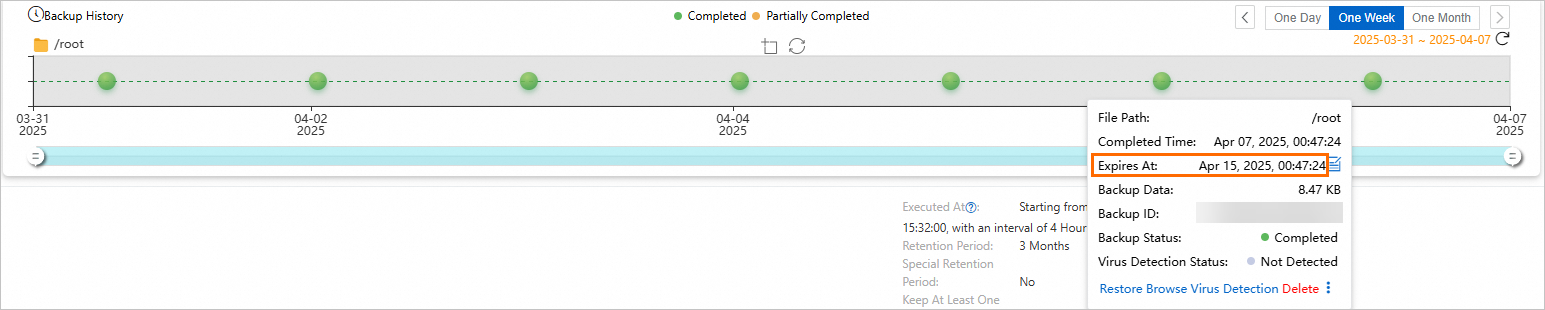
In the Backup History section, click the historical backup point whose retention period you want to extend. Set Specify Time or select Never Expire.
-
Click Save.
After the configuration is complete, view the new expiration time in the Expires At column.
Virus scan
To prevent files that contain viruses from being restored to your production environment, Cloud Backup provides the Backup Point Virus Detection feature. This feature helps you select clean and secure backup points for future data restoration. Click Virus Detection to scan files for viruses. For more information, see Virus scan for backup points.
Backup vault replication
To mitigate risks to business continuity from regional disasters or account management issues, Cloud Backup supports cross-region and cross-account replication for general backup vaults. Once configured, data from the source vault is automatically synchronized to a replication target vault. This ensures data consistency across both locations and enables on-demand, cross-region data recovery using the target vault.
For general backup vaults storing on-premises files, backup vault replication provides an effective solution for cross-region or cross-account disaster recovery. In addition, on-premises file backup offers a range of enterprise-grade features, including Cross-account backup, Automatic archiving, KMS-based encryption, Immutable backup, and Backup point virus detection.
Configure retry parameters for failed backups
If a file backup job fails due to factors such as an unstable network, configure retry parameters.
Log on to the server whose files you want to back up.
Switch to the default installation directory of the Cloud Backup client.
In the
clientfolder, create a file namedhbr.config.NoteThe
hbr.configfile is in the same directory as thehbrclientandidsexecutable programs.Add the following parameters to the
hbr.configfile.Parameter
Description
retry_times
For clients of version 2.16.0 and later, this is the number of data backup retries. The default value is 30.
retry_interval
For clients of version 2.16.0 and later, this is the data backup retry interval. The default value is 1000 milliseconds.
skip_error_files
Specifies whether to skip files that fail to be backed up.
false (default): Does not skip files that fail to be backed up.
true: Skips files that fail to be backed up.
The following is a sample configuration of the hbr.config file:
retry_times=30
retry_interval=1000
skip_error_files=false
Troubleshooting
If the Status of a client or backup job is abnormal, refer to the following suggestions for troubleshooting.
-
Client status is Stopped
The backup client is disconnected from Cloud Backup.
-
If you have uninstalled the backup client and no longer need to perform backups or restore historical data, choose More > Delete Backup to delete the backup.
-
Check the running status of the backup client on the local server. For more information, see How do I check the running status of a Cloud Backup client?.
-
-
Backup status is Failed
-
Check and correct the configuration based on the prompts in the UI.
-
View the logs to locate the specific error code.
NoteThe default installation paths of the backup client are for reference only. Use the actual installation paths on your server.
-
Windows: C:\Program Files\Aliyun Hybrid Backup Service Client\logs
-
Linux: /opt/alibabacloud/hbrclient/logs
-
-
More operations
-
Use HTTPS to transmit data
Using HTTPS reduces data transmission performance. If you modify this setting, the change takes effect when the next backup or restore job starts.
Click in the Actions column, and then select whether to use HTTPS to transmit data.
-
Alert notification method
Click in the Actions column and then select an alert notification method.
Alert notification method
Description
Disabled
No alert notifications are sent for the client.
Same as Backup Vault
The client uses the same alert notification method as the backup vault.
Notify Alibaba Cloud Account
Alert notifications for the client are sent to the Alibaba Cloud account by email.
Custom
Select the contacts or contact groups that should receive alert notifications for this client. Once confirmed, all future alerts will be sent to the chosen recipients. For more information, see Manage alert contacts.
-
Delete backup
This operation deletes all backup data that is generated by this backup client.
WarningDeleting the client permanently removes all its backup data and will cause any running jobs to fail. Ensure data is no longer needed before proceeding.
Click in the Actions column to delete client backup data that you no longer need.
Next step
References
-
Cloud Backup provides resource plans for different backup scenarios. Resource plans offer greater discounts and can help you save on costs. For more information, see Purchase a resource plan.