If you want to establish network communication among network instances across regions, such as virtual private clouds (VPCs), virtual border routers (VBRs), Cloud Connect Network (CCN) instances, and IPsec-VPN connections, you need to create inter-region connections between the transit routers and allocate bandwidth resources to the inter-region connections.
Background information
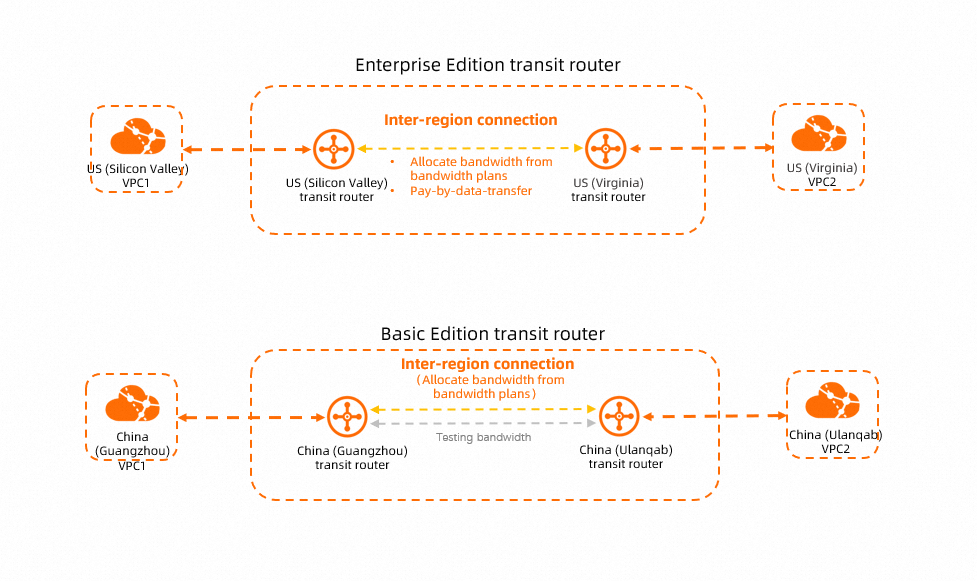
Bandwidth allocation modes
Inter-region connections support multiple bandwidth allocation modes. The bandwidth allocation modes supported by Basic Edition transit routers and Enterprise Edition transit routers are different. The following table describes the bandwidth allocation modes supported by each edition of transit routers.
In the following table, "![]() " indicates that the bandwidth allocation mode is supported by the transit router. "
" indicates that the bandwidth allocation mode is supported by the transit router. "![]() " indicates that the bandwidth allocation mode is not supported by the transit router.
" indicates that the bandwidth allocation mode is not supported by the transit router.
Bandwidth allocation mode | Basic Edition transit router | Enterprise Edition transit router | Description | Use scenario | Supported line type |
Allocate from bandwidth plans |
|
| You must purchase a bandwidth plan and associate it with your Cloud Enterprise Network (CEN) instance if you want to allocate bandwidth from a bandwidth plan to inter-region connections. Then, bandwidth is allocated from the bandwidth plan to inter-region connections. This allocation mode generates bandwidth plan fees. For more information, see Billing rules. | Ideal for long-term services with small traffic fluctuations, such as file transfer, data migration, and data synchronization. | Gold |
Pay-by-data-transfer |
|
| You are charged for data transfer. You can set a bandwidth cap for each inter-region connection to limit the amount of bandwidth that the inter-region connections can consume. This allocation mode generates data transfer fees, which are managed by Cloud Data Transfer (CDT). For more information, see Inter-region data transfers. Note After you create a pay-by-data-transfer inter-region connection, you can run the | Ideal for services with large traffic fluctuations and unpredictable bandwidth usage, such as temporary scale-outs, testing, video conferencing, and real-time gaming. |
Existing pay-by-data-transfer inter-region connections use the Gold line type by default. You can change the line type of existing inter-region connections. For more information, see Change the line type of an inter-region connection. |
Use testing bandwidth |
|
| CEN provides a testing bandwidth value of 1 Kbit/s that is free of charge for you to test the network connectivity of inter-region connections. The testing bandwidth is limited to 1 Kbit/s, and you can use it only for connectivity tests. It does not support service traffic. After you connect a network instance to a Basic Edition transit router, you can test the connectivity of inter-region IPv4 networks without creating inter-region connections. By default, the testing bandwidth is used. | The testing bandwidth can be used only for connectivity tests. It does not support service traffic. | Gold |
Line types
Inter-region connections support multiple line types. The network performance varies based on the line type.
Service level | Service availability | Applicable scenario |
Gold | 99.95% | Services with moderate network quality requirements, such as data synchronization and file transfer. |
Platinum | 99.995% | Services that require high network quality and low latency, such as securities transactions, online voice chat, video conferencing, and real-time gaming. |
Prerequisites
When you allocate bandwidth from a bandwidth plan, make sure that the sum of maximum bandwidth values specified for inter-region connections does not exceed the maximum bandwidth value of the bandwidth plan.
For example, a CEN instance is associated with a 20 Mbit/s bandwidth plan that connects the Chinese mainland to North America. You can allocate bandwidth from the bandwidth plan to inter-region connections between US (Silicon Valley) and China (Hangzhou), between US (Silicon Valley) and China (Shanghai), and between US (Silicon Valley) and China (Shenzhen). In this case, the sum of the maximum bandwidth values of the inter-region connections cannot exceed 20 Mbit/s.
Upper bandwidth limits for inter-region connections that use the pay-by-data-transfer allocation mode:
Within the Chinese mainland: 1,000 Mbit/s.
Between the Chinese mainland and regions outside the Chinese mainland: 100 Mbit/s.
If you require a higher bandwidth value, go to the Quotas page in the CEN console or to the Quota Center console to request a quota increase. For more information, see Manage CEN quotas.
Prerequisites
A transit router is deployed in each of the regions to be connected. For more information, see Create a transit router.
A bandwidth plan is purchased if you want to use the Allocate from Bandwidth Plan bandwidth allocation mode for the inter-region connection. For more information, see Work with a bandwidth plan.
Create an inter-region connection
Use an Enterprise Edition transit router to create an inter-region connection
Log on to the CEN console.
On the Instances page, click the ID of the CEN instance that you want to manage.
On the tab, find the transit router in one of the regions to be connected, and click Create Connection in the Actions column.
On the Connection with Peer Network Instance page, set the following parameters and click OK.
Parameter
Description
Network Type
In this example, Inter-region Connection is selected.
Region
Select one of the regions to be connected.
Transit Router
The ID of the transit router in the selected region is automatically displayed.
Attachment Name
Enter a name for the inter-region connection.
Peer Region
Select the other region to be connected.
ImportantTo create an cross-border connection, you must comply with the cross-border network communication requirements and follow the console prompts to proceed.
Transit Router
The ID of the transit router in the selected region is automatically displayed.
Tag
Add tags to the inter-region connection.
Tag Key: The tag key can be up to 64 characters in length. It cannot be an empty string or start with
acs:oraliyunor containhttp://orhttps://.Tag Value: The tag value can be an empty string with a maximum length of 128 characters. It cannot start with
acs:oraliyunor containhttp://orhttps://.
You can add one or more tags to an inter-region connection. For more information about tags, see Manage tags.
Bandwidth allocation mode
Select the method that is used to allocate bandwidth to the inter-region connection. Transit routers support the following bandwidth allocation modes:
Allocate from Bandwidth Plan: The bandwidth is allocated from a bandwidth plan.
Pay-By-Data-Transfer: You are charged for data transfer over the inter-region connection. Inter-region connection fees in this billing mode are managed by Cloud Data Transfer (CDT).
Bandwidth Plan
Select a bandwidth plan that is associated with the CEN instance.
This parameter is required if Allocate from Bandwidth Plan is selected.
Bandwidth
Specify a maximum bandwidth value for the inter-region connection. Unit: Mbit/s.
If you select Allocate from Bandwidth Plan, the specified bandwidth value is used as the maximum bandwidth value of the inter-region connection.
If you select Pay-By-Data-Transfer, the specified bandwidth value is used as the bandwidth cap of the inter-region connection. If the bandwidth cap is reached, bandwidth throttling is triggered.
The default maximum bandwidth for connections within the Chinese mainland is 1,000 Mbit/s.
The default bandwidth for connections between the Chinese mainland and regions outside the Chinese mainland is 100 Mbit/s.
Default Line Type
Select a line type for the inter-region connection.
If Allocate From Bandwidth Plan is selected, only the Gold line type is supported.
If Pay-By-Data-Transfer is selected, both the Platinum and Gold line types are supported. For more information, see Line types.
Advanced Settings
When you create an inter-region connection, the system automatically selects the following features in the advanced settings:
Associate with Default Route Table of Transit Router
After this feature is enabled, the inter-region connection is automatically associated with the default route table of the transit router. The transit router uses the default route table to forward network traffic across regions.
Propagate System Routes to Default Route Table of Transit Router
After this feature is enabled, the inter-region connection is associated with the default route tables of the transit routers in the connected regions.
Automatically Advertise Routes to Peer Region
After this feature is enabled, the routes in the route table of the transit router in the current region are automatically advertised to the route table of the peer transit router for cross-region communication. The route tables of the transit routers refer to the route tables that are associated with the inter-region connection.
You can disable the preceding advanced features by clearing the check boxes. If you want to establish network communication between network instances, you can configure associated forwarding and route learning on the transit router. For more information, see Manage routes.
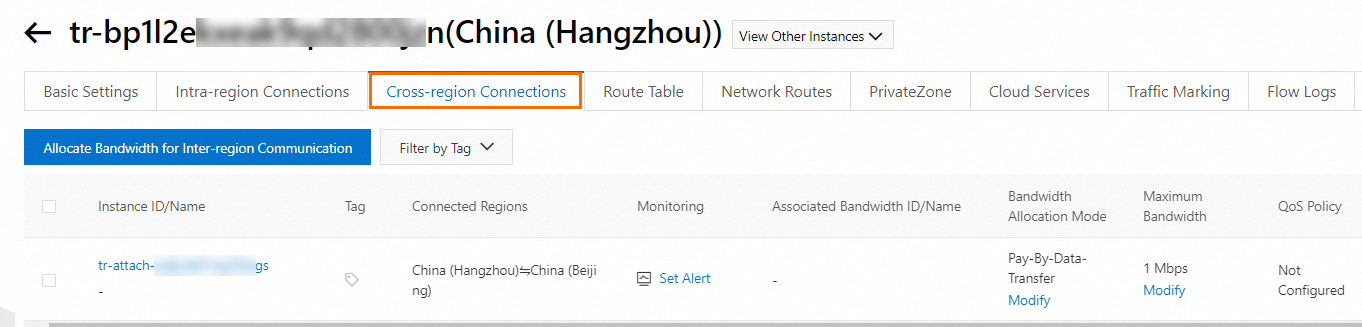
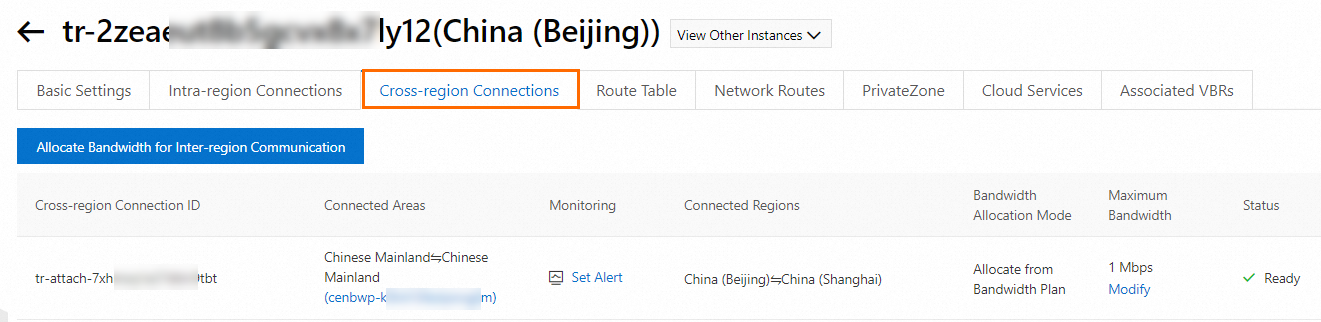
After you create the inter-region connection, you can view and manage the inter-region connection on the Cross-region Connections tab of the transit router details page.
If networks in the regions cannot communicate with each other, you can use the reachability analyzer and the instance diagnostics features of transit routers to troubleshoot errors. For more information, see Work with the reachability analyzer and Diagnose a transfer router.
Use a Basic Edition transit router to create an inter-region connection
Log on to the CEN console.
On the Instances page, click the ID of the CEN instance that you want to manage.
On the tab, find the transit router in one of the regions to be connected, and click Create Connection in the Actions column.
On the Connection with Peer Network Instance page, set the following parameters and click OK.
Parameter
Description
Network Type
In this example, Inter-region Connection is selected.
Region
Select one of the regions to be connected.
Transit Router
The ID of the transit router in the selected region is automatically displayed.
Peer Region
Select the other region to be connected.
Transit Router
The ID of the transit router in the selected region is automatically displayed.
Tag
Add tags to the inter-region connection.
Tag Key: The tag key cannot be an empty string. The tag key can be up to 64 characters in length. The key cannot start with
acs:oraliyunor containhttp://orhttps://.Tag Value: The tag value can be an empty string. The tag value can be up to 128 characters in length. The tag value cannot start with
acs:oraliyunor containhttp://orhttps://.
You can add one or more tags to an inter-region connection. For more information about tags, see Manage tags.
Bandwidth Plan
Select a bandwidth plan that is associated with the CEN instance.
Bandwidth
Specify a maximum bandwidth value for the inter-region connection. Unit: Mbit/s.
After you create the inter-region connection, you can view and manage the inter-region connection on the Cross-region Connections tab of the transit router details page.
If networks in the regions cannot communicate with each other, you can use the reachability analyzer to troubleshoot errors. For more information, see Work with the reachability analyzer.
What to do next
Modify the bandwidth allocation mode of an inter-region connection
Modify the maximum bandwidth value of an inter-region connection
Change the line type of an inter-region connection
Associate an inter-region connection with a different transit router route table
Delete an inter-region connection
Call API operations to create and manage inter-region connections
You can use tools such as Alibaba Cloud SDKs (recommended), Alibaba Cloud CLI, Terraform, and Resource Orchestration Service (ROS) to create and manage inter-region connections by calling API operations. For more information, see the following API references:
CreateTransitRouterPeerAttachment: creates an inter-region connection on an Enterprise Edition transit router.
UpdateTransitRouterPeerAttachmentAttribute: modifies the configurations of an inter-region connection on an Enterprise Edition transit router.
ListTransitRouterPeerAttachments: queries the inter-region connections on an Enterprise Edition transit router.
DeleteTransitRouterPeerAttachment: deletes an inter-region connection from an Enterprise Edition transit router.
SetCenInterRegionBandwidthLimit: configures, modifies, or deletes an inter-region bandwidth on a Basic Edition transit router.
DescribeCenInterRegionBandwidthLimits: queries the bandwidth values of inter-region connections.
References
For more information about how to use inter-region connections to establish communication across VPCs, see the following topics: