When connecting virtual private clouds (VPCs) using peering connections, you may encounter increasing complexity in configuration and challenges in maintenance as the number of VPCs grows. To address this, migrate these VPCs to Cloud Enterprise Network (CEN). CEN enables automatic route propagation, streamlines configuration, and enhances the scalability of your network architecture, providing a more efficient and manageable solution for multi-VPC environments.

How to migrate
The key of migration is directing the traffic of VPC peering connections to the transit router by configuring route entries. This process consists of three steps:
Create a CEN instance: We recommend using scenario-based networking to create an instance. The system automatically:
Creates a transit router in the region where the VPC is located.
Connects VPCs to the transit router. For inter-region scenarios, inter-region connections are automatically created between transit routers.
Enables route learning to learn system routes from VPCs and route synchronization to propagate routes of the transit router to VPCs.
NoteIn regions where transit routers support multiple zones, a VPC must have at least two vSwitches that spread across zones. If this condition is not met, you must first create vSwitches.
Configure routes: After ensuring the route entries of the transit router and VPC are working properly, delete the route entries that point to the peering connection.
If the route tables of VPCs contain entries pointing to Elastic Compute Service (ECS), VPN gateway, or high-availability virtual IP (HAVIP) instances, you must advertise routes to the transit router in the CEN console.
Check the route table of the transit router to ensure there are entries to each VPC.
Check the route table of each VPC and ensure there are entries to the transit router. Go to the Network Routes tab in the CEN console and check the Status of each route:
If there are no route conflicts, delete the route entries with the peering connection as the next hop to achieve smooth migration.
If route conflicts occur, choose one of the following solutions:
Migration with transient interruption: Deleting the route entries that use the peering connection as the next hop may result in a temporary connection interruption. This interruption is expected to last for a few minutes, and will be proportional to the number of route entries in the transit router.
Smooth migration: Add more specific routes to ensure the route entries to the transit router take effect. Then delete the route entries with the peering connection as the next hop.
For example, if there is a conflict between one route (destination CIDR block 10.0.0.0/24, next hop peering connection) and another (destination CIDR block 10.0.0.0/24, next hop transit router) in the VPC route table, perform these steps:
Add two more specific routes:
Destination CIDR block 10.0.0.0/25, next hop peering connection
Destination CIDR block 10.0.0.128/25, next hop peering connection
Delete the route entry: Destination CIDR block 10.0.0.0/24, next hop peering connection.
Wait for route synchronization to take effect: Destination CIDR block 10.0.0.0/24, next hop transit router.
Delete the two specific route entries in step a.
Verify that two VPCs are connected through the transit router. Then delete the peering connection.
Scenario

Assume two VPCs are connected through a VPC peering connection, and you plan to migrate them to CEN.
One vSwitch is created in each VPC, and one ECS instance is created in each vSwitch. The two ECS instances can ping each other.
The VPCs are planned as follows:
Parameter | VPC1 | VPC2 |
Region | China (Hangzhou) | China (Hangzhou) |
CIDR block | 10.0.0.0/16 | 172.16.0.0/16 |
vSwitch | Name: Zone: J CIDR block: 10.0.0.0/24 | Name: Zone: J CIDR block: 172.16.0.0/24 |
ECS | Name: IP address: 10.0.0.1 | Name: IP address: 172.16.0.1 |
Custom route entry | Destination CIDR block 172.16.0.0/16, next hop peering connection | Destination CIDR block 10.0.0.0/16, next hop peering connection |
Preparations
During the smooth migration, the two VPCs remain connected.
Before you start, log on to ECS1 and run the ping 172.16.0.1 command to access ECS2. Keep it running in the background to track the connectivity status.
If your ECS instances are running Windows, add the -t parameter to keep the ping command running: ping -t 172.16.0.1.
Procedure
Step 1: Create a CEN instance
Create a new vSwitch in Zone K in each VPC, both named
vSwitch2, with respective CIDR blocks of 10.0.1.0/24 and 172.16.1.0/24. This ensures that you meet the requirements of selecting two vSwitches in different zones when connecting a VPC to the transit router.Log on to the CEN console. Click Create CEN Instance, select the Create Scenario-specific CEN (Recommended) tab in the dialog box, select VPC Interconnection, and click Create.
On the page, configure the following parameters:
Region: Select China (Hangzhou).
Zone: Select Zone J and Zone K.
VPC:
Set VPC to VPC1, and choose the two vSwitches.
Click Add VPC, set VPC to VPC2, and choose the two vSwitches.
Click Next.
On the Confirm Network Settings and Fees page, it takes a few minutes to generate the setting overview. You can view the resources that will be automatically created, and check which resources will incur fees. Confirm and Start Deployment.
The Start Deployment page will show Deploying, which should take about 5-10 minutes. After completion, Network Deployed will appear. Click View CEN Instance to access auto-created resources. As shown in the figure, a CEN instance named
created_by_cadthas been automatically created and a transit router namedcn-hangzhouhas been created in the CEN.
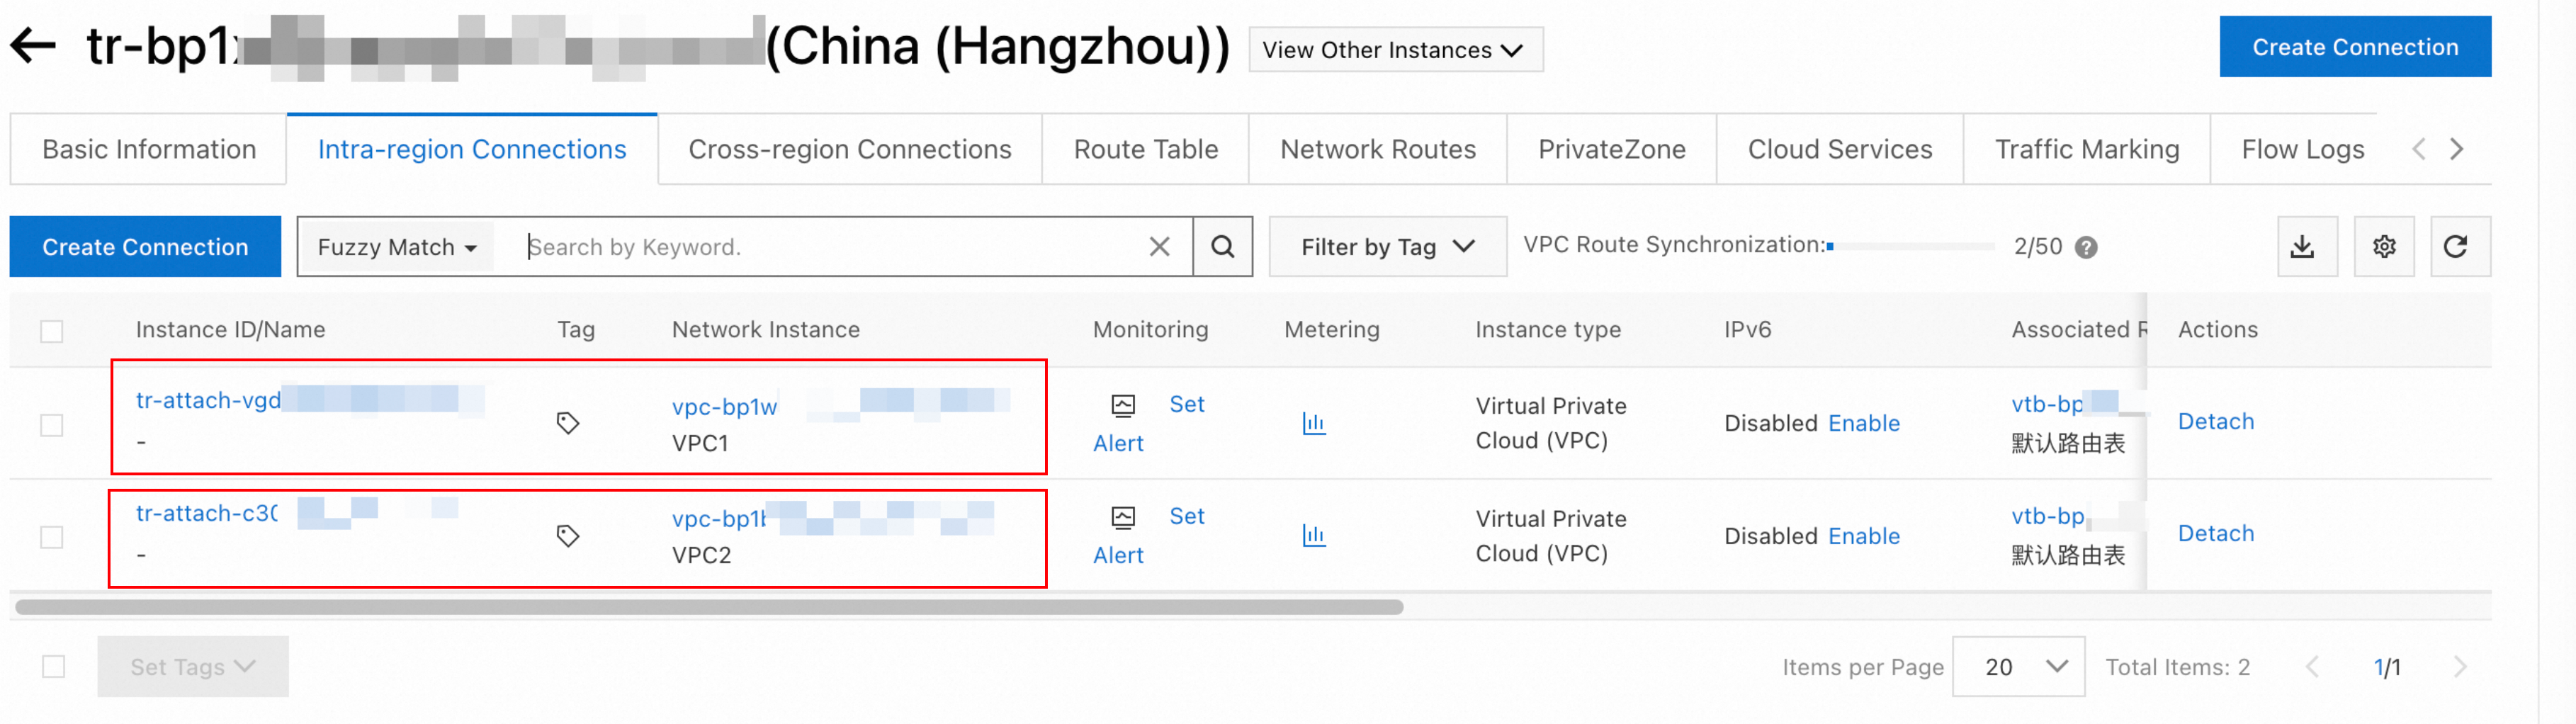
Click the transit router ID. You can see two auto-created Intra-region Connections, indicating that VPC1 and VPC2 have been connected to the transit router.
Step 2: Configure routes
If the route table of a VPC contains route entries pointing to ECS, VPN gateway, and HAVIP instances, you must advertise these routes to the transit router in the CEN console. There are no such routes in this example, so advertisement is not needed.
Check the route table of the transit router: Click the transit router ID, and go to the Route Entry tab. You'll see that the transit router has learned routes to VPC1 and VPC2, as shown in the following figure:

Check VPC route tables
Check the route table of VPC1: Click the Network Routes tab, select VPC1 for Network Instance, and check the route table.
As shown in the figure below, the transit router has synchronized the auto-learned routes to the route table of VPC1. There are no conflicts because the Status of all entries is Ready.

Check the route table of VPC2: Repeat step 1 and check the route table of VPC2.
If there are no route conflicts in either VPC, delete the route entries with peering connections as the next hop to achieve smooth migration.
Log on to the VPC console. Click VPC Peering Connection in the left navigation pane, select China (Hangzhou) at the top, click the target Peering Connection ID, and choose the Route Entry List tab. For each route entry, click Delete in the Actions column.
Suppose that before migration, there is a custom route entry in the route table of VPC1 with a destination CIDR block of 172.16.0.0/24 and the next hop being the peering connection. Route conflicts will occur.
As shown in the figure below, when you view the route table under the Network Routes tab, VPC1 prioritizes the existing route entry for the peering connection. It marks the new route synchronized from the transit router as conflicting.

You have the following options to resolve this issue:
Migration with transient interruption: Delete the route entry with the peering connection as the next hop. Note that this may cause transient connection interruption, which will likely last for several minutes, and will be proportional to the number of route entries in the transit router.
Smooth migration: Add more specific routes to ensure that the route entries to the TR in the VPC route table take effect, then delete the route entries with the peering connection as the next hop.
Log on to the VPC console. Click Route Tables in the navigation pane on the left, then the Instance ID of the route table of VPC1. On the tab:
Add two more specific routes:
Destination CIDR block 172.16.0.0/25, next hop peering connection
Destination CIDR block 172.16.0.128/25, next hop peering connection
Delete the route entry: Destination CIDR block 172.16.0.0/24, next hop peering connection.
Wait for route synchronization to become active: Destination CIDR 172.16.0.0/24, next hop transit router.
Delete the two specific route entries: Destination CIDR block 172.16.0.0/25, next hop peering connection and destination CIDR block 172.16.0.128/25, next hop peering connection.
Step 3: Verify the results
Check the ping command executed in the Preparations section above. If the command is still receiving responses, this indicates that you have directed the traffic to the transit router.
Delete the peering connection: Log on to the VPC console. Click VPC Peering Connection in the navigation pane on the left. Select China (Hangzhou) at the top, find the target peering connection, and click Delete in the Actions column.
How to roll back
Re-establish a peering connection between the VPCs: Add routes with the destination CIDR block as the peer VPC and the next hop as the peering connection, and ensure the new routes are active. If route conflicts occur (for example, you receive the prompt "This CIDR block already exists in the route table"), add routes that are more specific to resolve the issue.
Delete resources in the following sequence: VPC connections (including inter-region connections if applicable), transit routers, and CEN instances.
References
What are the differences between Cloud Enterprise Network and VPC peering connections?