This tutorial walks you through configuring a custom recommendation solution in PAI-Rec using a public dataset. By the end, you will have a working end-to-end recommendation pipeline covering feature engineering, recall, and fine-grained ranking — with the workflow deployed to DataWorks.
Prerequisites
Before you begin, ensure that you have:
-
Activated PAI. See Activate PAI and create a default workspace.
-
Created a virtual private cloud (VPC) and a vSwitch. See Create a VPC with an IPv4 CIDR block.
-
Activated PAI-FeatureStore with FeatureDB as the online store (do not activate Hologres). See the Prerequisites section of Create a data source and Create an online store: FeatureDB.
-
Activated MaxCompute and created a MaxCompute project named project_mc. See Activate MaxCompute and Create a MaxCompute project.
-
Created an Object Storage Service (OSS) bucket. See Create a bucket.
-
Activated DataWorks and completed the following setup:
-
Created a DataWorks workspace. See Create a workspace.
-
Purchased a Serverless resource group for DataWorks (used to sync data for PAI-FeatureStore and run eascmd commands to create and update PAI-EAS services). See Use a Serverless resource group.
-
Configured an OSS data source and a MaxCompute data source in DataWorks. See Data source management and Attach a MaxCompute computing resource.
-
-
Created a FeatureStore project and feature entities. Skip this step if you use a Serverless resource group. If you use a dedicated resource group, install the FeatureStore Python SDK. See II. Create and register a FeatureStore and Install the FeatureStore Python SDK.
-
Activated Flink with Storage Type set to OSS bucket (not Fully Managed Storage). The OSS bucket for Flink must match the one configured for PAI-Rec. Flink is used to record real-time user behavioral data and calculate real-time user features. See Activate Realtime Compute for Apache Flink.
-
(Conditional) If you use EasyRec (TensorFlow): the model trains on MaxCompute by default.
-
(Conditional) If you use TorchEasyRec (PyTorch): the model trains on PAI-DLC by default. To download MaxCompute data on PAI-DLC, activate Data Transmission Service (DTS). See Purchase and use a dedicated resource group for Data Transmission Service.
Step 1: Create a PAI-Rec instance and initialize the service
This step provisions a PAI-Rec Premium Edition instance and connects it to the cloud resources you set up in the prerequisites. The Premium Edition is required — it includes data diagnostics and the custom recommendation solution features used in this tutorial.
-
Log on to the Personalized Recommendation Platform home page and click Buy Now.
-
On the purchase page, set the following parameters and click Buy Now.
Parameter Description Region and zone The region where your cloud services are deployed. Service type Select Premium Edition. The Premium Edition adds data diagnostics and custom recommendation solution features compared to the Standard Edition. -
Log on to the PAI-Rec console and select your region from the top menu bar.
-
In the left navigation pane, click Instance list. Click the instance name to open the instance details page.
-
In the Operation guide section, click Init. You are redirected to System configurations > End-to-End service. Click Edit, configure the resources in the following table, and then click Done.
-
In the left navigation pane, choose System configurations > Permission management. On the Access service tab, verify that access is granted for each cloud product.
Step 2: Clone the public dataset
This step loads sample data into your MaxCompute project. PAI-Rec provides three shared tables in the publicly accessible pai_online_project project:
-
User table:
pai_online_project.rec_sln_demo_user_table -
Item table:
pai_online_project.rec_sln_demo_item_table -
Behavior table:
pai_online_project.rec_sln_demo_behavior_table
The data in these tables is randomly generated and has no real business meaning, so training metrics such as Area Under the Curve (AUC) will be low. This is expected for a demo setup.
Two methods are available:
| Method | Scheduling support | When to use |
|---|---|---|
| Synchronize a fixed time window using SQL | No | One-time setup for exploring the tutorial |
| Generate data using a Python script | Yes (daily) | Routine model training with scheduled tasks |
For daily data generation and model training, use the Python script method.
Synchronize a fixed time window
Run SQL commands in DataWorks to copy the three tables from pai_online_project into your MaxCompute project (for example, project_mc).
-
Log on to the DataWorks console and select your region.
-
In the left navigation pane, click Data development and O&M > Data development.
-
Select the DataWorks workspace you created and click Go to data development.
-
Hover over Create and choose Create node > MaxCompute > ODPS SQL. Set the following parameters and click Confirm.
-
In the node editor, paste and run the following SQL. Before running, configure scheduling variables so that
${bizdate}is set to yesterday's date and${bizdate_100}is set to 100 days before${bizdate}. Configure the scheduling parameters as follows: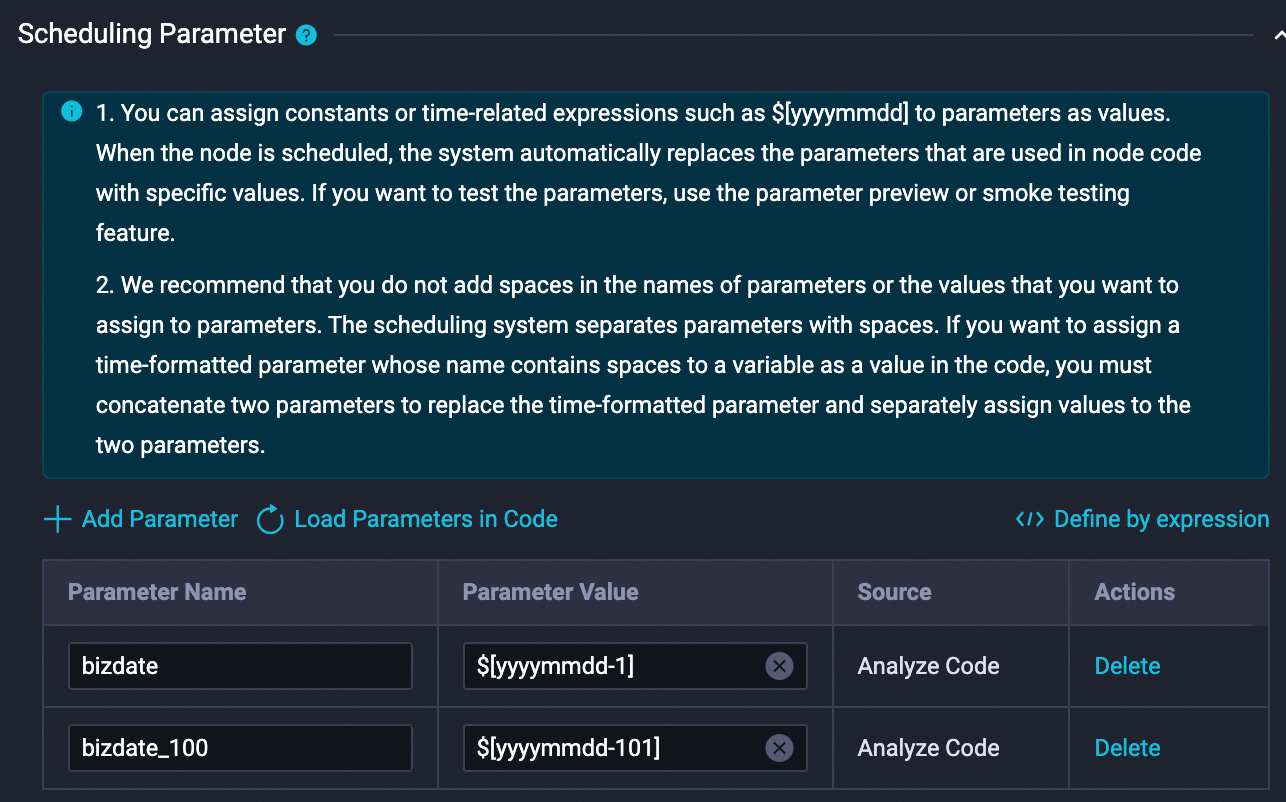 Run the following SQL once to copy data from the public project into your project:
CREATE TABLE IF NOT EXISTS rec_sln_demo_user_table_v1(
 user_id BIGINT COMMENT 'Unique user ID',
 gender STRING COMMENT 'Gender',
 age BIGINT COMMENT 'Age',
 city STRING COMMENT 'City',
 item_cnt BIGINT COMMENT 'Number of created items',
 follow_cnt BIGINT COMMENT 'Number of follows',
 follower_cnt BIGINT COMMENT 'Number of followers',
 register_time BIGINT COMMENT 'Registration time',
 tags STRING COMMENT 'User tags'
) PARTITIONED BY (ds STRING) STORED AS ALIORC;

INSERT OVERWRITE TABLE rec_sln_demo_user_table_v1 PARTITION(ds)
SELECT *
FROM pai_online_project.rec_sln_demo_user_table
WHERE ds >= "${bizdate_100}" and ds <= "${bizdate}";

CREATE TABLE IF NOT EXISTS rec_sln_demo_item_table_v1(
 item_id BIGINT COMMENT 'Item ID',
 duration DOUBLE COMMENT 'Video duration',
 title STRING COMMENT 'Title',
 category STRING COMMENT 'Primary tag',
 author BIGINT COMMENT 'Author',
 click_count BIGINT COMMENT 'Total clicks',
 praise_count BIGINT COMMENT 'Total likes',
 pub_time BIGINT COMMENT 'Publication time'
) PARTITIONED BY (ds STRING) STORED AS ALIORC;

INSERT OVERWRITE TABLE rec_sln_demo_item_table_v1 PARTITION(ds)
SELECT *
FROM pai_online_project.rec_sln_demo_item_table
WHERE ds >= "${bizdate_100}" and ds <= "${bizdate}";

CREATE TABLE IF NOT EXISTS rec_sln_demo_behavior_table_v1(
 request_id STRING COMMENT 'Instrumentation ID/Request ID',
 user_id STRING COMMENT 'Unique user ID',
 exp_id STRING COMMENT 'Experiment ID',
 page STRING COMMENT 'Page',
 net_type STRING COMMENT 'Network type',
 event_time BIGINT COMMENT 'Behavior time',
 item_id STRING COMMENT 'Item ID',
 event STRING COMMENT 'Behavior type',
 playtime DOUBLE COMMENT 'Playback/Read duration'
) PARTITIONED BY (ds STRING) STORED AS ALIORC;

INSERT OVERWRITE TABLE rec_sln_demo_behavior_table_v1 PARTITION(ds)
SELECT *
FROM pai_online_project.rec_sln_demo_behavior_table
WHERE ds >= "${bizdate_100}" and ds <= "${bizdate}";
Generate data using a Python script
Use this method to schedule daily data generation. The script generates synthetic data for a specified time range.
-
In the DataWorks console, create a PyODPS 3 node. See Create and manage MaxCompute nodes.
-
Download create_data.py and paste its content into the PyODPS 3 node.
-
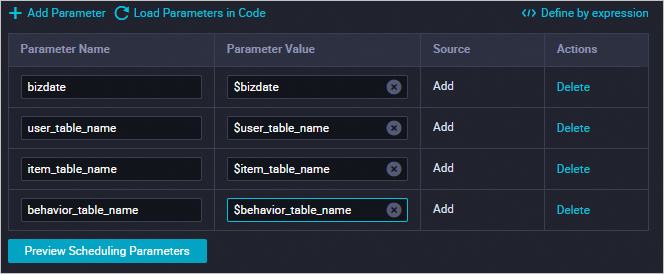
In the right-side pane, click Scheduling configurations and configure the scheduling parameters. Replace the following variables: After replacement: Configure the scheduling dependencies, then click the Save
 and Submit
  icons.
-
$user_table_name→rec_sln_demo_user_table -
$item_table_name→rec_sln_demo_item_table -
$behavior_table_name→rec_sln_demo_behavior_table
-
-
Go to the Operation center and choose Periodic task O&M > Periodic tasks.
-
In the Actions column of the target task, choose Backfill data > Current and descendant nodes.
-
In the Backfill data panel, set the data timestamp and click Submit and go. Set the data timestamp to
Scheduled task date - 60to backfill 60 days of data and ensure data integrity.
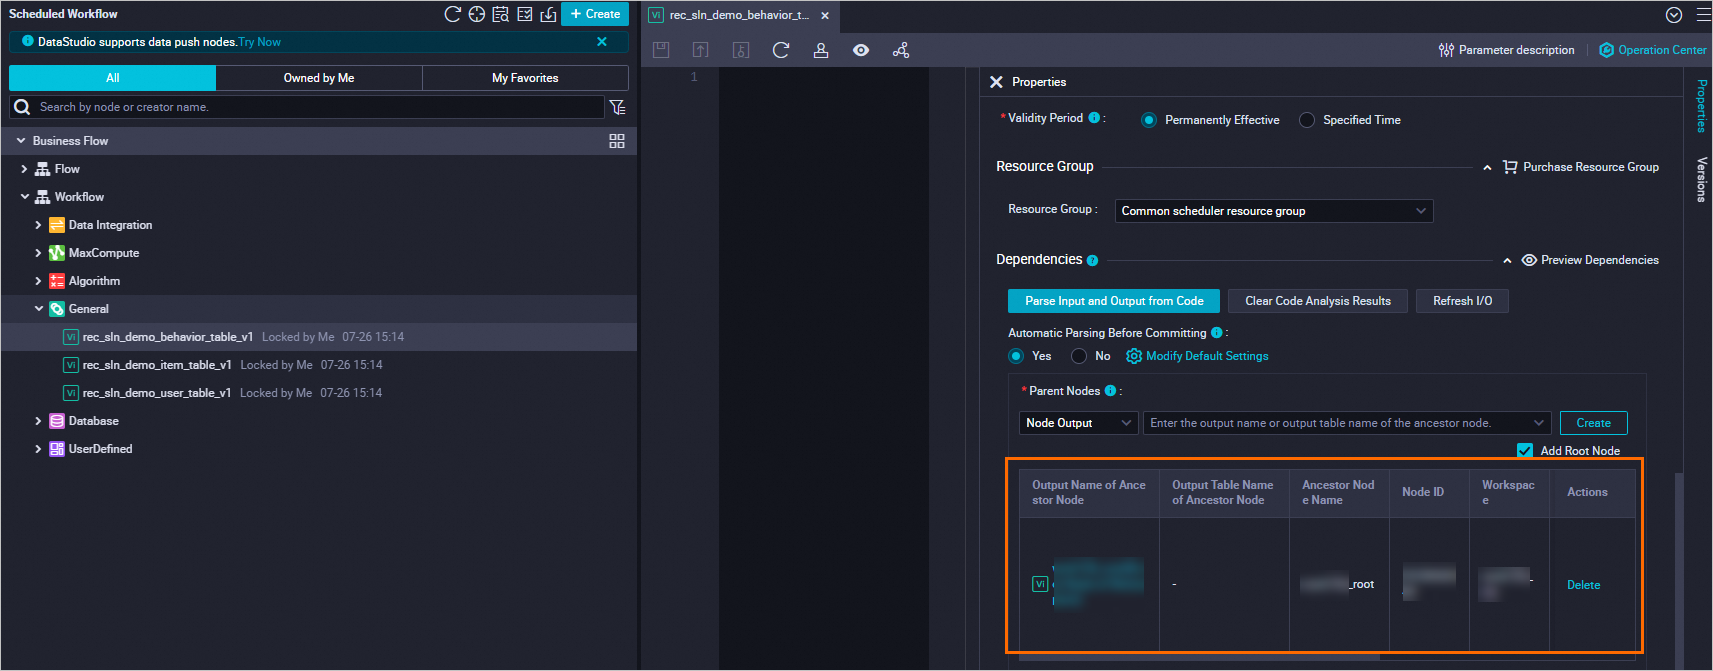
Configure dependency nodes
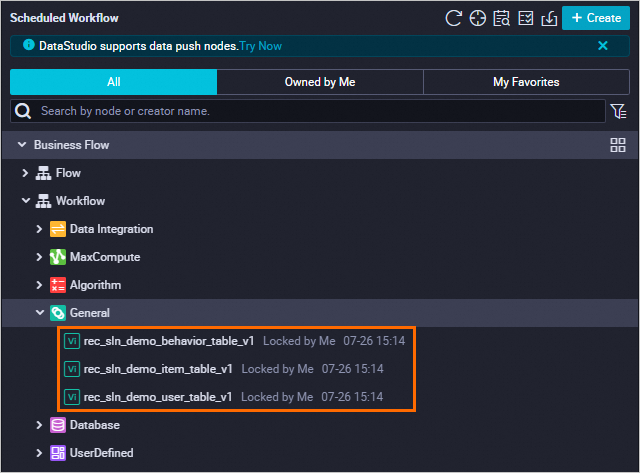
Add three virtual nodes to your DataWorks project. These nodes act as dependency anchors for the data tables, ensuring that downstream tasks wait for data to be available before running.
-
Hover over Create and choose Create node > General > Virtual node. Create three virtual nodes using the following settings and click Confirm.
-
For each virtual node, set the node content to
select 1;. Then click Scheduling configurations in the right-side pane and complete the following settings: Configure all three nodes.-
Under Time property, set Rerun property to Rerun when succeeded or failed.
-
Under Scheduling dependencies > Upstream dependencies, enter the DataWorks workspace name, select the node with the _root suffix, and click Add.
-
-
Click the
 icon in front of each virtual node to submit it.
Step 3: Register data
Register the three synchronized tables in PAI-Rec so they are available for feature engineering, recall, and ranking configuration in subsequent steps.
-
Log on to the PAI-Rec console and select your region.
-
In the left navigation pane, click Instance list. Click the instance name to open the instance details page.
-
In the left navigation pane, choose Custom recommendation solution > Data registration. On the MaxCompute table tab, click Add data table. Add one user table, one item table, and one behavior table using the following settings, then click Start import.
Parameter Description Example MaxCompute project The MaxCompute project you created. project_mcMaxCompute table The synchronized data tables. User: rec_sln_demo_user_table_v1; Item:rec_sln_demo_item_table_v1; Behavior:rec_sln_demo_behavior_table_v1Data table name A custom display name for the table. User Table,Item Table,Behavior Table
Step 4: Create a recommendation scenario
Create a recommendation scenario to define the context in which recommendations are served (for example, a home page feed). For background on recommendation scenarios and traffic IDs, see Terms.
In the left navigation pane, choose Recommendation scenarios. Click Create scenario, configure the following parameters, and click OK.
Step 5: Create and configure an algorithm solution
This step configures the recall and ranking algorithms for your recommendation scenario. For a complete production setup, the following algorithms are available:
-
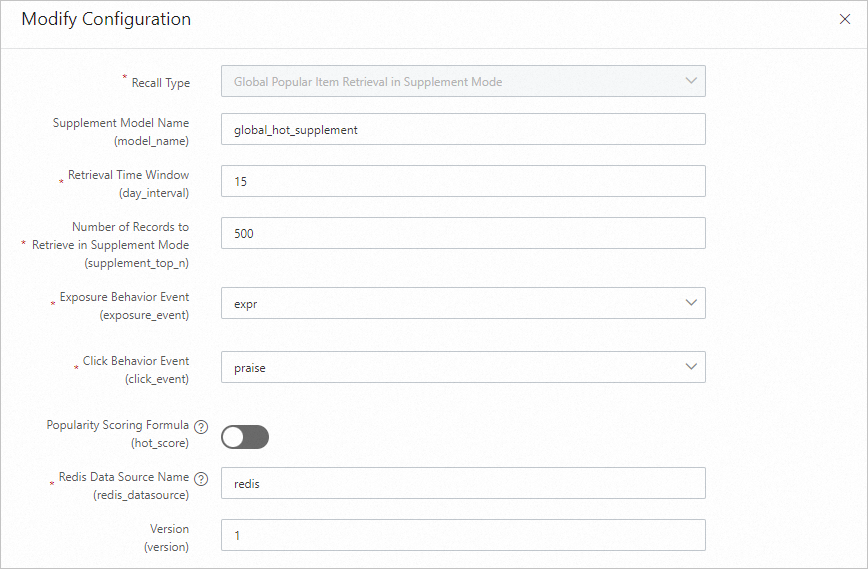
Global hot recall: Ranks the top-k items by click statistics from log data.
-
Global hot fallback recall: Stores a fallback candidate set in Redis to prevent empty results if the primary recall engine fails.
-
Grouped hot recall: Recalls items by attribute groups (for example, city or gender) to improve personalization for popular items.
-
etrec u2i recall: User-to-item recall based on the etrec collaborative filtering algorithm.
-
Swing u2i recall (optional): User-to-item recall based on the Swing algorithm.
-
Cold-start recall (optional): Recall for new users and items using the DropoutNet algorithm.
-
Fine-grained ranking: Choose MultiTower for single-objective ranking or DBMTL for multi-objective ranking.
Vector recall and PDN recall are typically added after the basic recall stage is complete. Vector recall requires a vector recall engine and is not covered in this tutorial because FeatureDB does not support it.
To quickly complete deployment, this tutorial configures only global hot recall and etrec u2i recall for the recall stage, and fine-grained ranking for the ranking stage.
-
In the left navigation pane, choose Custom recommendation solution > Solution configuration. Select the scenario you created, click Create recommendation solution, fill in the following parameters, and click Save and configure algorithm solution. For parameters not listed here, keep the default values. See Data table configuration for details.
-
At the Data table configuration node, click Add next to each data table. Configure the behavior log table, user table, and item table as described below, then click Next. For parameters not listed here, keep the default values. See Data table configuration. Behavior log table When configuring the behavior log table, adjust the fields to match your actual data. The demo behavior log contains: request ID, user ID, page, behavior timestamp, and behavior type. If your data has additional dimensions, classify them as user or item information for feature engineering.
User table
Item table
-
At the Feature configuration node, set the following parameters, click Generate features, set the feature version, and click Next. After clicking Generate features, the system derives statistical features for users and items. The defaults work for this tutorial. See Feature configuration to customize derived features.
-
At the Recall configuration node, click Add next to the target recall category, configure the parameters, click Confirm, and then click Next.
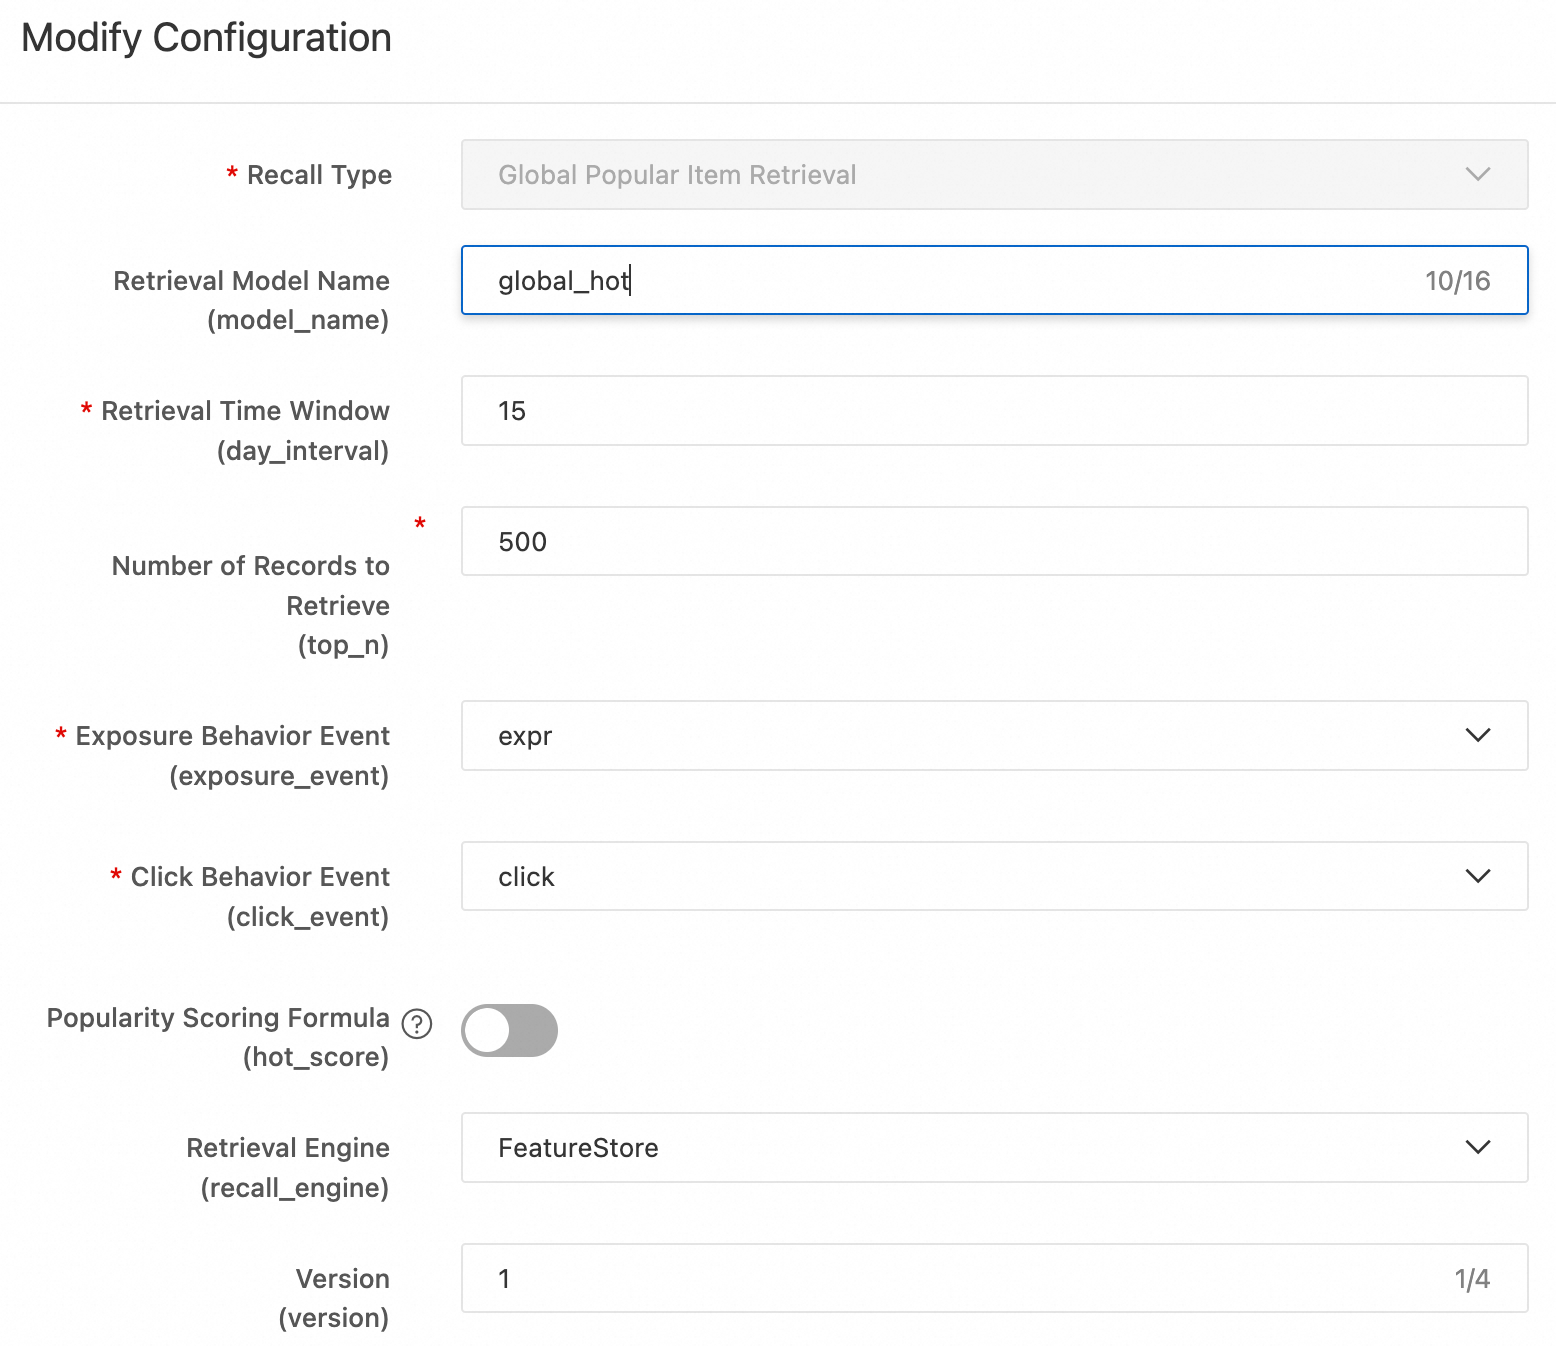
The following sections describe each recall method. For a quick deployment, configure only Global hot recall and etrec u2i recall. The remaining methods are for reference. #### Global hot recall Global hot recall generates a ranked list of popular items (
top_nitems) based on click event statistics. After deploying the code to DataWorks, you can modify the scoring formula or the target event. The scoring formula is:Global hot recall
Global hot recall generates a ranked list of popular items (
top_nitems) based on click event statistics. After deploying the code to DataWorks, you can modify the scoring formula or the target event.The scoring formula is:
click_uv * click_uv / (expr + adj_factor) * exp(-item_publish_days / fresh_decay_denom)Where:
-
click_uv: For the same click-through rate (CTR), more clicks indicates higher popularity. -
click_uv / (expr + adj_factor): The smoothed CTR.click_uvis the number of unique users who clicked;expris impression count. The adjustment factoradj_factorprevents a zero denominator and corrects CTR when impression count is low. -
exp(-item_publish_days / fresh_decay_denom): A freshness penalty that reduces the score of older items.item_publish_daysis the number of days since publication.
etrec u2i recall
etrec is an item-based collaborative filtering algorithm. See Collaborative filtering etrec for details.
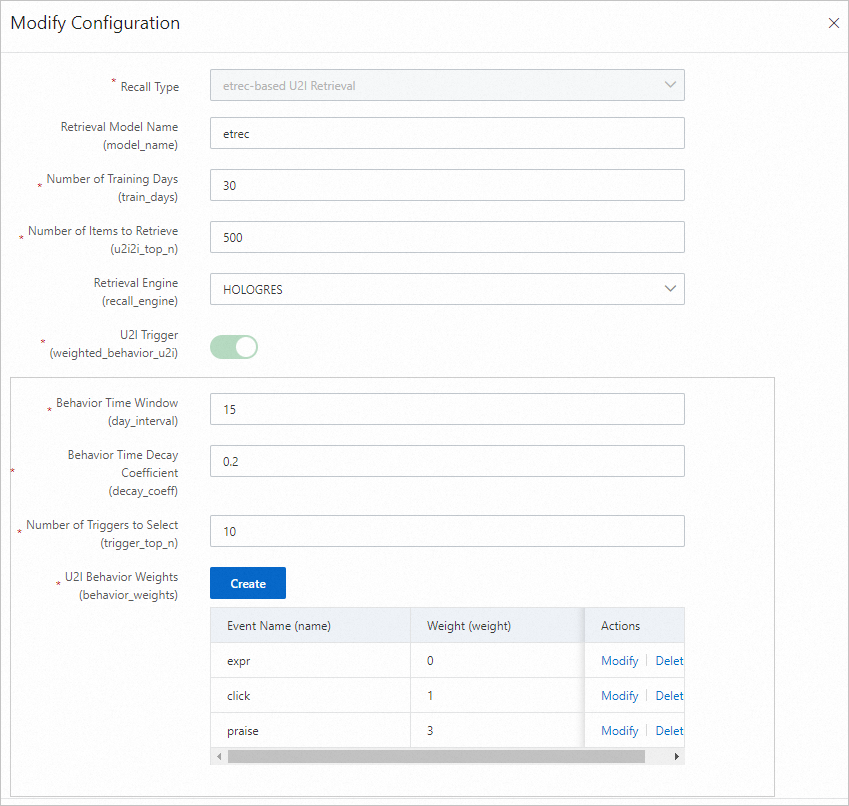
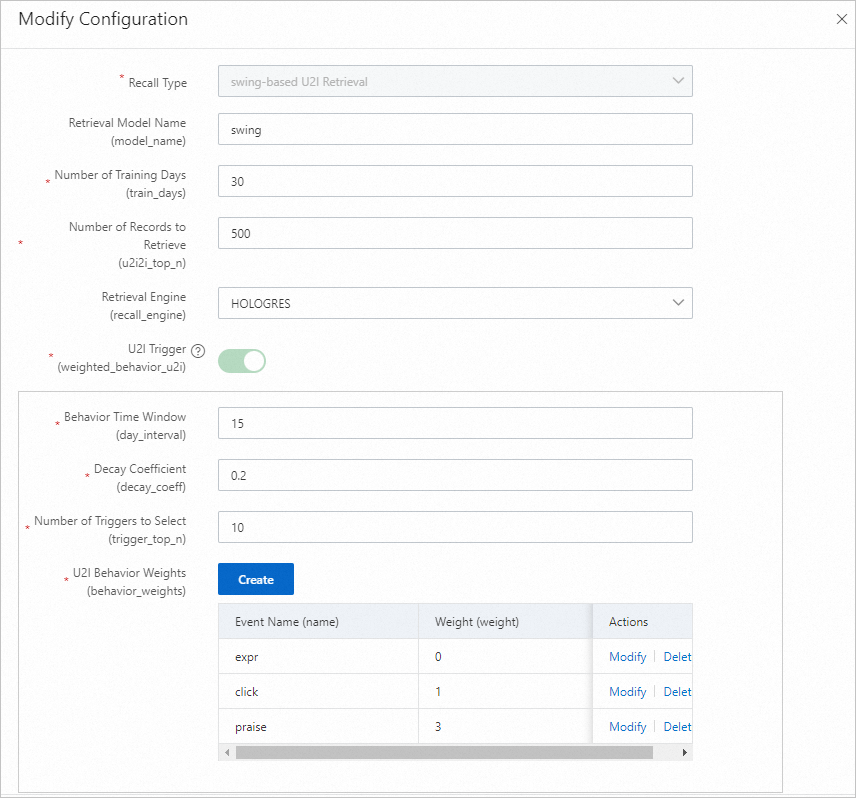
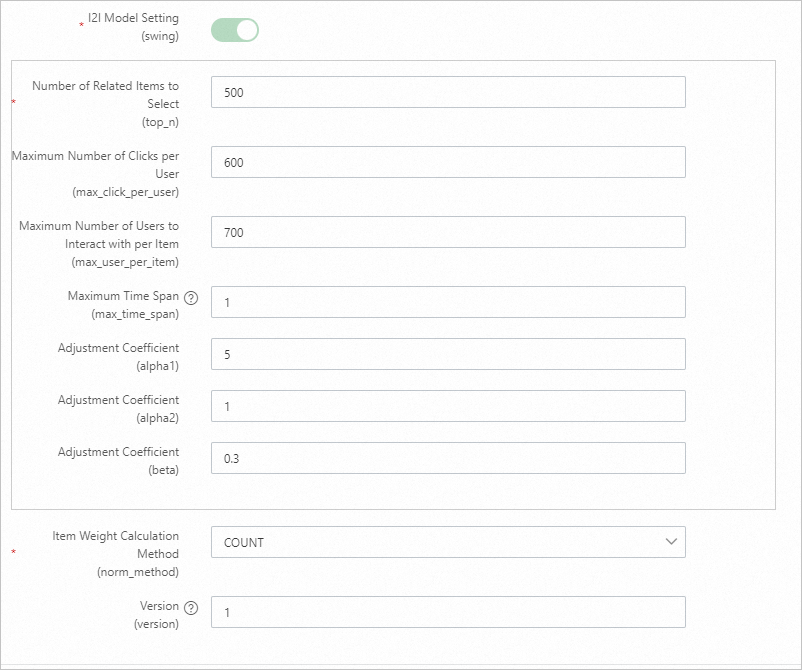
Parameter Description Training days The number of days of behavior logs used for training. Default: 30. Adjust based on log volume. Recall count The final number of user-to-item pairs generated offline. U2ITrigger Items the user has interacted with (for example, clicked, favorited, or purchased). Do not include impression-only items. Behavior time window The number of days of behavior data to collect. Default: 15. Behavior time attenuation coefficient A value between 0 and 1. Higher values cause past behaviors to decay faster, reducing their weight in constructing the trigger item. Trigger selection count The number of item IDs per user used to perform a Cartesian product with the i2i data from etrec. A value between 10 and 50 is typical. Too many triggers result in an oversized candidate set. U2i behavior weight Set the impression event weight to 0 or leave it unset. I2I model settings etrec model parameters. See Collaborative filtering etrec. Avoid setting the number of related item selections too high. 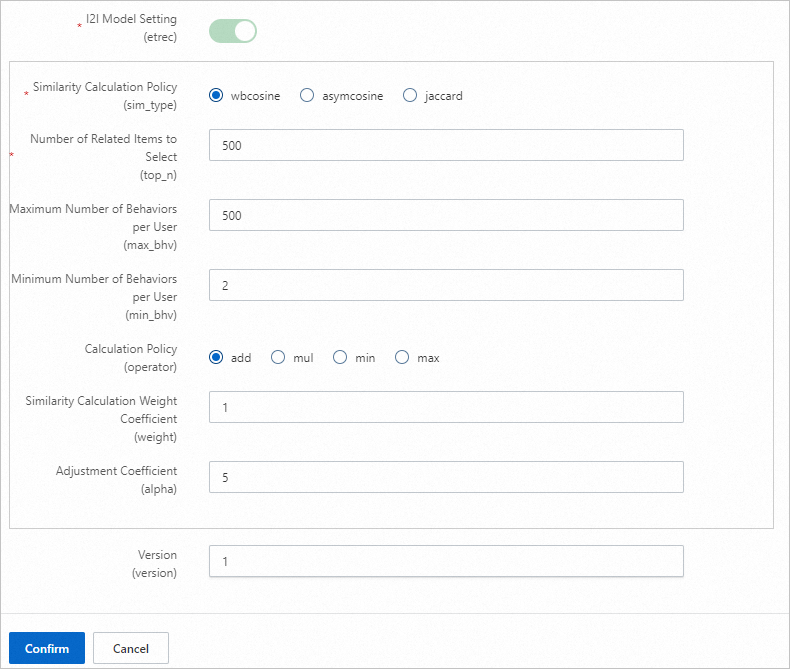
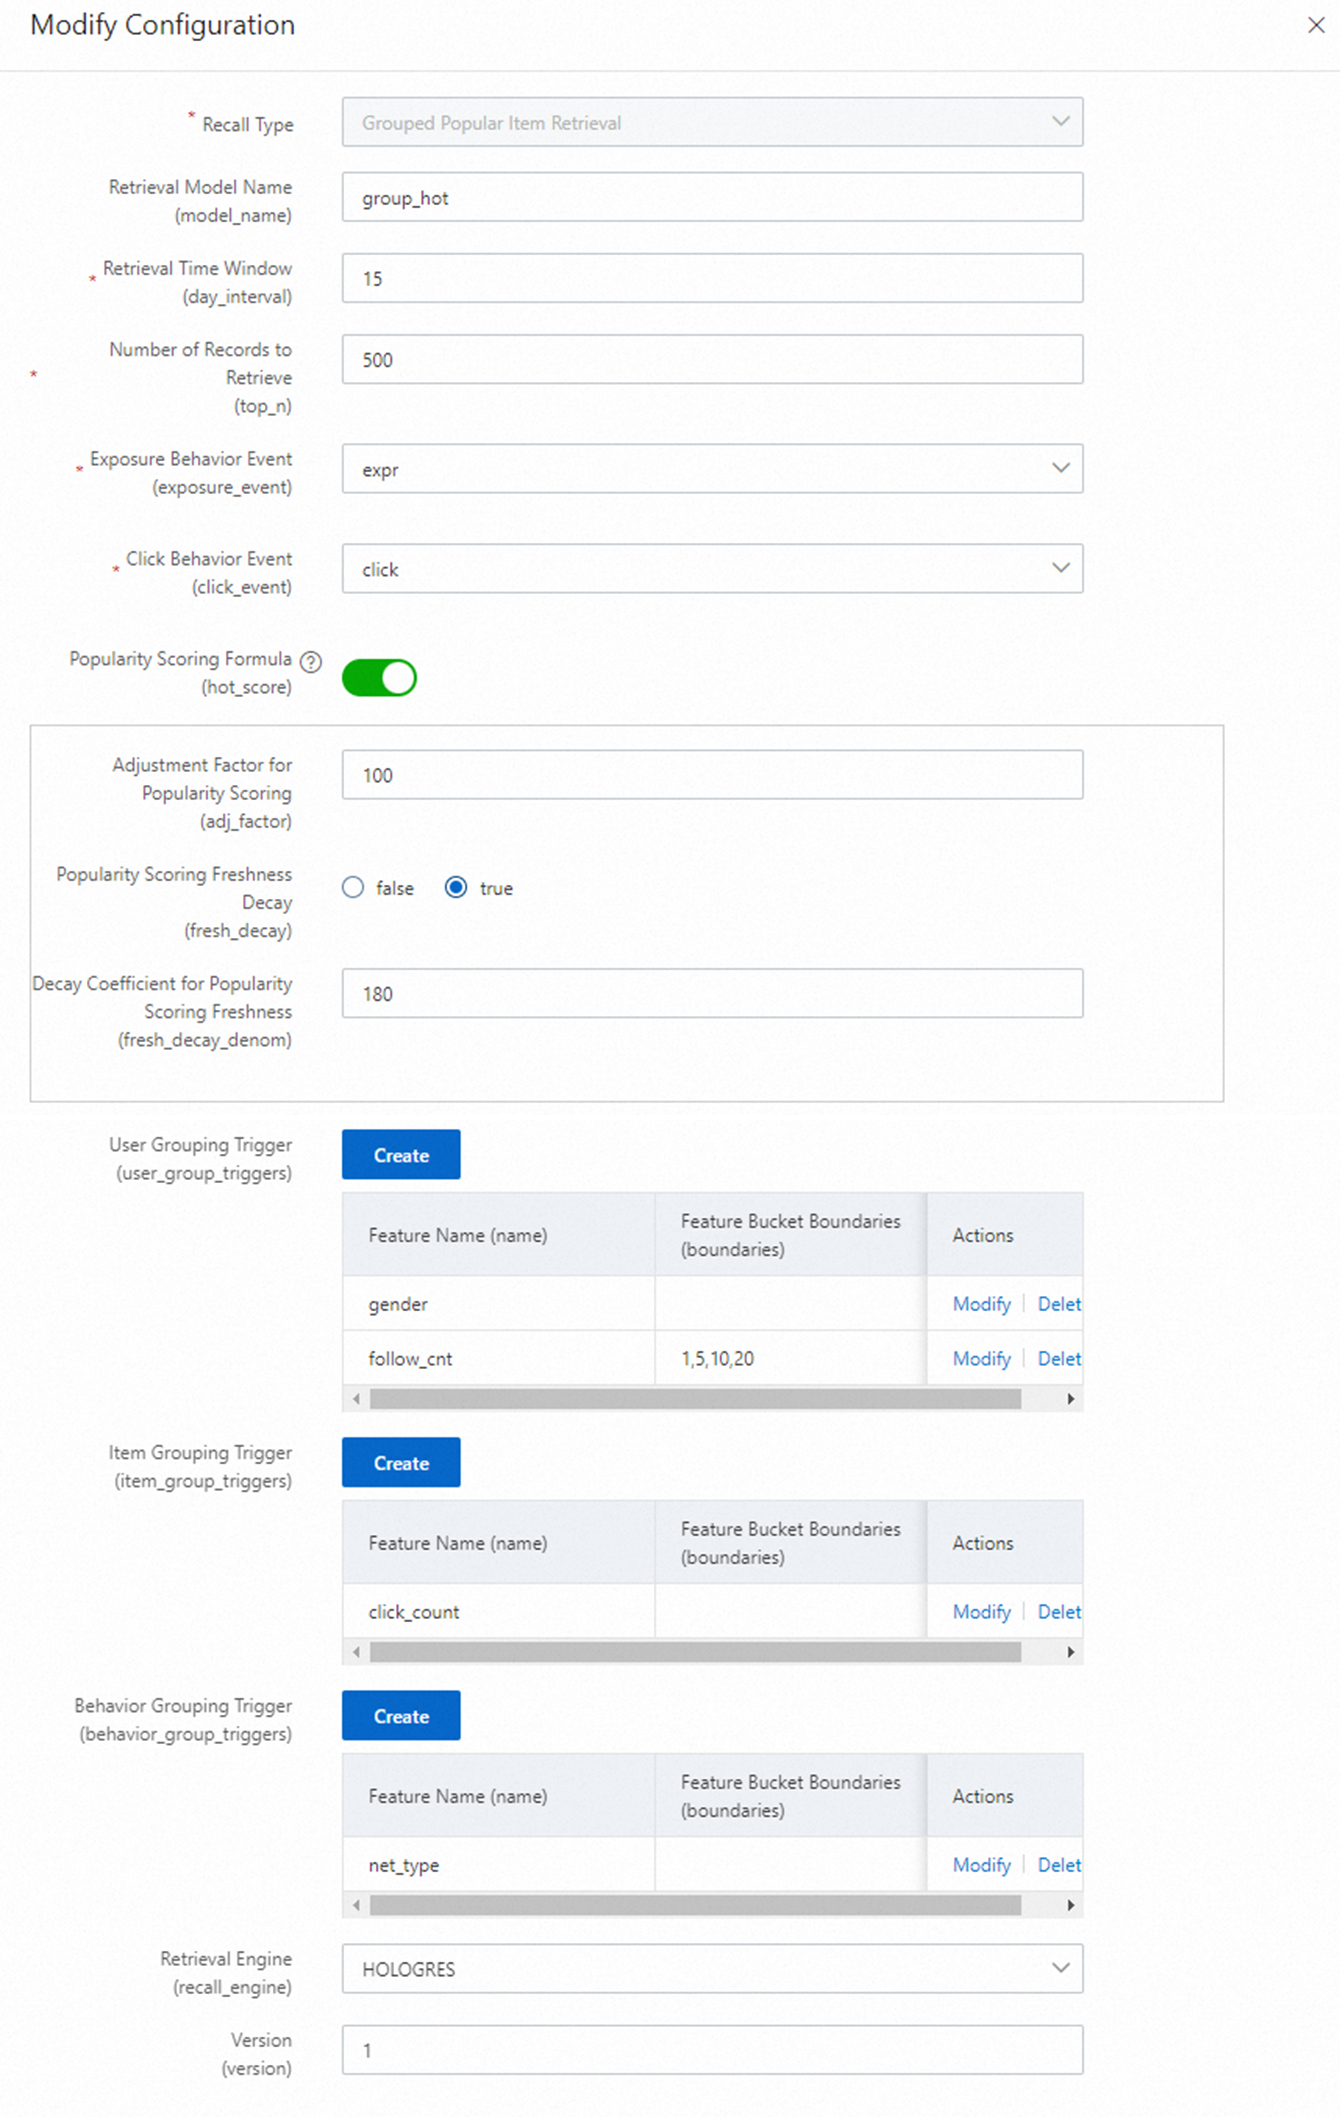
Grouped hot recall
Set up rankings by attribute groups (for example, city and gender) to provide initial personalization. The following example uses a combination of gender and the bucketed value of a numerical attribute as the group.
Swing u2i recall
Swing measures item similarity based on the User-Item-User principle.
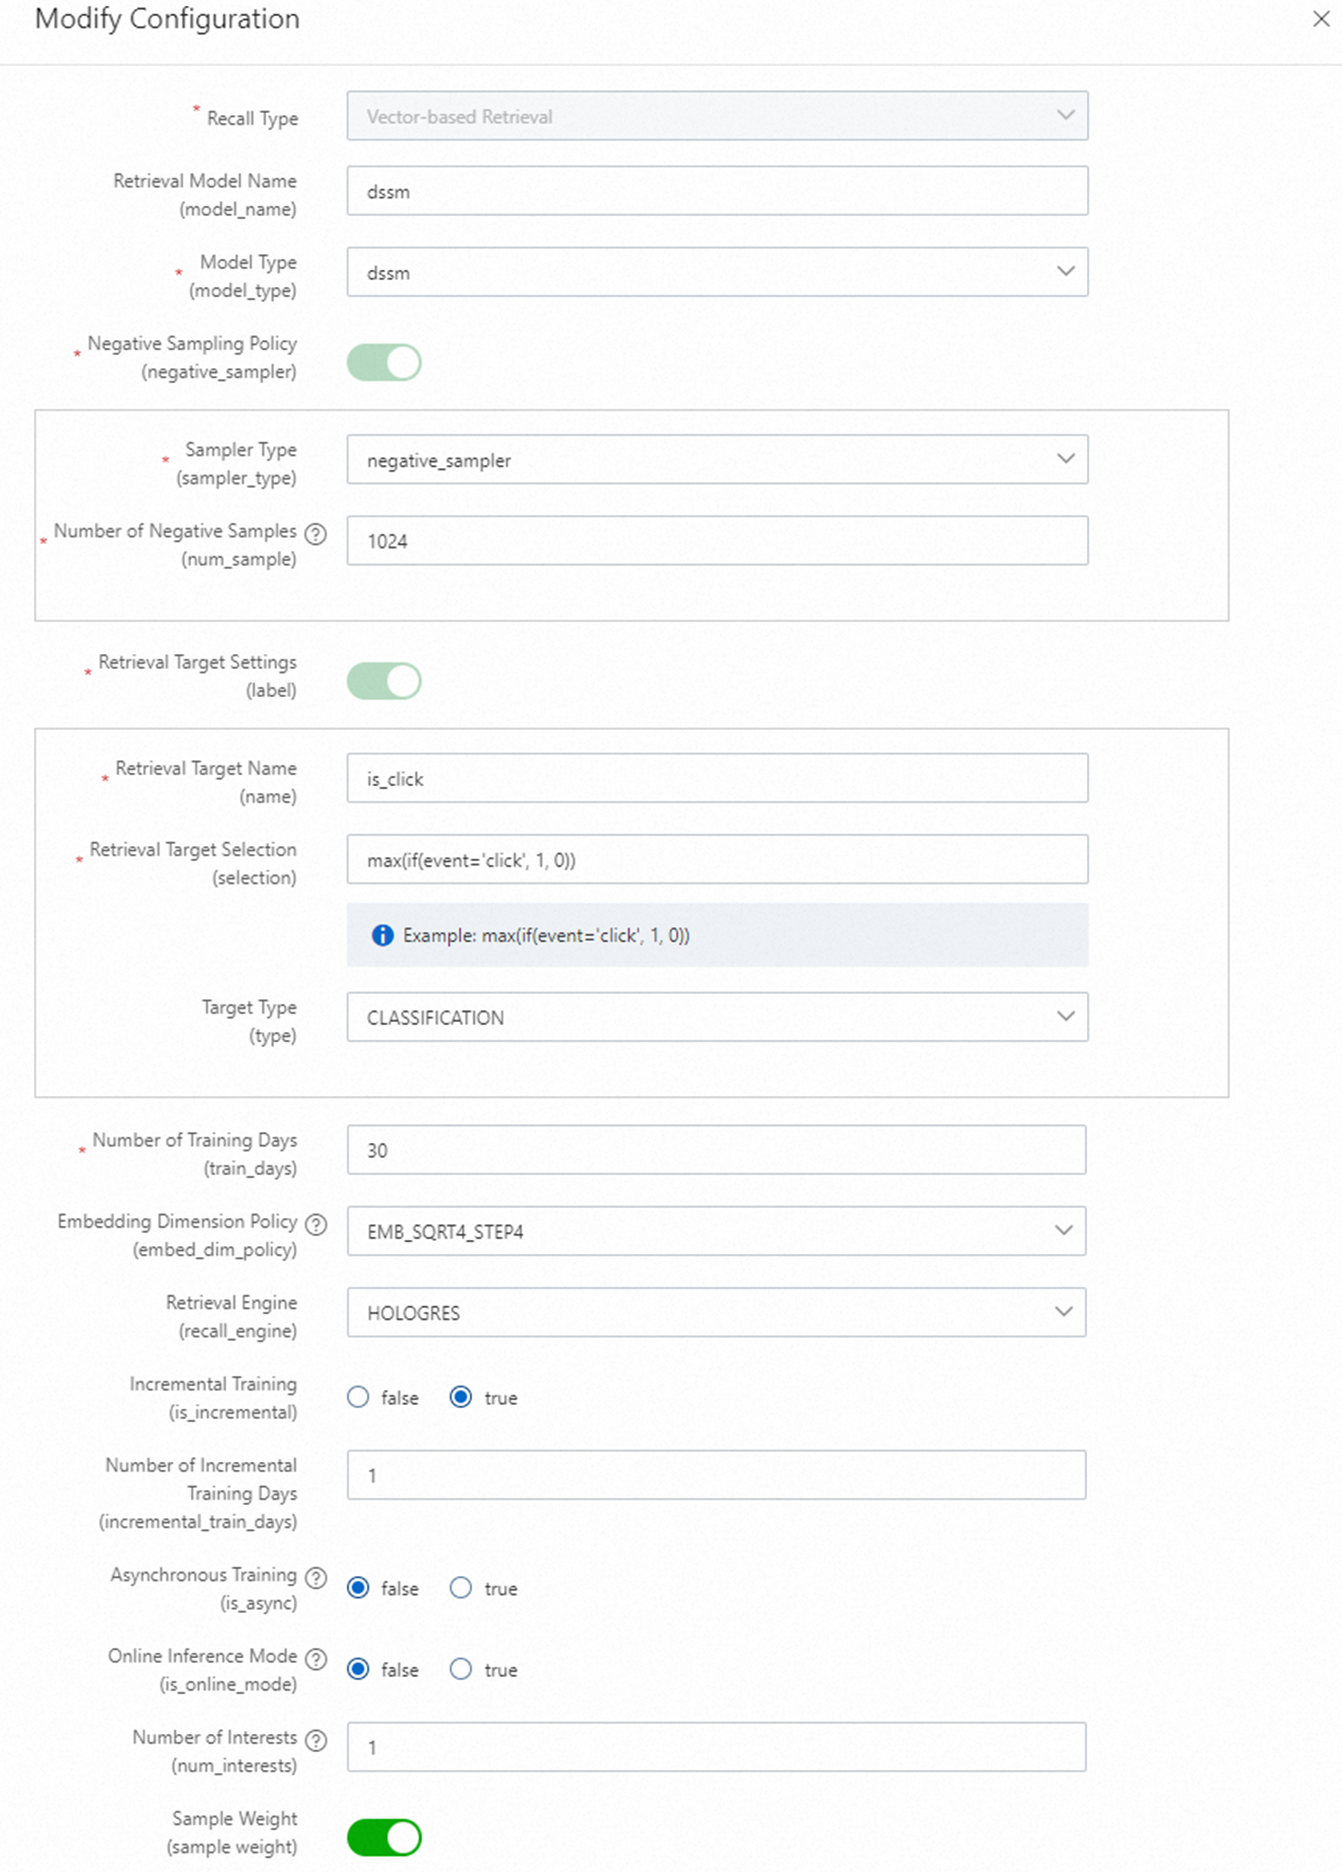
Vector recall
Two vector recall methods are available: DSSM and MIND.
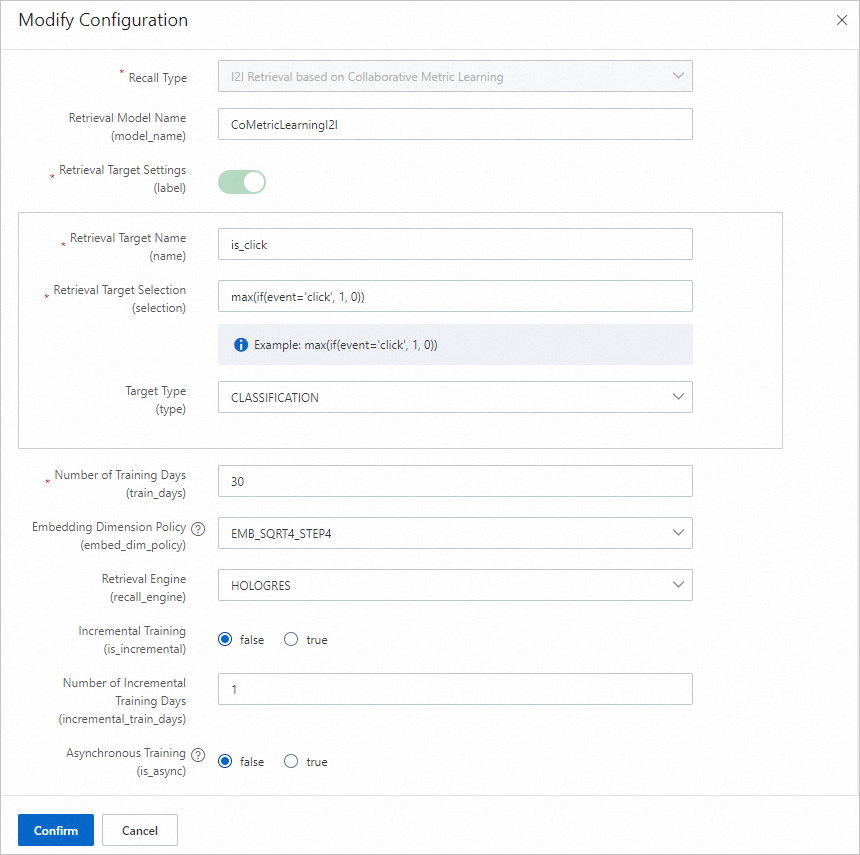
Set the recall target as follows:
-
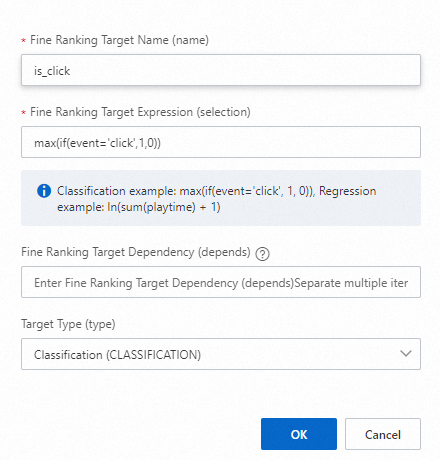
Recall target name:
is_click -
Recall target selection:
max(if(event='click', 1, 0))
The following SQL generates the recall target:
select max(if(event='click',1,0)) is_click, ...
from ${behavior_table}
where dt between ${bizdate_start} and ${bizdate_end}
group by req_id, user_id, item
Where:
-
${behavior_table}: The behavior table. -
${bizdate_start}: The start date of the behavior time window. -
event: The event field in the behavior table. Select the value based on your specific field. -
is_click: The target name.
Embedding dimension formulas:
EMB_SQRT4_STEP8: (8 + Pow(count, 0.25)) / 8) * 8
EMB_SQRT4_STEP4: (4 + Pow(count, 0.25)) / 4) * 4
EMB_LN_STEP8:    (8 + Log(count + 1)) / 8) * 8
EMB_LN_STEP4:    (4 + Log(count + 1)) / 4) * 4
Use the Log function when the number of feature values is large.

Cold-start recall
DropoutNet is a dual-tower recall model (user tower + item tower) suitable for head users and items, as well as long-tail and brand-new users and items. See DropoutNet.

Global hot fallback recall
Global hot fallback recall serves as a safety net: if the primary recall engine fails, it returns a pre-computed candidate set stored in Redis. Its output is a single row of data.
Collaborative metric learning i2i recall
The Collaborative Metric Learning I2I recall model calculates item similarity based on session click data.
-
-
At the Ranking configuration node, click Add next to Fine-grained ranking, configure the parameters, click Confirm, and then click Next.
PAI-Rec supports multiple ranking models. See Ranking models for the full list. The following shows how to configure DBMTL, a multi-objective ranking model.
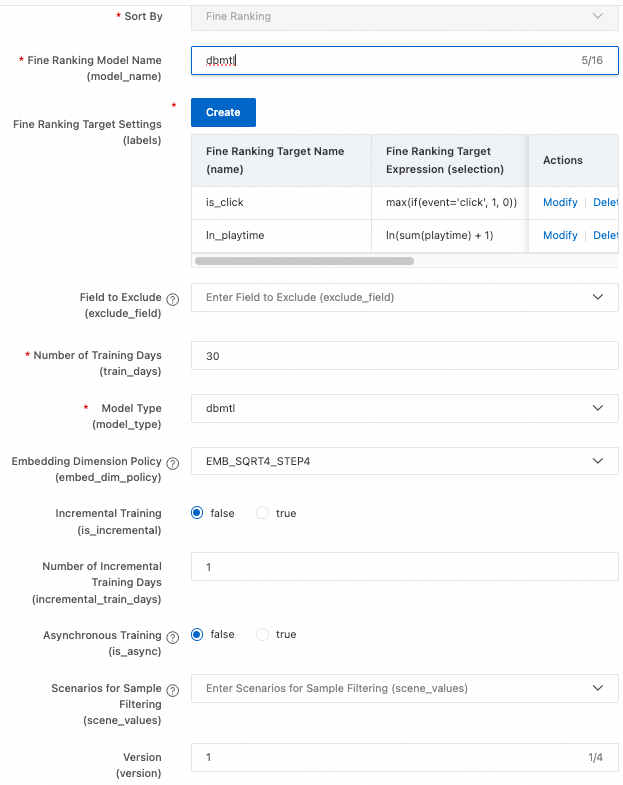
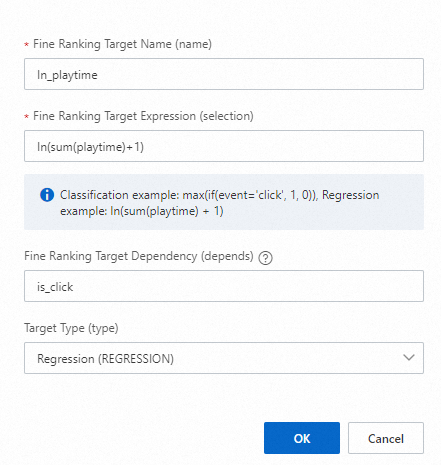
Click Add next to Refined ranking target settings (labels) and add two labels:
-
Target 1
-
Target 2 (the 'l' in 'ln' is a lowercase L)
-
-
At the Generate script node, click Generate deployment script.
ImportantAfter the script is generated, the system produces an OSS address where all deployment files are stored. Save this address locally — you will need it if you deploy manually via Migration Assistant.
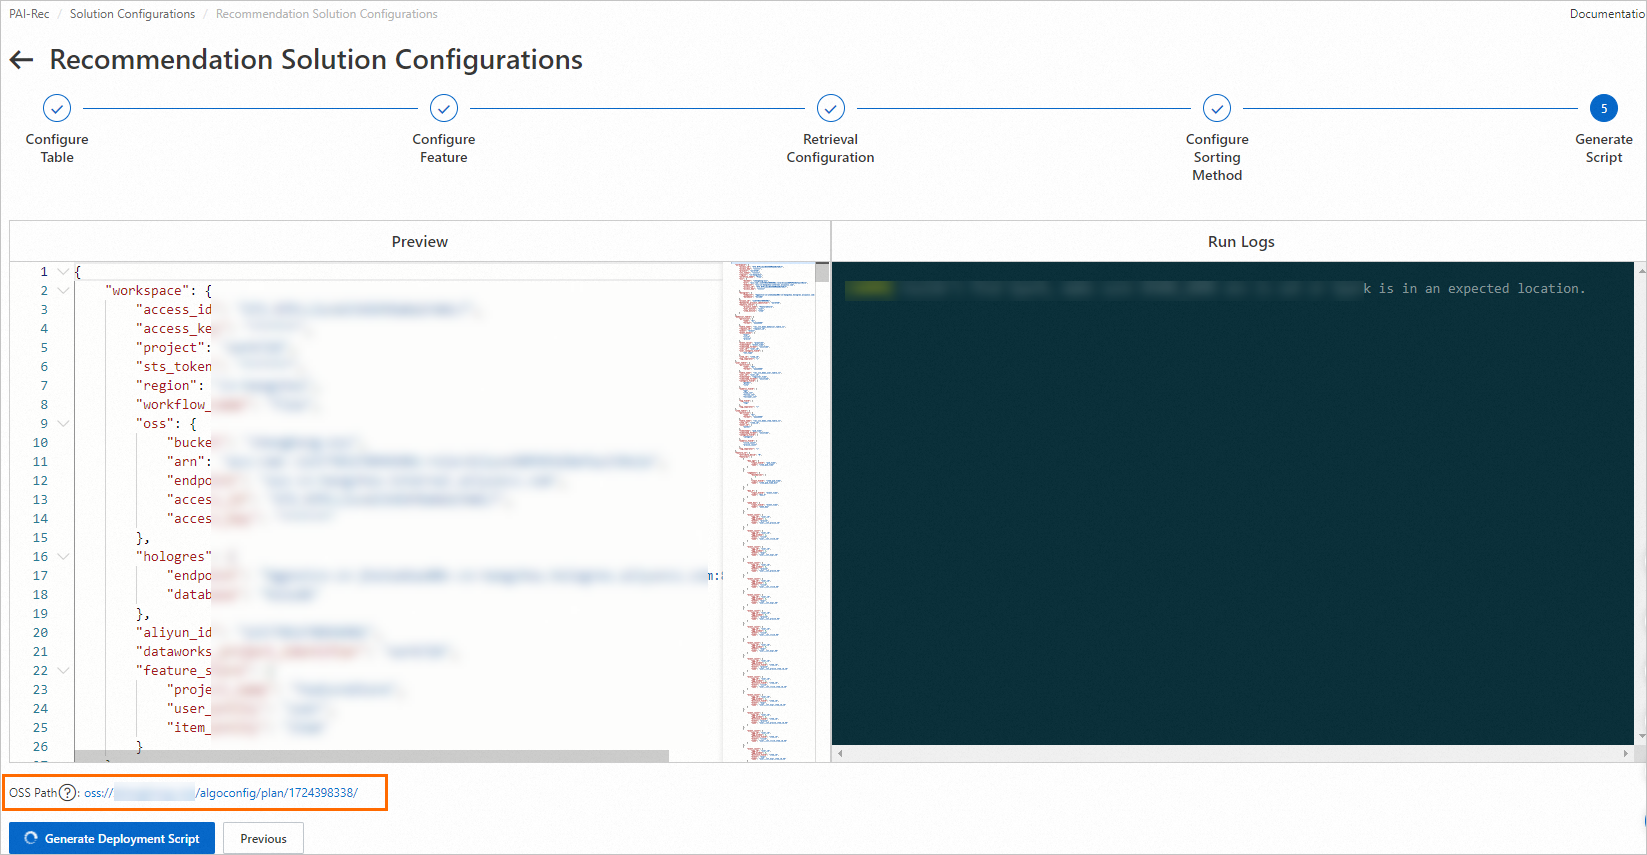
-
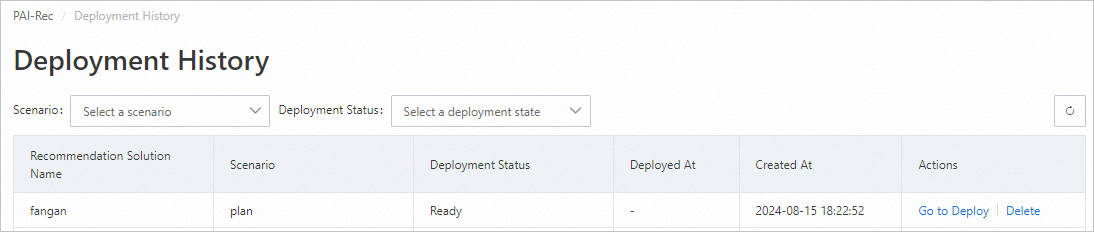
After script generation completes, click OK in the dialog box. You are redirected to Custom recommendation solution > Deployment records. If generation fails, review the run logs, resolve the error, and regenerate the script.
Step 6: Deploy the recommendation solution
After the script is generated, deploy it to DataWorks using one of two methods.
Method 1: Deploy through the Personalized Recommendation Platform
-
Click Go to deploy next to the target solution.
-
On the Deployment preview page, in the File diff section, select the files to deploy. For the first deployment, click Select all, then click Deploy to DataWorks. The page returns to Deployment records, showing deployment in progress.

-
Click
 to refresh the list and check the deployment status.
-
If deployment fails, click View log in the Actions column, resolve the error, then regenerate and redeploy the script.
-
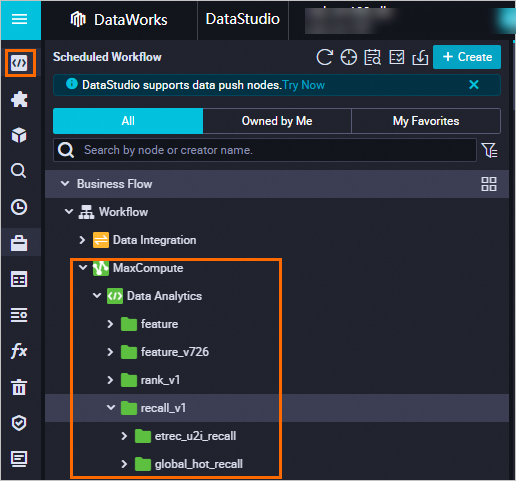
When Deployment status changes to Success, the script is deployed. Go to the DataWorks Data development page to view the deployed code. See Data development process guide.
-
-
Run the data backfill to populate historical data for training.
-
On the Deployment records page, click Details next to the successfully deployed solution.
-
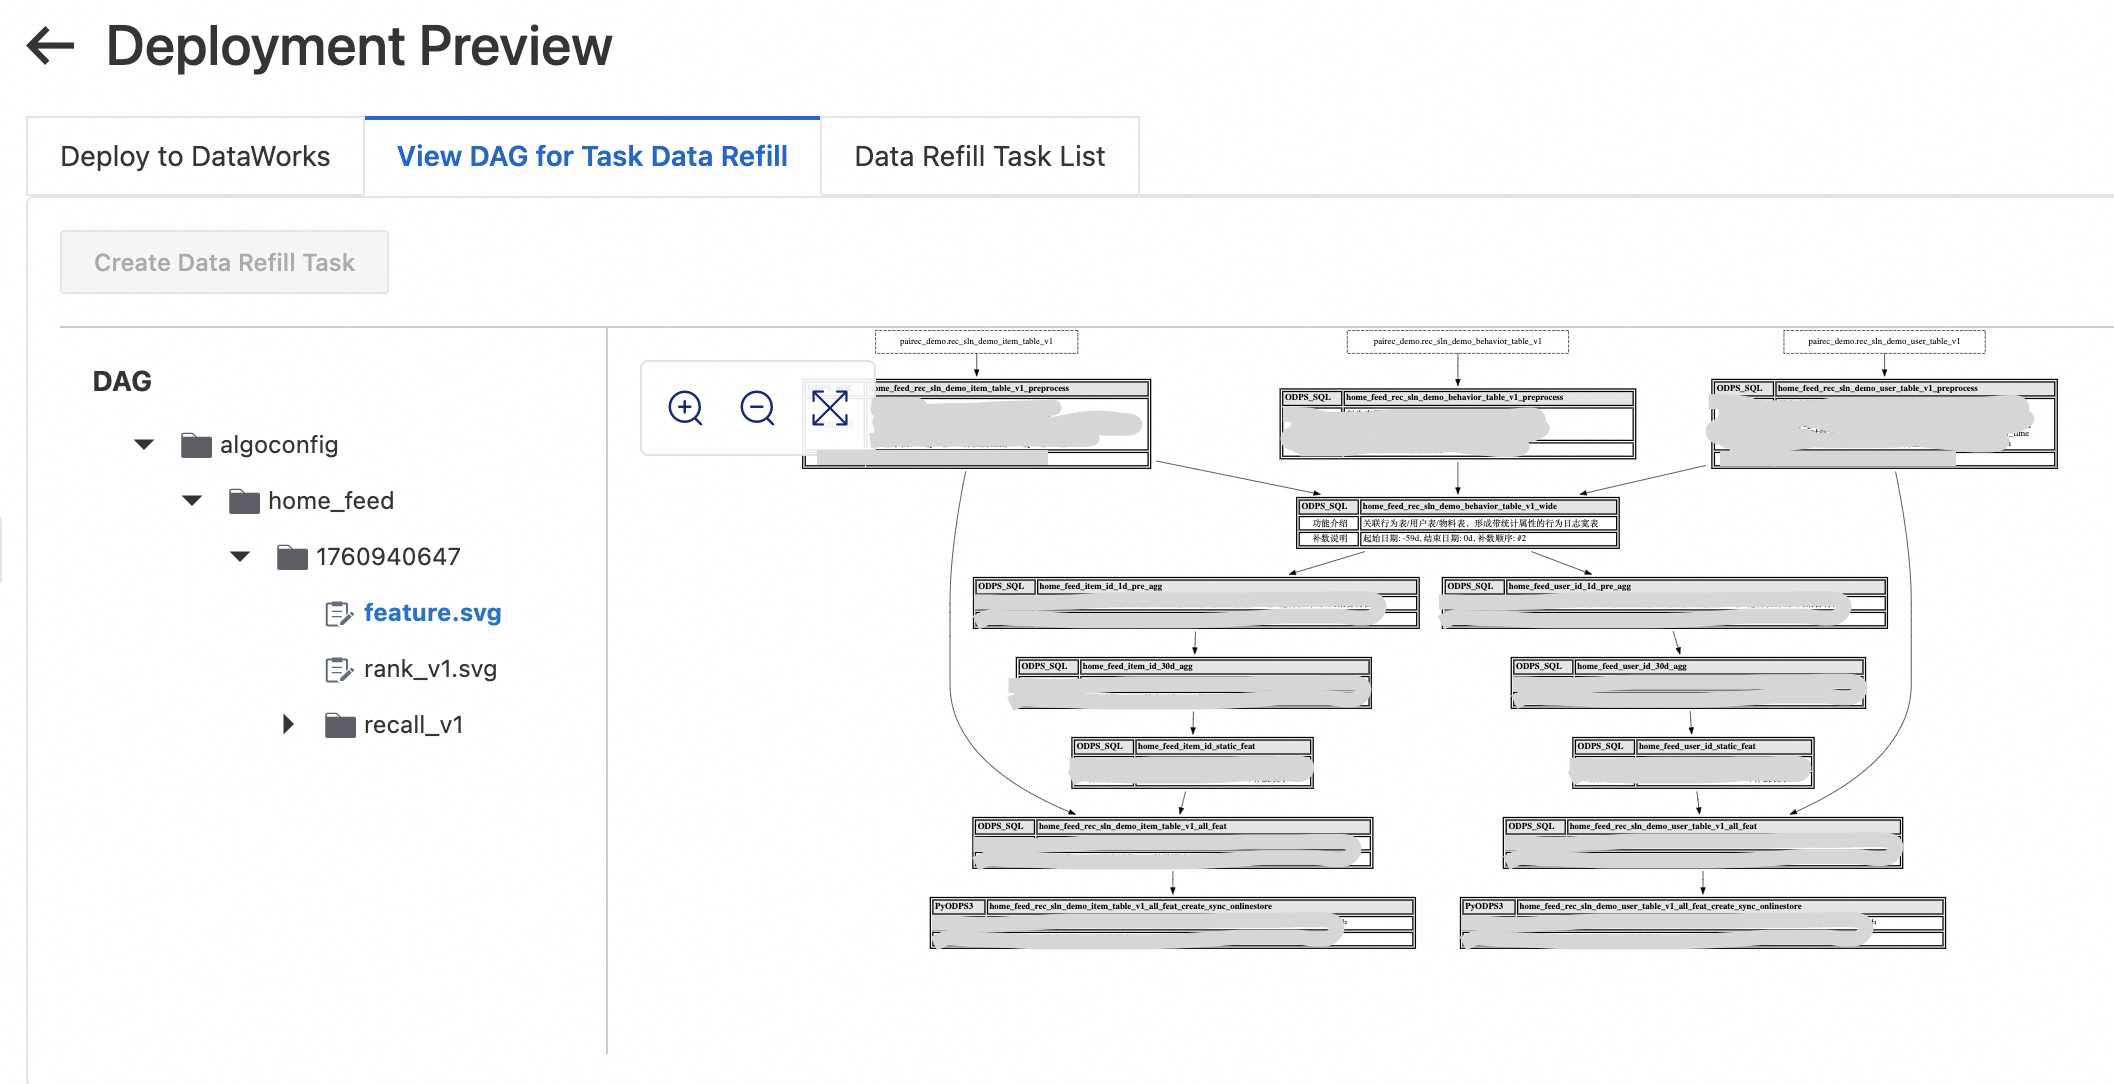
On the Deployment preview page, click View task data backfill process to review the backfill instructions and ensure data integrity.
-
Confirm that the user table, item table, and behavior table all contain data for the last _n_ days, where _n_ equals the sum of the training time window and the maximum feature time window. If you are using the demo data from this tutorial, sync the latest data partitions. If you generated data with the Python script, backfill via the DataWorks Operation center.
-
Click Create deployment task. Under Backfill task list, click Start tasks sequentially. Wait for all tasks to complete successfully. If a task fails, click Details to view the log, resolve the error, rerun the task, and then click Continue to proceed.
-
Method 2: Deploy using Migration Assistant
After the script is generated, deploy it manually through the DataWorks Migration Assistant. For full instructions, see Create and view a DataWorks import task. The key parameters are:
-
Import name: Set as prompted in the console.
-
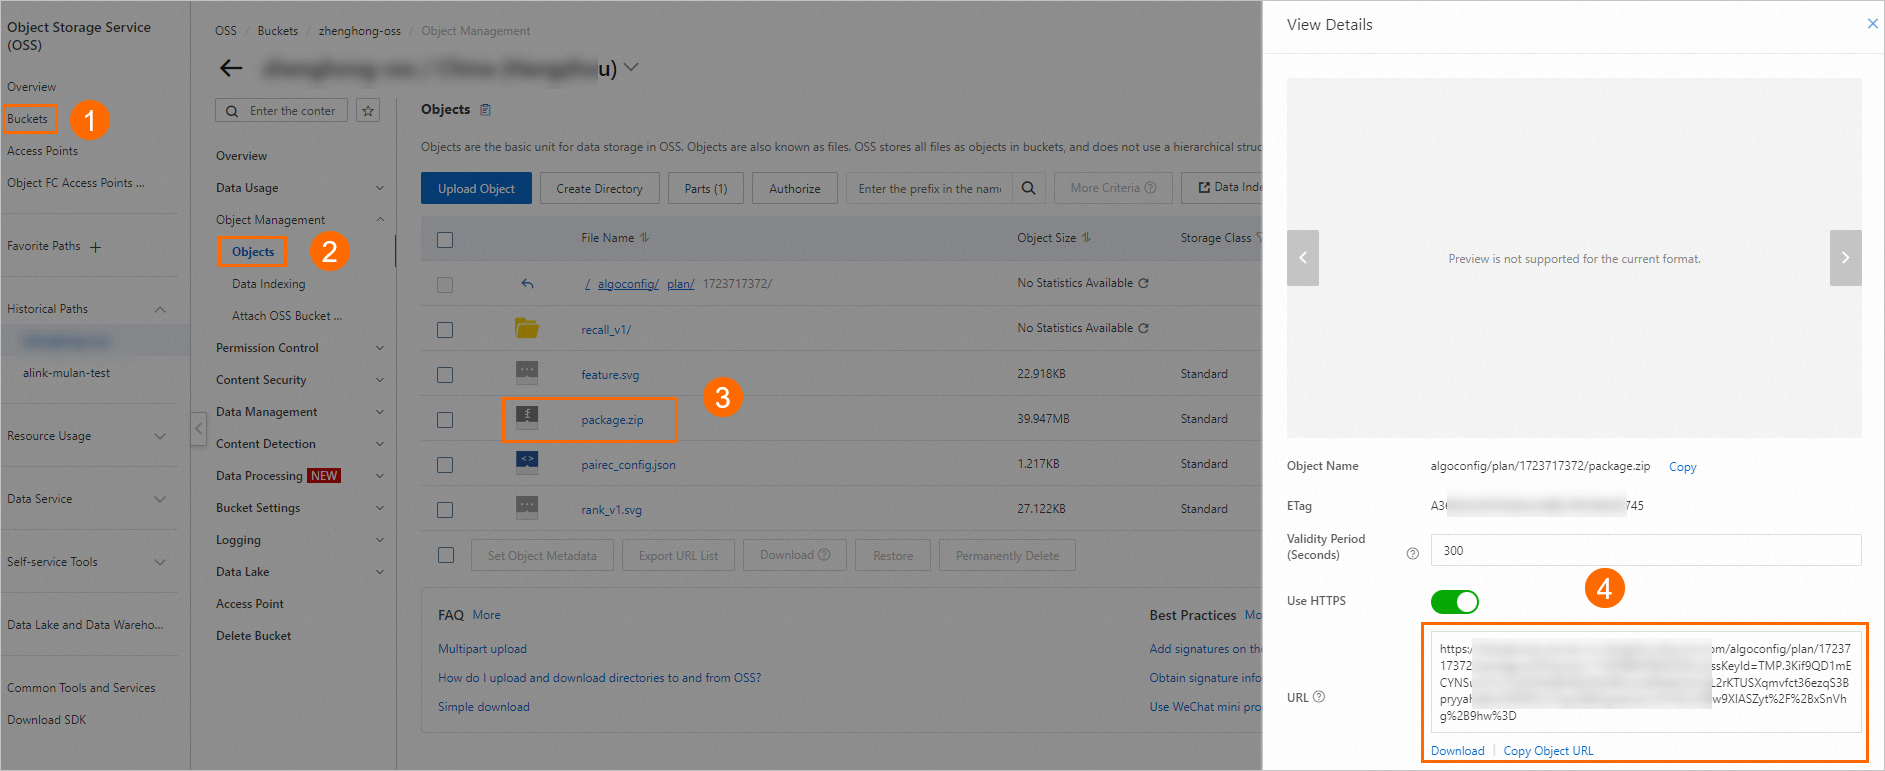
Upload method: Select OSS file, enter the OSS link from Step 5, and click Verify.
The deployment package is stored at the OSS address generated in Step 5, for example: oss://examplebucket/algoconfig/plan/1723717372/package.zip. Log on to the OSS console to retrieve the file URL.
Step 7: Freeze nodes
This tutorial uses demo data. After the data backfill completes, freeze the three virtual nodes created in Step 2 to prevent them from running on a daily schedule.
In the DataWorks Operation center, choose Periodic task O&M > Periodic tasks. Search for the node names (for example, rec_sln_demo_user_table_v1), select the target node (Workspace.Node name), and choose Pause (Freeze).