This page walks you through creating a PolarDB for MySQL cluster on the PolarDB cluster purchase page.
If you already have an ApsaraDB RDS for MySQL instance, you can migrate or clone it directly into PolarDB rather than starting from scratch. See Creation method for details.
Prerequisites
Before you begin, ensure that you have:
A registered and active Alibaba Cloud account
Configure basic settings
Go to the PolarDB cluster purchase page and configure the following parameters.
Billing method
| Billing method | How it works | Choose when |
|---|---|---|
| Subscription | Pay upfront for a fixed period. Longer commitments get steeper discounts. | Your workload is stable and predictable over months or years. |
| Pay-as-you-go | Pay for actual usage after the fact, with no upfront commitment. | Your resource needs fluctuate or you want to avoid long-term commitment. |
| [Serverless](https://www.alibabacloud.com/help/en/polardb/polardb-for-mysql/user-guide/serverless-overview) | PolarDB auto-scales compute resources based on actual workload. No need to select or reserve fixed capacity. | Your workload is unpredictable or spiky, or you want to minimize idle capacity costs. |
You can switch between Subscription and Pay-as-you-go after purchase. You cannot convert a Serverless cluster to another billing method. For a full comparison, see Billing methods.
Region
Select the region closest to your users. Create the cluster in the same region as your Elastic Compute Service (ECS) instance — clusters and ECS instances in different regions cannot communicate over the internal network and must use the public internet, which reduces performance.
You cannot change the region after purchase.
Creation method
| Method | Description |
|---|---|
| Create primary cluster (default) | Creates a new standalone PolarDB cluster. |
| Create secondary cluster | Adds a secondary cluster to an existing global database network (GDN). Create a GDN first. |
| Upgrade/Migrate from PolarDB | Replicates data from a source PolarDB cluster (full copy + incremental sync) to perform a major version upgrade between different engine versions or editions. See Major version upgrades. |
| Migrate from RDS | Migrates an ApsaraDB RDS for MySQL instance to a new PolarDB cluster, automatically syncing accounts, databases, IP whitelists, and parameters. You can also choose to retain the original database endpoint to simplify migration and ensure smooth business transition. Read-only instances and non-InnoDB instances are not eligible. See Migrate from RDS. |
| Clone from RDS | Creates an exact replica of an RDS instance. Incremental data written to the RDS instance after the clone point is not synced. Read-only instances and non-InnoDB instances are not eligible. See Clone from RDS. |
| Restore from recycle bin | Restores a deleted cluster from backup sets retained in the cluster recycle bin. If the original cluster used X-Engine, set Storage engine to InnoDB & X-Engine to preserve access to X-Engine data. |
Database engine
Select the MySQL-compatible engine version that matches your application requirements.
| Engine version | MySQL compatibility |
|---|---|
| MySQL 8.0.2 | MySQL 8.0.18 and earlier |
| MySQL 8.0.1 | MySQL 8.0.13 and earlier |
| MySQL 5.7 | MySQL 5.7 |
| MySQL 5.6 | MySQL 5.6 |
Features vary by engine version. See Feature comparison for MySQL 5.6, 5.7, and 8.0.
Edition, series, and compute specifications
PolarDB for MySQL offers two editions with different capability sets and compute options.
Step 1: Choose an edition
| Edition | Series options | CPU architecture | Choose when |
|---|---|---|---|
| Enterprise Edition | Cluster Edition, Multi-master Cluster (Limitless) | x86 only | You need the highest performance, multi-master write capability, or enterprise SLAs. |
| Standard Edition | N/A | x86 or ARM | You want a cost-effective managed MySQL cluster for standard workloads. |
For a full capability comparison, see Feature comparison between Enterprise Edition and Standard Edition.
Step 2: Choose a series (Enterprise Edition only)
Enterprise Edition supports two series:
Cluster Edition: Standard architecture suitable for most production workloads.
Multi-master Cluster (Limitless) Edition: Supports multiple read/write nodes for scenarios requiring distributed write scaling.
For architecture and scenario details, see Enterprise Edition series.
Step 3: Choose a sub-series
| Sub-series | Resource allocation | Choose when |
|---|---|---|
| Dedicated Specification | Each cluster exclusively owns its allocated CPU and compute resources — no sharing with other clusters on the same server. | You need consistent, predictable performance for production or latency-sensitive workloads. |
| General Specification | Clusters share idle CPU resources on the same server, reducing cost through resource reuse. | You want to optimize cost for non-latency-sensitive or development workloads. |
For a detailed comparison, see General Specification vs. Dedicated Specification.
Step 4: Choose a CPU architecture (Standard Edition only)
| Architecture | Processor | Choose when |
|---|---|---|
| x86 | Intel processors with high-performance networking | You need broad software compatibility and proven enterprise stability. |
| ARM | Alibaba Cloud YiTian 710 chips with 25 GE high-speed network cards | You want cost-effective performance for internet or public-sector workloads. |
Step 5: Select a compute node specification
Specifications differ in CPU, memory, maximum storage capacity, and IOPS. Select based on your expected workload.
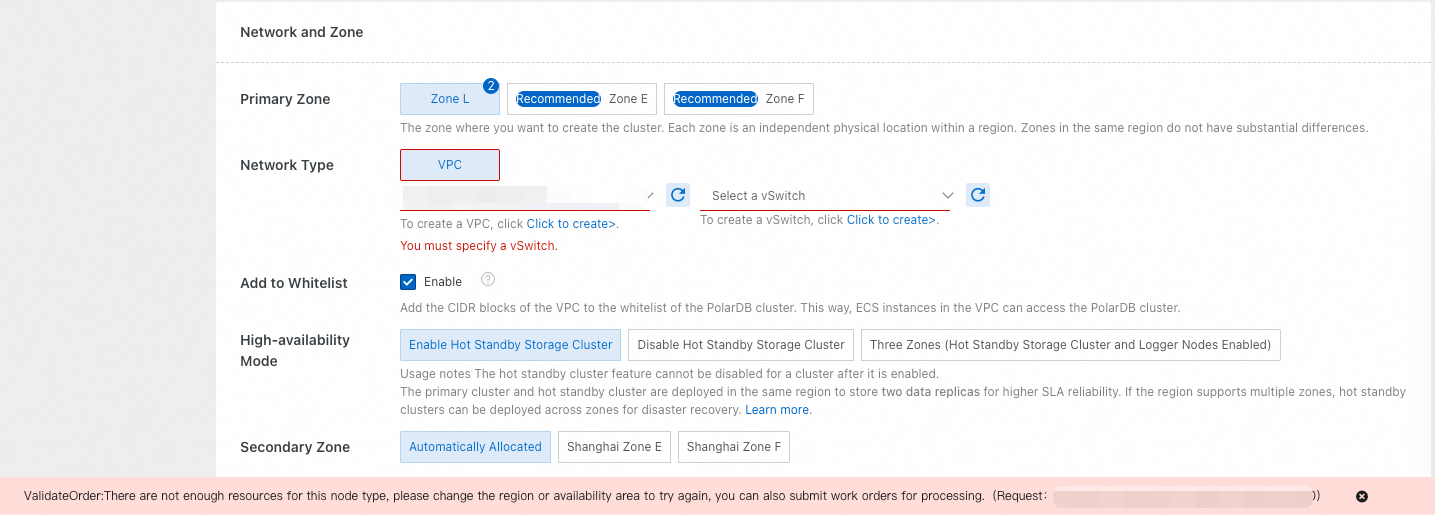
Primary zone and network
| Parameter | Description |
|---|---|
| Primary zone | A zone is a physically isolated area within a region with independent power and network infrastructure. Place your cluster and ECS instance in the same zone or in different zones — there is no functional difference between zones. |
| Network type | Fixed as VPC (Virtual Private Cloud). Select the same VPC as your ECS instance so they can communicate over the internal network. If you have not created a suitable VPC, use the default VPC and vSwitch. To create one, see Create a VPC and vSwitch. |
| Add to whitelist | Enable this option to automatically add the selected VPC's CIDR blocks to the cluster whitelist. This lets ECS instances in the same VPC connect to the cluster immediately after creation, without manual whitelist configuration. |
High-availability mode
When you enable the hot standby storage cluster feature, PolarDB creates a standby storage cluster in a secondary zone or a different data center within the same zone. The standby cluster has independent storage resources and takes over read/write operations automatically if the primary cluster fails.
| Mode | Standby resources | Choose when |
|---|---|---|
| Single zone (hot standby storage cluster disabled) | No standby cluster | Cost is the priority and your application can tolerate brief downtime during zone-level failures. |
| Double zones (hot standby storage cluster enabled) | Independent storage in a secondary zone | You need fast failover with cross-zone storage redundancy. |
| Double zones (hot standby storage and compute clusters enabled) | Independent storage and compute in a secondary zone | You need minimal recovery time and can afford the cost of fully redundant standby compute. |
| Three zones | Across three zones | You require the highest level of availability with protection against two simultaneous zone failures. |
Mode change rules:
To move from Double zones to Single zone: purchase a new cluster and migrate data using Data Transmission Service (DTS). Direct downgrade is not supported.
Three zones can only be selected at purchase time. You cannot switch to or from three zones after the cluster is created.
To move from Single zone to any other mode, see High availability modes (hot standby clusters).
Serverless scaling range (Serverless billing method only)
If you selected Serverless as the billing method, configure the auto-scaling boundaries for the cluster.
| Parameter | Valid values | Notes |
|---|---|---|
| Minimum read-only nodes | 0–15 | Set to 1 or more for high availability. |
| Maximum read-only nodes | 0–15 | Node count scales automatically within this range based on workload. |
| Minimum PCUs per node | 0.25–31 PCUs | One PolarDB Capacity Unit (PCU) equals approximately 1 vCPU core and 2 GB memory. |
| Maximum PCUs per node | 1–32 PCUs | PCUs scale in increments of 0.5 PCU. |
Example: Set minimum to 2 PCUs (2 cores, 4 GB) and maximum to 16 PCUs (16 cores, 32 GB). The cluster starts at 2 PCUs and scales up automatically as load increases, capped at 16 PCUs.
Enable Serverless for a fixed-spec cluster
For clusters with a fixed compute specification (Subscription or Pay-as-you-go), you can also enable the Serverless feature to add dynamic elastic scaling on top of the fixed spec. This incurs scale-up fees when the cluster exceeds the fixed spec.
Default Serverless boundaries for fixed-spec clusters:
Maximum: 8 PCUs per node
Minimum: 0 PCUs per node
Maximum read-only nodes: 1
Minimum read-only nodes: 0
Adjust these limits at any time from the cluster details page.
Number of nodes
By default, a cluster has two nodes: one read/write node and one read-only node.
| Node type | Role |
|---|---|
| Read/write node | The primary node — handles all write operations and some read operations. Works with read-only nodes in an active-active failover configuration. |
| Read-only node | Offloads read traffic from the primary node. Add or remove read-only nodes after creation. |
| Read-only column store node | A specialized node for In-Memory Column Index (IMCI). After you add a read-only IMCI node and add columnstore indexes, OLAP queries automatically route to the column store node instead of the primary node — enabling real-time transaction processing and analytics on the same cluster. |
Usage notes:
Only Multi-master Cluster (Limitless) Edition supports multiple read/write nodes. All other series support exactly one read/write node.
To create a single-node cluster, set read-only nodes to 0 at purchase time. (The single-node series is discontinued but this configuration achieves the same result.)
If you set read-only nodes to 1 or more at purchase, you cannot reduce to 0 afterward. To change to a zero-read-only-node setup, purchase a new cluster and migrate data using DTS or the major version upgrade feature.
Database proxy specification (Standard Edition only)
Standard Edition clusters include a database proxy. Select the proxy size based on your sub-series:
General Specification → Standard Enterprise Edition proxy
Dedicated Specification → Dedicated Enterprise Edition proxy
Proxy options range from 4 vCPUs to 16 vCPUs. Automatic matching selects the optimal size for your cluster specification.
Storage type
| Storage type | Description | Best for |
|---|---|---|
| ESSD (Standard Edition only) | Ultra-high performance cloud disks with 25 GE networking and Remote Direct Memory Access (RDMA). Single-disk IOPS up to 1,000,000. | Workloads requiring extreme I/O performance. |
| PSL5 | PolarDB's high-performance storage class. Default for clusters purchased before June 7, 2022. | Core business systems — finance, e-commerce, government, and large-scale internet applications. |
| PSL4 | Uses Alibaba Cloud's smart-SSD technology to compress and decompress data at the physical SSD layer, reducing storage cost per unit. | Cost-sensitive workloads where lower storage cost matters more than maximum performance. |
ESSD performance levels (Standard Edition):
| Level | Relative performance |
|---|---|
| PL0 | Base level |
| PL1 | ~5x higher IOPS and ~2x higher throughput vs. PL0 |
| PL2 | ~2x higher IOPS and throughput vs. PL1 |
| PL3 | Up to 10x higher IOPS and 5x higher throughput vs. PL2 — for scenarios requiring extreme concurrent I/O with stable low latency |
| ESSD AutoPL | Decouples IOPS from capacity for flexible, on-demand configuration |
When an ESSD disk is full, it becomes read-only and locked. To prevent service disruption, enable automatic ESSD storage expansion.
Storage class conversion rules:
PSL4 can be upgraded to PSL5.
PSL5 cannot be downgraded to PSL4. To switch, purchase a new cluster and migrate data using DTS or the major version upgrade feature.
Storage engine
| Option | Description |
|---|---|
| InnoDB | Standard InnoDB engine. |
| InnoDB & High-compression Engine | Hybrid engine combining InnoDB and X-Engine (also referred to as InnoDB & X-Engine). After selection, configure the X-Engine ratio. See X-Engine. |
Storage billing method
| Method | How it works | Available when |
|---|---|---|
| Pay-as-you-go (billed by capacity) | Storage scales automatically as data grows. You pay only for actual used space — no pre-selection required. | Always available |
| Subscription (billed by space) | Prepay for a fixed storage allocation at purchase time. | Billing method is Subscription only |
Storage capacity
Specify the pre-purchased storage size when:
Storage type is ESSD, or
Billing method is Subscription and storage billing method is Subscription (billed by space)
Configure advanced options (optional)
| Parameter | Description |
|---|---|
| Cluster name | A name for the cluster. If left blank, the system generates one. You can change it at any time. Requirements: 2–256 characters; cannot start with http:// or https://. |
| Resource group | Assign the cluster to a resource group under your Alibaba Cloud account for access control and cost management. Each resource can belong to only one group. |
| Parameter template | Apply a system-provided or custom parameter template at creation time. The list shows all templates in the selected region. |
| Time zone | Set the cluster time zone. Default: UTC+08:00. |
| Table name case sensitivity | Controls whether table names are case-sensitive. Default: case-insensitive. If your on-premises database uses case-sensitive table names, select Case-sensitive to ensure consistency during migration. Cannot be changed after cluster creation. |
| Deleting (releasing) a cluster | Controls what happens to backups when the cluster is deleted. Options: Retain last backup (automatic backup before release) (default — last backup kept in the cluster recycle bin, fees apply); Retain all backups (all backups kept, fees apply); Delete all backups (cannot be restored) (permanently deletes all data and backups, no fees). |
| Enable TDE | Enables transparent data encryption (TDE) for the cluster's data files. TDE operates transparently — no application changes required. Performance impact: 5%–10%. After enabling, you must configure a service-linked role and authorize PolarDB to access KMS. TDE cannot be disabled after it is enabled. |
Complete the purchase
On the right side of the page, confirm the cluster configuration and set the purchase quantity.
| Parameter | Description |
|---|---|
| Quantity | Number of clusters to create in one purchase. Maximum 50 per order; 50 total per Alibaba Cloud account. Useful for bulk deployment scenarios such as game server launches. |
| Duration | Subscription period. Available for Subscription billing only. |
| Auto-renewal | Prevents service interruption by automatically renewing before expiration. Available for Subscription billing only. Configure or change this setting in Expenses and Costs. |
Review the cluster configuration, payment amount, and service agreement, then click Buy now.
Verify cluster creation
After purchase, cluster creation takes approximately 10–15 minutes. To find the new cluster:
Go to the PolarDB console.
Confirm the region in the top-left corner matches where you created the cluster.
Check the cluster list. The cluster is ready when its status shows Running.
While the cluster status is Creating, it is not available. Wait until the status changes to Running before connecting.
What's next
FAQ
What should I do if I see "Insufficient resources for the selected node specification in this zone"?
Switch to a different zone. The current zone has run out of capacity for the node specification you selected. Choosing a different zone also reduces the risk of running into resource shortages when scaling the cluster in the future.
API reference
Create and manage clusters programmatically using the following API operations.
| API operation | Description |
|---|---|
| CreateDBCluster | Creates a PolarDB cluster. |
| DescribeDBClusters | Lists all clusters in an account. |
| DescribeDBClusterAttribute | Returns detailed attributes of a specified cluster. |
| DescribeAutoRenewAttribute | Returns the auto-renewal settings for a subscription cluster. |
| ModifyAutoRenewAttribute | Updates the auto-renewal settings for a subscription cluster. |