This topic describes how to mount and access an SMB protocol share using a Windows system.
Prerequisites
An SMB protocol share is created. For more information, see Create a share.
You have created an ECS (Windows) instance. For more information, see Create an ECS instance.
Ensure port 445 is open. SMB protocol shares communicate through port 445. If port 445 is not open, you must add a security group rule for port 445 in the security group of the target ECS instance. For more information, see Using security groups.
A file gateway deployed on Alibaba Cloud can have up to 16 SMB shares. The maximum number of SMB shares supported by different types of gateways varies due to differences in CPU and memory specifications. For more information, see Specifications.
After shares are mounted, the displayed maximum capacity of file systems varies based on the file gateway specifications. For more information, see the recommended file system capacity provided in the Specifications of cloud file gateways table.
Starting from V1.0.35, if no user is configured for an SMB share, a client accesses the SMB share as a public user by default. If you have configured users, you must grant them read and write permissions or read-only permissions before they can access the SMB share. For more information, see Configure an SMB share.
After changing SMB user permissions, run the net use /delete <share path> command to clear client information in the Windows system. Do not restart the client.
Step 1: Prepare the environment
Perform the following steps only once when you first mount each Windows server. Do not repeat them for every mount operation.
For the following system versions, configure the client to allow anonymous access.
For Windows Server 2016 and later, execute the following command.
REG ADD HKEY_LOCAL_MACHINE\SYSTEM\CurrentControlSet\services\LanmanWorkstation\Parameters /f /v AllowInsecureGuestAuth /t REG_DWORD /d 1For Windows Server 2025, also perform the following operations to disable SMB signing:
Open CMD as an administrator and execute the following command:
REG ADD "HKLM\SYSTEM\CurrentControlSet\Services\LanmanWorkstation\Parameters" /v RequireSecuritySignature /t REG_DWORD /d 0 /fRestart the computer for the changes to take effect.
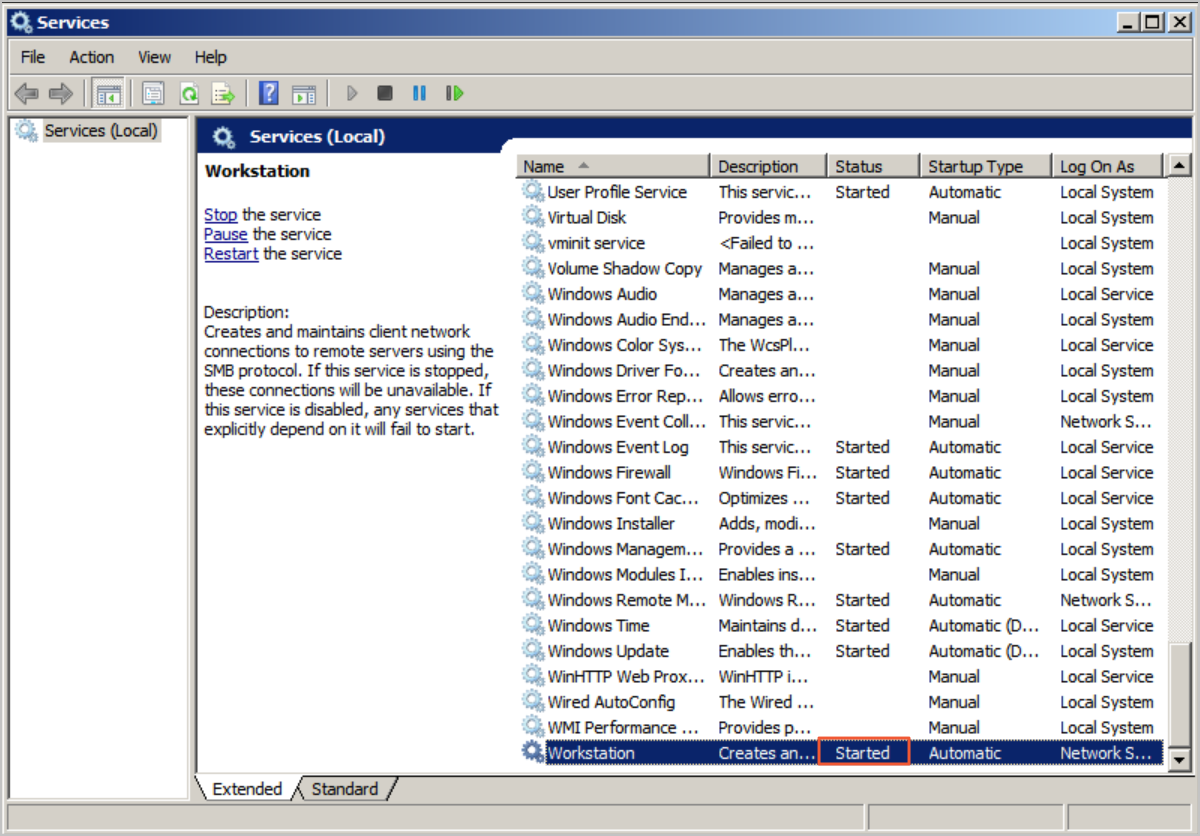
Enable the Workstation service.
Select or use the keyboard shortcut
Win+R. Enterservices.mscto open local services.Find Workstation in Services. Confirm its status is Running and its startup type is Automatic.
Normally, the Workstation service is enabled by default.
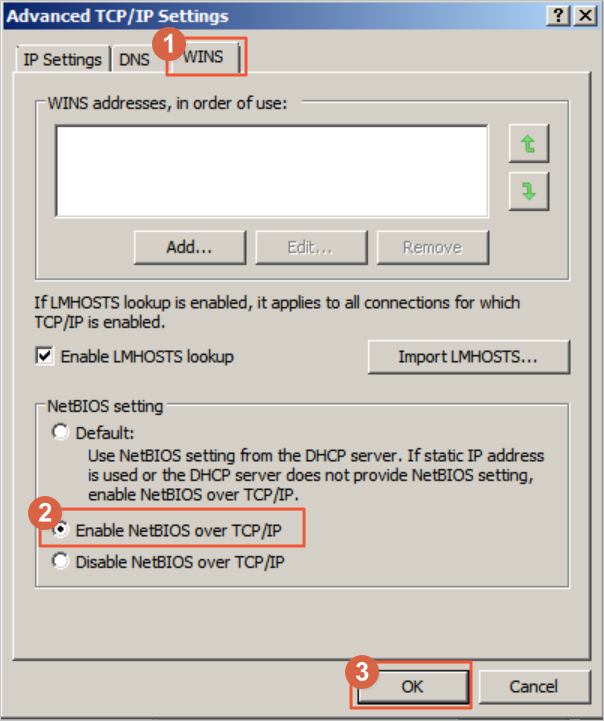
Enable the TCP/IP NetBIOS Helper service.
Open Network And Sharing Center, and click on the network the host is connected to.
Click Properties, double-click Internet Protocol Version 4, and then click Advanced.
In the Advanced TCP/IP Settings dialog box, select .
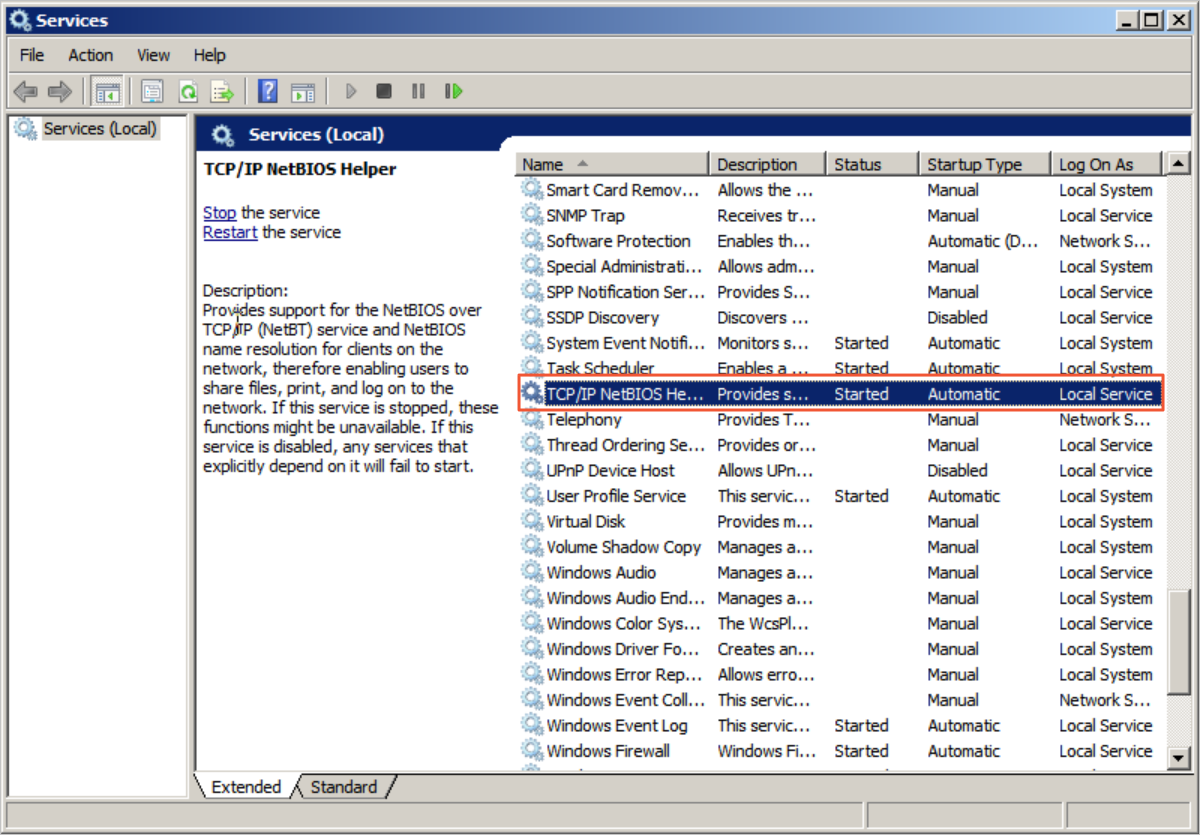
Select or use the keyboard shortcut
Win+R. Enterservices.mscto open local services.Find TCP/IP NetBIOS Helper in Services. Confirm its status is Running and its startup type is Automatic.
Normally, the TCP/IP NetBIOS Helper service is enabled by default.
Step 2: Mount an SMB protocol share
SMB protocol shares support both manual and automatic mount methods. Manual mount is for temporary mounts. Remount the share after each server startup or restart. Automatic mount is for persistent mounts. You do not need to remount the share after each server startup or restart. To prevent mount information loss and ensure visibility of mounted file systems after a server restart, configure automatic mount after a successful manual mount.
Manually mount an SMB share
Open a CMD command line window and execute the following command to mount the SMB share.
net use Z: \\gateway_ip\share_nameParameter
Description
Z
The target drive letter to mount on the current Windows system. If conflicts occur or multiple SMB shares are mounted, assign drive letters in descending alphabetical order.
gateway_ip
The Cloud Storage Gateway IP address. Replace it with the actual value. In the Cloud Storage Gateway console, find the target Cloud Storage Gateway. View the mount target on its Shares page. The default is an IPv4 mount target.
NoteOnly the China (Hohhot) region supports IPv6 mounts. The Virtual Private Cloud (VPC) and vSwitch used by the gateway must support IPv6.
Before using IPv6 mounts, ensure the ECS client has an IPv6 address configured.
If an existing gateway's VPC and vSwitch support IPv6, enable IPv6 in the gateway's operation list. The second row of mount targets will then display the IPv6 mount target by default. Gateways newly created in this VPC support IPv6 by default and do not require explicit enabling.
share_name
The SMB share name.
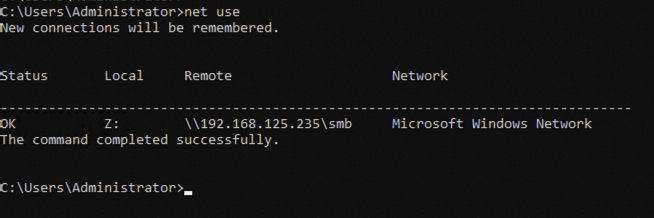
Confirm the SMB protocol share mounted successfully.
Execute the command:
net useExample output
If a command output such as the following example appears, the SMB file system is mounted. After an SMB share is mounted, you can access the SMB share in the same way that you access a local directory. If you have write permissions on the SMB share, you can write data to the SMB share. If you have read-only permissions on the SMB share, you can only read data from the SMB share. For more information, see Manage Shares.
(Optional) Automatically mount an SMB share
Configure the c:\ProgramData\Microsoft\Windows\Start Menu\Programs\StartUp\auto_mount.bat file on your Windows ECS instance to automatically mount SMB protocol shares when ECS restarts.
Open a CMD command line window. Execute the following command to configure the `auto_mount.bat` script.
echo %HOMEPATH%\mount.bat > auto_mount.batExecute the following three commands to configure `auto_mount.bat` to run automatically after a user logs on, and set read and execute permissions for others.
MOVE auto_mount.bat "c:\ProgramData\Microsoft\Windows\Start Menu\Programs\StartUp"icacls "c:\ProgramData\Microsoft\Windows\Start Menu\Programs\StartUp\auto_mount.bat" /grant everyone:rxREG ADD HKEY_LOCAL_MACHINE\Software\Microsoft\Windows\CurrentVersion\Run /f /v MyMount /t REG_SZ /d "c:\ProgramData\Microsoft\Windows\Start Menu\Programs\StartUp\auto_mount.bat"Execute the following command to configure the `mount.bat` script.
Mount without identity verification
For cases that do not require identity verification, use the following command:
echo net use z: \\gateway_ip\share_name > "%HOMEPATH%\mount.bat"Replace the drive letter
z, gateway IPgateway_ip, and share nameshare_namewith actual values.Mount with identity verification
To mount an SMB protocol share using an SMB user, execute the following command to configure the script.
echo net use z: \\gateway_ip\share_name /user:username password > "%HOMEPATH%\mount.bat"Replace the drive letter
z, the gateway IPgateway_ip, the share nameshare_name, the SMB usernameusername, and the SMB user passwordpasswordwith their actual values.To mount an SMB protocol share using a domain user identity other than the Windows logon user identity, execute the following command to configure the script.
echo net use z: \\gateway_ip\share_name /user:username@domain password > "%HOMEPATH%\mount.bat"Replace the drive letter
z, gateway IPgateway_ip, share nameshare_name, domain usernameusername@domain, and domain user passwordpasswordwith actual values.
Restart the ECS server.
After the user logs on again, execute the
net usecommand to verify the mount result.ImportantRestarting the Elastic Compute Service (ECS) instance interrupts services. Restart the ECS instance during off-peak hours.
If you encounter other issues when you mount a share, see Troubleshoot mount failures.
Uninstall a share
Before you perform the uninstall operation, check the upload status of the share. We recommend that you perform the operation when the share is in the Upload Complete state to prevent data loss. For more information, see Why does the sync status of the share always show 'Upload incomplete'?.
In the command line interface, enter the following command:
net use Z: /delNoteHere,
Zis the drive letter. Replace it with the actual value.In the command line interface, enter
net useto verify if the share uninstalled successfully.
More operations
To use an SMB user to mount and access a share, see How do I use an SMB user to access an SMB share?.
To configure ACL access permissions for different users, such as read-only or read-write, see Set up an AD domain using a Windows instance and How a file gateway joins an AD domain.