By Che Yang, nicknamed Biran at Alibaba.
In the previous article in this series, Unlock Cloud-native AI Skills | Build a Machine Learning System on Kubernetes, we set up a Kubeflow Pipelines platform. Now, we can try it out with a real case. Let's learn how to develop a Kubeflow Pipelines-based machine learning workflow.
A machine learning workflow is a task-driven and data-driven process. In this process, we import and prepare data, export and evaluate model training checkpoints, and export the final model. To do this, we need to use a distributed storage system as the transmission medium. In this example, we use a network-attached storage (NAS) as the distributed storage. To do this follow these steps:
Note that, in this tutorial, we use a NAS as the distributed storage, and we need to replace NFS_SERVER_IP with the real NAS server address.
1. Create an Alibaba Cloud NAS service. For more information, click Here.
2. Create /data in the network file system (NFS) server.
# mkdir -p /nfs
# mount -t nfs -o vers=4.0 NFS_SERVER_IP:/ /nfs
# mkdir -p /data
# cd /
# umount /nfs
3. Create a corresponding persistent volume.
# cat nfs-pv.yaml
apiVersion: v1
kind: PersistentVolume
metadata:
  name: user-susan
  labels:
    user-susan: pipelines
spec:
  persistentVolumeReclaimPolicy: Retain
  capacity:
    storage: 10Gi
  accessModes:
  - ReadWriteMany
  nfs:
    server: NFS_SERVER_IP
    path: "/data"

# kubectl create -f nfs-pv.yaml
4. Create a persistent volume claim (PVC).
# cat nfs-pvc.yaml
apiVersion: v1
kind: PersistentVolumeClaim
metadata:
  name: user-susan
  annotations:
    description: "this is the mnist demo"
    owner: Tom
spec:
  accessModes:
    - ReadWriteMany
  resources:
    requests:
       storage: 5Gi
  selector:
    matchLabels:
      user-susan: pipelines
# kubectl create -f nfs-pvc.yamlThe examples provided on Kubeflow Pipelines depend on Google's storage service. As Google is inaccessible in China, users in China cannot truly experience the capabilities of Kubeflow Pipelines. For this reason, an example of training the Modified National Institute of Standards and Technology (MNIST) model based on Alibaba Cloud NAS was provided to help you get started with and learn about Kubeflow Pipelines on Alibaba Cloud. The example includes the following steps:
Each of the three steps depends on the previous step.
You can use Python code to describe this process on Kubeflow Pipelines. For the complete code, see standalone_pipeline.py.
In this example, we use arena_op, which is based on the Arena open-source project. This API is obtained by packaging default container_op in Kubeflow. It can seamlessly connect to the message passing interface (MPI) and parameter server (PS) modes of distributed training. In addition, it allows you to easily gain access to distributed storage by using heterogeneous devices such as a graphics processing unit (GPU) or remote direct memory access (RDMA). You can also conveniently synchronize code from Git sources. It is really a useful API tool.
@dsl.pipeline(
  name='pipeline to run jobs',
  description='shows how to run pipeline jobs.'
)
def sample_pipeline(learning_rate='0.01',
    dropout='0.9',
    model_version='1',
    commit='f097575656f927d86d99dd64931042e1a9003cb2'):
  """A pipeline for end to end machine learning workflow."""
  data=["user-susan:/training"]
  gpus=1
# 1. prepare data
  prepare_data = arena.standalone_job_op(
    name="prepare-data",
    image="byrnedo/alpine-curl",
    data=data,
    command="mkdir -p /training/dataset/mnist && \
  cd /training/dataset/mnist && \
  curl -O https://code.aliyun.com/xiaozhou/tensorflow-sample-code/raw/master/data/t10k-images-idx3-ubyte.gz && \
  curl -O https://code.aliyun.com/xiaozhou/tensorflow-sample-code/raw/master/data/t10k-labels-idx1-ubyte.gz && \
  curl -O https://code.aliyun.com/xiaozhou/tensorflow-sample-code/raw/master/data/train-images-idx3-ubyte.gz && \
  curl -O https://code.aliyun.com/xiaozhou/tensorflow-sample-code/raw/master/data/train-labels-idx1-ubyte.gz")
  # 2. downalod source code and train the models
  train = arena.standalone_job_op(
    name="train",
    image="tensorflow/tensorflow:1.11.0-gpu-py3",
    sync_source="https://code.aliyun.com/xiaozhou/tensorflow-sample-code.git",
    env=["GIT_SYNC_REV=%s" % (commit)],
    gpus=gpus,
    data=data,
    command='''
    echo %s;python code/tensorflow-sample-code/tfjob/docker/mnist/main.py \
    --max_steps 500 --data_dir /training/dataset/mnist \
    --log_dir /training/output/mnist  --learning_rate %s \
    --dropout %s''' % (prepare_data.output, learning_rate, dropout),
    metrics=["Train-accuracy:PERCENTAGE"])
  # 3. export the model
  export_model = arena.standalone_job_op(
    name="export-model",
    image="tensorflow/tensorflow:1.11.0-py3",
    sync_source="https://code.aliyun.com/xiaozhou/tensorflow-sample-code.git",
    env=["GIT_SYNC_REV=%s" % (commit)],
    data=data,
    command="echo %s;python code/tensorflow-sample-code/tfjob/docker/mnist/export_model.py --model_version=%s --checkpoint_path=/training/output/mnist /training/output/models" % (train.output, model_version))
Kubeflow Pipelines converts the preceding code into a directed acyclic graph (DAG). Each node in the DAG is a component, and the lines connecting the components represent the dependencies between them. You can see the DAG on the Pipelines UI.
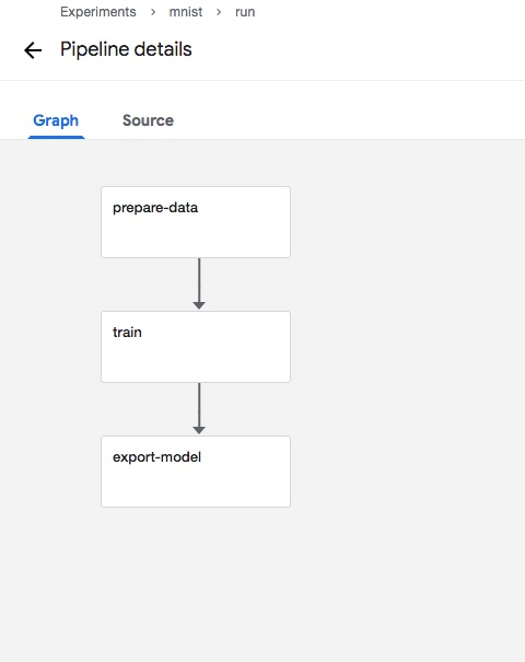
First, let's talk about data preparation. We have provided the Python API arena.standalone_job_op. Now we need to specify the following parameters: name (which is the name of this step), image (the container image to be used), and data (the data to be used and the directory to which the data is mounted within the container).
Here, data is in the array format. For example, data = ["user-susan:/training"] indicates multiple pieces of data that can be mounted, where user-susan is the previously created PVC, and /training is the directory to which the data is mounted within the container.
prepare_data = arena.standalone_job_op(
    name="prepare-data",
    image="byrnedo/alpine-curl",
    data=data,
    command="mkdir -p /training/dataset/mnist && \
  cd /training/dataset/mnist && \
  curl -O https://code.aliyun.com/xiaozhou/tensorflow-sample-code/raw/master/data/t10k-images-idx3-ubyte.gz && \
  curl -O https://code.aliyun.com/xiaozhou/tensorflow-sample-code/raw/master/data/t10k-labels-idx1-ubyte.gz && \
  curl -O https://code.aliyun.com/xiaozhou/tensorflow-sample-code/raw/master/data/train-images-idx3-ubyte.gz && \
  curl -O https://code.aliyun.com/xiaozhou/tensorflow-sample-code/raw/master/data/train-labels-idx1-ubyte.gz")
Actually, the preceding step uses curl to download the data from the specified address to the /training/dataset/mnist directory in the distributed storage. Note that /training is the root directory, which is similar to a root mounting point, and /training/dataset/mnist is a sub-directory of the distributed storage. In fact, in the following steps, the same root mounting point can be used to read data and perform operations.
The second step is to download code and train the model based on the data downloaded to the distributed storage. Before downloading the code, use Git to specify a fixed commit ID.
train = arena.standalone_job_op(
    name="train",
    image="tensorflow/tensorflow:1.11.0-gpu-py3",
    sync_source="https://code.aliyun.com/xiaozhou/tensorflow-sample-code.git",
    env=["GIT_SYNC_REV=%s" % (commit)],
    gpus=gpus,
    data=data,
    command='''
    echo %s;python code/tensorflow-sample-code/tfjob/docker/mnist/main.py \
    --max_steps 500 --data_dir /training/dataset/mnist \
    --log_dir /training/output/mnist  --learning_rate %s \
    --dropout %s''' % (prepare_data.output, learning_rate, dropout),
    metrics=["Train-accuracy:PERCENTAGE"])
As you can see, this step is more complex than data preparation. In addition to specifying the name, image, data, and command parameters as in the first step, we need to specify the following parameters in this model training step:
sync_source when calling the API and set GIT_SYNC_REV in env to specify the commit ID of the code to be trained.PERCENTAGE or RAW. For example, metrics = ["Train-accuracy:PERCENTAGE"]. Second, output {metrics name }={ value} or {metrics name }:{ value} in the actual model code because Pipelines collect metrics from stdout logs by default. For more information, see Sample Code.
After setting the data parameter, which is the same as the prepare_data parameter, to ["user-susan:/training"], you can read the corresponding data in the training code, for example, --data_dir /training/dataset/mnist.
This step depends on the prepare_data parameter. You can specify prepare_data.output to indicate the dependency between the two steps.
The export_model parameter is to generate a training model based on a checkpoint obtained through the train parameter.
export_model = arena.standalone_job_op(
    name="export-model",
    image="tensorflow/tensorflow:1.11.0-py3",
    sync_source="https://code.aliyun.com/xiaozhou/tensorflow-sample-code.git",
    env=["GIT_SYNC_REV=%s" % (commit)],
    data=data,
    command="echo %s;python code/tensorflow-sample-code/tfjob/docker/mnist/export_model.py --model_version=%s --checkpoint_path=/training/output/mnist /training/output/models" % (train.output, model_version))
The export_model parameter is similar to and simpler than the train parameter. It simply exports code from the Git synchronization model and then uses the checkpoints in the shared directory /training/output/mnist to export the model.
The entire workflow is much more intuitive. Now, let's define a Python method to integrate the entire process:
@dsl.pipeline(
  name='pipeline to run jobs',
  description='shows how to run pipeline jobs.'
)
def sample_pipeline(learning_rate='0.01',
    dropout='0.9',
    model_version='1',
    commit='f097575656f927d86d99dd64931042e1a9003cb2'):
The @dsl.pipeline parameter is a decorator that indicates the workflow. It defines two attributes: name and description.
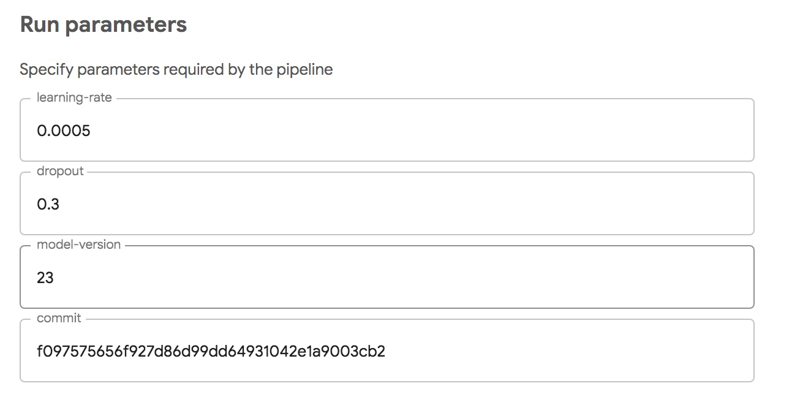
The entry point method sample_pipeline defines four parameters: learning_rate, dropout, model_version, and commit. These parameters can be used at the preceding train and export_model stages. The parameter values are in the format of dsl.PipelineParam, so that they can be converted into input forms through the native UI of Kubeflow Pipelines. The keyword of an input form is the parameter's name, and the default value of the input form is the parameter's value. Note that the value of dsl.PipelineParam can only be a string or numerical value. Arrays, maps, and custom values cannot be converted through transformation.
In fact, you can overwrite these parameters when submitting a workflow. The following figure shows the UI where you can submit a workflow.
The Python domain-specific language (DSL) that you previously used to develop the workflow can be submitted to the Kubeflow Pipelines service in your own Kubernetes. Actually, it is easy to submit code.
KFP_SERVICE="ml-pipeline.kubeflow.svc.cluster.local:8888"
  import kfp.compiler as compiler
  compiler.Compiler().compile(sample_pipeline, __file__ + '.tar.gz')
  client = kfp.Client(host=KFP_SERVICE)
  try:
    experiment_id = client.get_experiment(experiment_name=EXPERIMENT_NAME).id
  except:
    experiment_id = client.create_experiment(EXPERIMENT_NAME).id
  run = client.run_pipeline(experiment_id, RUN_ID, __file__ + '.tar.gz',
                            params={'learning_rate':learning_rate,
                                     'dropout':dropout,
                                    'model_version':model_version,
                                    'commit':commit})
First, run compiler.compile to compile the Python code into a DAG configuration file that can be identified by the execution engine Argo.
Second, on the Kubeflow Pipelines client, create an experiment or find an existing experiment and submit the previously compiled DAG configuration file.
Third, prepare a Python 3 environment in the cluster and install a Kubeflow Pipelines software development kit (SDK).
# kubectl create job pipeline-client --namespace kubeflow --image python:3 -- sleep infinity
# kubectl  exec -it -n kubeflow $(kubectl get po -l job-name=pipeline-client -n kubeflow | grep -v NAME| awk '{print $1}') bash
Fourth, log on to the Python 3 environment and run the following commands to successively submit two tasks with different parameters.
# pip3 install http://kubeflow.oss-cn-beijing.aliyuncs.com/kfp/0.1.14/kfp.tar.gz --upgrade
# pip3 install http://kubeflow.oss-cn-beijing.aliyuncs.com/kfp-arena/kfp-arena-0.4.tar.gz --upgrade
# curl -O https://raw.githubusercontent.com/cheyang/pipelines/update_standalone_sample/samples/arena-samples/standalonejob/standalone_pipeline.py
# python3 standalone_pipeline.py --learning_rate 0.0001 --dropout 0.8 --model_version 2
# python3 standalone_pipeline.py --learning_rate 0.0005 --dropout 0.8 --model_version 3Log on to the Kubeflow Pipelines UI: [https://](){pipeline address}/pipeline/#/experiments. For example:
https://11.124.285.171/pipeline/#/experiments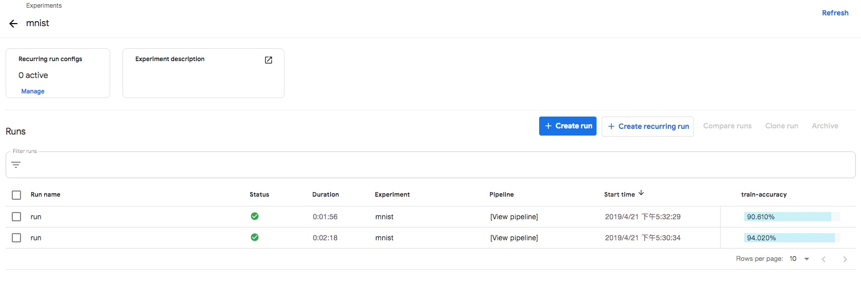
To compare metrics such as the input, duration, and accuracy of the two experiments, you can click the Compare runs button. Making an experiment traceable is the first step to make the experiment reproducible. Leveraging the experiment management capabilities of Kubeflow Pipelines is the first step to enable experiment reproducibility.

To implement a runnable Kubeflow Pipeline, do as follows:
dsl.container_ops API, you need to construct two parts of code:container_op = dsl.ContainerOp(
name=name,
image='<train-image>',
arguments=[
'--input_dir', input_dir,
'--output_dir', output_dir,
'--model_name', model_name,
'--model_version', model_version,
'--epochs', epochs
],
file_outputs={'output': '/output.txt'}
)
container_op.add_volume(k8s_client.V1Volume(
host_path=k8s_client.V1HostPathVolumeSource(
path=persistent_volume_path),
name=persistent_volume_name))
container_op.add_volume_mount(k8s_client.V1VolumeMount(
mount_path=persistent_volume_path,
name=persistent_volume_name))The native dsl.container_ops API improves flexibility. It enables the interface that interacts with Pipelines. This allows users to do a lot of things through container_ops. However, it also has many drawbacks:
container_op API performs an operation for a single container. To support distributed training, you must submit and manage tasks such as a TensorFlow training jobs (TFJob) through container_ops. This increases the complexity and poses security challenges. It is easy to understand that this produces high complexity. Regarding security, since you need to grant additional permissions to pipeline developers to submit TFJob-like tasks, the permissions represent security risks.Alternatively, you can choose to use the reusable component API arena_op. The universal runtime code used by this API spares you from repeatedly constructing runtime code. In addition, the universal arena_op API is user-friendly and supports both PS and MPI scenarios. We recommend that you use this method to compile pipelines.
Are you eager to know the latest tech trends in Alibaba Cloud? Hear it from our top experts in our newly launched series, Tech Show!

120 posts | 26 followers
FollowBen - April 28, 2023
Lana - April 14, 2023
Alibaba Cloud Community - October 18, 2023
Nick Patrocky - January 26, 2024
Alibaba Clouder - December 31, 2020
Alibaba Clouder - November 14, 2018

120 posts | 26 followers
Follow Platform For AI
A platform that provides enterprise-level data modeling services based on machine learning algorithms to quickly meet your needs for data-driven operations.
Learn More Container Service for Kubernetes
Alibaba Cloud Container Service for Kubernetes is a fully managed cloud container management service that supports native Kubernetes and integrates with other Alibaba Cloud products.
Learn More ACK One
Provides a control plane to allow users to manage Kubernetes clusters that run based on different infrastructure resources
Learn More Container Registry
A secure image hosting platform providing containerized image lifecycle management
Learn MoreMore Posts by Alibaba Container Service