By Arslan Ud Din Shafiq, Alibaba Cloud Tech Share Author. Tech Share is Alibaba Cloud's incentive program to encourage the sharing of technical knowledge and best practices within the cloud community.
Vesta Control Panel is an open source software to host your websites. When you are tired of using command line for making any changes to your hosting or you want to work instantly and faster, VestaCP is best option. Most of the web hosting software are expensive. You can only afford them if you are running a web hosting selling business, otherwise, for personal use, I won't recommend to use any paid hosting control panel software. VestaCP is available for free and is one of the best options available in the market.
VestaCP allows you to manage your websites, ftp accounts, databases, email and DNS settings. The web interface of VestaCP is developed in PHP and JS. Vesta Open API is used for CLI calls. Vesta core has been written in bash which is native programming language in Linux operating system. VestaCP does not support all operating systems. Currently, it supports RHEL, CentOS, Debian, and Ubuntu.
In this tutorial, we will be installing and configuring VestaCP on an Alibaba Cloud Elastic Compute Service (ECS) with CentOS 7 installed.
VestaCP requires a decently sized server to host and manage multiple websites. The following are the minimum requirements for installing VestaCP on your server. You are recommended to use a higher configuration whenever possible to host more websites, but you should manage your hardware requirements according to your actual usage.
Before proceeding with installation of any kind of package, use the following command to update your Ubuntu system. To execute this command, remember to login from non-root user with sudo privileges.
# yum updateThere are 2 ways to install VestaCP: basic installation and advanced installation.
For basic installation follow the steps below:
For downloading installation script:
# curl -O http://vestacp.com/pub/vst-install.shFor installation:
# bash vst-install.sh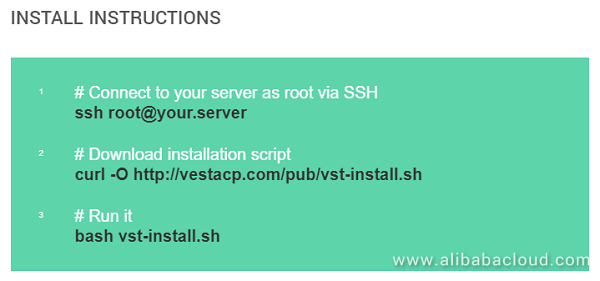
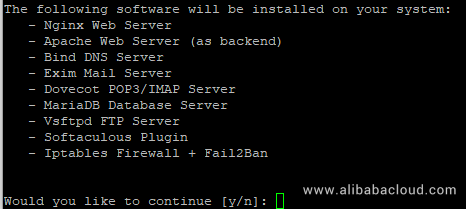
Skip this section if you have followed basic installation steps above.
For generating advanced installation commands, follow the steps below:
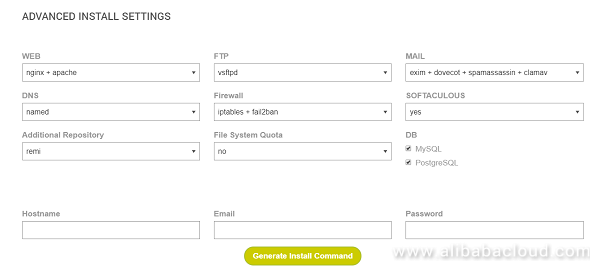

# curl -O http://vestacp.com/pub/vst-install.sh

# bash vst-install.sh --nginx yes --apache yes --phpfpm no --named yes --remi yes --vsftpd yes --proftpd no --iptables yes --fail2ban yes --quota yes --exim yes --dovecot yes --spamassassin yes --clamav yes --softaculous yes --mysql yes --postgresql yes --hostname imarslan --email test@example.com --password *******
Note: The password has been changed for security purposes. Please copy the code directly from your own machine.
If you have activated firewalls, you will have to define a rule in Alibaba Cloud security group for your cloud server to add exception for port 80/TCP, 443/TCP and port 8083/TCP. You can enable these ports while creating ECS instance, but in case, if you have forgotten to unblock these ports, you can follow the procedure below. By default, these ports are blocked by the firewalls.
If you are not sure how to do this, refer to the ECS documentation.
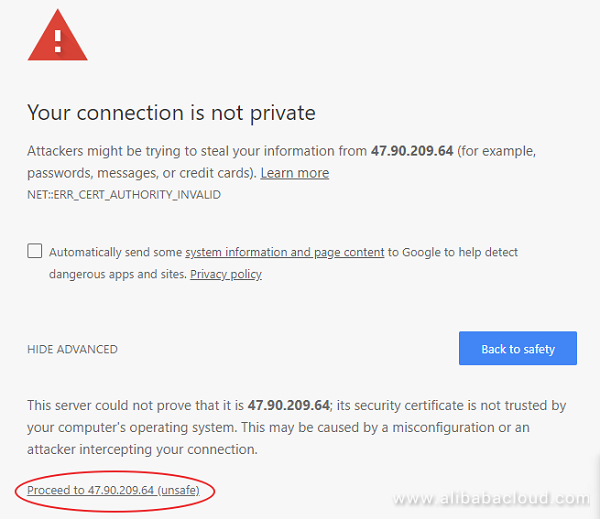
Your VestaCP is ready to be accessed via IP address of your Alibaba Cloud ECS or domain name. As you can't install SSL certificate to IP address, upon accessing VestaCP via IP Address, you will see the following warning. Click Advance and then click proceed.
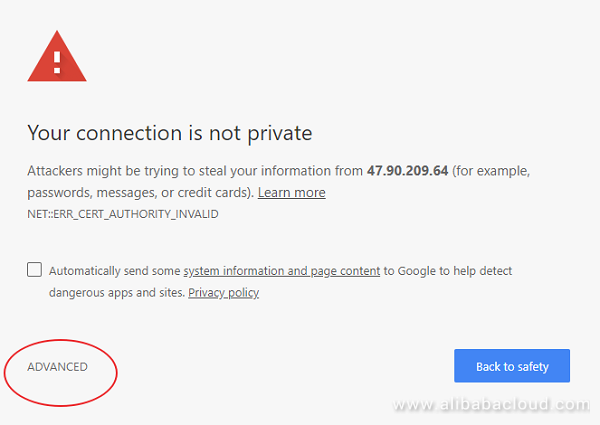
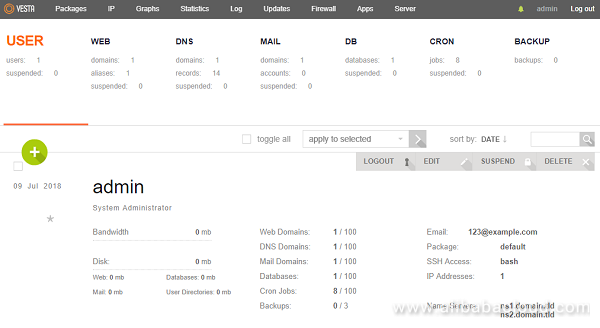
You will be redirected to login page of VestaCP. Enter your login credentials, you will be redirected to VestaCP dashboard.
For installation of Let's Encrypt SSL certificate, you will need to install Git to fetch Let's Encrypt form official GitHub Repository. I will use /opt/letsen directory for this purpose.
Execute the following command to install git.
# yum install gitTo allow HTTPS access to your VestaCP, you will need to install an SSL certificate. For a free SSL certificate, I will use Let's Encrypt SSL. Follow the steps below to install Let's Encrypt SSL Certificate.
Execute the following command to fetch and clone Let's Encrypt.
# git clone https://github.com/letsencrypt/letsencrypt /opt/letsenNavigate to directory /opt/letsen by using the following command.
# cd /opt/letsenBefore asking for issuance of SSL, you will need to stop your apache and nginx server because issuance of certificate will utilize port 80. To do so, execute the following commands.
# service nginx stop
# systemctl stop httpd
Execute the following command to install SSL certificate on your domain.
# sudo -H ./letsencrypt-auto certonly --standalone -d softpedia.xyz -d www.softpedia.xyzAccept the terms and conditions and proceed. Upon successful installation, you will see the following screen.
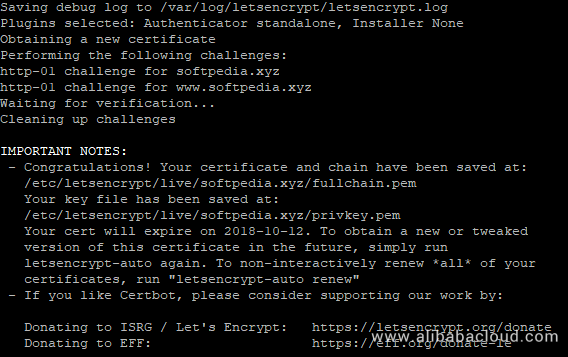
Confirm or verify the installation of your SSL certificate by executing the following command.
# ./certbot-auto certificatesAfter successful issuance of SSL certificate, you will need to restart your nginx and apache server by using the commands below.
# service nginx start
# systemctl start httpd
Here you go! Now you can access your VestaCP using HTTPS.
How to Migrate WooCommerce to Alibaba Cloud ECS with Let's Encrypt

2,593 posts | 792 followers
FollowAlibaba Clouder - August 2, 2019
Alibaba Clouder - August 2, 2019
Alibaba Clouder - May 15, 2018
Alibaba Clouder - July 2, 2019
ApsaraDB - December 17, 2024
Alibaba Clouder - February 18, 2019
Hello, guys, I'm facing problems with the installation of ssl lets encrypt. I've tried in many ways but unfortunately it doesn't work. I already followed your tutorial on this link on your blog, but it also doesn't work. I don't know what to do can you help me?

Hi, there. Thanks for reaching out. You can go to our Forum(https://www.alibabacloud.com/forum) to provide more details and let us see what we can do.
WE NEED TO SEE A VIDEO TUTORIAL FOR THAT .. WILL BE MORE CLEARLY ..

2,593 posts | 792 followers
Follow ECS(Elastic Compute Service)
Elastic and secure virtual cloud servers to cater all your cloud hosting needs.
Learn More Simple Log Service
An all-in-one service for log-type data
Learn More CloudMonitor
Automate performance monitoring of all your web resources and applications in real-time
Learn MoreMore Posts by Alibaba Clouder
thefinalwatcher September 12, 2018 at 7:36 am
Vesta is good but not the best one in the free control panel space. The major downsides of Vesta is the nature of being a web-based app, which can result into a steep server memory consumption for it's installation on the server-end and more risks by keeping connecting to the server through the web. As well as a complex installation and configuration. Personally, I use VPSrobots to manage servers - https://vpsrobots.com/, aside from living on my PC like any other desktop apps, it comes with a free version that includes pretty much all the basic features for the server and site management.