Alibaba Cloud ACK One is a service that supports hybrid cloud and multi-cloud implementation based on Kubernetes. This service makes the flexible configuration of clusters distributed in different environments possible. ACK One allows you to centrally manage Kubernetes clusters of various service providers (such as AWS, Azure, and Google Cloud) and on-premises clusters. You only need to register the target Kubernetes clusters in ACK One to implement this. In this case, you can use Alibaba Cloud Container Service for Kubernetes (ACK) as your operational base.
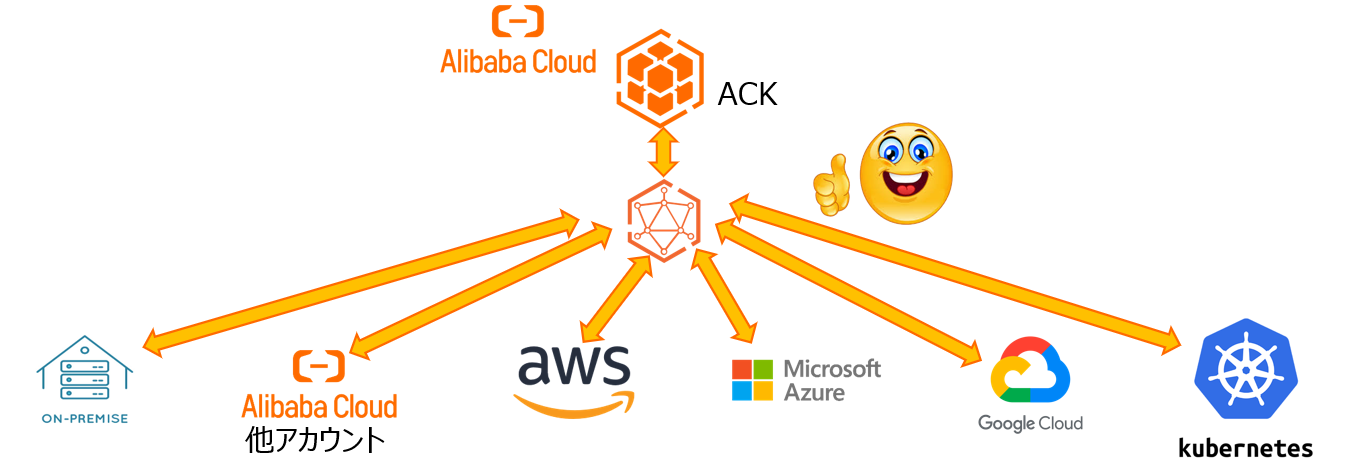
This article introduces the basic operations of ACK One and explains how to use ACK One to deploy multi-cluster services with ACK/ASK clusters. This method can also be used for other Kubernetes services, such as on-premise Kubernetes, Amazon Elastic Kubernetes Services (EKS), and Azure Kubernetes Service (AKS). We hope you will find this article helpful.
The configuration diagram is given below. The VPCs under different Alibaba Cloud accounts are independent of each other, but they are integrated as a whole using VPC peering connections.
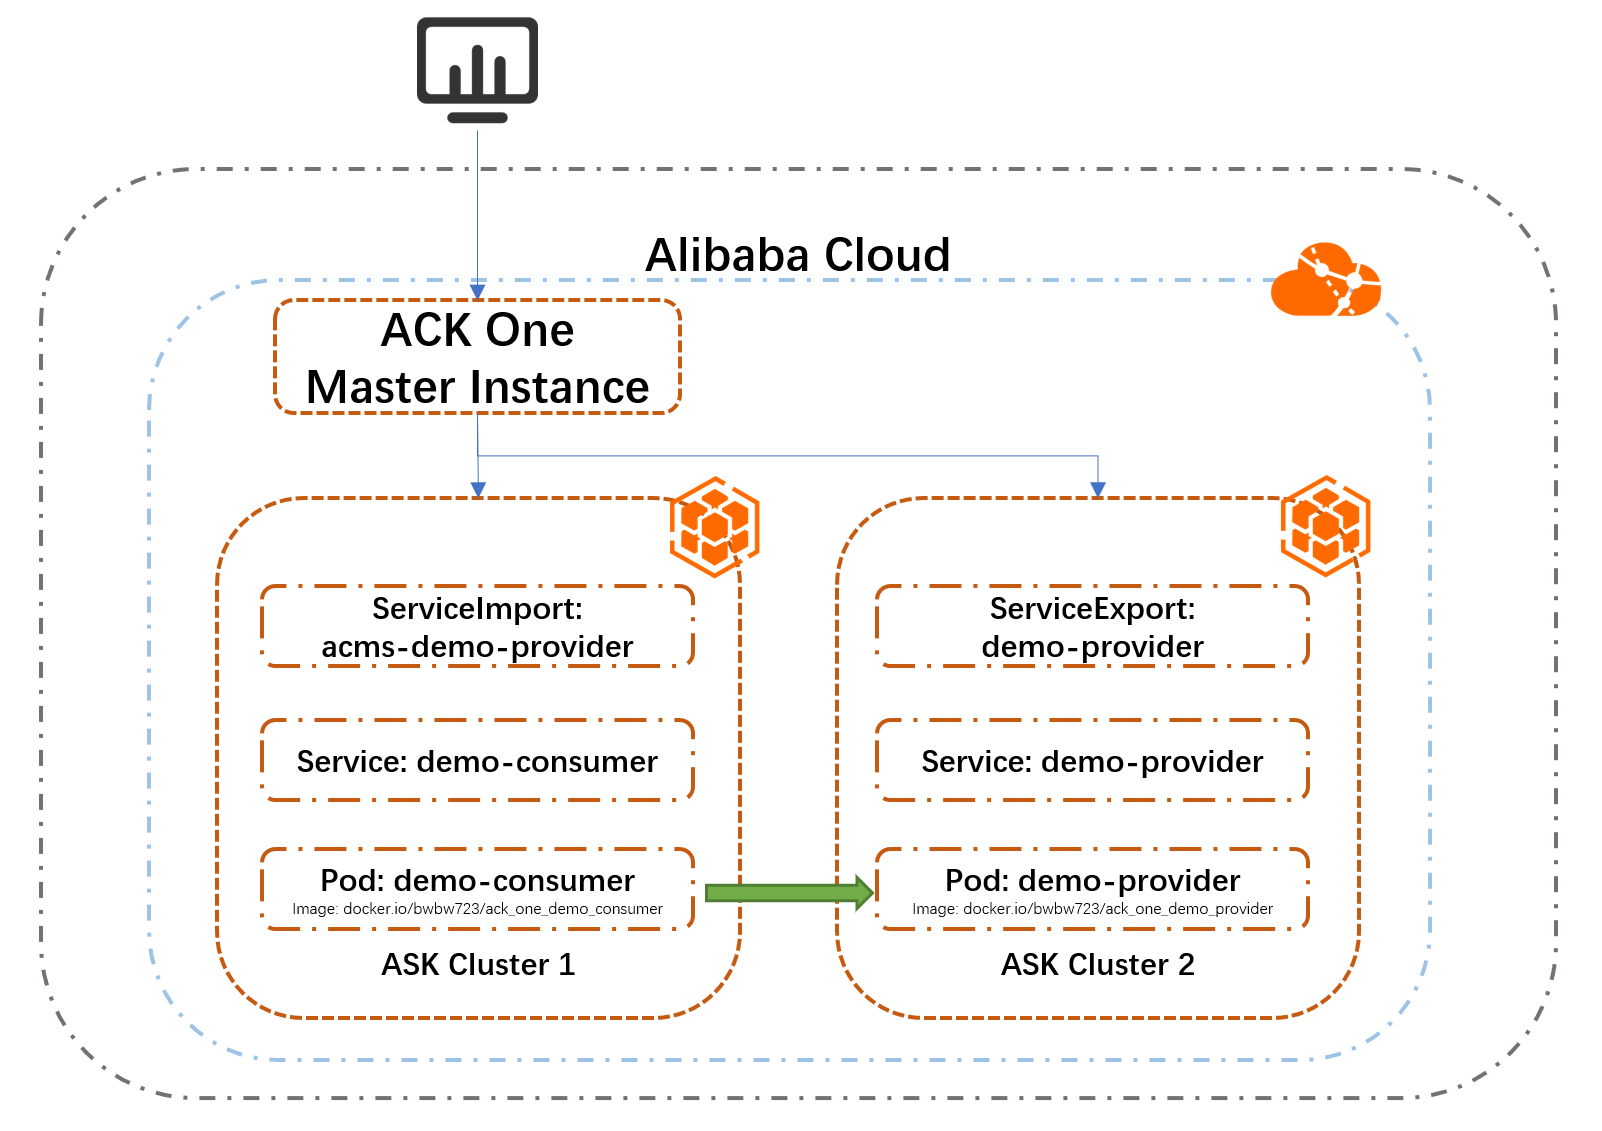
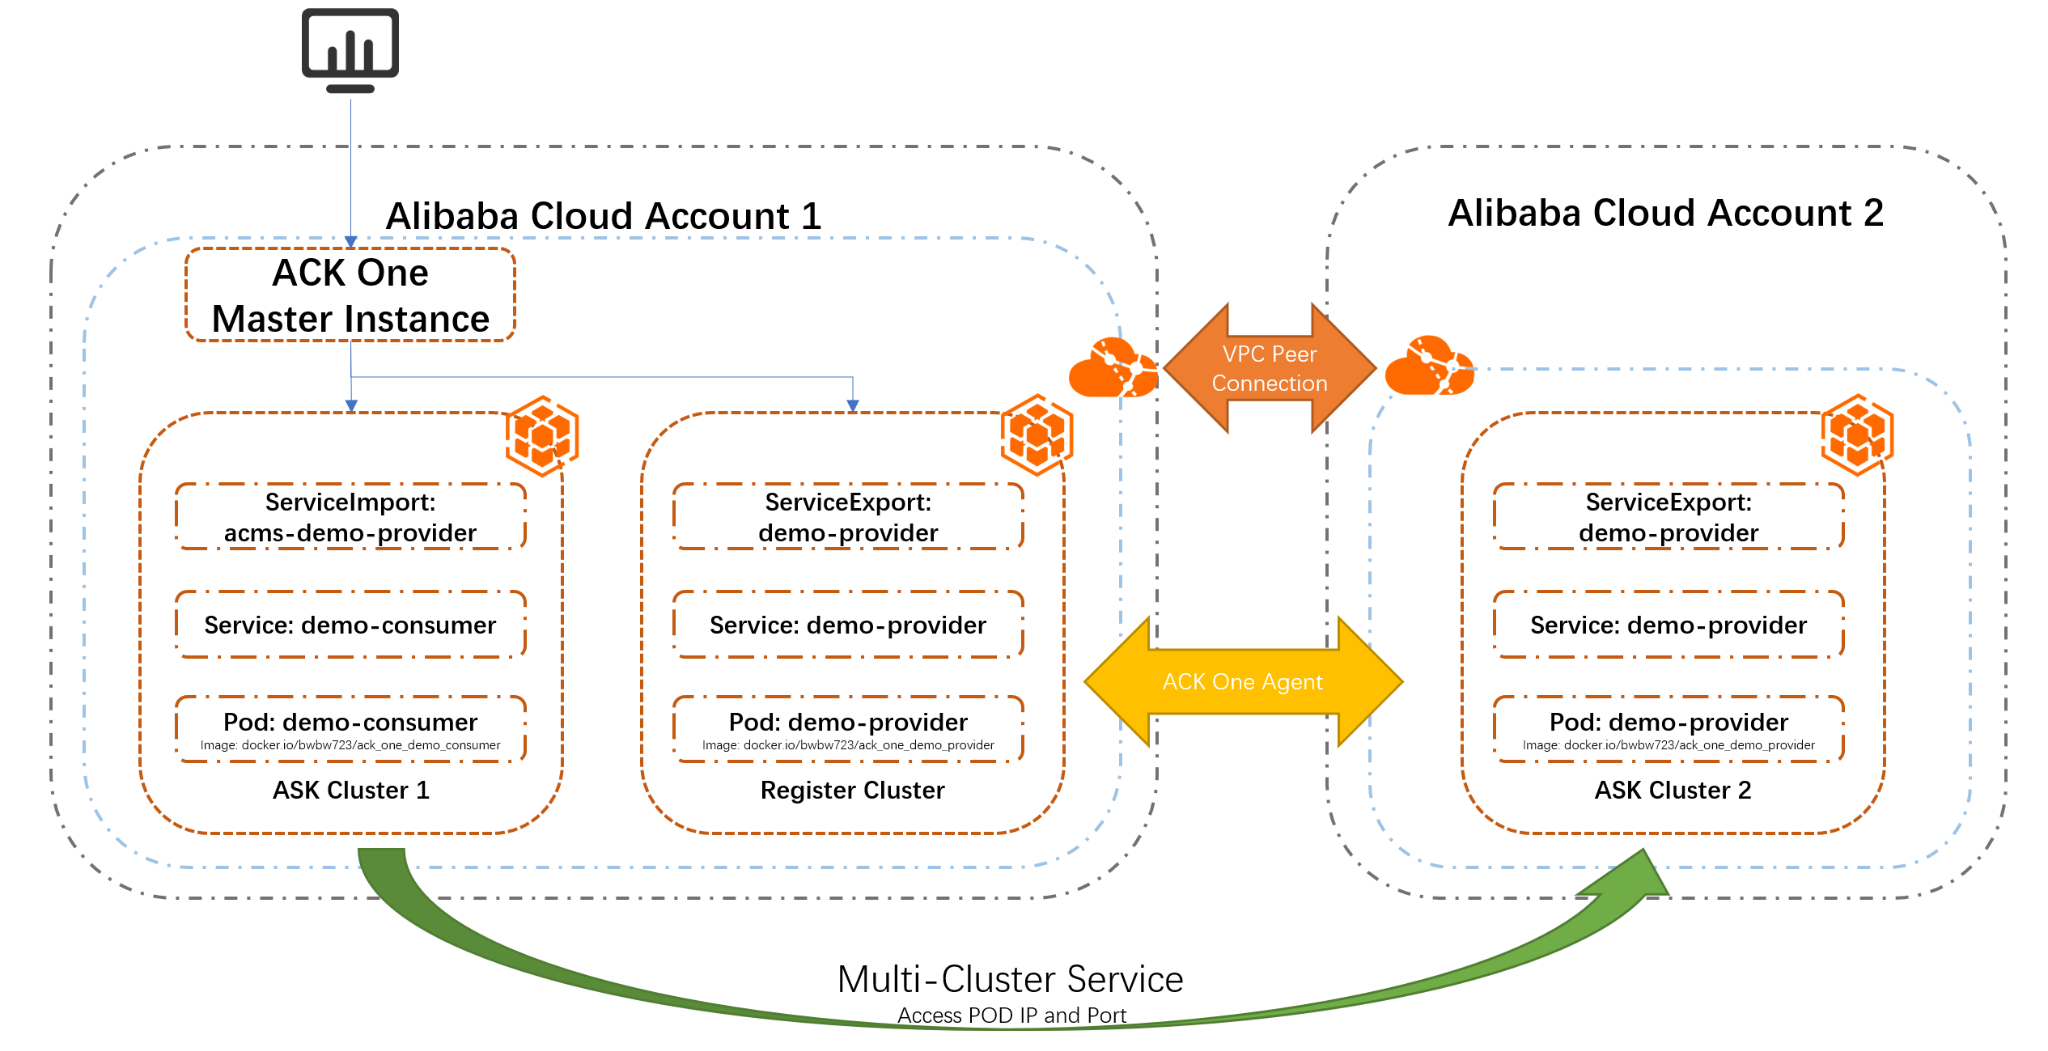
Prepare the following resources in your target Region:
After the preparation, you can proceed with deployment using ACK One. When you access the ACK One console for the first time, you need to activate this service before you can use it.
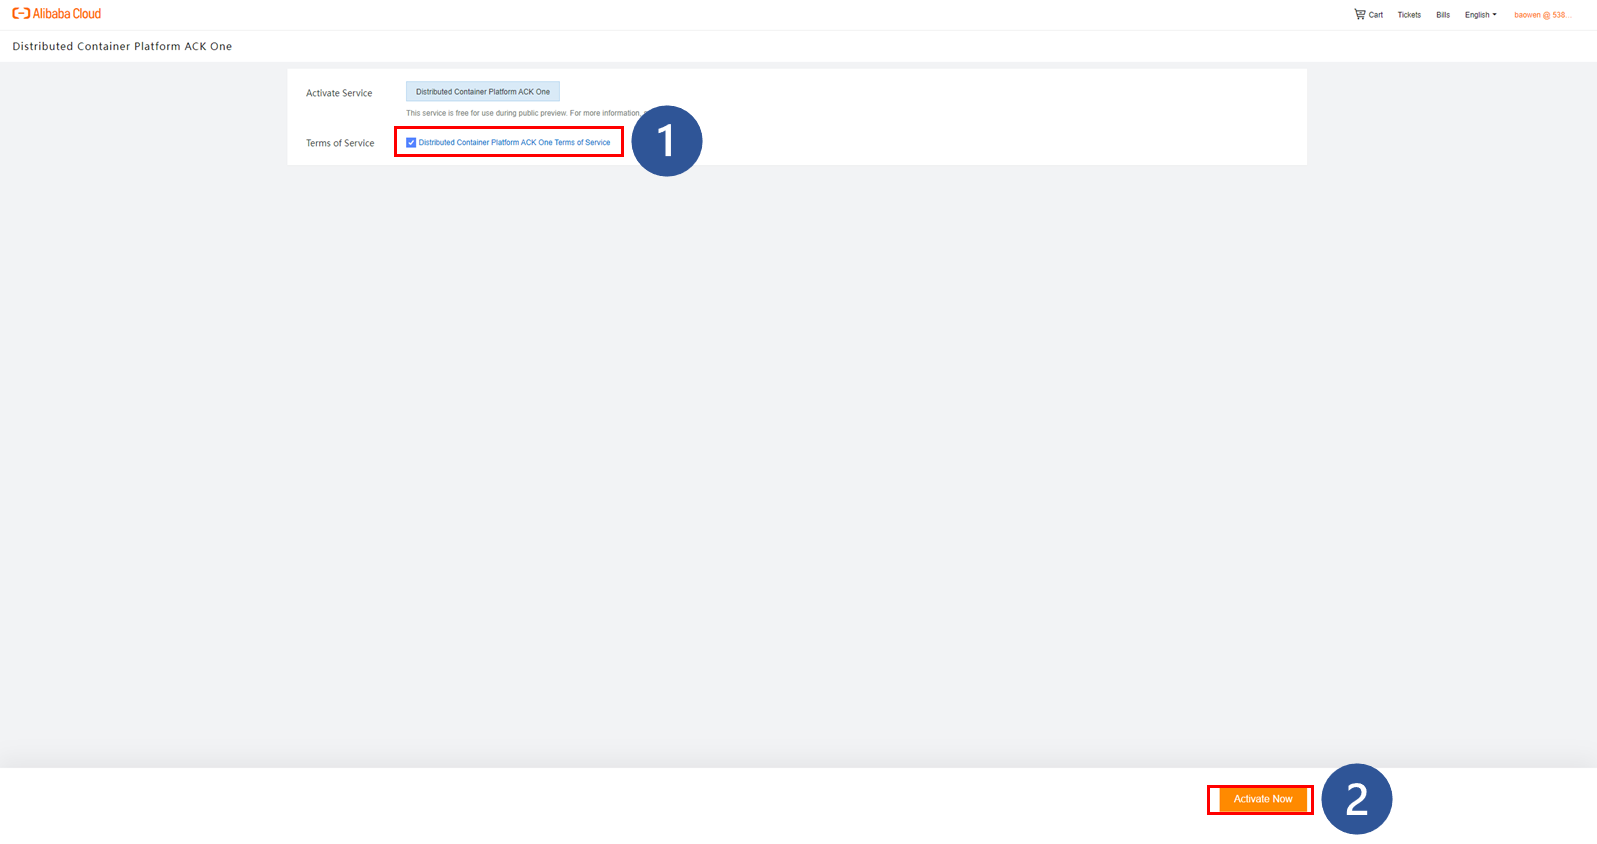

After the activation of ACK One, you will be directed to the page for configuring ACK One master instances. After picking up the region of the target prepared with VPCs and vSwitches, enable multi-cluster management on the created master instance.


If multi-cluster management is enabled under the current account for the first time, an error will occur indicating that the specific role or role policy is not found.
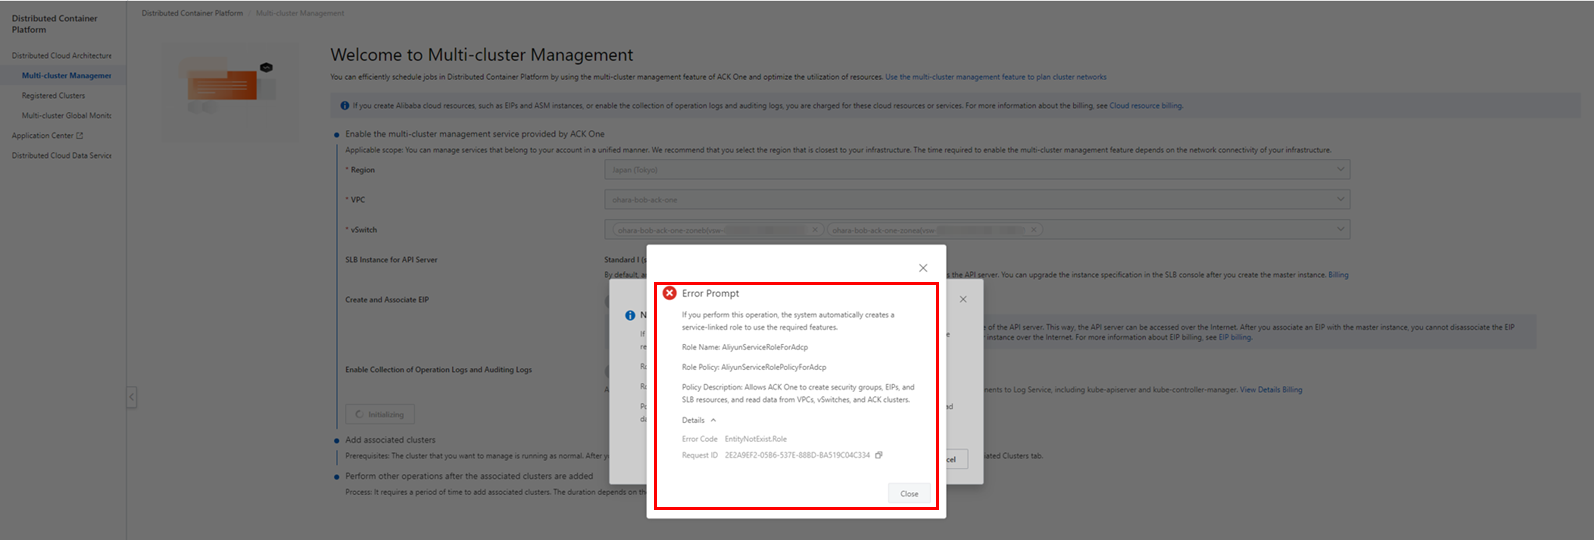
To resolve this, close the error message and click OK on the pop-up window. The necessary role and role policy will be created.

If the selected region does not have a cluster, the initial processing will be suspended at an error.

As the master instances get created, the initial processing will take some time.
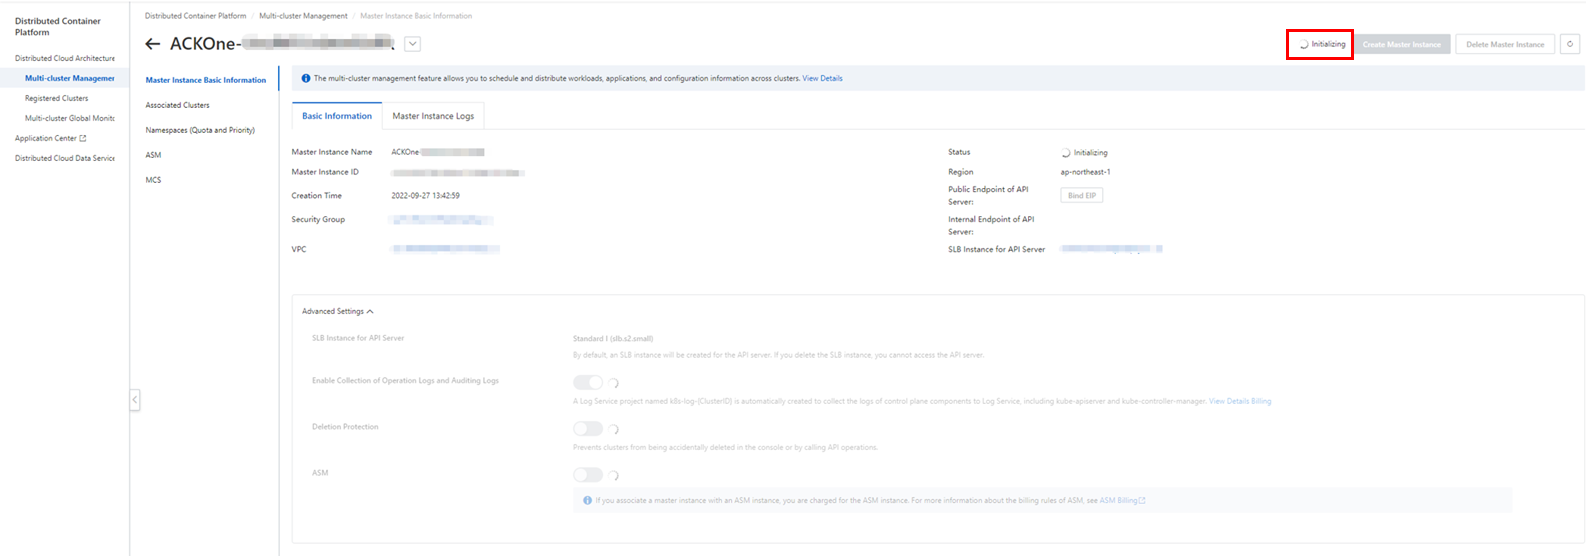
This processing can be checked from the creation log on the Master Instance Logs tab.

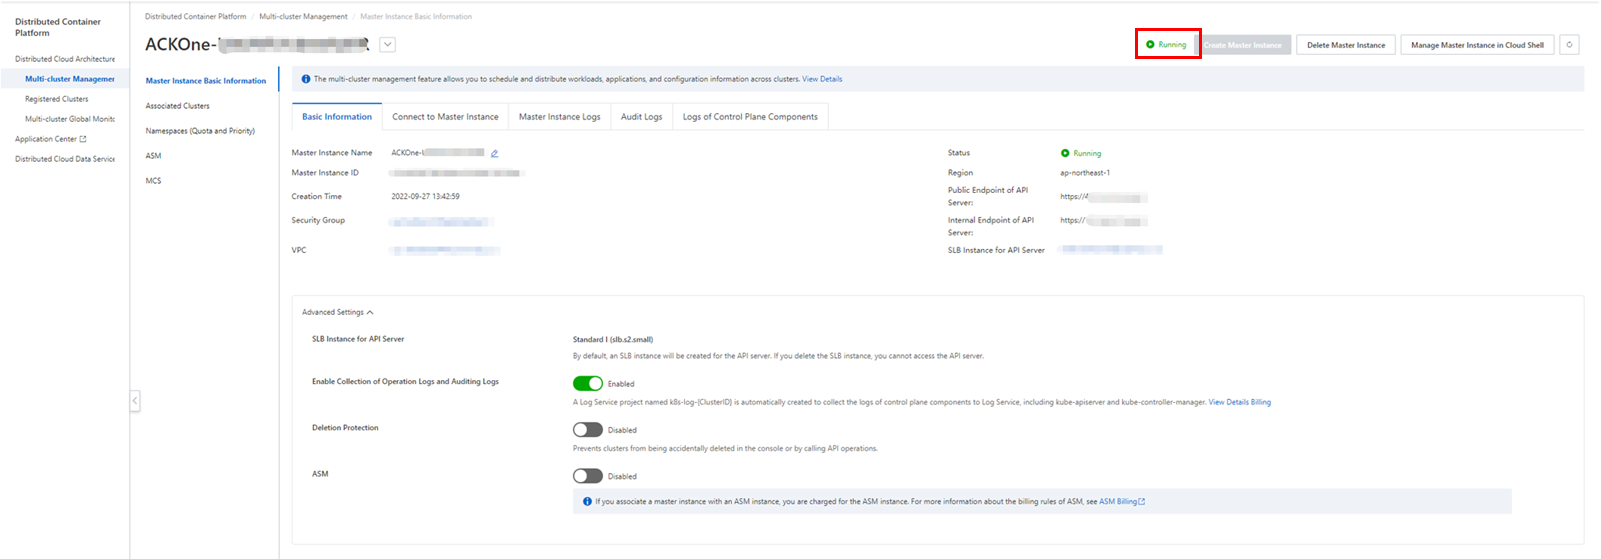
Once the master instance starts running, it can be used for multi-cluster management.
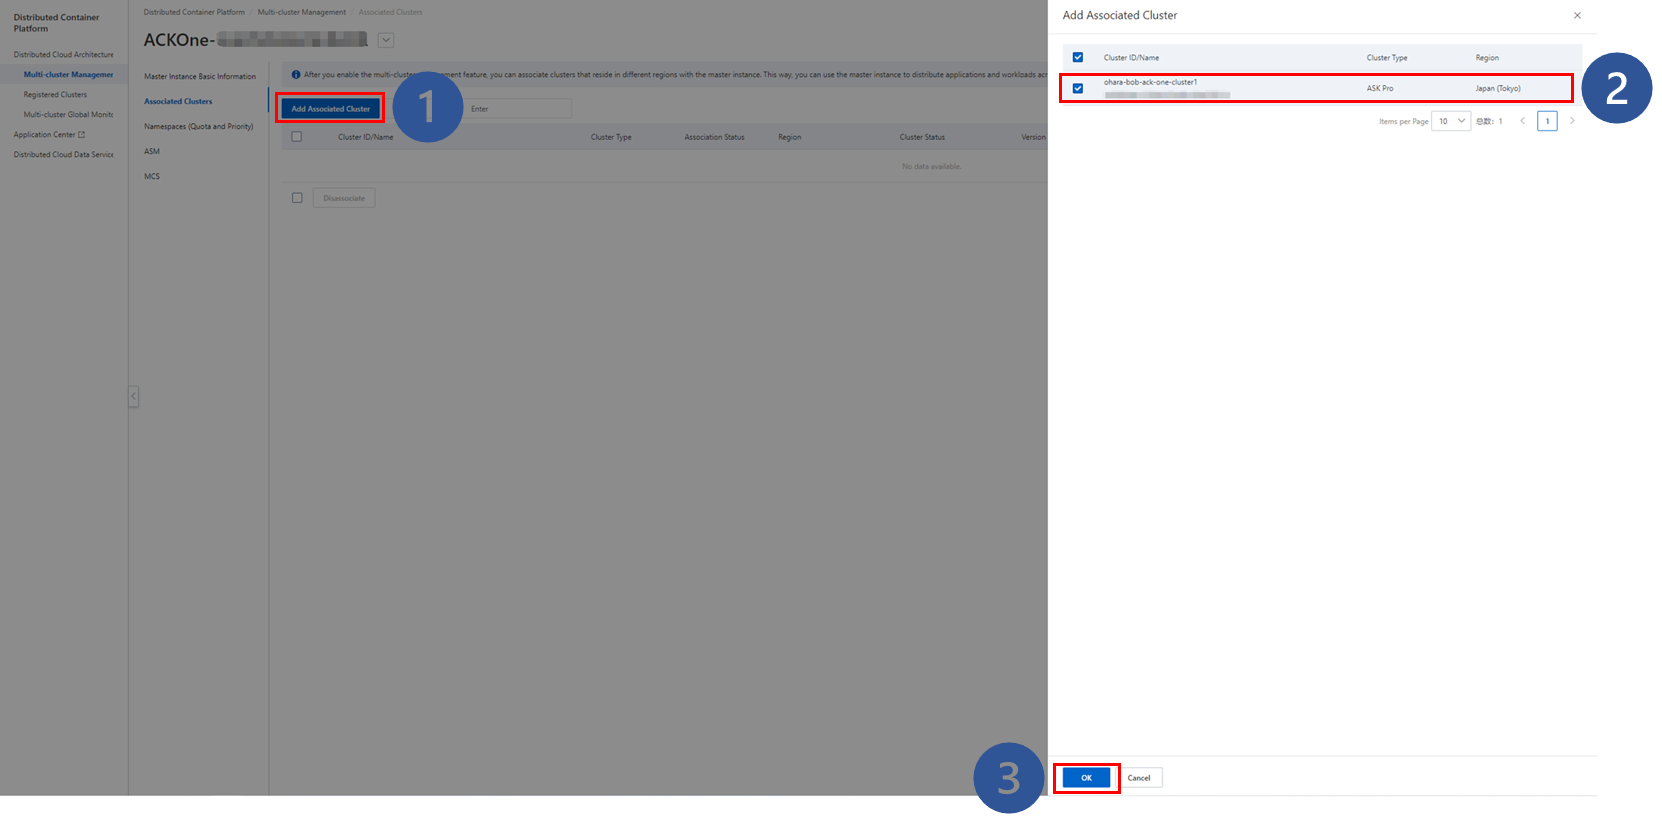
To manage a cluster, you have to add it as an associated cluster of ACK One. Click Add associated Cluster on the Associated Clusters page, choose the target cluster from the list, and click OK.
After a short while, the target cluster will become an associated cluster of ACK One.


In ACK One, you can register clusters deployed in data centers and clusters deployed on third-party clouds. We will explain this with the example of a Google Kubernetes Engine (GKE) cluster deployed on the Google Cloud Platform (GCP).
Let's assume a GKE Standard cluster is already present. Check to ensure your cluster is not a GKE Autopilot cluster.

When registering the cluster process, it will be deployed under the kube-system namespace because a fully managed GKE Autopilot cluster is not permitted to create the kube-system namespace.
Error from server (Forbidden): error when creating "agent.yaml": serviceaccounts is forbidden: User "xxxxxx" cannot create resource "serviceaccounts" in API group "" in the namespace "kube-system": GKEAutopilot authz: the namespace "kube-system" is managed and the request's verb "create" is denied
Prepare gcloud CLI for the current work environment. Get the latest version of gke-gcloud-auth-plugin and install it. Otherwise, the errors given below will occur in the subsequent procedures:

gcloud components install gke-gcloud-auth-plugin
gcloud components update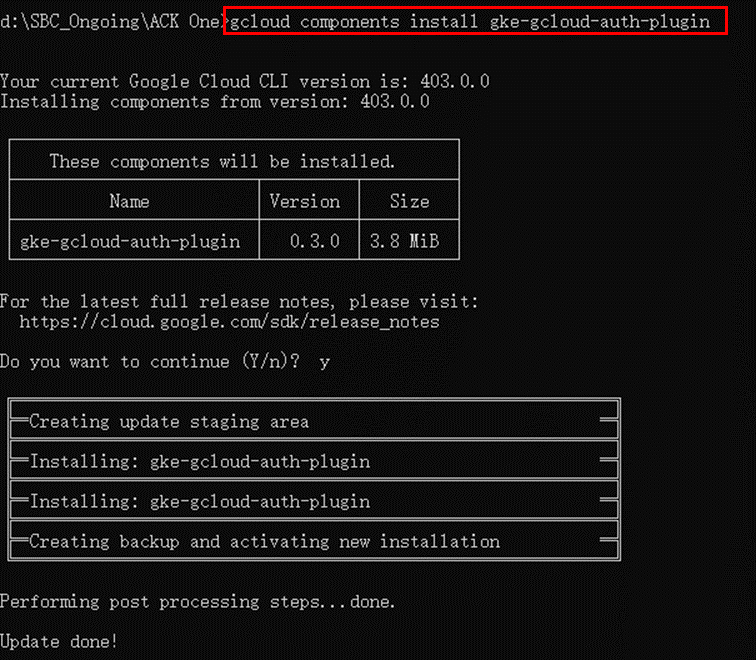
Access the details page of the prepared GKE cluster and copy the command for obtaining the authentication information.
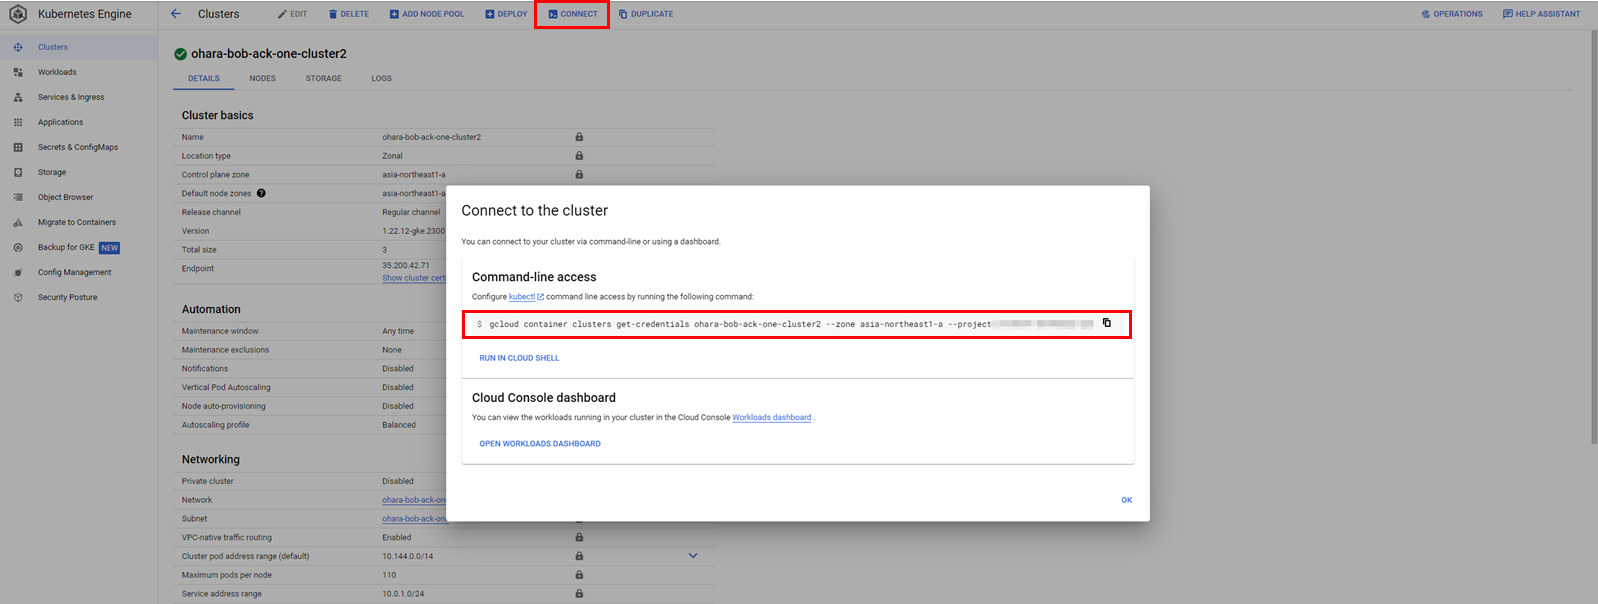
Run the command and create the connection with the GKE cluster.

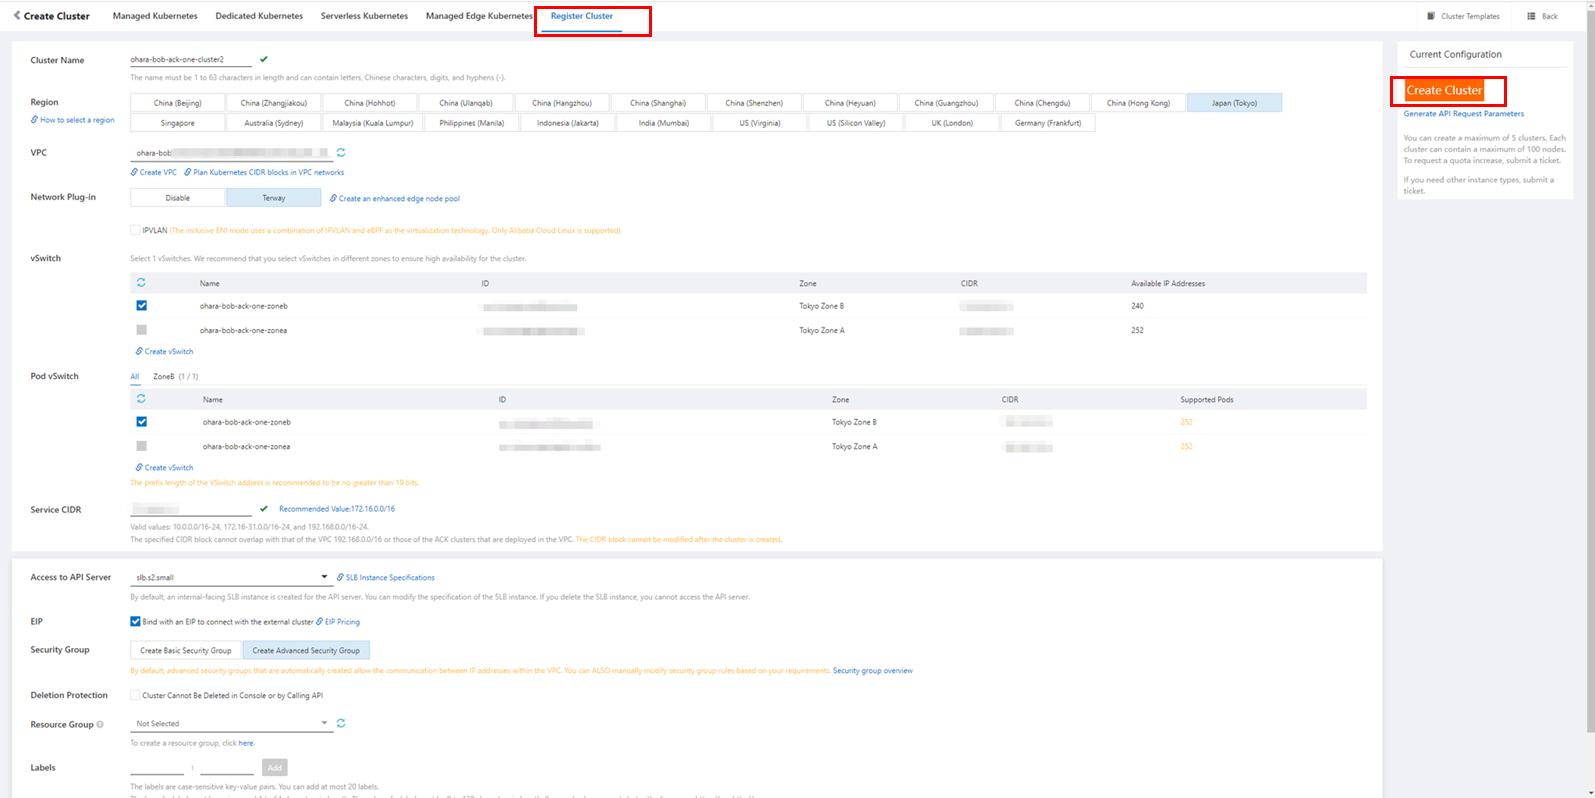
Create Register Cluster as a cluster registration proxy on Alibaba Cloud and register the target GKE cluster with it.
Go to the Register Clusters page in the ACK One console and click Ready to Connect*:

Enter the necessary information (such as target Region, Zone, VPC, and vSwitch) in the create form. Then, click Create Cluster:
As usual, the creation process will take some time.


After a short while, Register Cluster will be created and will be in the Waiting for Connections state.

Go to the details page of the target cluster and check the connection information in the related tab. Select the public network or the internal network and copy the network connection information to agent.yaml.

Copy the connection information of the public network to register an existing GKE cluster from the Internet.
Run the command and install the ack-cluster-agent in the target cluster. With the following kubectl command, check whether it has been safely installed under the namespace kube-system:
kubectl apply -f agent.yaml
kubectl -n kube-system get pod

If the target ack-cluster-agent pod is ready, the registration is completed. The target Alibaba Cloud Register Cluster will be in the Running state.

AMC is the command line tool provided by ACK One.
It works as a kubectl plug-in and offers the following functions:
You can check the help information with the kubectl amc -h command.
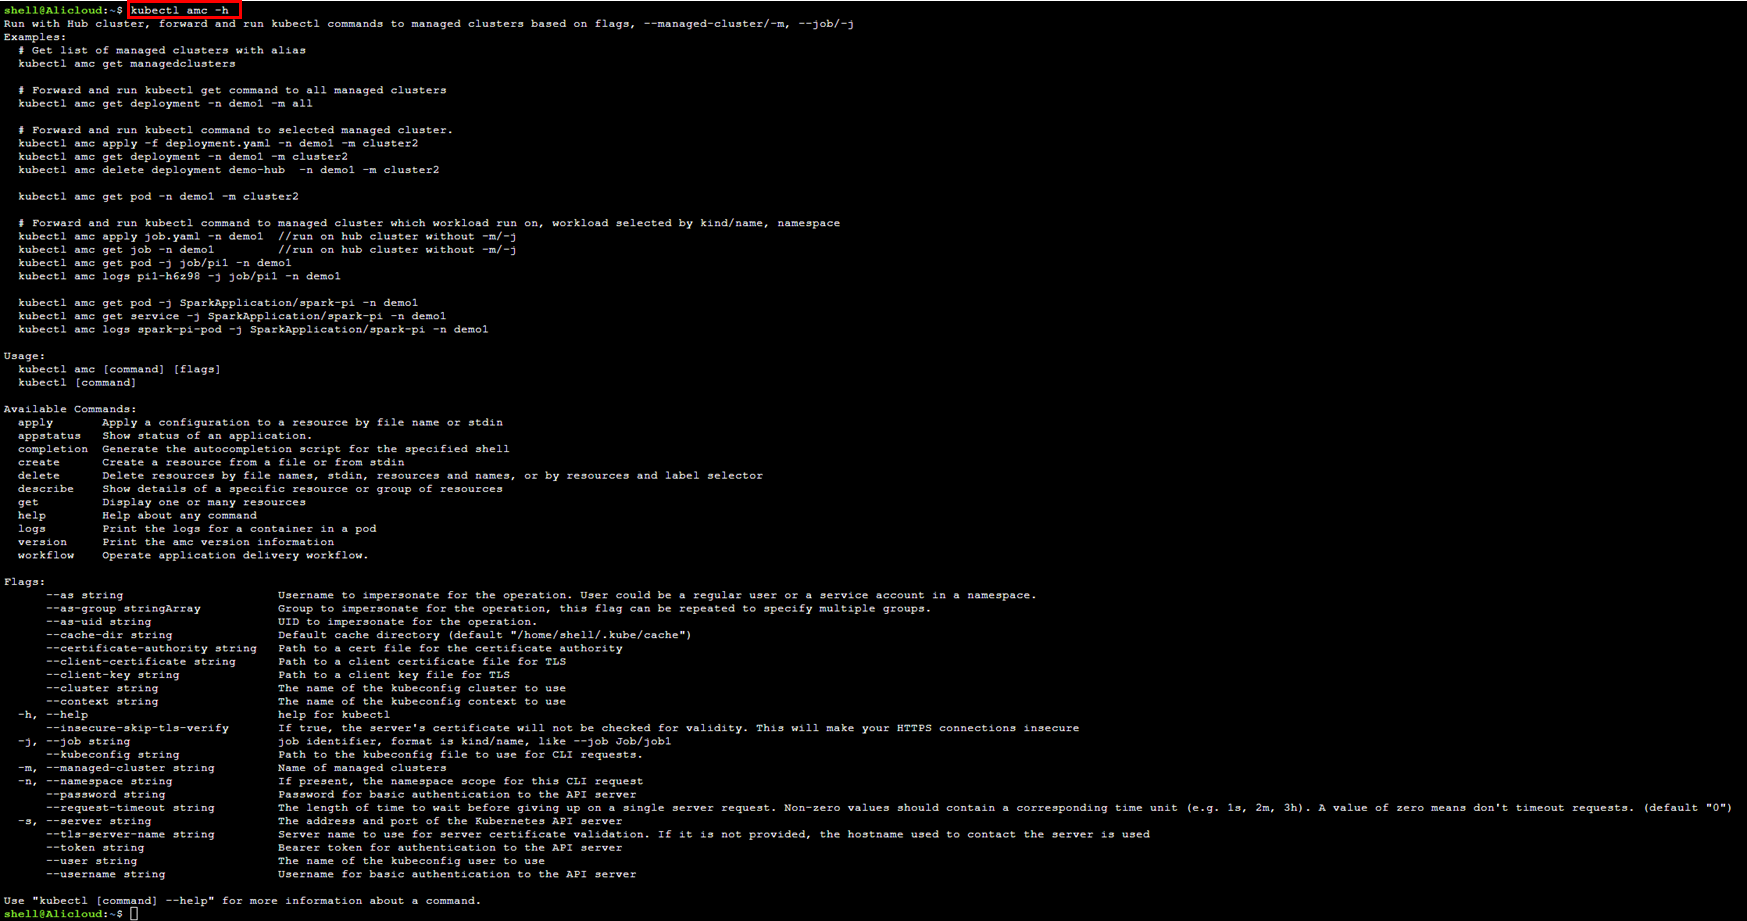
Note: If AMC does not run after you download the AMC package the error message below will be displayed:

If you are using AMC in your working environment, you only need to run the following command:
wget http://ack-one.oss-cn-hangzhou.aliyuncs.com/kubectl-amc-linux && chmod +x kubectl-amc-linux && mv kubectl-amc-linux/usr/local/bin/kubectl-amc
If you are using Cloud Shell from ACK One, the reminder message will be displayed first:

We will introduce the general commands of AMC in the following multi-cluster service scenario:


Manage the cluster with another account and use ACK One to build multi-cluster services. Start with a VPC peering connection.
Prepare a traffic tunnel with a VPC peering connection to build services across different Kubernetes clusters.
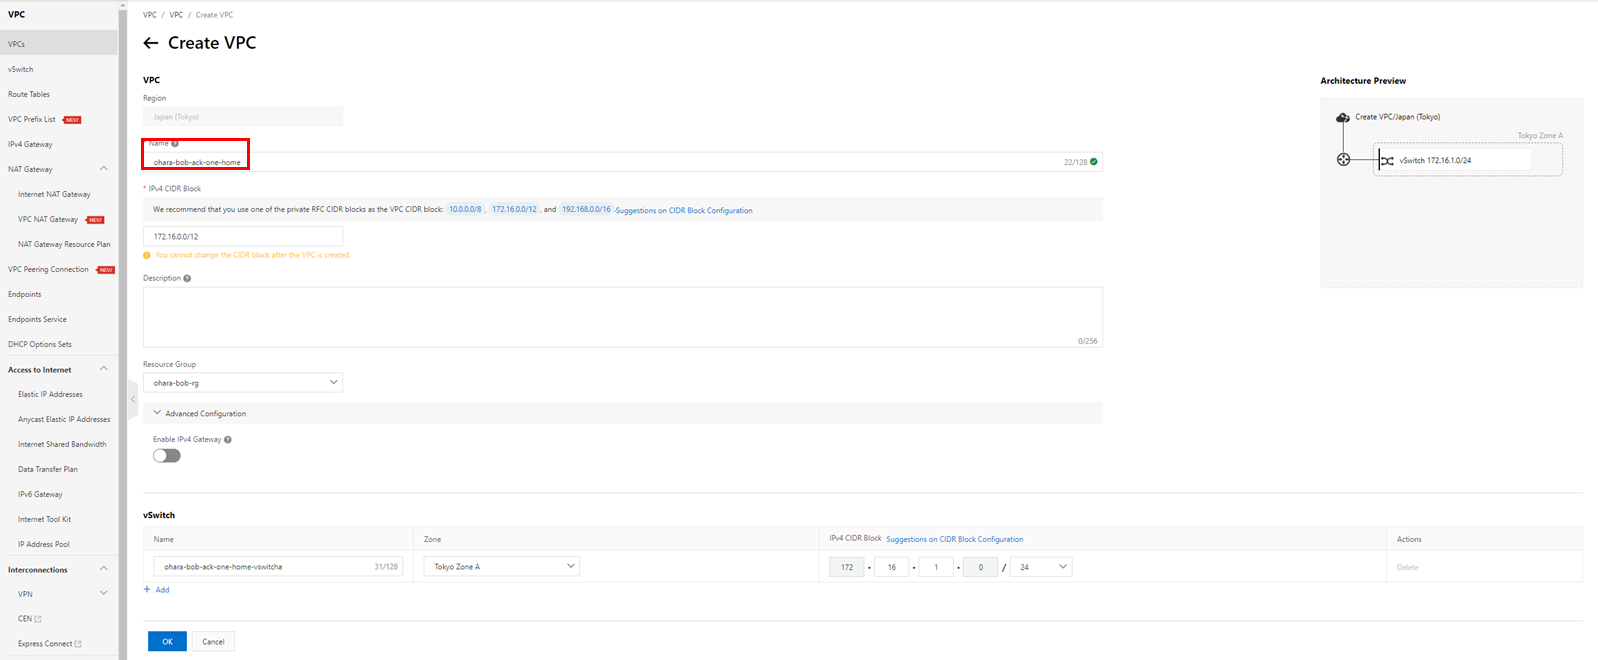
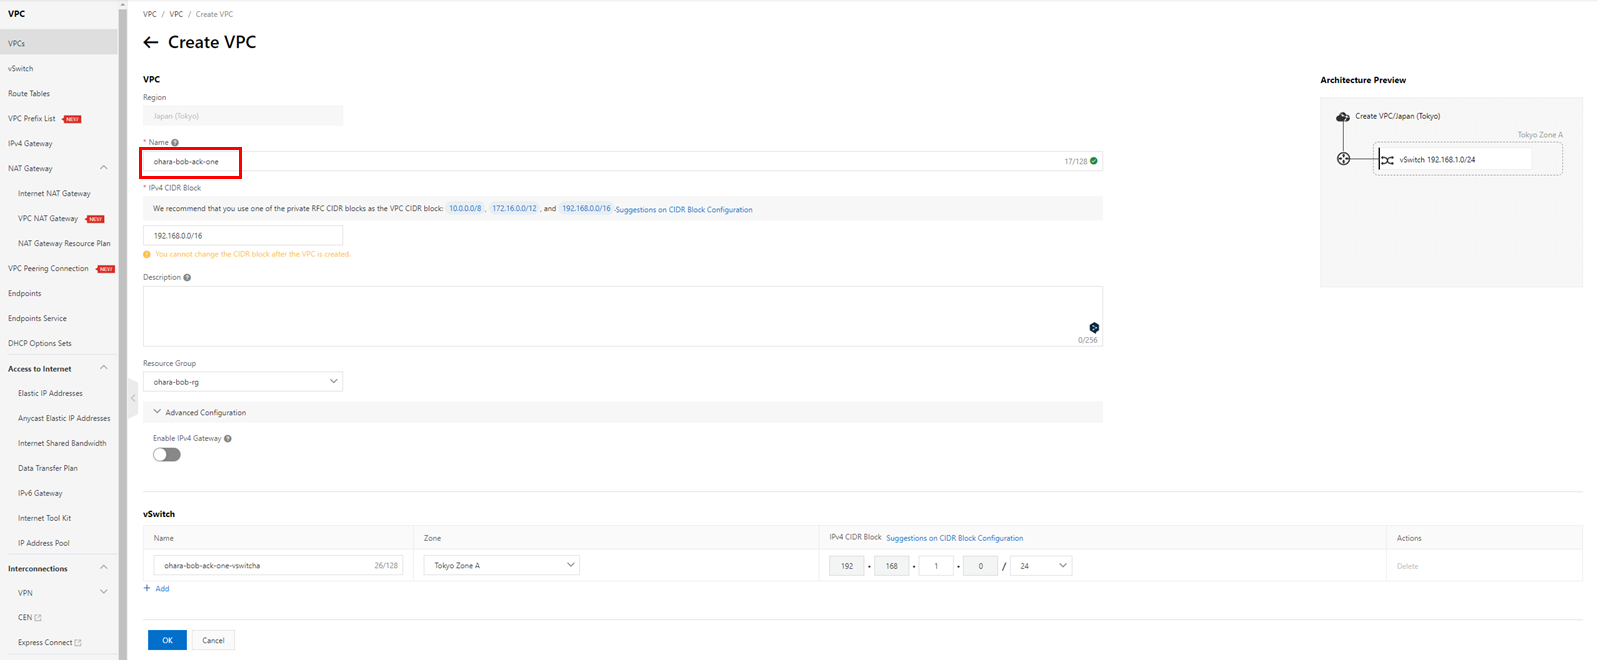
With the two accounts prepared in advance, find a VPC and a vSwitch of the same region.
The following image is the configuration of account A, which associates instances of ACK One and ASK clusters one by one.

The following image is the configuration of account B with only one distributed ASK cluster.

This time, we initialize a VPC peering connection from account A and apply it from account B.

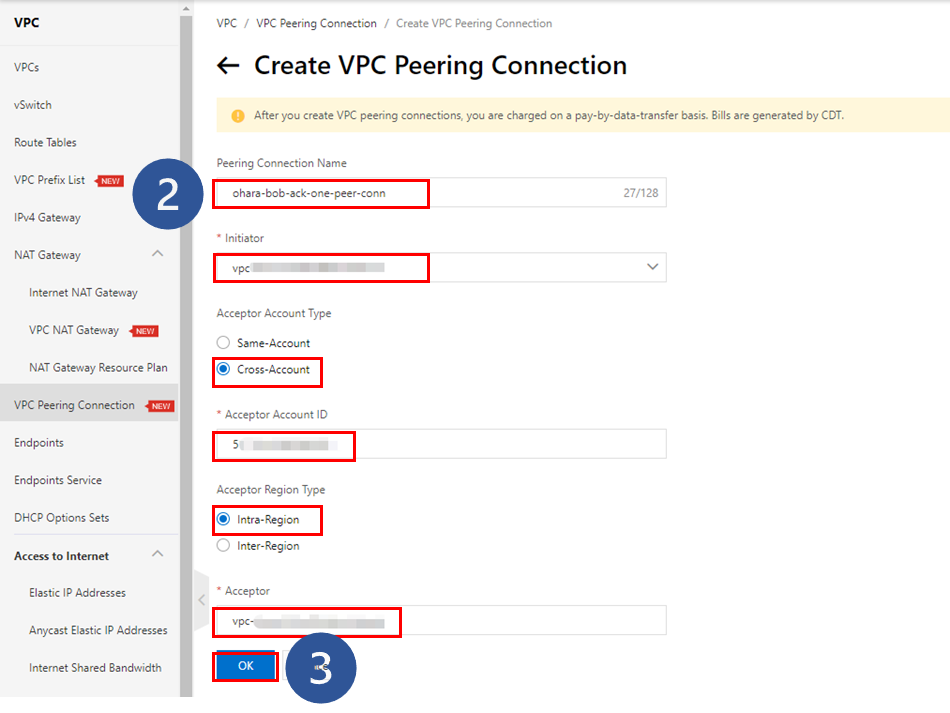
1. Go to the VPC peering connection page in the VPC console and create a VPC peering connection by clicking Create VPC Peering Connection.
2. Input the necessary information in the form
a) Input the connection name
b) Select the prepared VPC as the initiator
c) Select the Cross-Account mode here since the target VPC belongs to another account
d) Input the account ID of account B
e) Select the Intra-Region mode here since the VPCs are in the same region
f) Input the VPC ID of the resource prepared under account B
3. Click OK to run the operation
After completion, the VPC peering connection instance of account A will become an initiator, and another instance of account B will become an acceptor.


Click Accept on the instance.

After a short while, both instances above will go into the Activated state.


Set the route table in the instance of account A.


After completion, the route entry created on the selected route table will be displayed.

Perform the same operation on the VPC peering connection instance of account B.


Create one Elastic Compute Service (ECS) instance under each VPC and check the connection with the ping command.
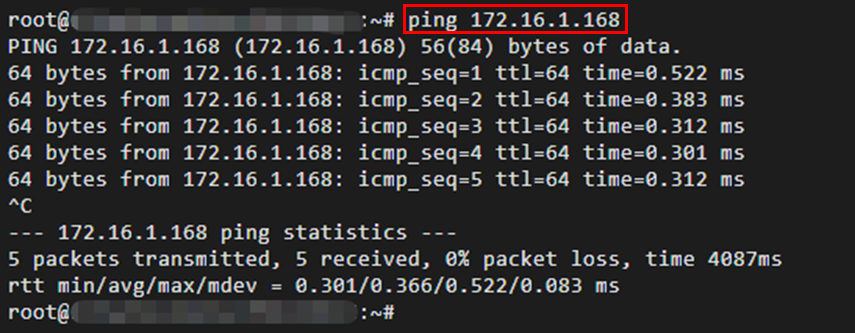
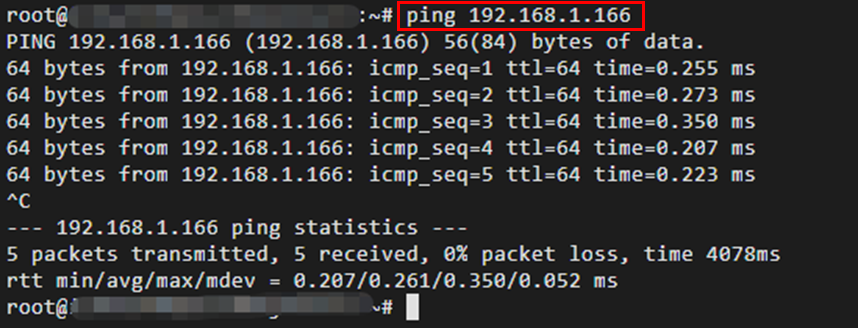
With this, VPC peering connections will be ready. The instance of account A will work as the initiator, and the instance of account B will work as the acceptor.
Access the Alibaba Cloud container service console and create one ASK cluster for each account. Check to ensure you have selected the VPC prepared above. Enable the component coreDNS that helps clusters resolve service domain names.
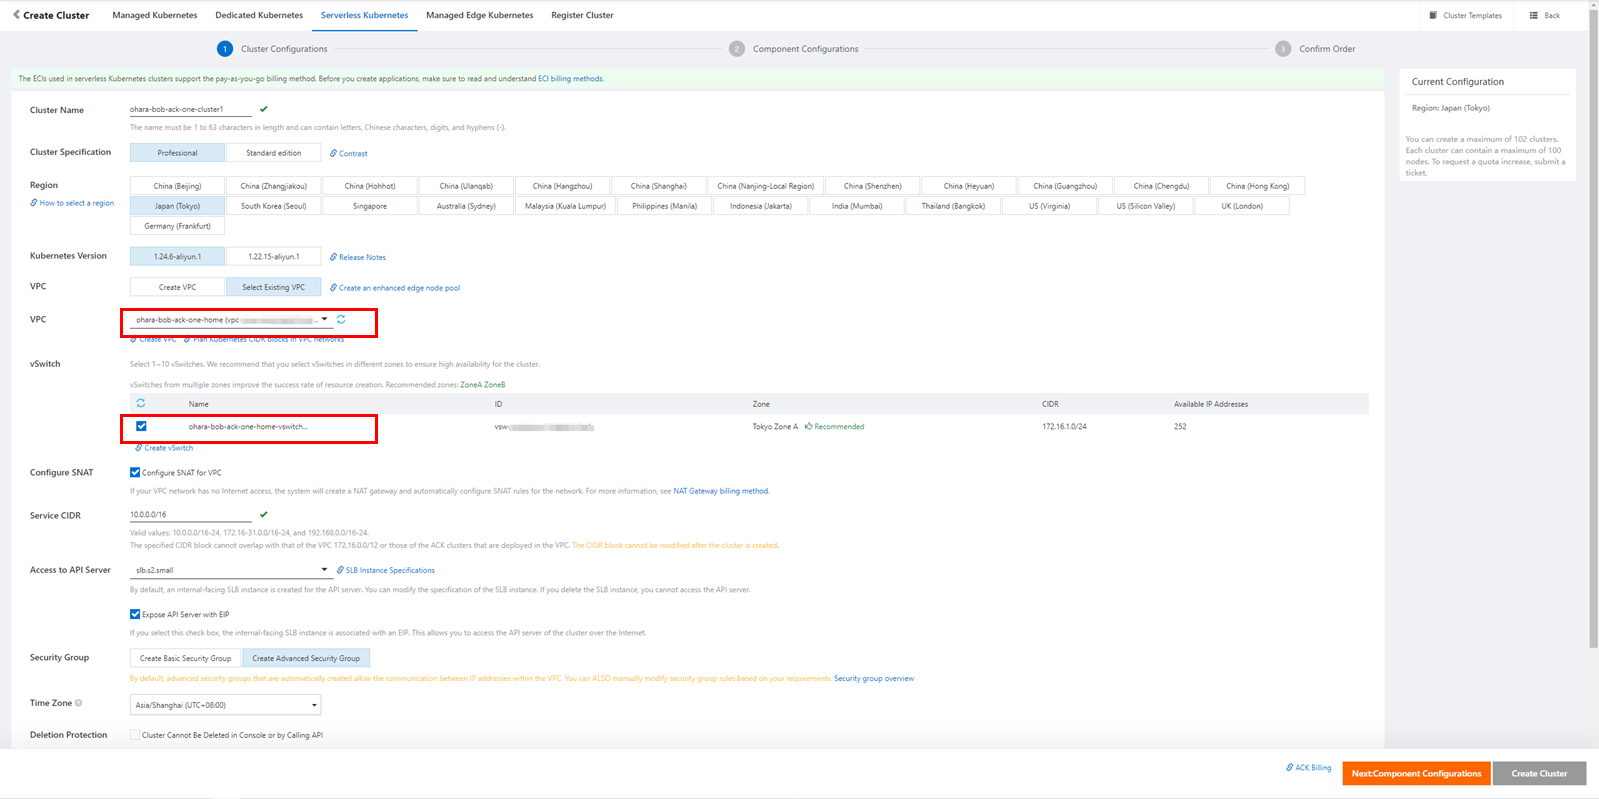
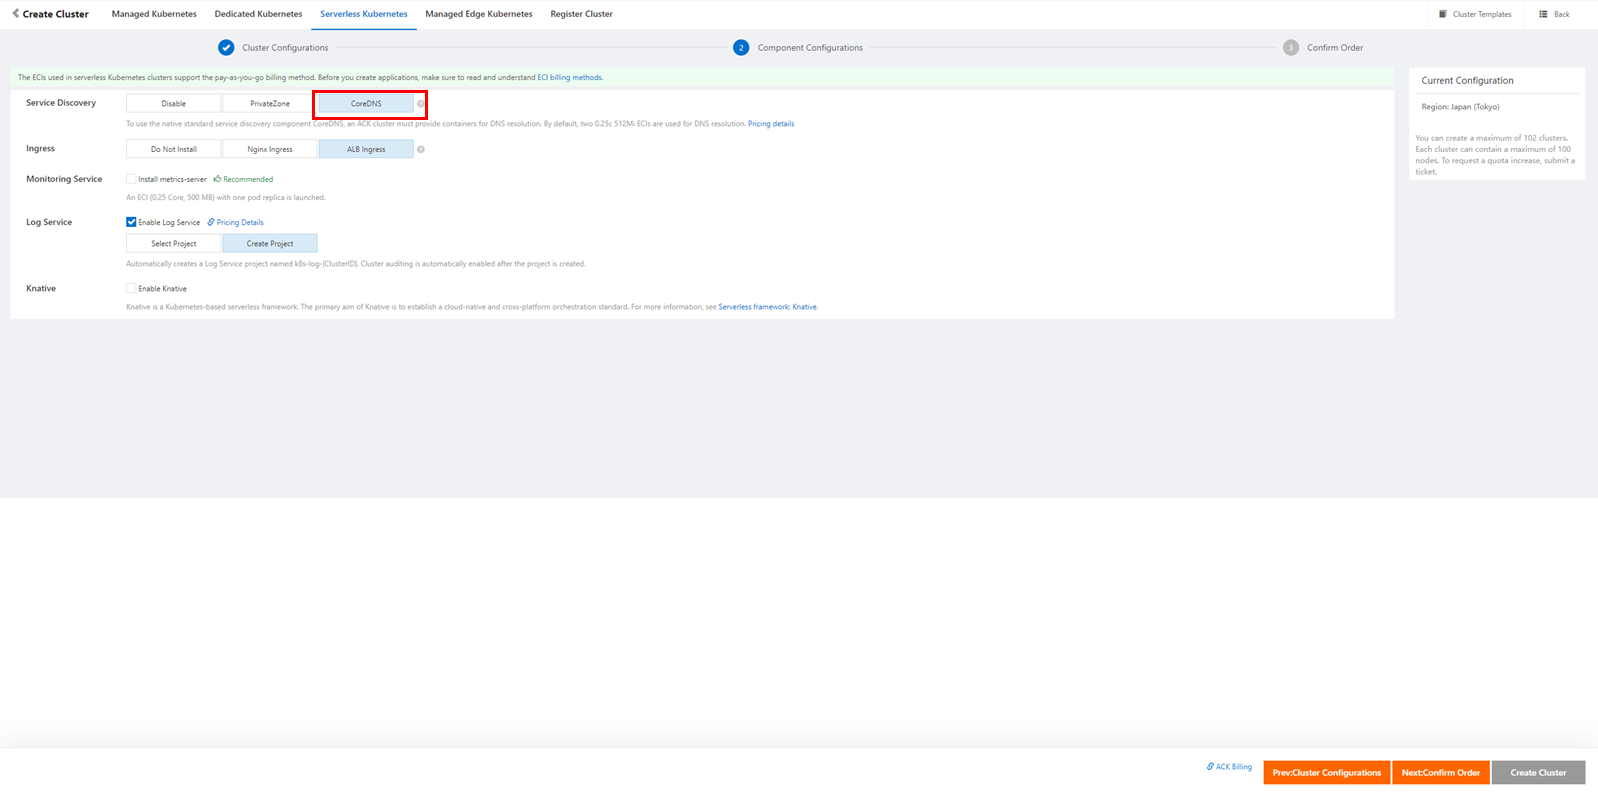
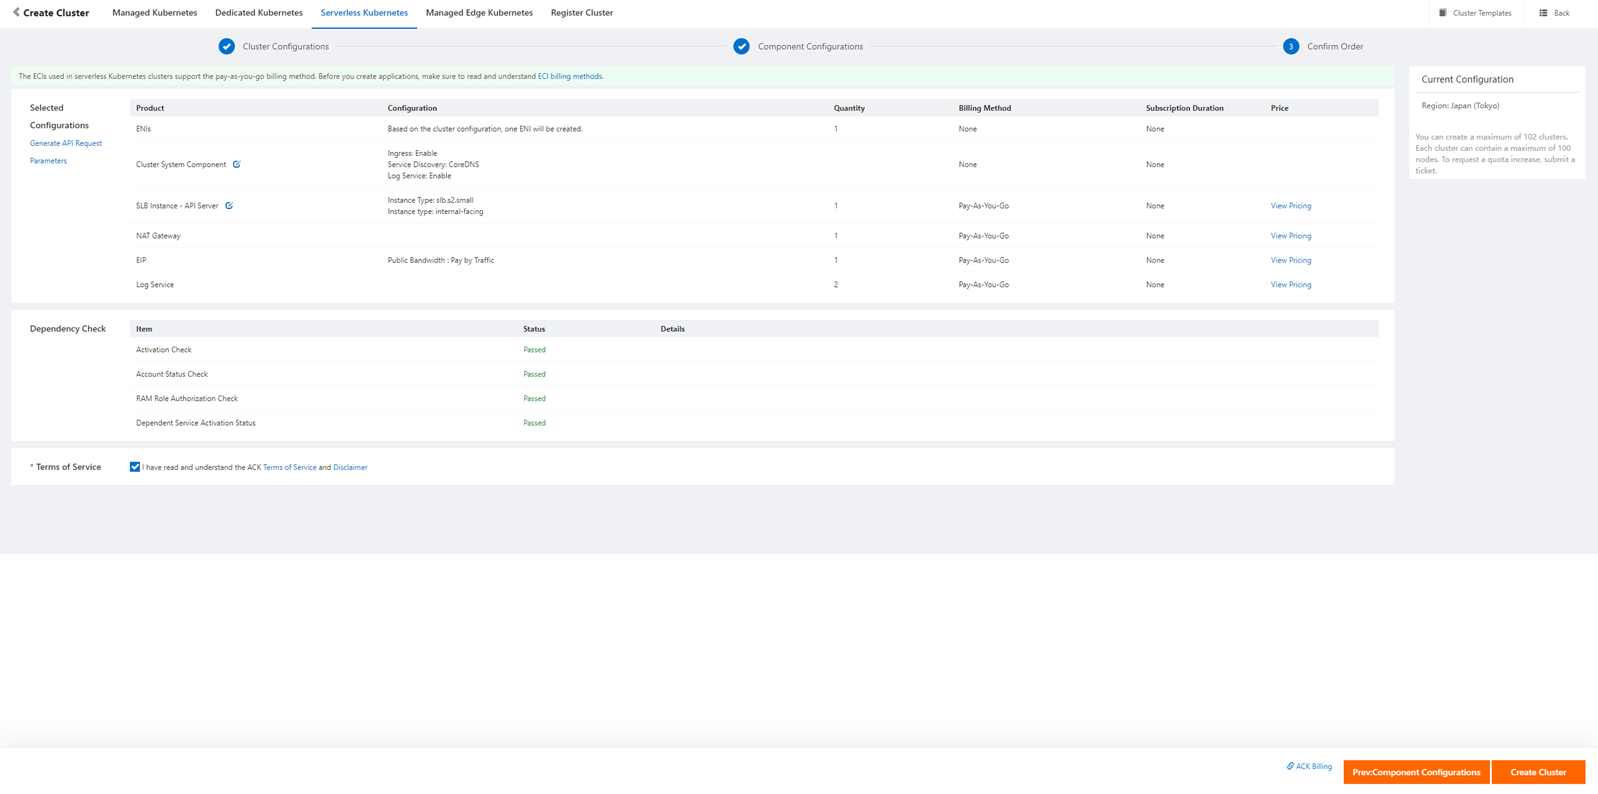
With this, an ASK cluster will be prepared under each account, as shown below:


Go to the Multi-Cluster Management page in the ACK One console. Enable multi-cluster management using the relevant setting and create the master instance in the region selected:

After a short while, the master instances will be ready to work.
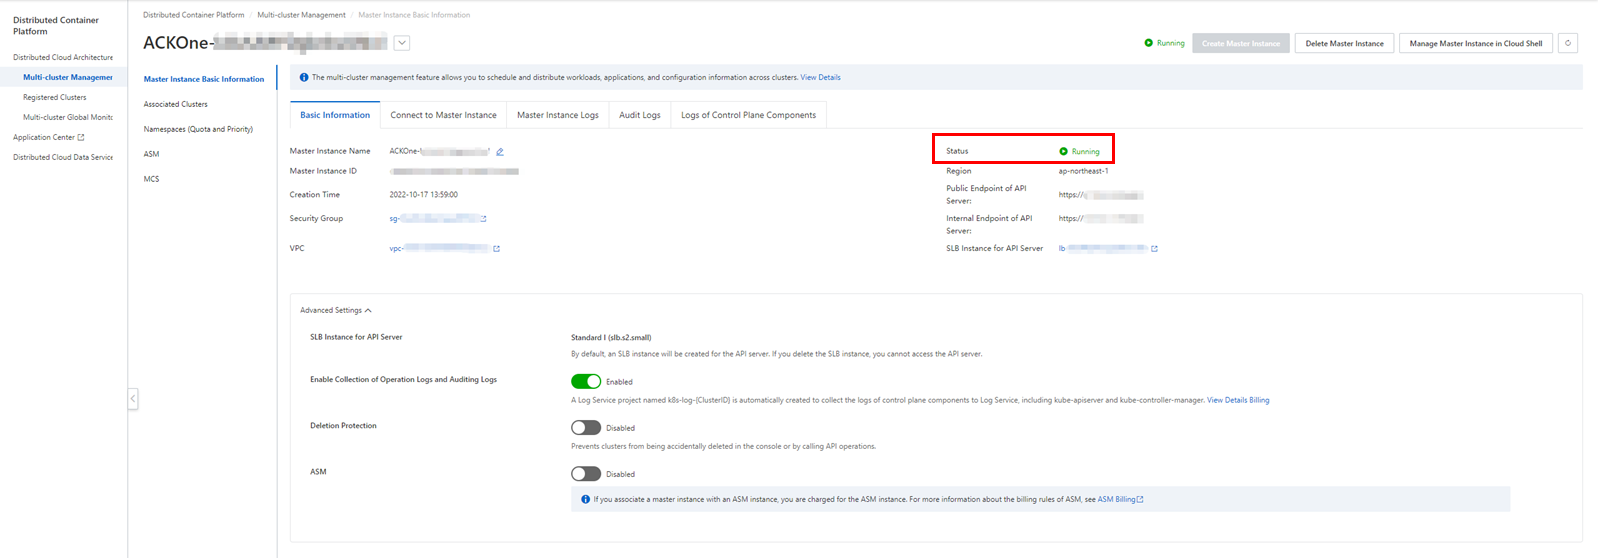
You have to create a Register Cluster as a proxy to manage the ASK cluster with a different account.

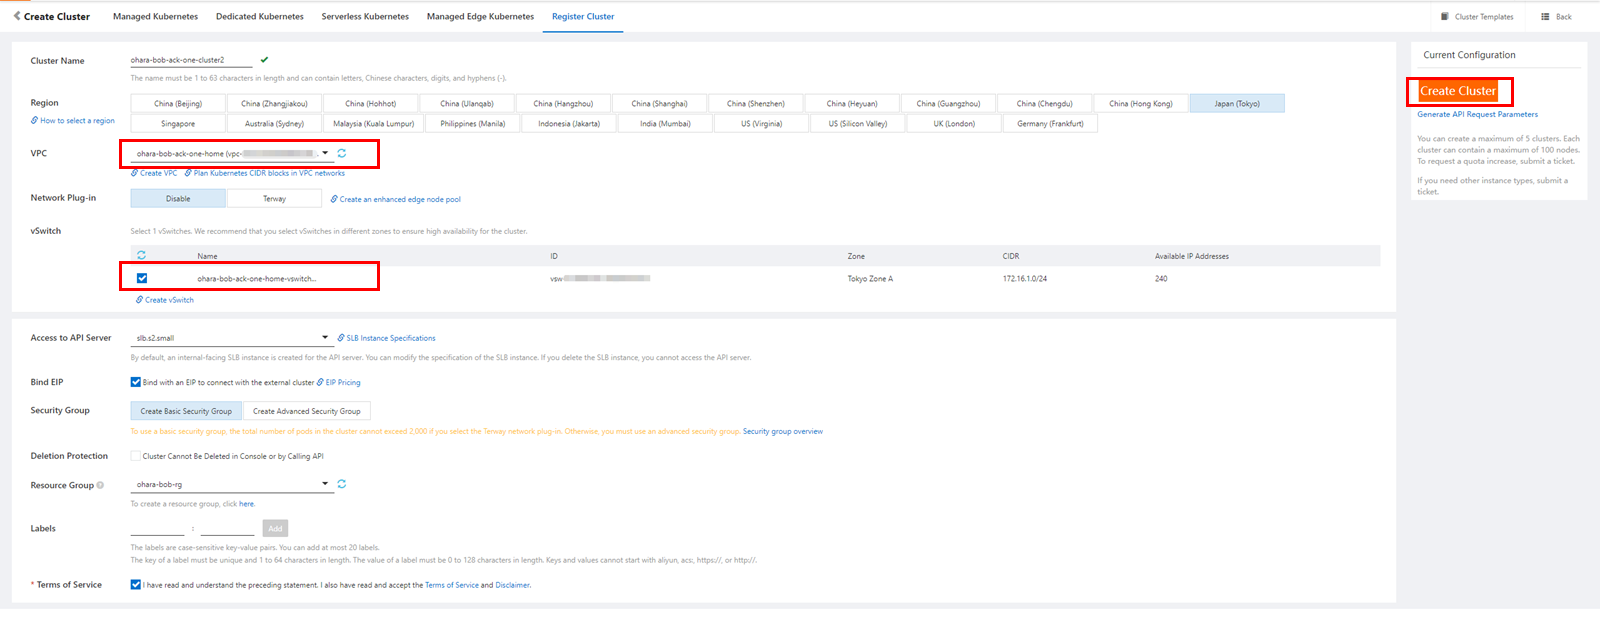

Next, copy the internal network connection information.

Open the details page of the target cluster of account B and click Create from YAML on the deployment page.

Choose the Custom mode and paste the copied YAML settings. Create the necessary resources according to the settings.
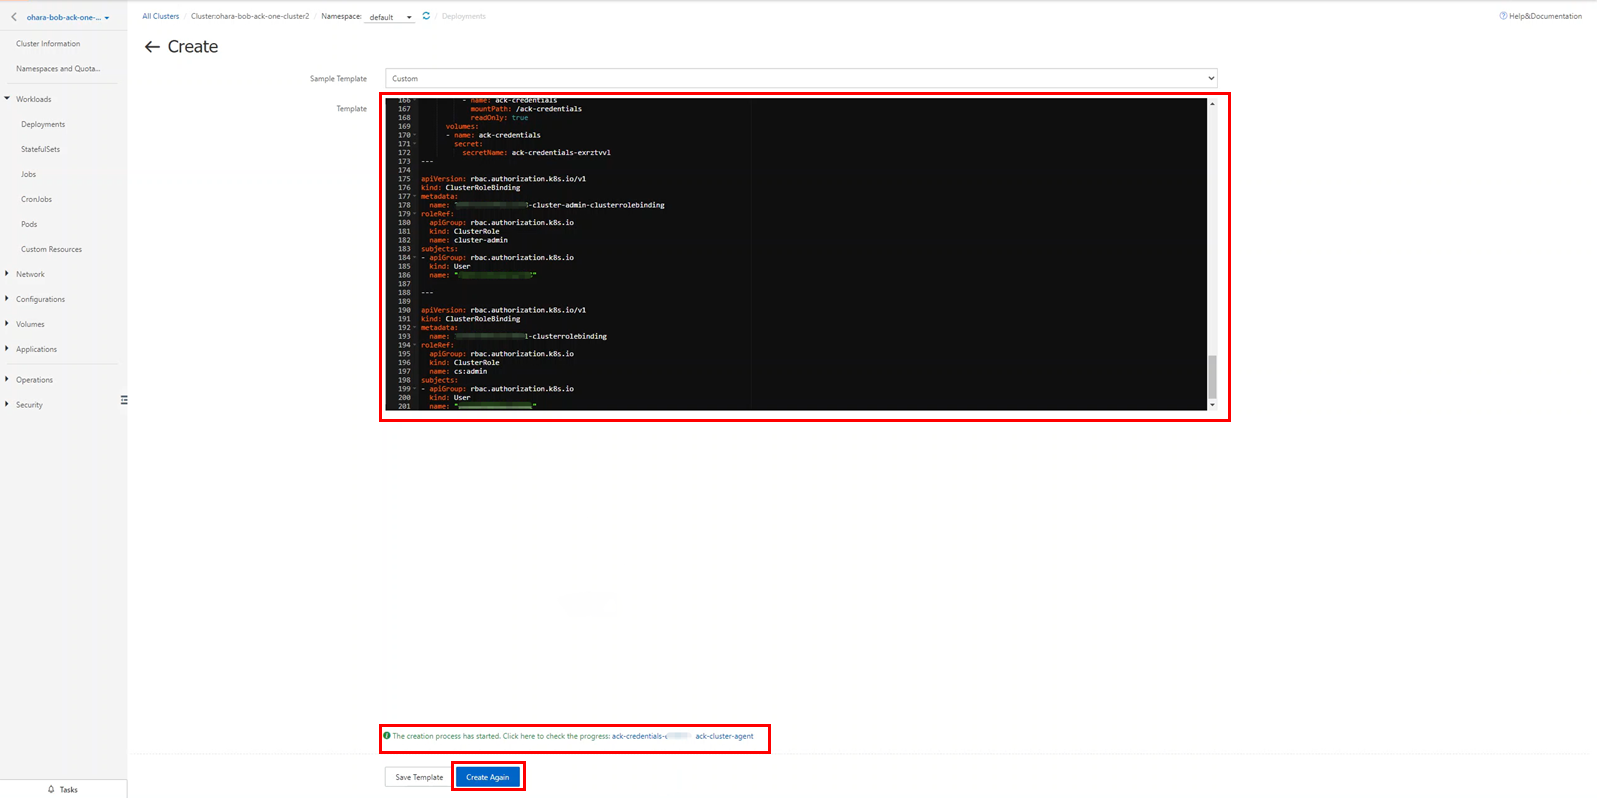
Check the status of the created deployments and pods.


Check the connection status of the Register Cluster. If the status has changed from To Be Connected to Running, the processing is complete.

Open the Associated Clusters page of the ACK One console and associate the prepared clusters.
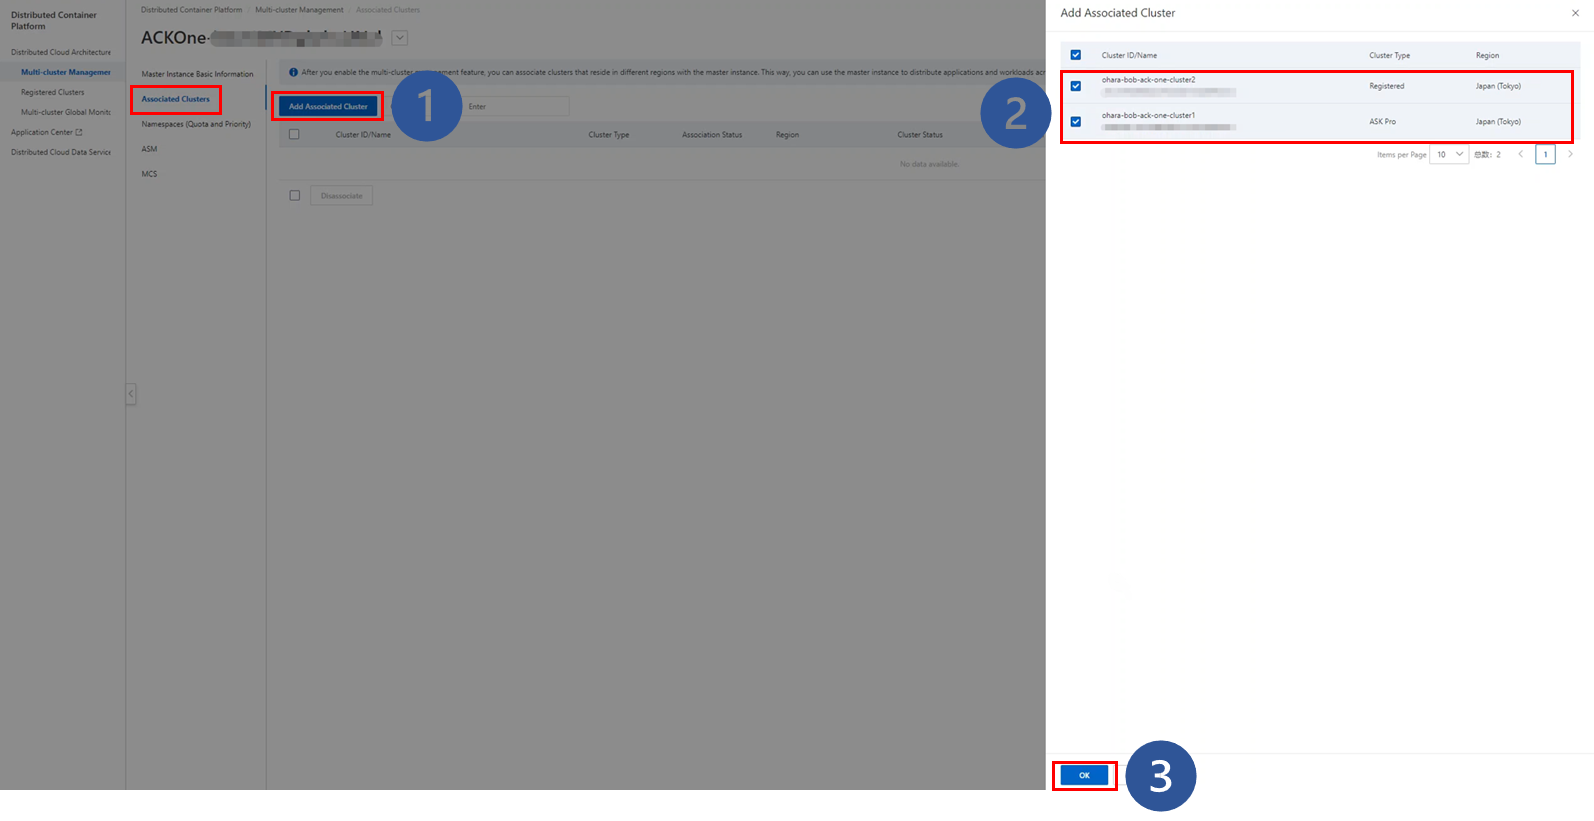
Wait for the processing until the status of the clusters becomes Associated. After that, you can manage the target clusters from the master instance in ACK One.


You can access services across Kubernetes clusters using the multi-cluster service (MCS) function without creating a load balancer. You need to create a service exporter and importer for the master instance to implement this.
All the operations can be processed with the settings YAML file and the console operations. This time, we will operate with the settings YAML file.
For distributed applications having deployments and services, prepare the settings YAML file named ack-vpc-app-meta.yaml, as shown below:
apiVersion: v1       # The Service provider.
kind: Service
metadata:
name: service1
  namespace: provider-ns
spec:
  ports:
  - port: 80
    protocol: TCP
    targetPort: 8080
  selector:
    app: web-demo
    department: demo
  sessionAffinity: None
  type: ClusterIP
---
apiVersion: apps/v1
kind: Deployment
metadata:
  labels:
    app: web-demo
    department: demo
  name: web-demo
  namespace: provider-ns
spec:
  replicas: 1
  selector:
    matchLabels:
    app: web-demo
    department: demo
  template:
    metadata:
      labels:
    app: web-demo
    department: demo
    spec:
      containers:
      - image: bwbw723/ack_one_demo_provider:1.0
        name: web-demo
        env:
        - name: ENV_NAME
          value: cluster1-jp-for-gke
---
apiVersion: core.oam.dev/v1beta1
kind: Application
metadata:
  name: web-demo  # Define the resources and the propagation policy of the application.
  namespace: provider-ns
  annotations:
    app.oam.dev/publishVersion: version1
spec:
  components:
    - name: web-demo
      type: ref-objects
      properties:
        objects:
          - resource: deployment
        name: web-demo
          - resource: service
            name: service1
  policies:
    - type: topology
      name: cluster2
      properties:
clusters: ["ID of Cluster 2"]     # This is the deployment cluster for resources. Replace this with the target cluster ID.
Update and then use the Cluster ID at the end of the file. In this case, we recommend the ID of the register cluster.
For the deployed image, you can use one of your images or the following for testing.
For the service importer and exporter, prepare the following settings YAML files (ack-vpc-mcs-service-policy.yaml) separately.
apiVersion: multicluster.x-k8s.io/v1alpha1
kind: ServiceExport
metadata:
name: service1 # This value has to be same as the name of the Kubernetes service to be exported.
namespace: provider-ns # This value has to be same as the namespace of the Kubernetes service to be exported.
---
apiVersion: multicluster.x-k8s.io/v1alpha1
kind: ServiceImport
metadata:
name: service1 # This value has to be same as the name of the Kubernetes service to be exported.
namespace: provider-ns # This value has to be same as the namespace of the Kubernetes service to be exported.
spec:
ports:# This field value has to be same as the port used by the Kubernetes service to be exported.
  - port: 80
    protocol: TCP
type:ClusterSetIP
---
apiVersion: core.oam.dev/v1beta1
kind: Application
metadata:
  name: amcs-export-service1
  namespace: provider-ns
  labels:
    amcs: export
    amcs-service: service1
    app: web-demo
    department: demo
  annotations:
    app.oam.dev/publishVersion: version1
spec:
  components:
    - name: export-service
      type: ref-objects
      properties:
        objects:
          - resource: serviceexport  # Refer ServiceExport
            name: service1
  policies:
    - type: topology
      name: export-clusters
      properties:
        clusters: ["ID of Cluster 2"]  # Distribute ServiceExport to ACK Cluster 2
---
apiVersion: core.oam.dev/v1beta1
kind: Application
metadata:
  name: amcs-import-service1
  namespace: provider-ns
  labels:
    amcs: import
    amcs-service: service1
    app: web-demo
    department: demo
  annotations:
    app.oam.dev/publishVersion: version1
spec:
  components:
    - name: import-service
      type: ref-objects
      properties:
        objects:
          - resource: serviceimport  # Refer ServiceImport
            name: service1
  policies:
    - type: topology
      name: import-clusters
      properties:
clusters: ["ID of Cluster 1"]# Distribute ServiceImport to ACK Cluster 1
As mentioned above, use the Cluster ID of the configuration file after updating. With the steps above, the service exporter has to be set up in a cluster with a deployed service provider. Also, you have to set the service importer to another cluster.
You can upload the file to an Object Storage Service (OSS) bucket or download it to Alibaba Cloud Cloud Shell. You can also use it directly in your local working environment, as shown in the next step.
Similar to connecting to ASK/ACK clusters, you can connect from the working environment to an ACK One master instance. This time, we will use Alibaba Cloud Cloud Shell.
Go to the Master Instance Basic Information page in the ACK One console and click Manage Master Instance in Cloud Shell to open Cloud Shell.
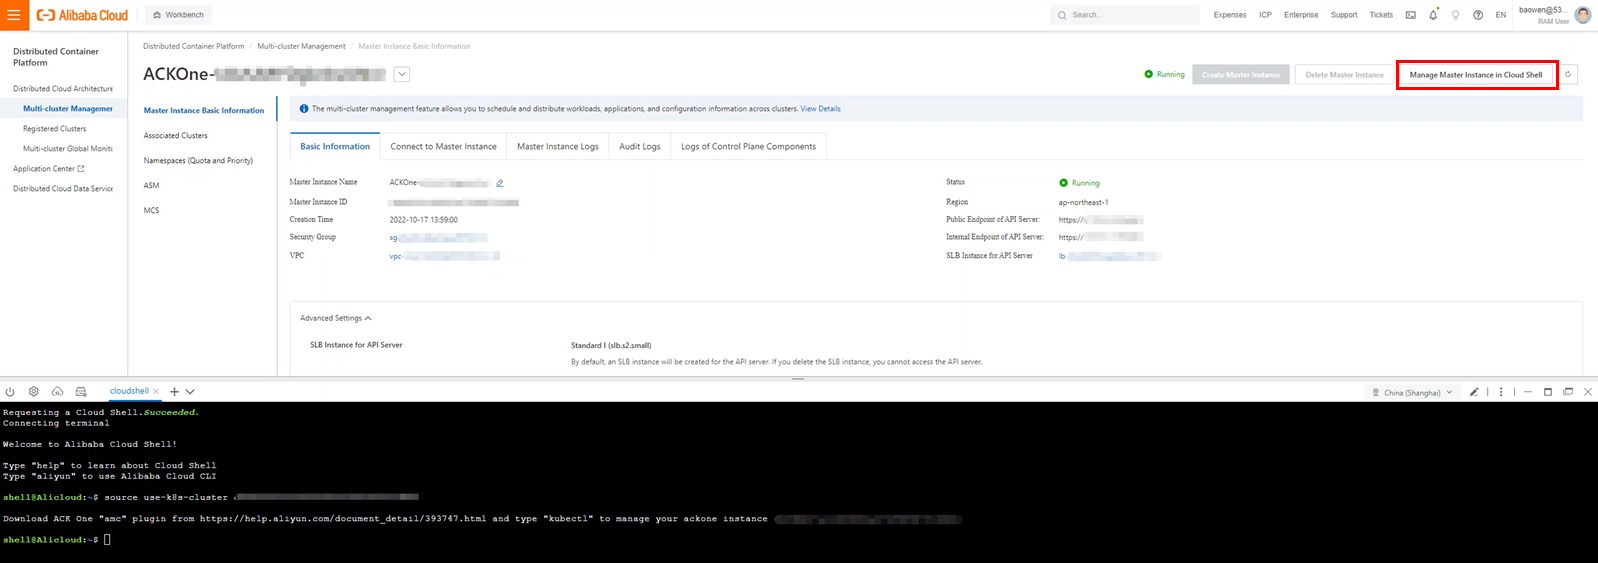
First, start the AMC command line tool in Cloud Shell.
wget http://ack-one.oss-cn-hangzhou.aliyuncs.com/kubectl-amc-linux && chmod +x kubectl-amc-linux && mv kubectl-amc-linux/usr/local/bin/kubectl-amc
Check the cluster managed by the following command:
kubectl amc get managedclusters
Create a new namespace for building multi-cluster services:
kubectl create ns provider-ns
Check the information of the created namespace in the console.

Deploy the distributed application using the prepared ack-vpc-app-meta.yaml file and check the resource status with the kubectl command:
kubectl apply -f ack-vpc-app-meta.yaml
kubectl get app web-demo -n provider-ns
kubectl amc get deployment,service -n provider-ns -m <cluster ID>

Check deployments and services in the console:


Deploy the service importer and the exporter with the prepared ack-vpc-mcs-service-policy.yaml file and check the resource status:
kubectl apply -f ack-vpc-mcs-service-policy.yaml
kubectl amc get serviceexport,serviceimport -n provider-ns -m all

Check the multi-cluster services in the console:

Display the details page of the ASK cluster used as the server importer in account A. Then, create the service consumer deployment with the following YAML settings:
apiVersion: apps/v1
kind: Deployment
metadata:
  name: demo-consumer
  labels:
    app: demo-consumer
spec:
  selector:
    matchLabels:
    app: demo-consumer
      tier: frontend
  strategy:
    type: Recreate
  template:
    metadata:
      labels:
    app: demo-consumer
      tier: frontend
    spec:
      containers:
      - image: bwbw723/ack_one_demo_consumer:1.0
        name: demo-consumer
        ports:
        - containerPort: 8080
          name: demo-consumer
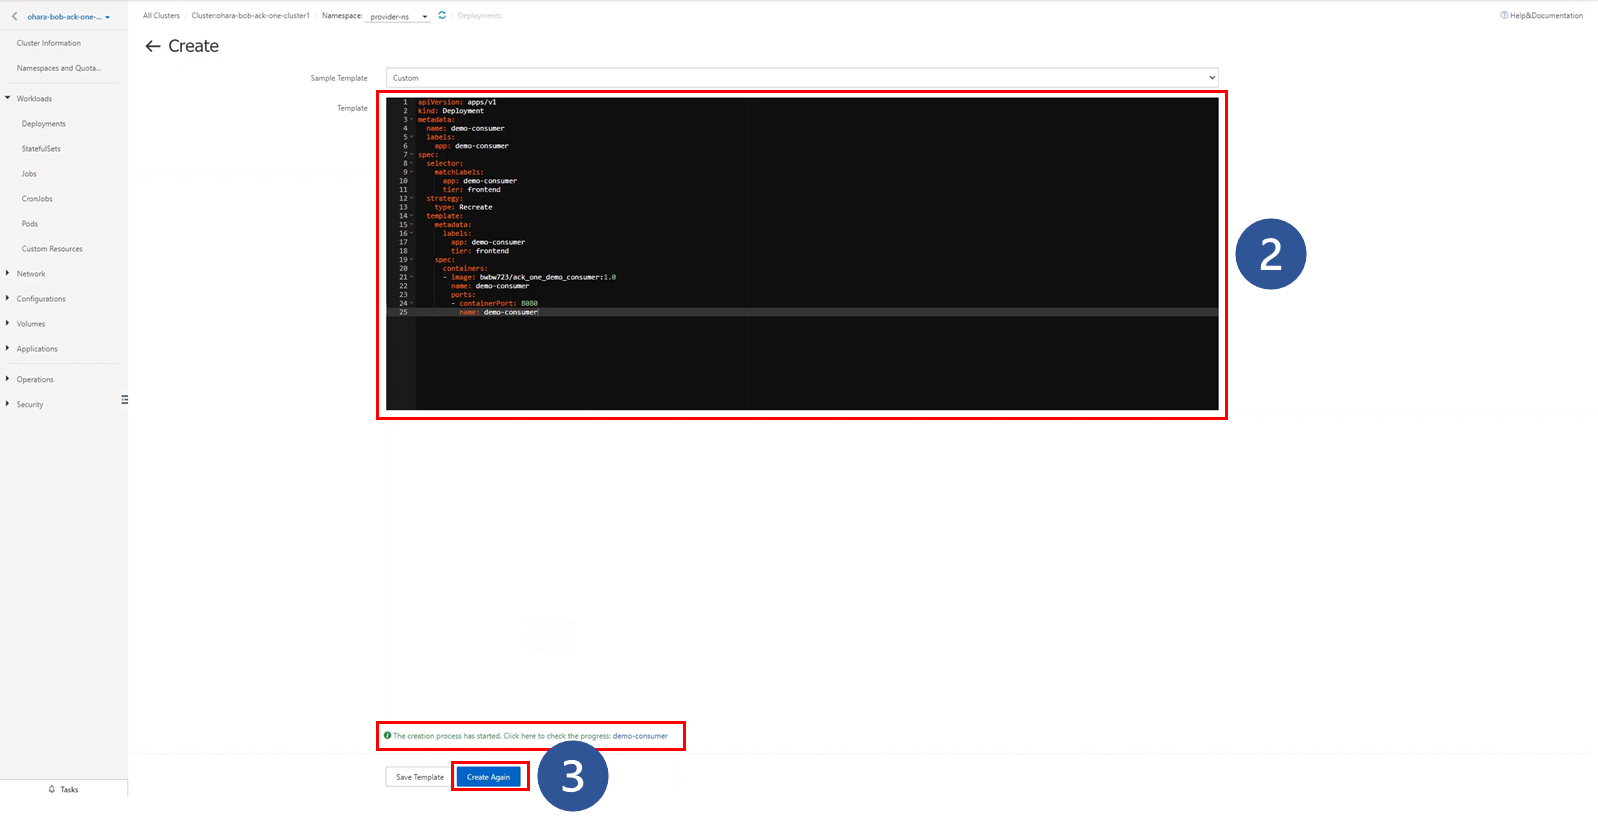
The involved image bwbw723/ack_one_demo_consumer:1.0 starts up the web application server and returns the JSON result obtained from the service imported. The curl command curl amcs-service1.provider-ns.svc.cluster.local is used within the code to access a multi-cluster service.
Check the status of the created deployments and Pods.


Enter the terminal of the associated pods and check the connection with the multi-cluster services.


Go to the Service page in the console and create a Server Load balancer (SLB) service based on the deployment of the demo-consumer.

The SLB service will be created upon the creation of the external endpoint. Access it from a web browser and check the execution results of the multi-cluster service.


Check the setting of the security group. If a connection error occurs there, use the inbound traffic of the 80/8080 port.
This article introduced how to use ACK One to centrally manage Kubernetes clusters that belong to different Alibaba Cloud accounts. With ACK One, you can easily process the application workload and manage multiple Kubernetes clusters effortlessly using direct interfaces. ACK One can work with other tools (such as Log Service, Application Real-Time Monitoring Service (ARMS), and Alibaba Cloud Prometheus). Please refer to the following articles when implementing hybrid cloud and multi-cloud deployment based on Kubernetes.
Start Hybrid Cloud and Multi-Cloud with Alibaba Cloud ACK One
Start Hybrid Cloud and Multi-Cloud with Alibaba Cloud ACK One [Part Two]

9 posts | 0 followers
FollowAlibaba Container Service - November 21, 2024
Alibaba Container Service - April 18, 2024
Alibaba Container Service - December 26, 2024
Alibaba Clouder - April 26, 2021
Alibaba Clouder - February 5, 2021
Alibaba Container Service - October 21, 2019

9 posts | 0 followers
Follow Function Compute
Alibaba Cloud Function Compute is a fully-managed event-driven compute service. It allows you to focus on writing and uploading code without the need to manage infrastructure such as servers.
Learn More Elastic High Performance Computing Solution
High Performance Computing (HPC) and AI technology helps scientific research institutions to perform viral gene sequencing, conduct new drug research and development, and shorten the research and development cycle.
Learn More Quick Starts
Deploy custom Alibaba Cloud solutions for business-critical scenarios with Quick Start templates.
Learn More Container Service for Kubernetes
Alibaba Cloud Container Service for Kubernetes is a fully managed cloud container management service that supports native Kubernetes and integrates with other Alibaba Cloud products.
Learn MoreMore Posts by Hironobu Ohara
5630880686732512 April 5, 2023 at 9:33 am
The blog is well-written and provides step-by-step instructions along with helpful screenshots to guide the reader. It is clear that the author has a good understanding of serverless Kubernetes clusters and Alibaba Cloud's ACK One platform. Also write something on CCSP Course .