This tutorial will show you how you can set up Plesk on Alibaba Cloud, including opening the ports needed for Plesk and creating a website using Plesk. With Plesk on Alibaba Cloud you can easily develop, secure, and run your websites, applications and online business on Alibaba Cloud.
Besides continuing with this tutorial, you can also find out more about using Plesk on Alibaba Cloud here: marketplace.alibabacloud.com/plesk.
Log in to your Alibaba Cloud account. If you do not have an Alibaba Cloud account, you will need to create a new one. Then, on the Alibaba Cloud Console, go to Elastic Compute Service in the left-side navigation pane.
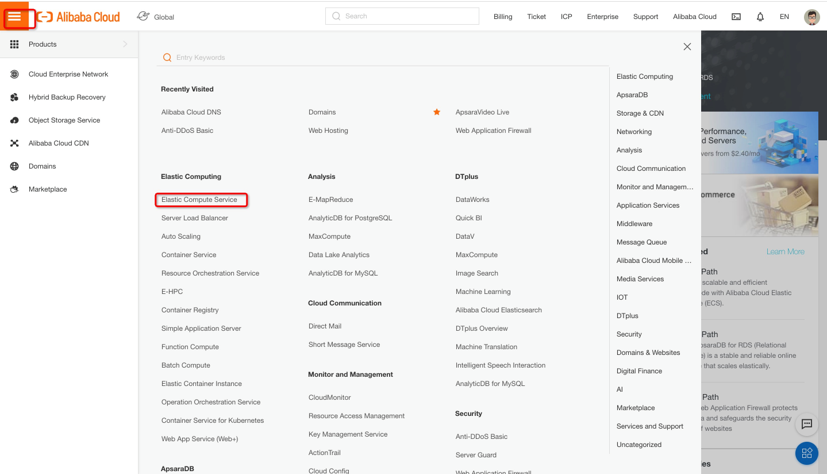
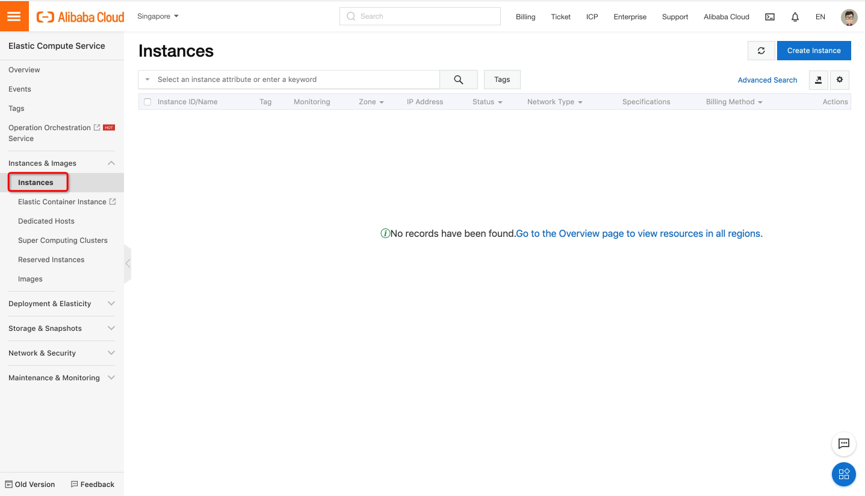
Click Instances, and then click the Create Instance button in the top right corner of the screen.
Next, you will need to fill in the basic configurations, including your billing method. There are three options here:
This billimg method is very cost effective and is cheaper than the other billing methods in the long run but requires a prepayment and a monthly commitment. If your ECS instance is placed behind a Server Load Balancer instance, you only need to purchase a small amount of bandwidth for the ECS instance for you to connect to the instance and perform administration remotely. If you decide that Plesk on Alibaba is right for you, we recommend using this model for web hosting.
This billing method offers a greater flexibility over a subscription, but usually costs more per hour, but you can cancel at any time. This pricing model allows you to try out Plesk on Alibaba cheaply, but is not well-suited for hosting. One thing that is important to know, however, is that you cannot apply for an ICP license for a Pay-As-You-Go ECS instance.
This billing method offers a discounted rate compared to standard pay-as-you-go pricing. The price may vary to reflect demand and supply, but generally this holds true. You set the highest hourly rate that you are willing to pay. When your bid price surpasses the market price, your instance starts running. ECS can choose to release your spot instance following a market price change. Note, again, you cannot apply for an ICP license for your spot instance.
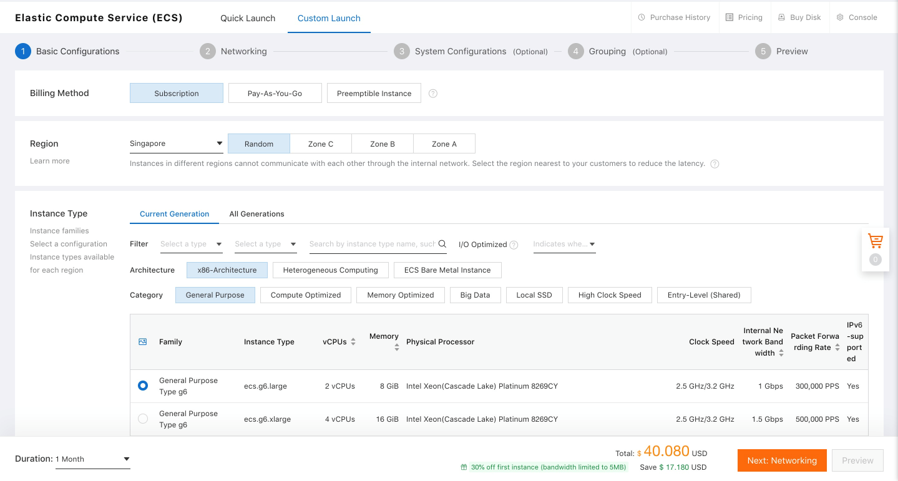
Next, select the data center region and zone. If you plan to host small business websites, we recommend choosing the data center region and zone closest to their geographic location to decrease page load times for local visitors.
Next, select the Instance Type. When choosing the ECS instance to deploy Plesk on, pay attention to the amount of memory it comes with. The more websites you intend to host, and the more traffic the hosted websites generate, the more memory you will need. Your Plesk System Requirements should give you an estimate of the amount of memory your setup will require.
If you are not sure which instance to choose, we recommend starting with the a .tiny or .medium instance and upgrading it later, if necessary, but do note that only the subscription pricing model supports instance upgrades.
Next, set your Image. There are four different images to choose from:
Alibaba Cloud provides official public images. These images only include standard system environments. You can apply your customization and configuration settings based on these images.
Custom images are created from system snapshots. These images include the standard system environments, configured user environments and applications. These custom images can be used as a preset to create more instances, saving you effort to set up the system from scratch.
Shared images are accessible to all users by default. Alibaba Cloud cannot guarantee the security and integrity of the images shared with you. Use at your own risk and discretion.
The image Marketplace provides certified images. Preinstalled with OS, configured user environments and applications, this image can be deployed immediately. It is suitable for website building, application development, visualized administration and other personalized use scenarios. As such, we highly recommend this image.
Choose Marketplace Image and then click on Select from image market.

The Image Marketplace menu will appear. Type Plesk in the search box and choose from the BYOL and WebHost configurations. Plesk WebHost is ready to work out of the box. There is more information on this choice in Appendix 1.
Under Storage, we recommend selecting SSD Cloud Disk for your website hosting and adding at least one Ultra Cloud Disk for storing backups. You can also add a Data Disk, if required.
Click Next: Networking and check that your network configuration is correct. Click Next: System Configurations. Here, you can set the authentication method for your instance. This can be password or key-based authentication. Click Next: Grouping. Here's where you can add a tag to your setup if required. Finally, click Next: Preview and review your Plesk setup. If you are happy, check the terms of service and click create order.
You will be taken to the payment screen and once successfully processed, your instance is activated. You can see this new instance in the Alibaba Cloud console. Click Elastic Compute Service then click Instances, and last click the data center region you specified during purchase.
Your instance is now up and running. To begin using Plesk, you need to perform a short post-install configuration where you purchase and bind an Elastic IP address.
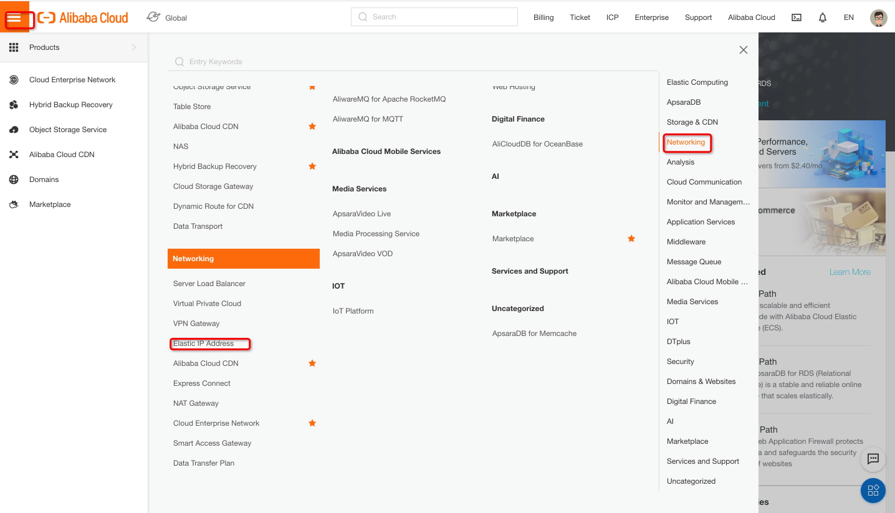
Log on to the Elastic IP console and click Create EIP. On the purchase page, select the region, bandwidth, and purchase quantity for the EIP and then click Buy Now. Then, complete the payment.
On the Elastic IP Address List page, choose a region. All the Elastic IP addresses under the selected region are displayed. Click Bind next to the target EIP. In the Bind dialog, select the ECS instance that you want to bind. Click OK.
Note: You can only bind an EIP to an ECS instance in Running or Stopped status.
On the Elastic IP Address List page, click Refresh on the upper-right corner. When the EIP address status changes to Allocated, the ECS instance bound with the EIP can communicate with the Internet.
Now, since we have covered the necessary steps to install Plesk on Alibaba Cloud, let's find out how to use your new Plesk installation.
On the Alibaba Cloud Console, go to Elastic Compute Service. Then, select the regions where you're running the instance we have just configured.
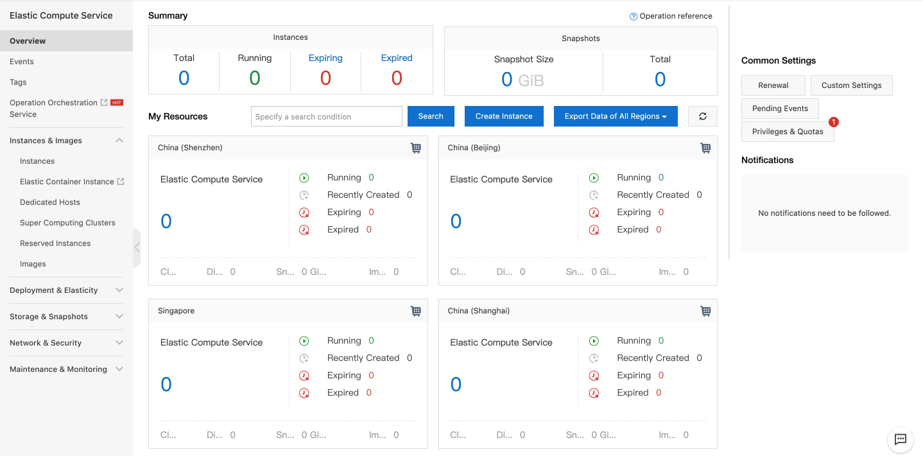
Next, click Instances to view all the instances in your desired region. In this example, we will select Singapore:
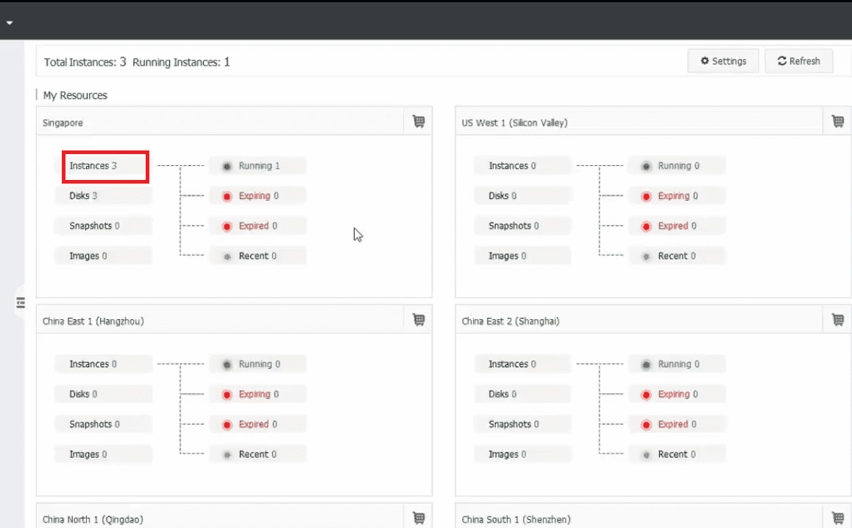
The following screen will appear. Click Security Groups in the left-side navigation pane:
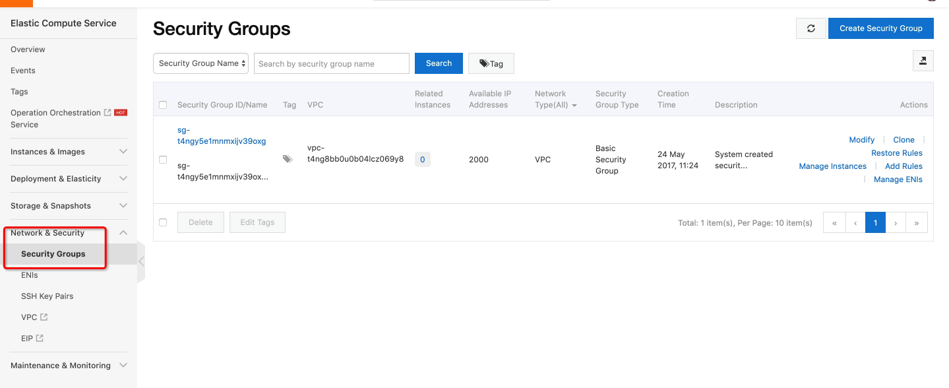
Find the Security Group that your instance uses and click Add Rules on the right-hand side of the table:
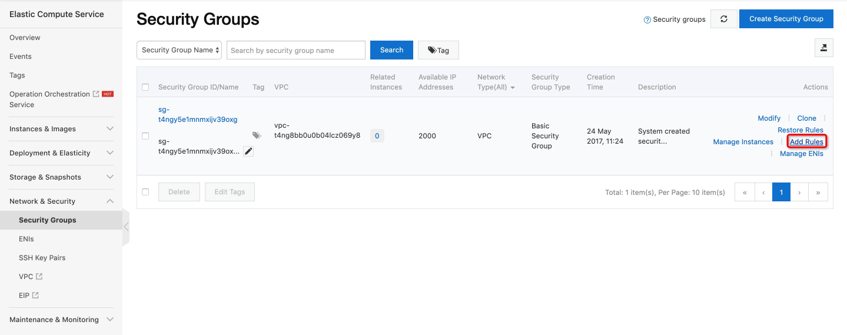
Click Add Security Group Rules:
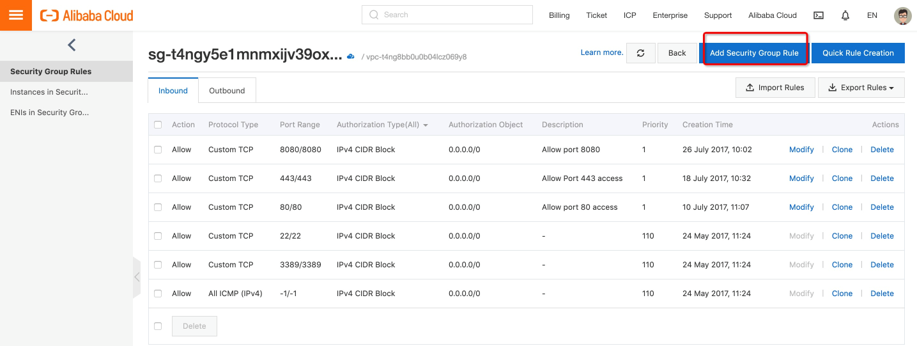
Specify your port range, IP addresses and description, which are available on your Plesk control panel, on the following form. After doing all of that, click OK.
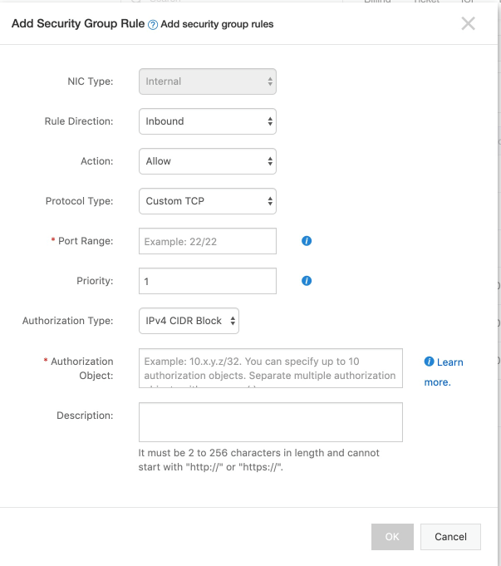
Check the list of Plesk ports at docs.plesk.com. To do this, go to the Administrator's Guide, from there go to Plesk Administration, and then last Ports.
When your subscription is created in Plesk, a domain is also created. We call this domain the subscription's main domain. If your subscription settings allow it, you can create one or more add-on domains. Let's learn how to do this in Plesk now.
Before we get into it, note that, depending on your Plesk version and the applied theme, the appearance of your Plesk platform might be different from what you see in this tutorial.
Click Add Domain.
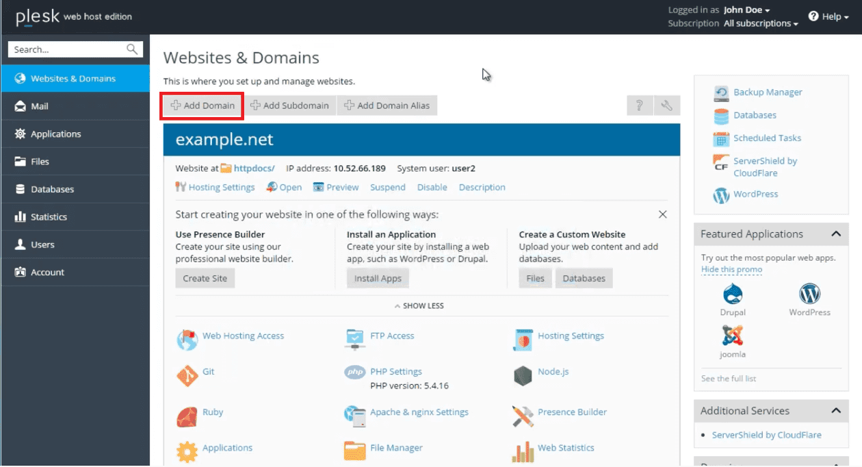
Enter in the name of the new domain in the Domain name field.
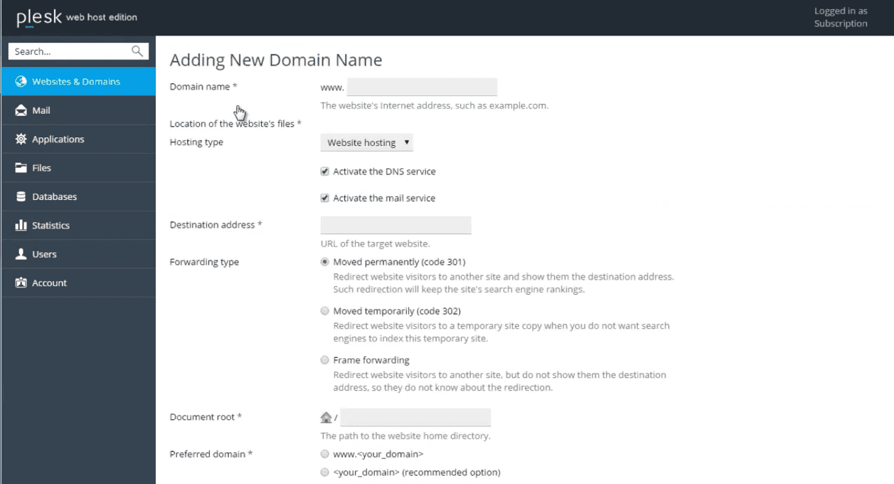
If your account is associated with multiple subscriptions, you can choose one of them to be the parent subscription for the new domain. Click Location of the website's files to select the desired subscription.
As we are creating a website, leave the Hosting type set to Website hosting. Leave the Activate the DNS service and the Activate the mail service checkboxes selected, unless you plan to use third-party DNS or mail services for your new domain.
By default, a new domain's home directory (the Document root) is created in the subscription's home directory and its name is identical to the domain name. You can choose a custom home directory for the domain by typing its path in the Document root field, relative to the subscription's home directory.
If you want visitors to your website to be redirected to the domain name with or without the www prefix, select the corresponding options under Preferred domain. We recommend selecting the your_domain option to ensure optimum search engine indexing of your website.
If you want to use Git repositories to copy your website files to the hosting, click Enable Git support. Last, click OK to add the domain. The new domain has now been added:
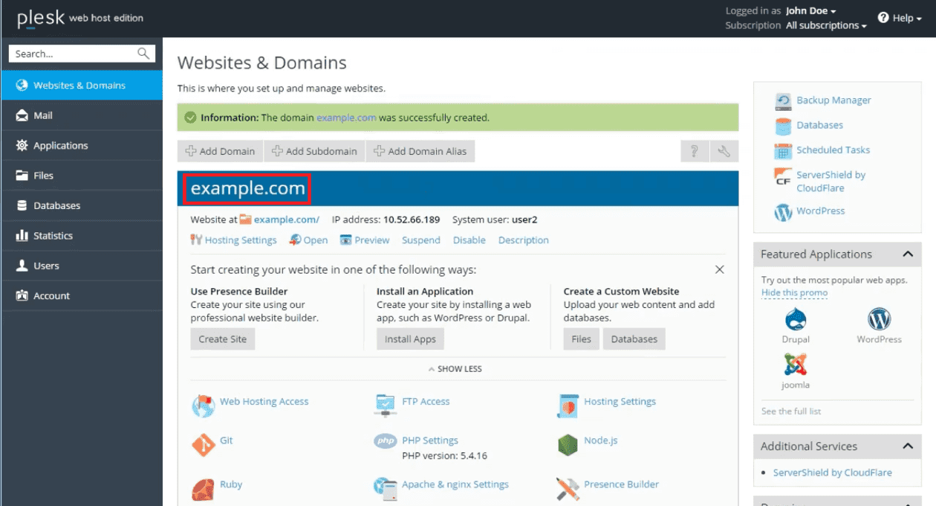
You can fill your new website with content by installing the WordPress content management system. A tutorial How to use the WordPress toolkit is available on the Plesk site. Alternatively, you can simply upload your content using the File Manager and there is also a How to use the File Manager tutorial available on the Plesk site.
In this tutorial, together we have introduced the Plesk web development platform on Alibaba Cloud to your services. In particular, we have provided guidance on installing Plesk on Alibaba Cloud, including how to bind an elastic IP and logging in as a server administrator.
Finally, we have provided two tutorials to help you get up and running with Plesk on Alibaba Cloud, including how to open ports for Plesk and how to create a website on Plesk.
You can also find out more about Plesk on Alibaba Cloud here: marketplace.alibabacloud.com/plesk.
This section explains the differences between Plesk WebHost and BYOL and provides recommendations on choosing between the two of them.
Both configurations provide all of the components necessary for web hosting plus the most popular and widely used features. However, there are some differences you should consider before choosing which option to go with.
Plesk WebHost is ready to work out of the box. WebHost comes with a Plesk license pre-installed and includes a wide variety of components and features, aimed both at shared hosts and web professionals.
Plesk WebHost is a good fit for you if:
Instances based on WebHost images come with a pre-installed Plesk WebHost Edition license, which will be billed even if you replace it with any other Plesk license. If you want to use Plesk Web Pro Edition or Plesk Web Admin Edition, you need to base your instance on a BYOL image.
BYOL stands for "Bring Your Own License", meaning that you have to supply a Plesk license obtained separately to operate an instance with Plesk BYOL. By default, Plesk BYOL does not include a number of components supplied with Plesk Web Host. You can install these components manually, if desired.
Plesk BYOL is a good fit for you if:
The following Plesk configurations are available in the Alibaba Cloud Marketplace:
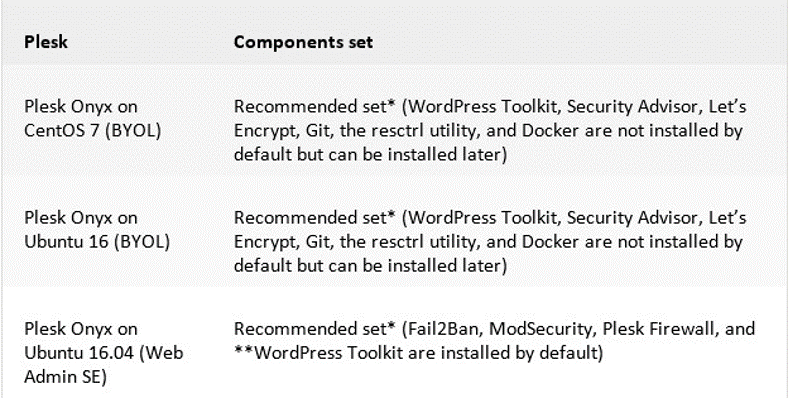
Some additional considerations:
1. The Recommended components set includes all components necessary for web hosting, including the web server, a mail server, a database server, and so on, plus the most popular and widely used features. For more information about Plesk BYOL, see the topic Choosing Between Plesk WebHost and BYOL. For more information about Plesk Onyx on Ubuntu 16.04 (Web Admin SE), see the topic Plesk Web Admin SE.
2. WordPress Toolkit in Plesk Onyx on Ubuntu 16.04 (WebAdmin SE) provides only basic functionality. To use premium WordPress features, upgrade your Plesk license to Web Pro or Web Host Edition.
Manage Traffic on Multiple Servers with Alibaba Cloud Server Load Balancer
Setting up an Intranet Connection between VPCs with Express Connect

2,593 posts | 793 followers
FollowMarketplace - November 23, 2018
Rupal_Click2Cloud - July 27, 2021
Alibaba Cloud Community - October 16, 2025
Alibaba Clouder - June 3, 2020
Alibaba Cloud Community - September 21, 2021
Alibaba Clouder - August 22, 2018

2,593 posts | 793 followers
Follow Elastic IP Address (EIP)
An independent public IP resource that decouples ECS and public IP resources, allowing you to flexibly manage public IP resources.
Learn More ECS(Elastic Compute Service)
Elastic and secure virtual cloud servers to cater all your cloud hosting needs.
Learn MoreMore Posts by Alibaba Clouder