WAF 3.0 protects your Application Load Balancer (ALB) instances from web attacks without changing your existing network architecture or DNS configuration. Protection is enabled through an SDK embedded directly in the ALB data plane — no extra gateway hop, no certificate or configuration drift between WAF and ALB.
How it works

When traffic reaches your ALB instance, the embedded SDK performs real-time threat detection in the forwarding path. The SDK blocks malicious requests and forwards valid ones to the backend server. Because WAF does not participate in traffic forwarding as a separate gateway, requests pass through only one gateway. This eliminates extra-hop latency and removes the need to synchronize certificates and cipher suites between WAF and ALB.
Prerequisites
Before you begin, make sure that:
Same account: The ALB instance and WAF instance belong to the same Alibaba Cloud account, unless you have configured multi-account management.
Supported region: The ALB instance is in one of the following regions. If not, use CNAME record mode instead.
Supported instance type: Only Basic and Standard ALB instances in the Running state can be upgraded to the WAF-enabled edition.
Identity verification: Complete identity verification before purchasing a WAF-enabled ALB instance.
Supported regions:
| Area | Regions |
|---|---|
| China | China (Chengdu), China (Qingdao), China (Beijing), China (Guangzhou), China (Hangzhou), China (Ulanqab), China (Shanghai), China (Shenzhen), China (Zhangjiakou), China (Hong Kong) |
| Asia-Pacific | Philippines (Manila), Indonesia (Jakarta), Japan (Tokyo), Malaysia (Kuala Lumpur), Singapore, Thailand (Bangkok), South Korea (Seoul) |
| Europe and Americas | Germany (Frankfurt), US (Silicon Valley), US (Virginia), Mexico |
| Middle East | SAU (Riyadh - Partner Region) |
Step 1: Open the ALB onboarding page
Log on to the WAF 3.0 console. In the top navigation bar, select the resource group and region (Chinese Mainland or Outside Chinese Mainland) of your WAF instance. In the left navigation pane, click Onboarding. Click the Cloud Native tab, then click Application Load Balancer (ALB) from the cloud service list.Web Application Firewall 3.0 console
Step 2: Authorize the cloud service (first-time only)
If this is your first time using cloud-native integration, follow the on-screen prompts and click Authorize Now. This creates the AliyunServiceRoleForWAF service-linked role, which you can view on the Identities > Roles page of the RAM console.
Step 3: Add the ALB instance
In the list on the right, find the ALB instance to protect and click Add Now in the Actions column. If the instance does not appear, click Synchronize Assets in the upper-right corner.
When the status shows Full Protection, the instance is added successfully.
Adding an ALB instance to WAF automatically upgrades it to the WAF-enabled edition. This incurs additional fees on the ALB side.
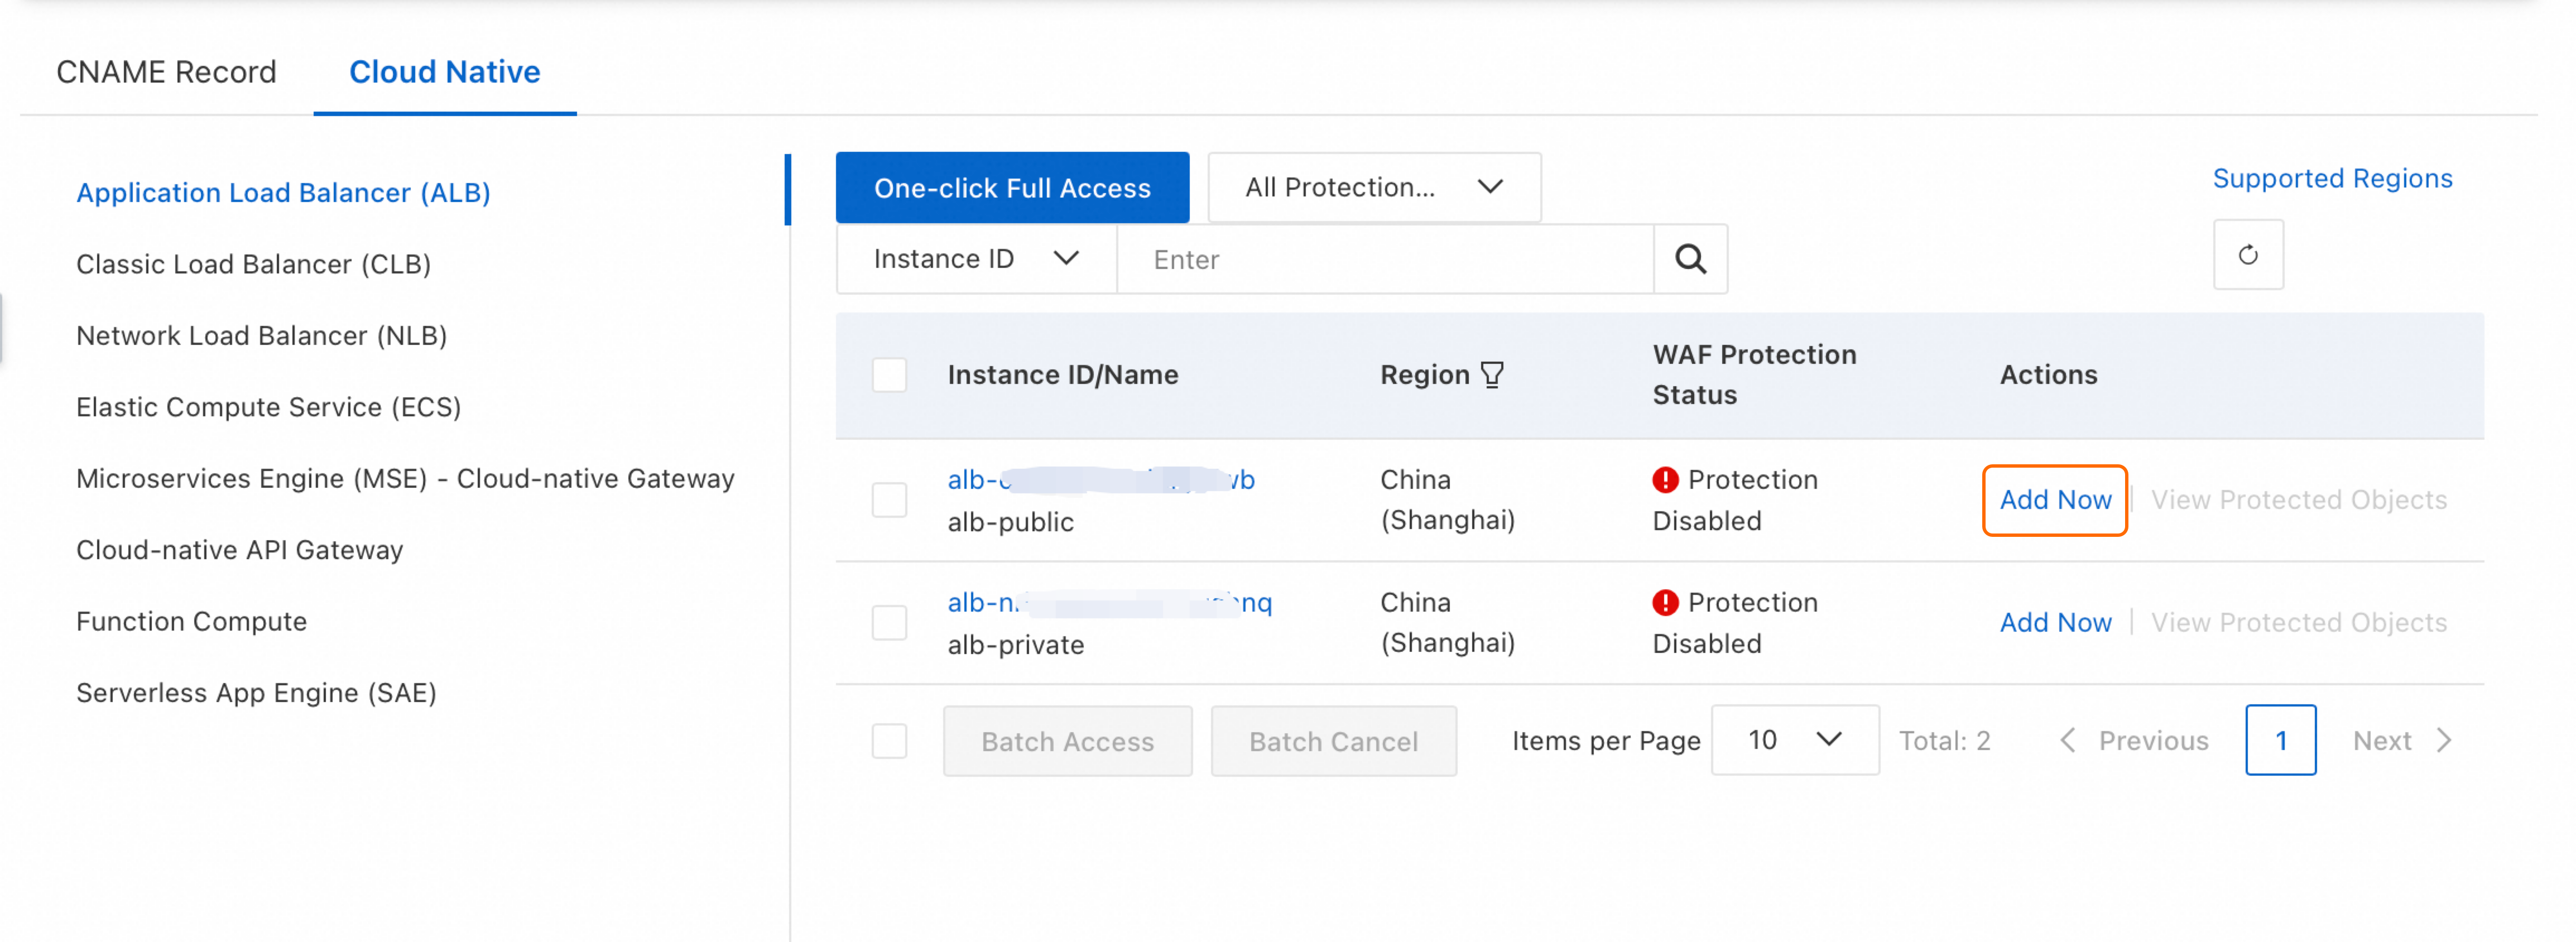
You can also add multiple ALB instances in a batch or click One-Click Onboarding to add all instances at once.
Step 4: Verify that protection is active
Enter your website domain followed by a cross-site scripting (XSS) test string in your browser:
<your-website-domain>/alert(xss)If WAF returns a 405 error page, it has successfully intercepted the request and protection is active.
Apply in production
Before enabling WAF on a production ALB instance, test with a non-production instance first. Enabling and removing WAF protection does not interrupt services, but you should monitor logs and service health to ensure service availability.
Recommended rollout:
During off-peak hours, add a non-production ALB instance to WAF.
Monitor logs and business metrics for at least one cycle to confirm stability.
Add production ALB instances after confirming no unexpected blocking.
Monitor your services after enabling:
| What to check | Tool | What to look for |
|---|---|---|
| Traffic logs | ALB logs | Significant drops in 200 status codes or sudden QPS spikes or drops |
| WAF-acted traffic | WAF logs | False positives — legitimate requests that WAF is blocking |
| Business metrics | Your monitoring tools | User access, transactions, and other services working correctly |
Ongoing maintenance:
Review security events: Monitor security reports and configure Cloud Monitor notifications to stay informed about attacks.
Tune protection rules: Review WAF logs to identify false positives and adjust rules to avoid blocking valid business requests.
Configure and manage protection rules
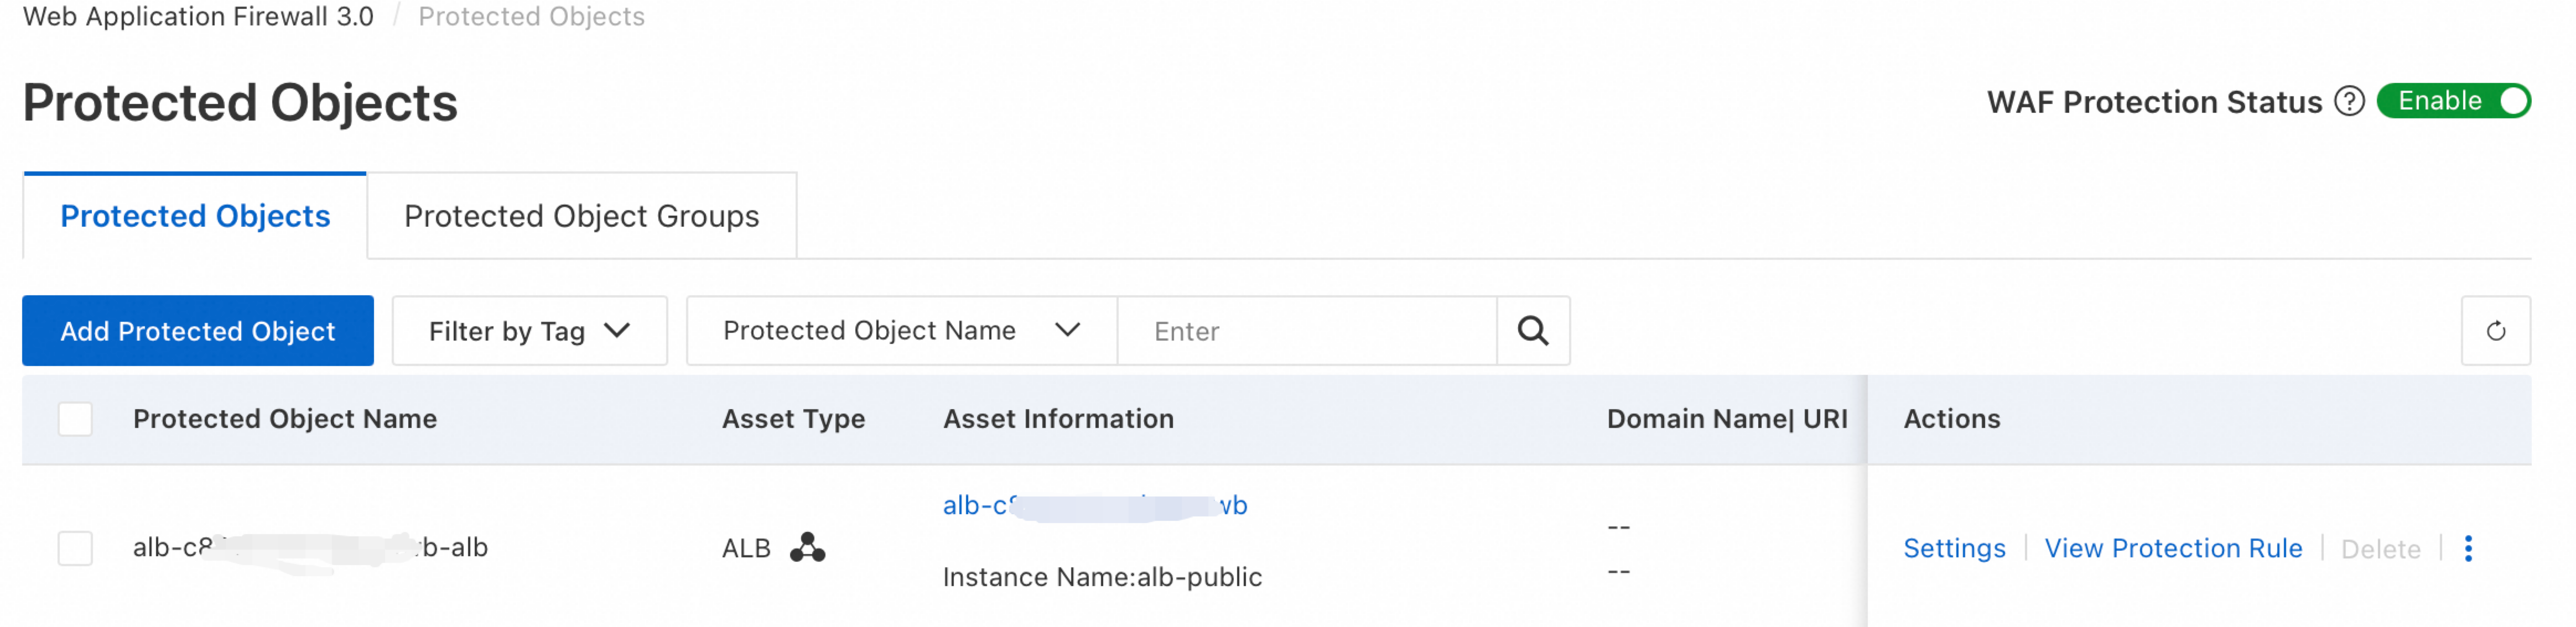
WAF automatically creates a protected object with a -alb suffix and enables default protection rules, including the core protection module. View them on the Protection Configuration > Protected Objects page.
If the default rules do not meet your requirements, create or edit protection rules. See Protection configuration overview.
If multiple domains resolve to the same ALB instance and you want different protection rules for each, manually add the domains as protected objects.
Disable or remove WAF protection
Temporarily disable WAF protection
If you encounter issues such as a high number of false positives, go to the Protected Objects page in the WAF console and turn off the WAF Protection Status switch. See Disable WAF protection with one click.
Remove WAF protection
Go to the Cloud Native tab, click Application Load Balancer (ALB) from the cloud service list, find the target instance, and click Remove in the Actions column. In the dialog box that appears, click OK.
After removal, traffic to the ALB instance is no longer WAF-protected, and security reports will not include data for that traffic.
For pay-as-you-go instances: request processing charges stop after removal, but feature usage fees continue because the WAF instance and its protection rules remain. To stop all WAF billing, see Terminate the WAF service.
Enable and manage WAF protection in the ALB console
You can also enable and manage WAF protection from the ALB console:
Limitations
| Limitation | Details |
|---|---|
| Identity verification | Required before purchasing a WAF-enabled ALB instance |
| Eligible instance types | Basic and Standard ALB instances in the Running state only |
| Container Service for Kubernetes (ACK) | To enable WAF for an ALB instance in ACK, see Use WAF-enabled ALB instances to protect applications |
| Subscription — max integrated instances | Basic Edition: 300 / Pro Edition: 600 / Enterprise Edition: 2,500 / Ultimate Edition: 10,000 |
| Pay-as-you-go — max integrated instances | 10,000 |
| Unsupported features | Data leak prevention; automatic Web SDK integration for the anti-crawler scenario in Bot Management |
FAQ
Why can't I find the ALB instance I want to add?
Click Synchronize Assets in the upper-right corner of the Onboarding page first.

If the instance still does not appear, it does not meet the prerequisites. For example, an ALB instance outside the Chinese mainland requires a WAF instance in the same region group for cloud-native integration. If your region is not supported, use CNAME record mode instead.

One domain resolves to multiple ALB instances — how do I add WAF protection?
In cloud-native mode, add all of those ALB instances to WAF. In CNAME record mode, add the domain and configure the multiple ALB instance CNAMEs as origin addresses.
Multiple domains resolve to the same ALB instance — how do I apply different rules to each?
After adding the ALB instance in cloud-native mode, all domains on it are protected by the default policy. To apply different protection rules per domain, manually add each domain as a protected object. In CNAME record mode, add each domain individually.
Can I use both cloud-native and CNAME record modes for the same domain on an ALB instance?
No. Using both modes simultaneously causes forwarding conflicts and protection failure. To switch a domain from CNAME record mode to cloud-native mode: point your DNS records back to the origin, wait for DNS changes to propagate, delete the CNAME record mode configuration, and then add the ALB instance in cloud-native mode.
What are the differences between WAF 2.0 and WAF 3.0 integration with ALB?

WAF 3.0 uses an SDK embedded in the ALB instance. The SDK handles traffic extraction, detection, and protection without sitting in the forwarding path, so requests pass through only one gateway. This eliminates extra-hop latency and removes the need to synchronize certificates and cipher suites between WAF and ALB.
WAF 2.0 uses a transparent proxy. Traffic is redirected through WAF, which blocks attacks and forwards clean requests to the origin. Requests pass through two gateways, so you must keep configurations such as timeouts and certificates in sync across both.
For a full comparison, see Compare WAF 3.0 with WAF 2.0.