SSL-VPN two-factor authentication requires clients to pass two independent checks before connecting: SSL client certificate authentication, then IDaaS (Identity as a Service) username and password authentication. This dual-authentication approach prevents identity theft and unauthorized access, protecting resources in your virtual private cloud (VPC) from external threats.
This topic walks through how to configure SSL-VPN two-factor authentication using an IDaaS EIAM 2.0 instance, so that remote clients can securely access VPC resources.
Which IDaaS version should I use?
| Scenario | Recommended path |
|---|---|
| New setup | Use IDaaS EIAM 2.0 (this topic) |
| Existing EIAM 1.0 instance | See How to use an EIAM 1.0 instance |
| AD/LDAP account synchronization | See Establish an SSL-VPN connection by using LDAP authentication |
New IDaaS EIAM 1.0 instances cannot be purchased. Use an IDaaS EIAM 2.0 instance. For details on the version upgrade, see [Notice of Change] SSL-VPN two-factor authentication supports IDaaS EIAM 2.0.
Limitations
IDaaS authentication supports username and password only. The following secondary authentication methods are not supported:
OTP dynamic passwords
SMS/text message authentication
Example scenario

A company uses Alibaba Cloud IDaaS to manage employee accounts and permissions. The company has a VPC in the China (Hangzhou) region and runs applications on Elastic Compute Service (ECS) instances in that VPC. To let employees on business trips access VPC resources securely, the company enables SSL-VPN two-factor authentication. After configuration, each client must pass both SSL certificate authentication and IDaaS username and password authentication before a connection is established.
How it works
The client initiates an SSL-VPN connection to the VPN Gateway.
The VPN Gateway validates the client's SSL certificate.
The VPN Gateway prompts the client for IDaaS credentials (username and password).
IDaaS verifies the credentials against the configured EIAM instance.
If both checks pass, the SSL-VPN connection is established and the client can access VPC resources.
Prerequisites
Before you begin, ensure that you have:
An IDaaS EIAM 2.0 instance. See Manage instances.
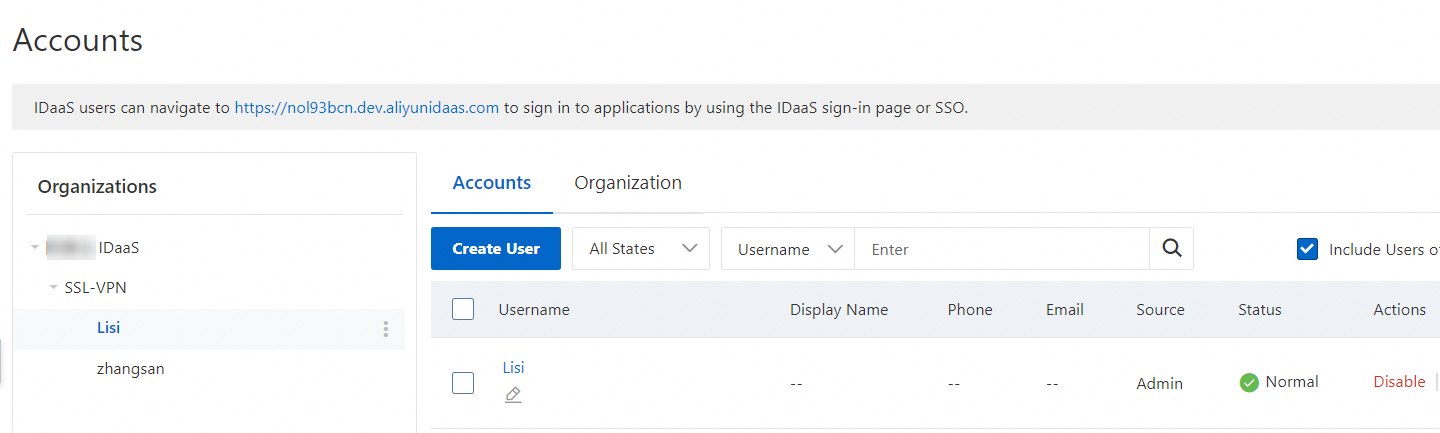
Organizations and accounts created in the EIAM instance. This topic creates an organization and an account manually, as shown below. To synchronize accounts using LDAP and authenticate through AD/LDAP, see Establish an SSL-VPN connection by using LDAP authentication. For account synchronization methods, see Create an account or organization.
A VPC in the China (Hangzhou) region with ECS instances deployed. See Create a VPC with an IPv4 CIDR block. Review the security group rules applied to the ECS instances and confirm they allow client access. See Query security group rules and Add a security group rule.
A client with internet access. The client's private CIDR block must not overlap with the VPC's CIDR block.
Configuration procedure

Step 1: Add an Alibaba Cloud SSL-VPN application
Log on to the IDaaS console.
On the EIAM page, find your EIAM instance and click Access Console in the Actions column.
In the left navigation pane, click Applications. On the Applications page, click Add Application.
On the Add Application page, click Add Application for the Alibaba Cloud - SSL VPN template.
In the dialog box, enter an application name and click Add Now.
On the Logon tab of the application details page, review the default settings and click Save. The key defaults are:
Single Sign-on Settings: Enabled
Authorization Mode: Password Mode. The default Identity Provider is IDaaS Account, which authenticates employees using the accounts you created in the EIAM instance.
Authorization Scope: Manual Authorization. In this mode, you must explicitly grant accounts access to the application. See Authorization scope.
Click the Application Authorization tab and grant access to the employee accounts that need to establish SSL-VPN connections. See Authorize applications.

Step 2: Create a VPN Gateway instance
Log on to the VPN gateway console.
On the VPN Gateways page, click Create VPN Gateway.
Configure the gateway with the parameters below, then click Buy Now and complete payment. The following table covers only the parameters relevant to this topic. Keep the default values for all other parameters. For the full parameter list, see Create and manage a VPN gateway instance.
Parameter Description Region Select the region of the VPN Gateway. In this topic, China (Hangzhou) is selected. The VPC and the VPN Gateway must be in the same region. Gateway type Select Standard. Network type Select Public. Tunnel The console displays the tunnel modes supported in the current region. VPC Select the VPC to connect. vSwitch 1 Select a vSwitch from the VPC. If you select single-tunnel, specify one vSwitch. If you select dual-tunnel, specify two vSwitches. After the IPsec-VPN feature is enabled, the system creates an elastic network interface (ENI) for each vSwitch to communicate over an IPsec-VPN connection. Each ENI occupies one IP address in the vSwitch. NoteThe system selects a vSwitch by default. After a VPN gateway is created, you cannot change its associated vSwitch.
vSwitch 2 For dual-tunnel, select a second vSwitch in a different zone to support cross-zone disaster recovery. If the region supports only one zone, you can select the same vSwitch as vSwitch 1. If the VPC does not have a second vSwitch, create one first. See Create and manage a vSwitch. IPsec-VPN Select Disable. SSL-VPN Select Enable. SSL connections Select the maximum number of concurrent client connections. This parameter is available only after SSL-VPN is enabled. Return to the VPN Gateways page. The new instance initially shows a Preparing status. After 1 to 5 minutes, the status changes to Normal, indicating the gateway is ready.
Step 3: Create an SSL server
In the left navigation pane, choose Interconnections > VPN > SSL Servers.
In the top navigation bar, select the region where you want to create the SSL server.
The SSL server and the VPN Gateway must be in the same region.
On the SSL Server page, click Create SSL Server.
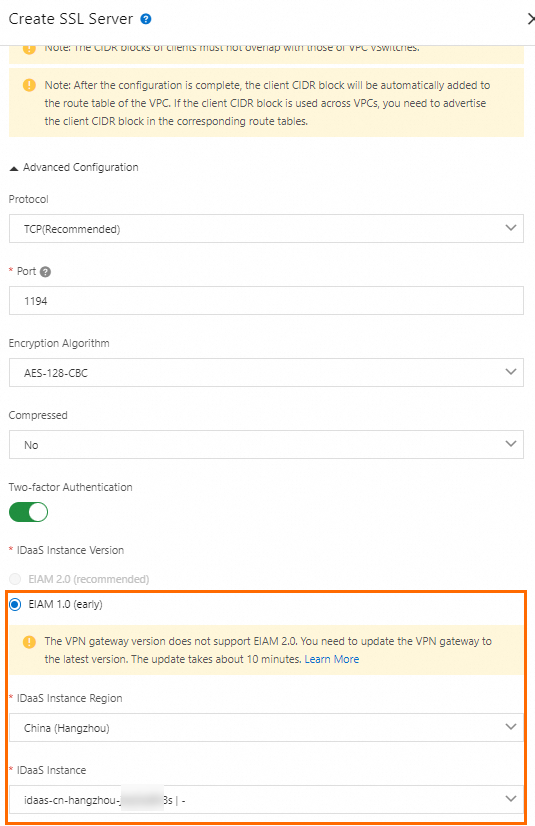
In the Create SSL Server panel, configure the settings below and click OK. The following table covers only the parameters relevant to this topic. Keep defaults for all other parameters. See Create and manage an SSL server for full details.
Parameter Description VPN gateway Select the VPN Gateway created in Step 2. Local network Enter the CIDR block of the VPC to access. In this topic, 192.168.0.0/16is used.Client CIDR block Enter the CIDR block the client uses to access the VPC. In this topic, 10.0.0.0/24is used.ImportantThe subnet mask prefix length must be between 16 and 29 bits. The client CIDR block must not overlap with the local network CIDR block, the VPC CIDR block, or route CIDR blocks associated with the client. Use
10.0.0.0/8,172.16.0.0/12,192.168.0.0/16, or their subnets when possible. If you must use a public IP range, configure it as a user-defined CIDR block for the VPC. See the FAQ. After you create the SSL server, the system automatically adds a route for the client CIDR block to the VPC route table — do not add this route manually.Advanced configuration Enable two-factor authentication. For this topic, EIAM 2.0 is used: set Region of IDaaS instance to China (Hangzhou), select your EIAM instance as IDaaS instance, and select the SSL-VPN application created in Step 1 as IDaaS application. NoteFor SSL servers created in the UAE (Dubai) region, associate with an IDaaS EIAM 2.0 instance in Singapore to reduce latency.
Step 4: Create an SSL client certificate
In the left navigation pane, choose Interconnections > VPN > SSL Clients.
On the SSL Client page, click Create SSL Client.
In the Create SSL Client panel, enter a name, select the SSL server created in Step 3, and click OK.
Find the certificate you just created and click Download Certificate in the Actions column. Save the certificate to your computer — you will use it to configure the client in the next step.
Step 5: Configure the client
Linux client
Open the command-line interface (CLI) and install the OpenVPN client:
# CentOS
yum install -y openvpn

# Ubuntu
apt-get update
apt-get install -y openvpn
Check whether the
/etc/openvpn/conf/directory exists. If not, create it:cd /etc/openvpn ls mkdir -p /etc/openvpn/confDecompress the downloaded SSL client certificate and copy the files to
/etc/openvpn/conf/.Start the OpenVPN client. Enter your IDaaS username and password when prompted:
openvpn --config /etc/openvpn/conf/config.ovpn --daemonAfter successful IDaaS authentication, the SSL-VPN connection is established.

Windows client
Download and install the OpenVPN client for Windows.
Decompress the downloaded SSL client certificate and copy the files to the OpenVPN config directory. In this topic, the files are copied to
C:\Program Files\OpenVPN\config. Use your actual installation path.Start the OpenVPN client and click Connect. Enter your IDaaS username and password when prompted. After successful authentication, the SSL-VPN connection is established.

Mac client (OpenVPN)
Open the CLI. If Homebrew is not installed, run:
/bin/bash -c "$(curl -fsSL https://raw.githubusercontent.com/Homebrew/install/HEAD/install.sh)"Install the OpenVPN client:
brew install openvpnBack up all existing files in
/usr/local/etc/openvpn/.ImportantThe default OpenVPN installation path may vary by macOS version. Use your actual installation path in this step and all subsequent steps.
Remove the existing OpenVPN configuration files:
rm /usr/local/etc/openvpn/*Copy the downloaded SSL client certificate to the configuration directory:
cp <cert_location> /usr/local/etc/openvpn/Replace
<cert_location>with the path to the downloaded certificate, for example,/Users/example/Downloads/certs6.zip.Decompress the certificate:
cd /usr/local/etc/openvpn/
unzip /usr/local/etc/openvpn/certs6.zip
Start the OpenVPN client and enter your IDaaS username and password when prompted:
sudo /usr/local/opt/openvpn/sbin/openvpn --config /usr/local/etc/openvpn/config.ovpnAfter successful authentication, the SSL-VPN connection is established.
Step 6: Test the connectivity
After completing the configuration, verify that the client can reach VPC resources. The following example uses a Linux client.
Open the CLI on the client.
Ping the ECS instance in the VPC:
ping <IP address of the ECS instance>If you receive echo reply packets similar to the following output, the client can access VPC resources.

FAQ
How do I configure an IDaaS EIAM 1.0 instance?
Skip Step 1 — you do not need to add an Alibaba Cloud SSL-VPN application in the IDaaS console. When creating the SSL server in Step 3, directly associate the EIAM 1.0 instance. All other steps remain the same.
Does IDaaS authentication support OTP or SMS as a second factor?
No. IDaaS supports username and password authentication only. OTP dynamic passwords and SMS authentication are not supported.