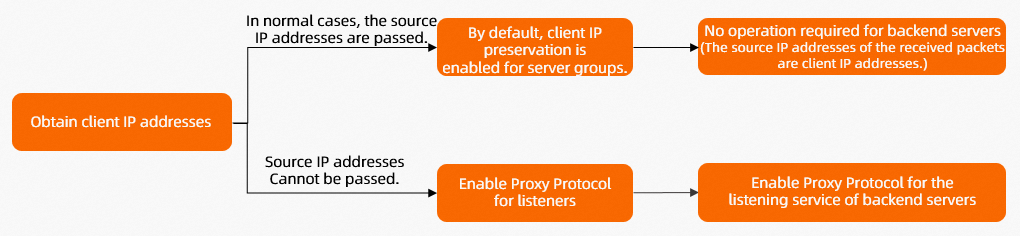
Network Load Balancer (NLB) layer 4 listeners allow backend servers to obtain the client IP address. In most cases, enabling client IP preservation in a server group is sufficient. However, you must enable Proxy Protocol on both the NLB listener and backend servers when an IPv6 client accesses an IPv4 service, the NLB instance uses a TCPSSL listener, or the NLB instance is associated with an IP-type server group.
Methods to obtain client IP addresses
Use client IP preservation
When you create a server group for an NLB instance, you can enable Client IP Preservation. With this feature enabled, the backend server receives the actual client IP address as the source IP address.
In certain scenarios, client IP preservation is unavailable and you must use Proxy Protocol instead. For more information, see Use Proxy Protocol.
Use Proxy Protocol
Proxy Protocol is a protocol that conveys a client's original connection information from a proxy server to a backend server.
Without Proxy Protocol, the proxy server replaces the client's source IP address and port with its own in the request header, preventing the backend server from seeing the original connection details.
With Proxy Protocol, the proxy server prepends the original connection information in a dedicated header. The backend server parses this header to retrieve the client's source IP address, source port, and transport protocol.
This enables accurate logging, access control, and traffic monitoring on backend servers.
-
Important: Proxy Protocol must be supported by both the proxy server (in this case, the NLB listener) and the backend server. If you enable this feature but your backend server cannot parse the Proxy Protocol header, request parsing may fail and impact service availability.
-
NLB listeners use Proxy Protocol to add original connection information, such as source IP address, destination IP address, source port, and destination port, to the TCP or UDP data header. This process does not discard or overwrite any existing data.
-
NLB supports only Proxy Protocol v2. Proxy Protocol v2 supports multiple transport protocols, such as TCP and UDP. For more information, see The PROXY protocol.
Enable Proxy Protocol on both the NLB listener and backend servers in the following scenarios:
-
An IPv6 client accesses an IPv4 service on a backend server
-
The NLB instance uses a TCPSSL listener (A TCPSSL listener cannot be associated with a server group that has client IP preservation enabled.)
-
The NLB instance is associated with an IP-type server group (IP-type server groups do not support client IP preservation.)
Procedure
Client IP preservation
Prerequisites
-
You have created an NLB server group and added backend servers to it. This topic uses an ECS-type server group as an example. The backend protocol is TCP, ECS instances are used as backend servers, and the application on the backend servers uses port 80. For more information, see NLB server groups.
-
You have created an NLB instance and added a listener to it. This topic uses a TCP listener on port 80 as an example. For more information, see Create and manage NLB instances and Add a TCP listener.
Step 1: Check client IP preservation
-
Log on to the Network Load Balancer console.
-
In the top navigation bar, select the region where the instance is deployed.
-
On the Server Groups page, find the target server group and click its ID.
-
On the server group details page, verify that the Client IP Preservation field is set to Enabled. If it is Disabled, click Modify Basic Information and enable the feature.
Step 2: Verify client IP retrieval
If NGINX is used as a backend server, you can check the NGINX logs to verify that the client IP address is obtained.
The following example shows the default log field configuration in NGINX:
http {
  # Default configuration
  log_format  main  '$remote_addr- $remote_user [$time_local] "$request" '
                      '$status $body_bytes_sent "$http_referer" '
                      '"$http_user_agent" "$http_x_forwarded_for"';
	#...
}
The default path for the NGINX log file is /var/log/nginx/access.log.
The first IP address in each log entry is the client IP address.
140.205.1xxx -- [xxx] xxx xxx xxx xxx xxx xxx
xxx xxx xxx xxx xxx xxx xxx xxx xxx xxx
140.205.xx.29 -- [27/xxx] xxx xxx xxx xxx xxx xxx 527 xxx
xxx xxx xxx xxx xxx xxx xxx xxx xxx
140.205.xx.29 -- [2xxx] xxx xxx 304 xxx xxx xxx xxx xxx
Proxy Protocol
Prerequisites
-
You have created an NLB server group and added backend servers to it. This topic uses an ECS-type server group as an example. The backend protocol is TCP, ECS instances are used as backend servers, and the application on the backend servers uses port 80. For more information, see NLB server groups.
-
You have created an NLB instance and added a listener to it. This topic uses a TCP listener on port 80 as an example. For more information, see Create and manage NLB instances.
Note-
Before you enable Proxy Protocol, make sure your backend servers support Proxy Protocol v2. Otherwise, new connections will fail.
-
If multiple listeners of an instance are associated with the same server group, you must enable Proxy Protocol for all of them.
-
NGINX Plus R16 or later and open source NGINX 1.13.11 or later support Proxy Protocol v2.
-
Step 1: Enable Proxy Protocol on the listener
-
Log on to the Network Load Balancer console.
-
In the top navigation bar, select the region where the instance is deployed.
-
On the Instances page, find the target instance and click its ID.
-
On the Instance Details page, click the Listener tab, find the target listener, and click the listener ID.
-
On the Listener Details page, verify that the Enable Proxy Protocol field is set to Enabled. If it is not enabled, click Modify Listener and enable the feature.
Step 2: Enable Proxy Protocol on the backend server
This section uses CentOS 7.9 and NGINX 1.20.1 as an example. Your configuration may vary.
-
Log on to the backend server and run the
nginx -tcommand to find the path of the configuration file. The default path is typically/etc/nginx/nginx.conf, but the actual path may vary. -
Modify and save the configuration file to enable Proxy Protocol, as shown in the following example.
http { # Make sure to set $proxy_protocol_addr. This variable is used to record the client IP address. log_format main '$proxy_protocol_addr - $remote_addr- $remote_user [$time_local] "$request" ' '$status $body_bytes_sent "$http_referer" ' '"$http_user_agent" "$http_x_forwarded_for"'; # For a listener on port 80, add the proxy_protocol parameter. server { listen 80 proxy_protocol; #... } } -
Run the
sudo nginx -s reloadcommand to reload the NGINX configuration file.
Step 3: Verify client IP retrieval
If NGINX is used as a backend server, you can check the NGINX logs to verify that the client IP address is obtained.
The default path for the NGINX log file is /var/log/nginx/access.log.
In each log entry, the IP address for the $proxy_protocol_addr variable is the client IP address.
140.205.1xxx -- [xxx]
xxx
140.205.xx.29 -- [27/xxx] xxx xxx xxx
xxx
140.205.xx.29 -- [2xxx] 304 xxx xxx xxx
xxx
Proxy Protocol v2 header reference
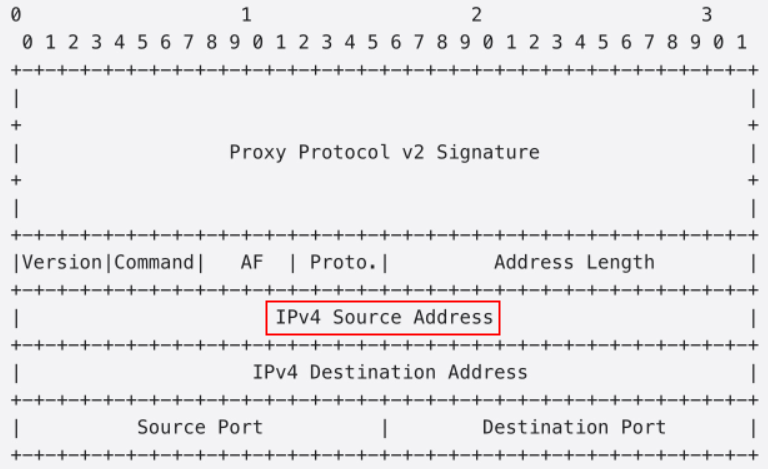
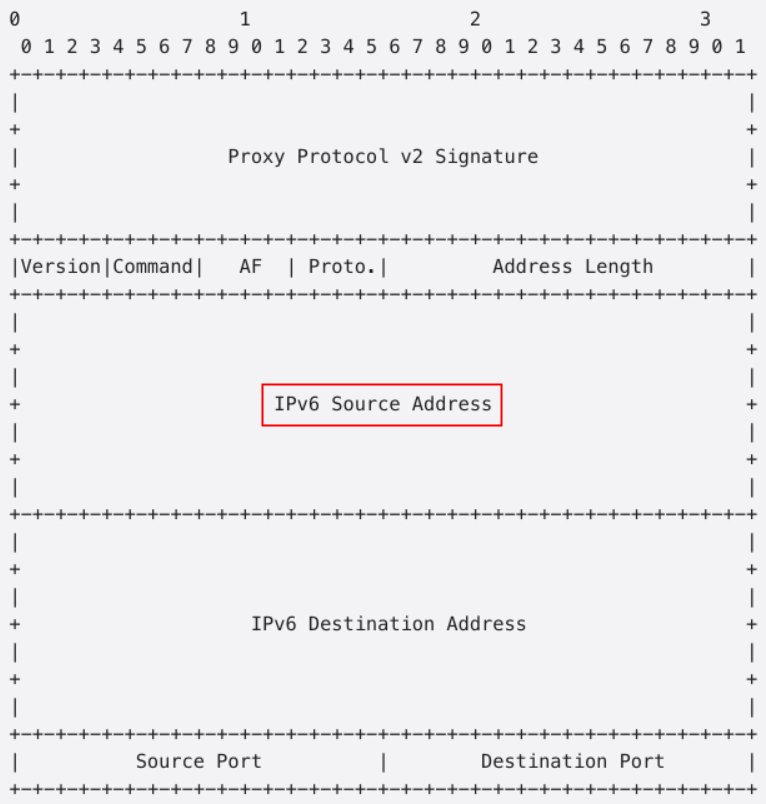
If you do not use NGINX, refer to the Proxy Protocol v2 header structure below and The PROXY protocol to implement custom parsing. See your server's official documentation for details.
-
The following figure shows the binary header format for Proxy Protocol v2 when carrying an IPv4 client address:
-
The following figure shows the binary header format for Proxy Protocol v2 when carrying an IPv6 client address:
FAQ
Getting client IPs in an ACK environment
In a Container Service for Kubernetes (ACK) cluster, the method is the same but some operational details differ. Network management FAQ.
Related documents
The method for obtaining the client IP address varies by load balancer type:
-
When you use a layer 4 listener of a Classic Load Balancer (CLB) instance, you can obtain the client IP address directly or by enabling Proxy Protocol. For more information, see Obtain the client IP address through a layer 4 listener of a CLB instance.
-
When you use a layer 7 listener of a CLB instance, you can obtain the client IP address from the X-Forwarded-For header. For more information, see Obtain the client IP address through a layer 7 listener of a CLB instance.
-
When you use an Application Load Balancer (ALB) instance, you can obtain the client IP address from the X-Forwarded-For header. For more information, see Obtain the client IP address on a backend server through an ALB instance.