When Application Load Balancer (ALB) forwards requests, the backend server sees the ALB instance IP as the source address. ALB appends the client's real IP to the X-Forwarded-For HTTP request header. Configure your backend server to extract the real IP from this header.
The X-Forwarded-For field uses the following format:
X-Forwarded-For: <Client IP>, <Proxy 1 IP>, <Proxy 2 IP>, ...The first IP address is the client's real IP. Each subsequent address is a proxy that forwarded the request.
Prerequisites
You have an ALB instance with a configured listener. For more information, see Create and manage ALB instances.
Procedure
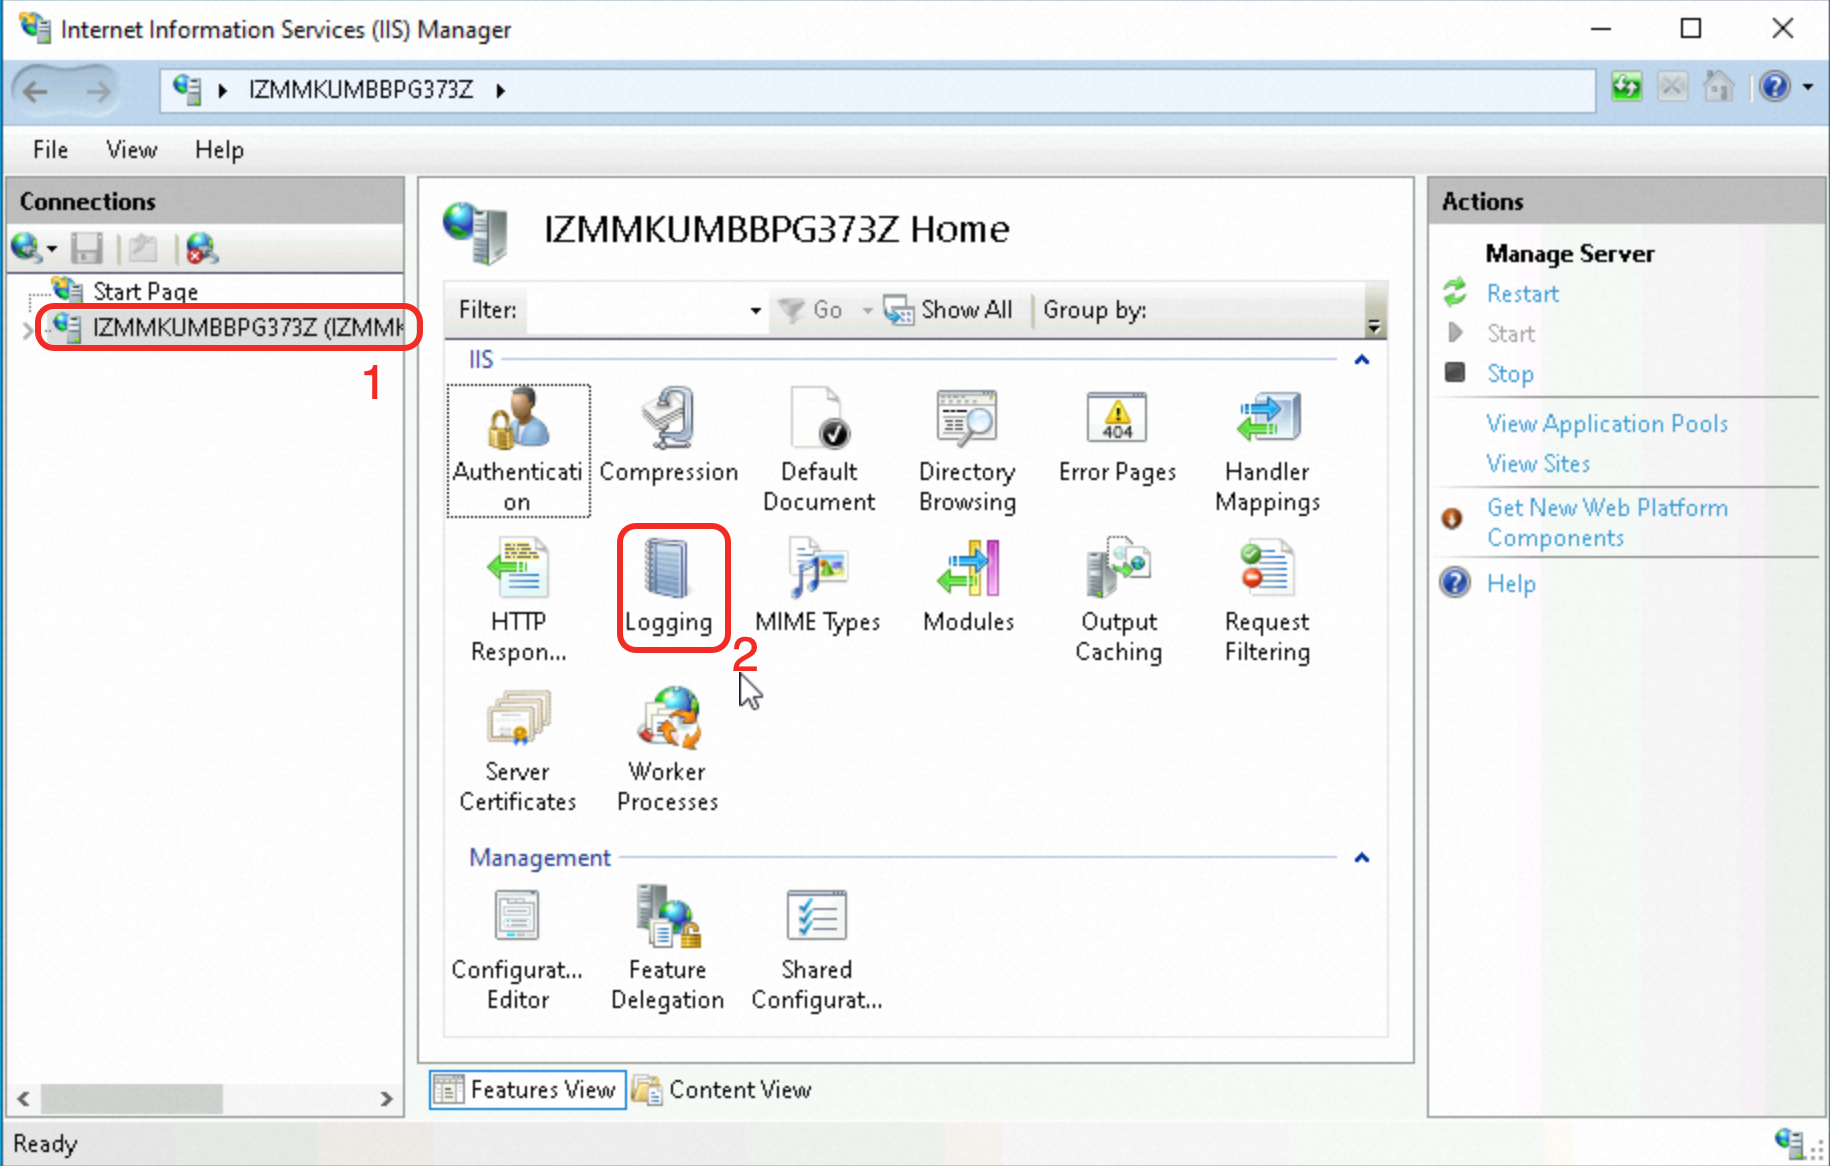
Step 1: Verify the X-Forwarded-For header setting on the listener
Log on to the ALB console and click the target instance ID.
On the Listener tab, click the target listener ID.
On the Listener Details tab, verify that Add HTTP Header is set to
Add X-Forwarded-For to preserve client IP addressesEnabled - Add.This option is enabled by default. If disabled, click Modify Listener in the Basic Information section to enable it.
Step 2: Configure the backend server
Configure your backend server to read the X-Forwarded-For header and extract the client's real IP address.
Nginx
Environment: Alibaba Cloud Linux 3.2104, nginx/1.20.1. Commands and paths may vary in your environment.
Nginx uses the http_realip_module module to extract the client's real IP from the X-Forwarded-For header.
Verify that the module is installed.
nginx -V 2>&1 | grep --color=auto http_realip_moduleIf the output contains
--with-http_realip_module, the module is installed.
Nginx installed via
yumorapton mainstream Linux distributions includes this module by default. If not found, install or upgrade Nginx through your package manager.Edit the Nginx configuration file.
Run
sudo nginx -tto locate the configuration file. The default path is/etc/nginx/nginx.conf. Add the following directives inside thehttpblock:http { # Trusted proxy IP range (ALB internal IP range) set_real_ip_from 100.64.0.0/10; # For upgraded ALB instances, use the vSwitch CIDR block instead: # set_real_ip_from 10.0.0.0/8; # Extract real client IP from X-Forwarded-For real_ip_header X-Forwarded-For; # Use the leftmost non-trusted IP real_ip_recursive on; # Log format with X-Forwarded-For log_format main '$remote_addr - $remote_user [$time_local] "$request" ' '$status $body_bytes_sent "$http_referer" ' '"$http_user_agent" "$http_x_forwarded_for"'; access_log /var/log/nginx/access.log main; # ... }Reload the configuration.
sudo nginx -t
sudo nginx -s reload
Apache
Environment: Alibaba Cloud Linux 3.2104, Apache/2.4.37. Commands and paths may vary in your environment.
Apache uses the mod_remoteip module to extract the client's real IP from the X-Forwarded-For header.
Verify that the module is installed.
httpd -M | grep remoteip_moduleIf the output contains
remoteip_module (shared), the module is installed.
Apache installed via
yumorapton mainstream Linux distributions includes this module by default. If not found, install or upgrade Apache through your package manager.Edit the Apache configuration file.
Run
httpd -Vto locate the configuration file. The default path is/etc/httpd/conf/httpd.conf. Add the following directives:# Extract real client IP from X-Forwarded-For RemoteIPHeader X-Forwarded-For # Trusted proxy IP range (ALB internal IP range) RemoteIPInternalProxy 100.64.0.0/10 # For upgraded ALB instances, use the vSwitch CIDR block instead: # RemoteIPInternalProxy 10.0.0.0/8 <IfModule log_config_module> # Log format with X-Forwarded-For LogFormat "%h %l %u %t \"%r\" %>s %b \"%{Referer}i\" \"%{User-Agent}i\" %{X-Forwarded-For}i" combined CustomLog "logs/access_log" combined </IfModule>Reload the configuration.
sudo systemctl restart httpd
IIS
Environment: Windows Server 2022 21H2, IIS 10.0. Steps may vary in your environment.
IIS logs the X-Forwarded-For header value as a custom field. It does not natively replace the client IP in the request pipeline.
Add a custom log field.
In IIS Manager, select the target server in the Connections pane. Double-click the Logging feature in the main panel.
Configure the field.
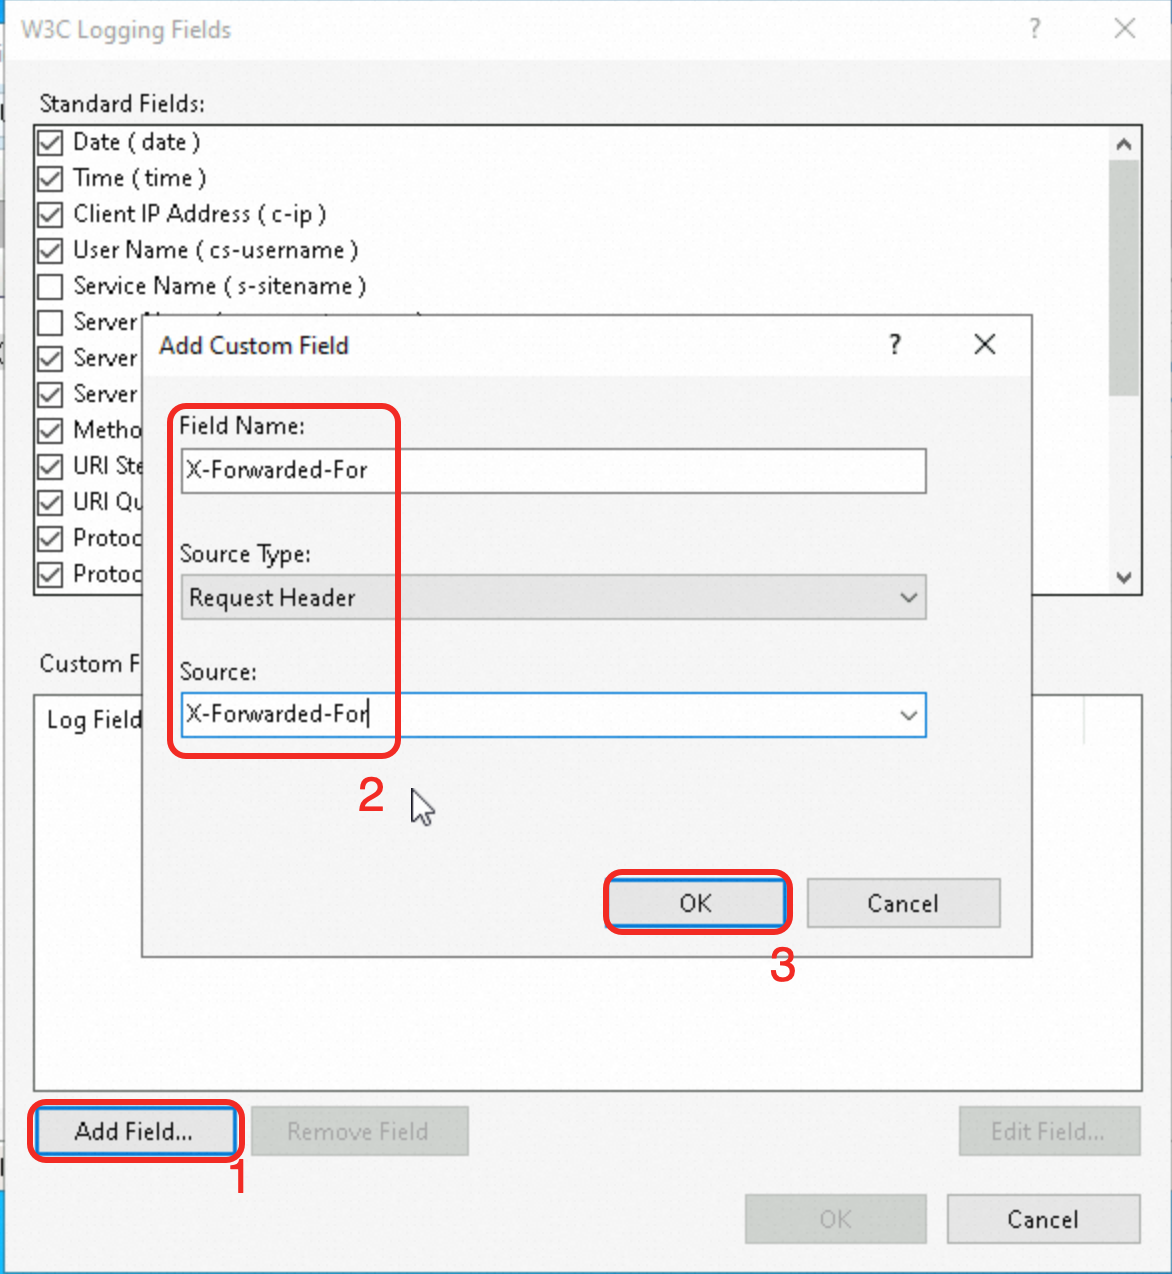
Click Select Fields > Add Field and enter the following values:
Setting
Value
Field Name
X-Forwarded-ForSource Type
Request HeaderSource
X-Forwarded-For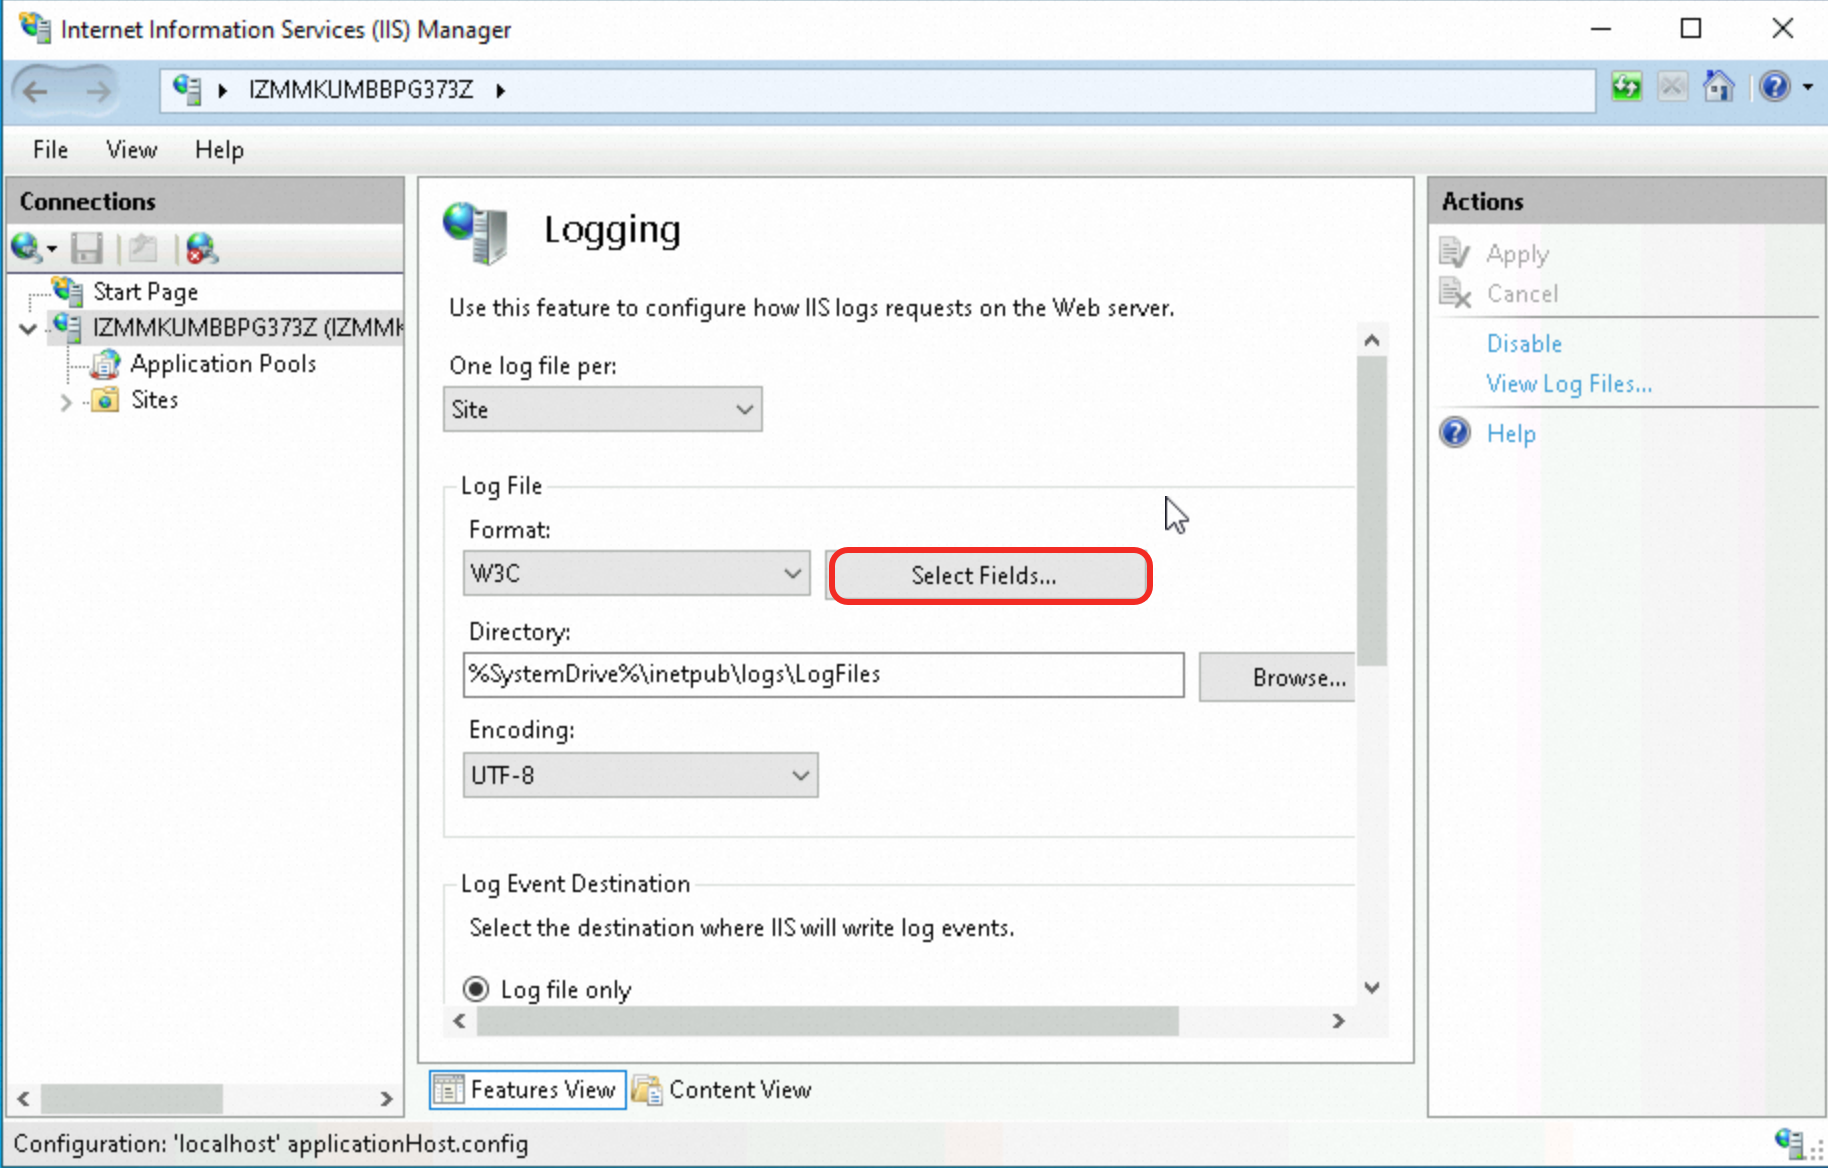
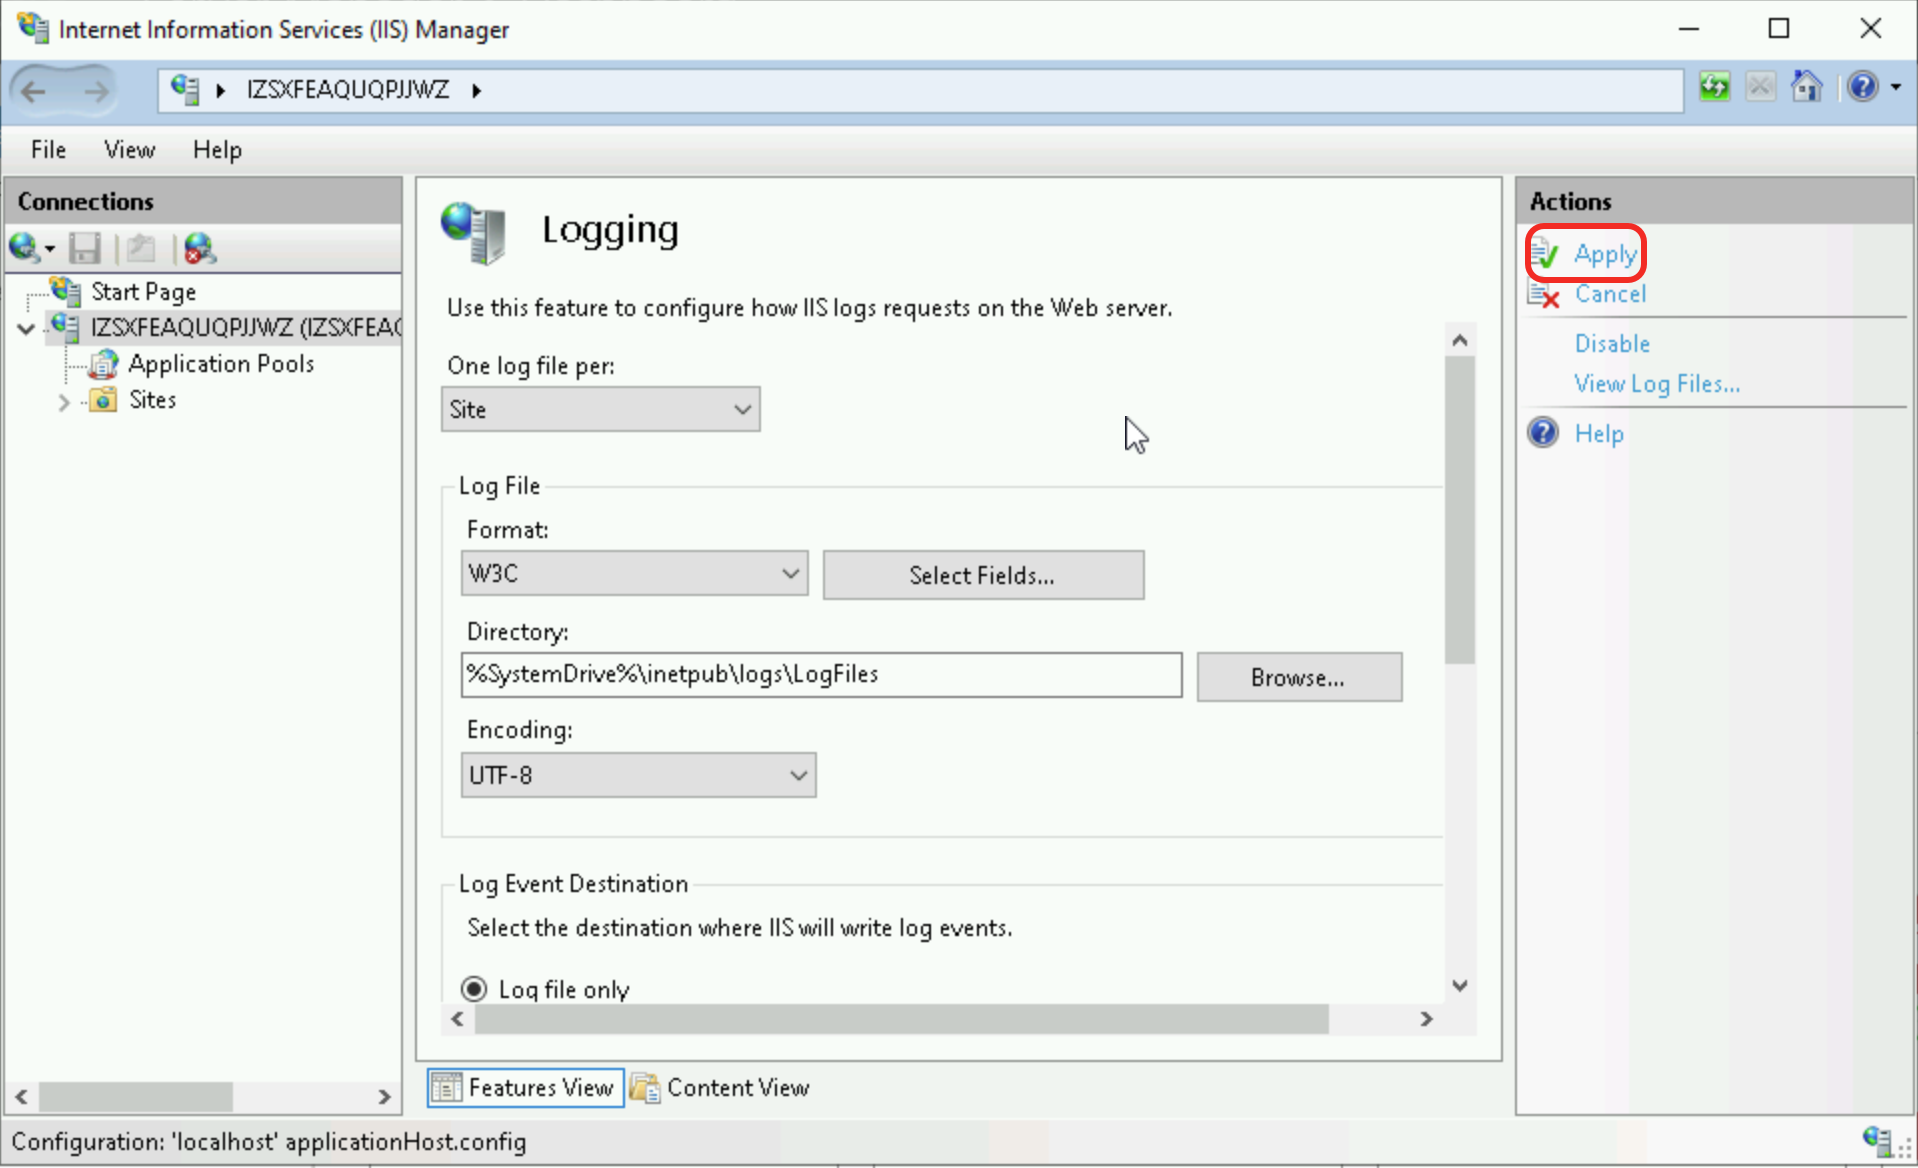
Apply the configuration.
Click OK to confirm, then click Apply in the Actions pane.
To use the real client IP in your application logic, parse the X-Forwarded-For header in your application code.Step 3: Verify the configuration
Check the backend server access log to confirm the client's real IP address is recorded.
Server | Default log path | Real IP variable | X-Forwarded-For variable |
Nginx |
|
|
|
Apache |
|
|
|
IIS |
| N/A |
|
Security best practices
Validate the X-Forwarded-For header. Filter and validate the header on the backend server. Reject requests with malformed or suspicious IP values.
Restrict traffic with security groups. Use security groups or firewall rules to allow only ALB-originated traffic to reach backend servers.
Enable TLS encryption. Encrypt communications between clients and ALB to protect the
X-Forwarded-Forheader from tampering.
FAQ
Why do IP addresses starting with 100 appear in backend access logs?
ALB communicates with backend servers using internal IP addresses:
Non-upgraded instances: Use the
100.64.0.0/10range reserved by Alibaba Cloud.Upgraded instances: Use local IP addresses from their vSwitch CIDR blocks.
ALB health checks generate requests from these addresses. If security groups or firewall rules are configured, allow traffic from:
The
100.64.0.0/10range (non-upgraded instances), orThe ALB vSwitch CIDR block (upgraded instances)
How do I retrieve the client's real IP when ALB is behind WAF, CDN, or GA?
The client's real IP is preserved in the X-Forwarded-For header by default. No additional configuration is required on Web Application Firewall (WAF), Content Delivery Network (CDN), or Global Accelerator (GA).
To prevent X-Forwarded-For spoofing, use dedicated headers:
Architecture | How to retrieve the real IP |
CDN + WAF + ALB (Client > CDN > WAF > ALB > ECS) | CDN adds the |
GA + ALB (Client > GA > ALB > ECS) | In the ALB forwarding rule, add a custom header
On the ALB listener, enable Retrieve Client IP and add the endpoint public IP of the GA instance to the trusted IP address list. In Nginx, log with |

How do I retrieve the client's real IP when ALB is used with Container Service for Kubernetes (ACK)?
For more information, see Configure ALB instances with AlbConfig.