Layer 4 listeners of Classic Load Balancer (CLB) can preserve client IP addresses and pass the IP addresses to backend servers. In most cases, backend servers can directly obtain client IP addresses. No additional configuration is required. In scenarios where IPv6 clients access IPv4 services, you need to enable the Proxy protocol for both Layer 4 listeners and backend servers so that the backend servers can obtain client IP addresses.
How backend servers obtain client IP addresses
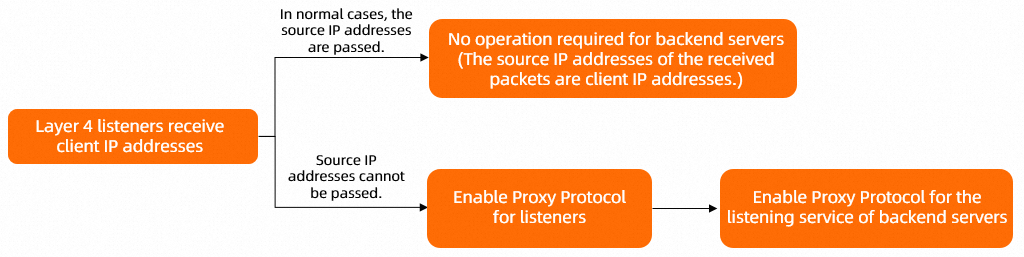
Directly obtain client IP addresses
In most cases, Layer 4 listeners pass source IP addresses to backend servers. The source IP addresses that the backend servers obtain are client IP addresses.
In some scenarios, this feature does not take effect. You need to enable the Proxy protocol so that the backend servers can obtain client IP addresses. For more information, see Enable the Proxy protocol.
Enable the Proxy protocol
The Proxy protocol is an Internet protocol which passes original connection information between proxy servers and backend servers.
In most cases, a proxy server overwrites the request header that carries the source client IP address and then forwards requests to backend servers. The source client IP address and port are replaced by the IP address and port of the proxy server. In this scenario, the backend servers cannot obtain the original connection information.
The Proxy protocol allows the proxy server to encapsulate the original connection information in a request header, which can be passed to backend servers. The backend servers can obtain the original connection information by parsing the request header encapsulated by the Proxy protocol. The original connection information includes the source IP address, source port, and transmission protocol.
The original connection information obtained by backend servers can be further used in logging, access control, and traffic monitoring.
The Proxy protocol takes effect only if it is enabled on both the proxy server and backend servers. If a backend server is uncapable of parsing Proxy protocol headers but the Proxy protocol is enabled, parsing errors may arise on the backend server and compromise service availability.
Layer 4 listeners can use the Proxy protocol to preserve original connection information, including the source IP address, destination IP address, source port, and destination port, and encapsulate the information in a TCP or UDP header. The Proxy protocol does not discard or overwrite any original connection information.
CLB supports only Proxy protocol v2. Proxy protocol v2 supports multiple transmission protocols, such as TCP and UDP. For more information, see The PROXY protocol.
In scenarios where IPv6 clients access IPv4 services through a CLB instance, you need to enable the Proxy proxy for both Layer 4 listeners and backend servers so that the backend servers can obtain client IP addresses.
Procedure
Directly obtain client IP addresses
In this scenario, backend servers can directly obtain client IP addresses.
If NGINX applications are deployed on the backend servers, you can check the NGINX log to determine whether the backend servers can obtain client IP addresses.
The following code block shows the default configurations of fields in the NGINX log.
http {
  # Default configurations
  log_format  main  '$remote_addr- $remote_user [$time_local] "$request" '
                      '$status $body_bytes_sent "$http_referer" '
                      '"$http_user_agent" "$http_x_forwarded_for"';
	#...
}
The default path of the NGINX log is /var/log/nginx/access.log.
The first IP address in each log entry is a client IP address.

Enable the Proxy protocol
Prerequisites
A CLB instance is created and listeners are created. In this example, a TCP listener that listens on port 80 is created. For more information, see Create and manage a CLB instance and Add a TCP listener.
A server group is created for the CLB instance and backend servers are added to the server group. In this example, a vServer group that uses TCP as the backend protocol is created. Elastic Compute Service (ECS) instances that use port 80 to receive requests are added to the vServer group. For more information, see Create and manage a vServer group.
NoteBefore you enable the Proxy protocol, make sure that your backend servers support Proxy protocol v2.
NGINX Plus R16 and later versions and open source NGINX 1.13.11 and later versions support Proxy protocol v2.
If the backend servers in a backend server group are attached to multiple listeners of a CLB instance, you must enable the Proxy protocol for all these listeners.
Step 1: Enable the Proxy protocol for the listener
Log on to the CLB console.
In the top navigation bar, select the region in which the CLB instance is deployed.
On the Instances page, click the ID of the CLB instance that you want to manage.
On the instance details page, click the Listeners tab, find the Layer 4 listener, and then click its ID.
On the listener details page, the Proxy Protocol parameter is set to Use the Proxy protocol to pass client IP addresses to backend servers. If the parameter is not displayed, click Modify Listener to enable the Proxy protocol.
ImportantThis feature does not support seamless migration. To enable the Proxy protocol, CLB needs to suspend and update your businesses. Proceed with caution.
Step 2: Enable the Proxy protocol on backend servers
In this example, the CentOS 7.9 operating system and NGINX 1.20.1 are used. Adjust the configurations based on the environment that you use.
Log on to a backend server and run the
nginx -tcommand to query the path of the configuration file. The default path is/etc/nginx/nginx.conf, which may vary based on the environment that you use.Modify the configurations of the Proxy protocol and save the modifications. The following code block shows an example:
http {
  # Make sure that $proxy_protocol_addr is configured.
  log_format  main  '$proxy_protocol_addr - $remote_addr- $remote_user [$time_local] "$request" '
                      '$status $body_bytes_sent "$http_referer" '
                      '"$http_user_agent" "$http_x_forwarded_for"';
  # Specify port 80 as the listener port and add the proxy_protocol.
  server {
    listen 80   proxy_protocol;
    #...
  }
}
Run the
sudo nginx -s reloadcommand to reload the NGINX configuration file.
Step 3: Verify that the backend servers can obtain client IP addresses
If NGINX applications are deployed on the backend servers, you can check the NGINX log to determine whether the backend servers can obtain client IP addresses.
The default path of the NGINX log is /var/log/nginx/access.log.
In each log entry, the IP address in the $proxy_protocol_addr variable is a client IP address.
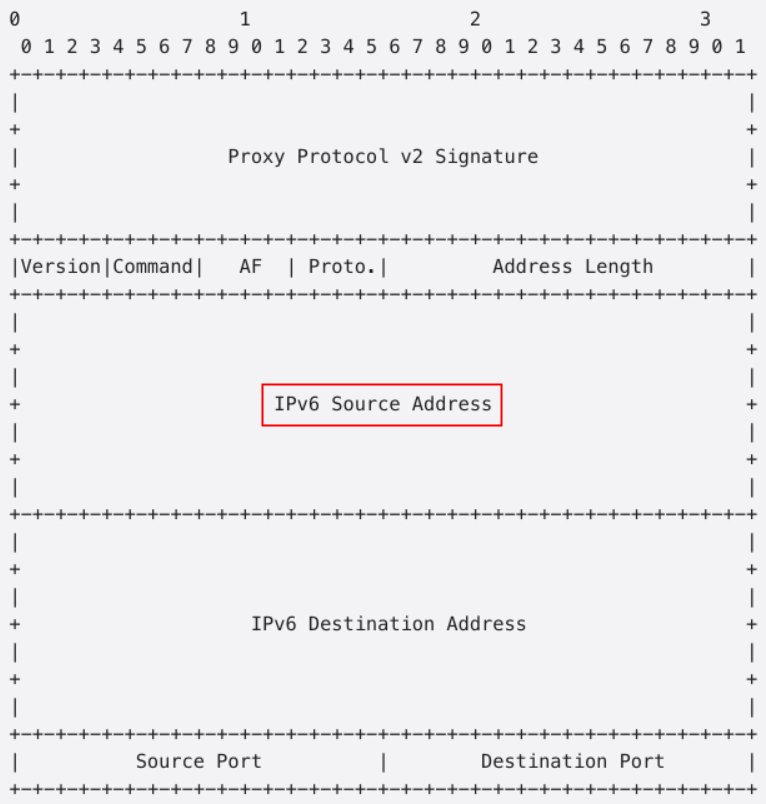
Proxy protocol v2 header formats
If the backend servers that you use are different from those in the preceding examples, you can refer to the manual of your server provider and The PROXY protocol to customize parsing configurations based on the header formats defined by Proxy protocol v2.
The following example shows how an IPv4 client IP address is preserved in the Proxy Protocol v2 header in the binary format.

The following example shows how an IPv6 client IP address is preserved in the Proxy Protocol v2 header in the binary format.
FAQ
Why do IP addresses that start with 100 frequently access backend ECS instances?
CLB forwards external requests to backend ECS instances by using the private IP address of the system server. CLB also accesses the ECS instances to perform health checks and monitor service availability.
The system CIDR block of CLB is 100.64.0.0/10, which is reserved by Alibaba Cloud. To prevent security issues, this CIDR block is not allocated to other network elements. As a result, the backend ECS instances are accessed by IP addresses that start with 100.
To ensure service availability, we recommend that you add a security rule which allows access from these IP addresses to all backend servers.
How does CLB preserve client IP addresses when it is deployed in a Container Service for Kubernetes (ACK) cluster?
CLB can preserve client IP addresses when it is deployed in an ACK cluster. Client IP preservation may be implemented in different ways. For more information, see How do I configure the pods to obtain the real IP addresses of clients?
References
Application Load Balancer (ALB), CLB, and Network Load Balancer (NLB) use different methods to preserve client IP addresses.
NLB uses the client IP preservation feature of backend server groups or the Proxy protocol to preserve client IP addresses. For more information, see Enable NLB to preserve client IP addresses.
Layer 7 listeners of CLB use the X-Forwarded-For header to preserve client IP addresses. For more information, see Enable Layer 7 listeners to preserve client IP addresses.
ALB uses the X-Forwarded-For header to preserve client IP addresses. For more information, see Preserve client IP addresses.