Retrieve the client IP address from the X-Forwarded-For HTTP header when using a CLB Layer 7 listener.
How it works
CLB Layer 7 listeners (HTTP/HTTPS) preserve the client IP address in the X-Forwarded-For HTTP header. Backend servers can retrieve this IP after configuration.
The X-Forwarded-For field has the following format:
X-Forwarded-For: <client IP address, proxy-server-1-IP, proxy-server-2-IP, ...>When you use this method, the leftmost IP address in the list is the client IP address.
CLB terminates HTTPS and communicates with backend servers over HTTP. Configure backend servers for HTTP only, even with an HTTPS listener.
Procedure
Prerequisites
-
A CLB instance with a Layer 7 listener has been created. This topic uses an HTTP listener on port 80. Create and manage CLB instances. Add an HTTP listener.
-
A server group with backend servers has been added to the CLB instance. This topic uses a vServer group with HTTP protocol, ECS instances, and port 80. Create and manage vServer groups.
Step 1: Verify that the listener uses X-Forwarded-For
-
Log on to the Classic Load Balancer (CLB) console.
-
In the top navigation bar, select the region where the instance is deployed.
-
On the Instances page, find the target instance and click its ID.
-
On the Instance Details page, click the Listener tab, find the target Layer 7 listener, and click its ID.
-
On the listener details page, verify that the Custom HTTP Header section includes X-Forwarded-For: Retrieve Client IP.
By default, CLB Layer 7 listeners use the X-Forwarded-For header to retrieve the client IP address. This feature cannot be disabled.
Step 2: Configure the backend servers
-
This section describes how to record the client IP address in backend server access logs (via the
X-Forwarded-Forfield). Connection-layer variables (such as Nginx$remote_addr) still show the CLB forwarding IP and are not affected. -
If you want to replace the connection-layer variable (such as
$remote_addr) with the real client IP so that existing log formats, access control, and rate-limiting rules work without modification, see the Replace connection-layer addresses with client IPs (Nginx and Apache).
Nginx server
Example environment: CentOS 7.9 with Nginx 1.20.1. Your configuration may differ.
-
Run
nginx -V | grep http_realip_moduleto check whether http_realip_module is installed. Nginx uses this module to parse X-Forwarded-For records.If the output includes
--with-http_realip_module, the module is installed. Proceed to the next step.http_realip_module is available since Nginx 1.0.4 (2011). If you use an older version, back up your configuration and upgrade Nginx.
If http_realip_module is not installed, recompile Nginx with the module or reinstall Nginx using a package manager such as yum.
-
Edit the Nginx configuration file. Run
nginx -tto find the file path. The default is/etc/nginx/nginx.conf.http { # Make sure that the log_format includes $http_x_forwarded_for. This variable records the value of X-Forwarded-For. log_format main '$remote_addr - $remote_user [$time_local] "$request" ' '$status $body_bytes_sent "$http_referer" ' '"$http_user_agent" "$http_x_forwarded_for"'; # ... } -
Run the
sudo nginx -s reloadcommand to reload the Nginx configuration.
Apache server
Example environment: CentOS 7.9 with Apache 2.4.6. Your configuration may differ.
-
Run
httpd -M | grep remoteip_moduleto check whether remoteip_module is installed. Apache uses this module to parse X-Forwarded-For records.If the output includes
remoteip_module (shared), the module is installed. Proceed to the next step.remoteip_module is available since Apache 2.4.0 (2012). If you use an older version, back up your configuration and upgrade Apache.
If remoteip_module is not installed, recompile Apache with the module or reinstall Apache using a package manager such as yum.
-
Edit the Apache configuration file. The default path is
/etc/httpd/conf/httpd.conf.# ... <IfModule log_config_module> # Add %{X-Forwarded-For}i to record X-Forwarded-For information. LogFormat "%{X-Forwarded-For}i %h %l %u %t \"%r\" %>s %b \"%{Referer}i\" \"%{User-Agent}i\"" combined LogFormat "%{X-Forwarded-For}i %h %l %u %t \"%r\" %>s %b" common #... </IfModule> # ... -
Run the
sudo systemctl restart httpdcommand to restart the Apache service.
IIS server
Example environment: Windows Server 2016. Your configuration may differ.
-
Download and decompress the F5XForwardedFor file.
-
Based on your OS architecture, copy
F5XFFHttpModule.dllandF5XFFHttpModule.inifrom thex86\orx64\directory to a location with IIS read permissions. -
In Server Manager, open IIS Manager.
-
Select the server and double-click Modules.
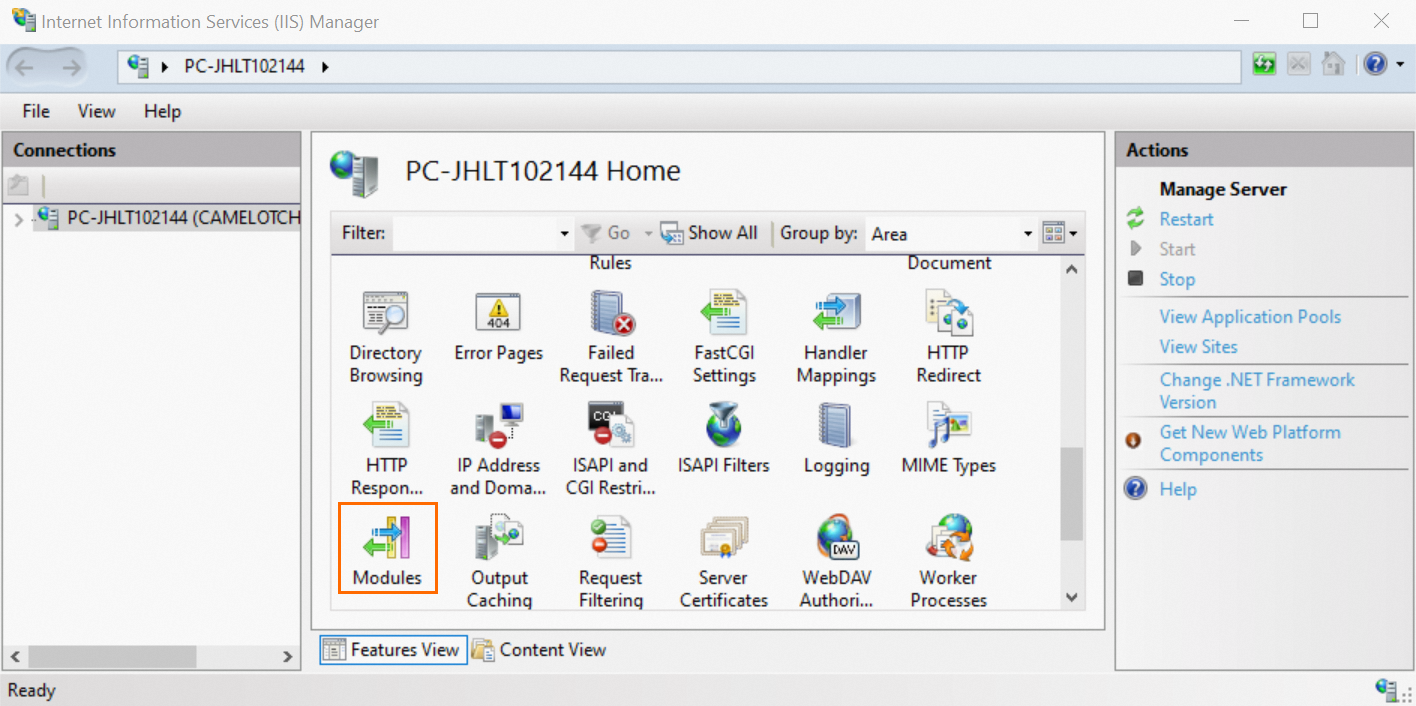
-
Click Configure Native Modules, and then click Register.
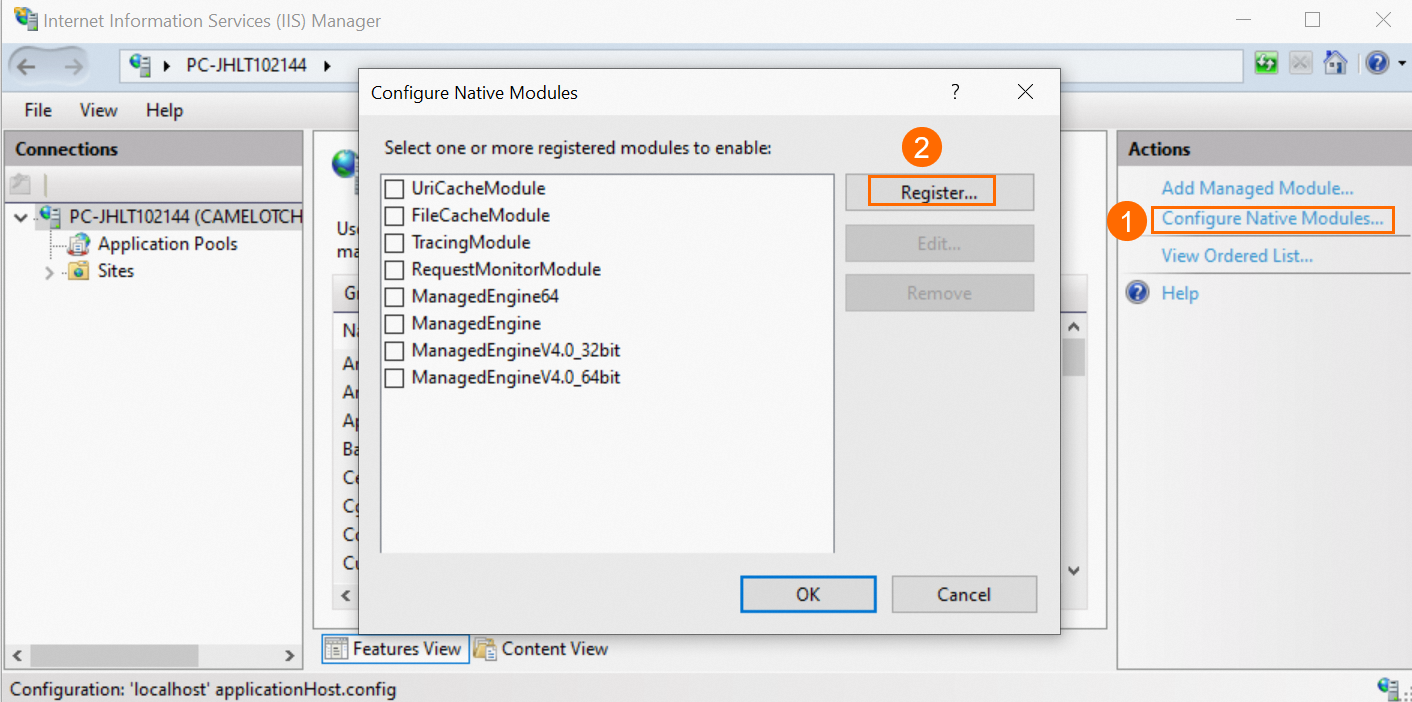
-
Add the downloaded .dll file.
-
Enter the file name, select the path, and click OK.
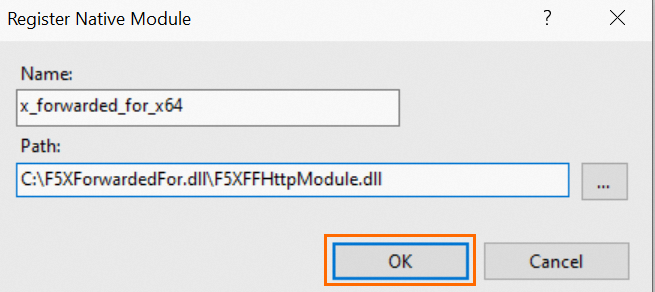
-
The system automatically selects the newly registered module. Click OK.
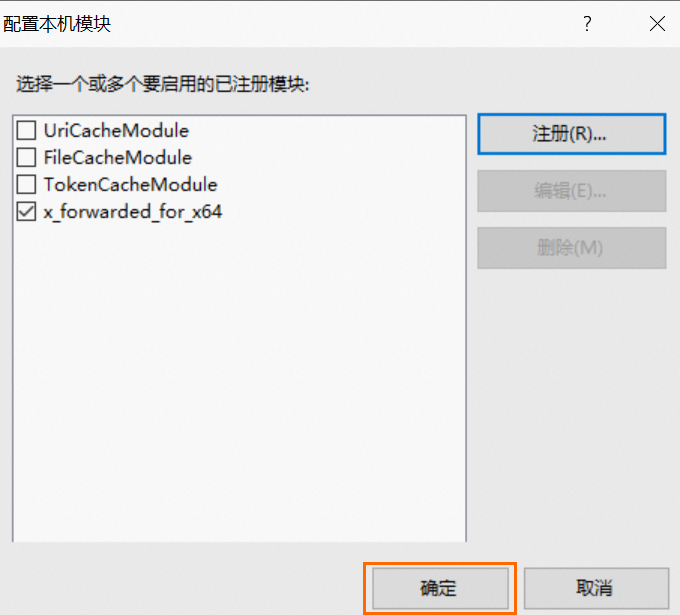
-
-
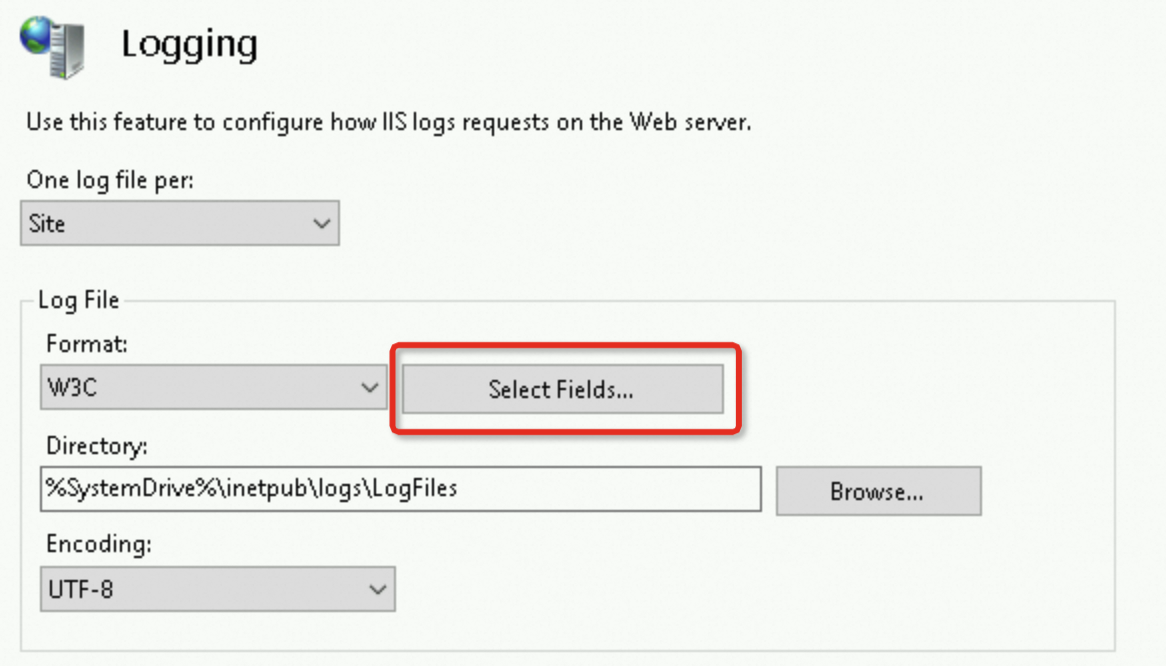
Return to the server's home page and double-click the Logging module. Configure the log format to record the
X-Forwarded-Forfield.-
Click Select Fields.
-
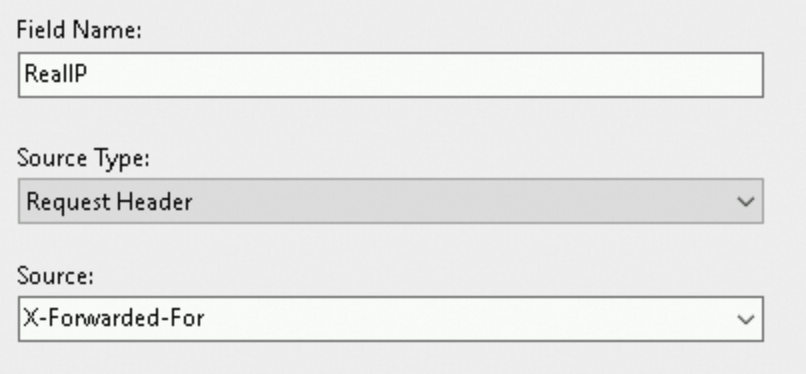
In the lower-left corner, click Add Field, add the log field, and then click OK.
-
In the upper-right corner, click Apply to save the changes.
-
-
Restart the IIS server for the configuration to take effect.
Step 3: Verify client IP retrieval
Follow the steps for your server type.
Nginx server
Check the Nginx access log to verify client IP retrieval.
The default path for the Nginx access log is /var/log/nginx/access.log.
The leftmost IP in the $http_x_forwarded_for field is the client IP address.

Apache server
Check the Apache access log to verify client IP retrieval.
The default path for the Apache access log is /var/log/httpd/access_log.
The leftmost IP in the %{X-Forwarded-For}i field is the client IP address.

IIS server
Check the IIS log to verify client IP retrieval.
Find the log file path in the Logging module.
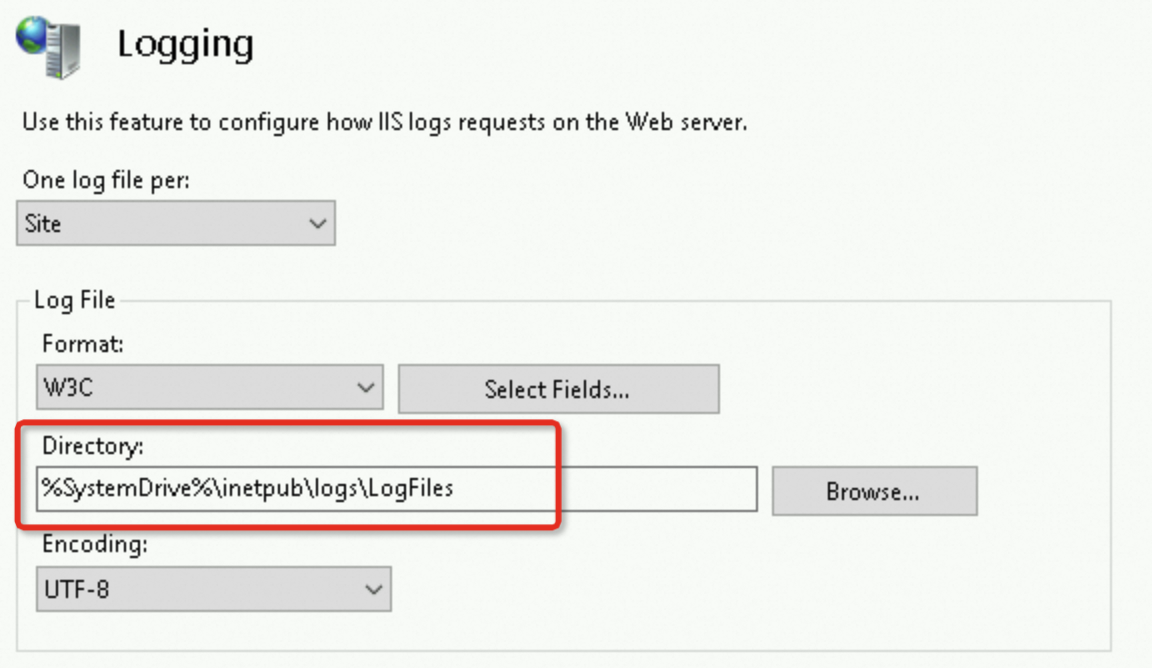
The leftmost IP in the X-Forwarded-For field is the client IP address.

FAQ
Frequent access from IPs starting with 100
The CLB system forwards external requests to backend ECS instances and performs health checks. Both types of requests originate from the system.
The CLB system uses the reserved CIDR block 100.64.0.0/10. This block is exclusive to Alibaba Cloud and poses no security risk, but explains the frequent access from IPs starting with 100.
Ensure that iptables and other security software on your servers do not block this CIDR block.
Getting client IPs with WAF, CDN, and GA
If traffic passes through WAF, CDN, or Global Accelerator (GA) before reaching CLB, you can still use X-Forwarded-For to retrieve the client IP. These services pass through X-Forwarded-For by default with no additional configuration.
To prevent X-Forwarded-For spoofing, use a custom header to record the client IP. For example, in a client > CDN > WAF > CLB > ECS architecture, CDN can pass the Ali-Cdn-Real-Ip header. In WAF, select Specify header field as the client IP determination method and set the header to Ali-Cdn-Real-Ip. Set the Nginx log variable to $http_Ali_Cdn_Real_Ip.
Additional security measures:
-
Validate and filter the XFF header on backend servers. Check the format and IP addresses, and reject invalid or suspicious values.
-
Use firewalls and ACLs between CLB and backend servers to filter malicious requests that target the XFF header.
-
Use SSL/TLS encryption to protect communications, including XFF header transmission, against man-in-the-middle attacks.
Getting client IPs in an ACK environment
In a Container Service for Kubernetes (ACK) cluster, the method is the same but some operational details differ. Network management FAQ.
Layer 4 vs Layer 7 listener: source IP behavior
When a client request passes through CLB, the source IP visible to backend servers depends on the listener type:
|
Listener type |
Source IP handling |
|
|
Layer 4 (TCP/UDP) |
CLB passes the client source IP through directly |
Client originating IP address |
|
Layer 7 (HTTP/HTTPS) |
CLB acts as a reverse proxy and establishes a new TCP connection with the backend server |
CLB internal forwarding IP (100.64.0.0/10 range) |
With Layer 7 listeners, CLB automatically adds the X-Forwarded-For HTTP request header to carry the client originating IP address. If $remote_addr in your Nginx access log shows a CLB internal forwarding IP in the 100.64.0.0/10 range instead of the client IP, this is expected behavior.
Replace connection-layer addresses with client IPs (Nginx and Apache)
Nginx
By default, $remote_addr in Nginx logs records the CLB internal forwarding IP (100.64.0.0/10 range). To replace it with the real client IP so that existing log formats, access control, and rate-limiting rules work without modification, use the ngx_http_realip_module module:
-
Run
nginx -V | grep http_realip_moduleto verify that the module is installed. -
Add the following to the
httpblock in the configuration file (default:/etc/nginx/nginx.conf):set_real_ip_from 100.64.0.0/10; real_ip_header X-Forwarded-For; real_ip_recursive on; -
Run
sudo nginx -tto validate the configuration, then runsudo nginx -s reloadto reload.
After the configuration takes effect, check the access log (default:/var/log/nginx/access.log) to confirm that$remote_addrnow shows the real client IP.
If traffic passes through multiple proxies such as WAF or CDN, add the origin IP ranges of each proxy layer to set_real_ip_from.
Health check requests (HEAD, withoutX-Forwarded-For) will still show$remote_addras100.64.0.0/10, which is expected.
Apache
By default, %h in Apache logs records the CLB internal forwarding IP. To replace it with the real client IP so that existing log formats and Require ip access control rules work without modification, use the built-in mod_remoteip module in Apache 2.4:
-
Run
httpd -M | grep remoteip_moduleto verify that the module is installed. -
Add the following to the configuration file (default:
/etc/httpd/conf/httpd.conf):RemoteIPHeader X-Forwarded-For RemoteIPTrustedProxy 100.64.0.0/10 -
Run
sudo systemctl restart httpdto restart the Apache service.
After the configuration takes effect, check the access log (default:/var/log/httpd/access_log) to confirm that%hnow shows the real client IP.
If traffic passes through multiple proxies such as WAF or CDN, add the origin IP ranges of each proxy layer to RemoteIPTrustedProxy.
Health check requests (HEAD, withoutX-Forwarded-For) will still show%has100.64.0.0/10, which is expected.
Related documents
Other load balancer types use different methods:
-
Application Load Balancer (ALB): uses X-Forwarded-For. Retrieve client IP addresses by using an ALB.
-
Network Load Balancer (NLB): uses server groups or Proxy protocol. Retrieve client IP addresses by using an NLB.
-
CLB Layer 4 listener: retrieves directly or uses Proxy protocol. Retrieve client IP addresses by using a CLB Layer 4 listener.