Compared to Classic Load Balancer (CLB), Application Load Balancer (ALB) offers superior Layer 7 processing capabilities, advanced routing features, and handles massive application-layer traffic. You can enable Web Application Firewall (WAF) with a single click, completely decoupling traffic forwarding from security. ALB also provides advanced features for an enhanced load balancing experience. This topic describes how to migrate Layer 7 listeners from a CLB instance to an ALB instance by using a migration wizard.
Limitations
Supported CLB instance types
Private-facing IPv4 CLB instances in a VPC with a configured Layer 7 listener (HTTP or HTTPS).
Public-facing IPv4 CLB instances with a configured Layer 7 listener (HTTP or HTTPS).
Unsupported migration scenarios
The migration wizard does not support one-click migration in the following scenarios. For these cases, we recommend that you manually migrate Layer 7 listeners from CLB to ALB.
CLB instances without an HTTP or HTTPS listener.
Private-facing CLB instances in a classic network.
IPv6 CLB instances.
Migration considerations
Migration is not supported in regions where ALB is unavailable. For information about supported regions and zones, see Regions and zones that support ALB.
Web Application Firewall (WAF) configurations are not migrated. If WAF is enabled for your CLB instance, you must manually enable WAF protection after migration. We recommend enabling WAF 3.0 for new ALB instances. For more information, see Enable WAF protection for an ALB instance.
Threshold-based alert rules for CLB in CloudMonitor are not migrated. You must reconfigure these rules in the CloudMonitor console or by using an API or SDK. After migration, see Set alert rules for ALB metrics to configure new rules.
Anti-DDoS is enabled by default. Custom Anti-DDoS threshold configurations are not migrated. After the migration, you must reconfigure them manually in the Anti-DDoS console.
Access control configurations are not migrated. After the migration, you must configure them manually. For more information, see Access control.
You must manually specify the server certificate and CA certificate for an HTTPS listener.
Configurations for primary/secondary server groups on a CLB instance cannot be migrated to an ALB instance.
For private-facing CLB instances, backend servers are migrated directly. For public-facing CLB instances, backend servers are not migrated. Instead, the system creates a new server group in the VPC where the ALB instance is located. You must manually add backend servers to this server group. The backend servers must be in the same VPC as the ALB instance.
Billing
The one-click CLB-to-ALB migration feature is free of charge. The new ALB instance is billed based on ALB billing rules.
Prerequisites
A Layer 7 listener (HTTP or HTTPS) is configured for the CLB instance that you want to migrate.
The examples in this topic use four ECS instances.
Servers that host business applications: ECS01 and ECS02 are used as backend servers.
Servers for testing: ECS03 is used to test traffic before the migration, and ECS04 is used to verify access traffic during the migration.
If you already have test servers, you do not need to create ECS03 and ECS04.
Step 1: Start the migration
Use one of the following methods to open the migration wizard.
Method 1: CLB console
-
Log on to the CLB console.
In the top navigation bar, select the region where the CLB instance is deployed.
On the Instances page, find the target instance and click its ID.
Click the Migration Wizard tab, review the information, and then click Enable on the Migrate from CLB to ALB card.
Method 2: ALB console
NoteIf you do not have an ALB instance in the region where the CLB instance is located, you cannot use the ALB console to perform a one-click migration. In this case, use Method 1.
Log on to the ALB console.
In the top navigation bar, select the region where the CLB instance is deployed.
On the Instances page, click Migrate from CLB to ALB.
In the Migrate from CLB to ALB dialog box, review the information, select the CLB instance to migrate, and then click Open Migration Wizard.
-
In the Review Configurations step, confirm the basic CLB information and the pre-configured ALB information. For each listener, complete all required configurations, which are indicated by the
 icon, select the confirmation checkbox, and then click Next.
- : Indicates a configuration item that requires manual input.
 : Indicates a configuration item that is automatically changed by the system.
You can click Modify Listener or Modify Certificate to change the ALB listener configuration. You can modify certificates only for HTTPS listeners.
In the Create Instance step, configure the VPC and vSwitch for the new ALB instance, and then click Next.
Parameter
Description
VPC
Private-facing CLB instance: The ALB instance is assigned to the same VPC as the CLB instance by default.
Public-facing CLB instance: You need to manually select a VPC.
Zone
Select a zone and a vSwitch.
ALB supports multi-zone deployment. If the current region supports two or more zones, select at least two zones to ensure high availability for your services. ALB does not charge additional fees for the zones.
Select a vSwitch for each selected zone. If no vSwitch is available, create one as prompted by the console.
Optional: When migrating a public-facing CLB instance, you need to select an EIP in the selected zone.
If no existing EIP is available, you can select Purchase EIP. The system automatically creates a pay-as-you-go (pay-by-traffic) BGP (Multi-ISP) EIP with default security protection and binds it to the ALB instance.
Select an existing EIP: Bind an existing EIP to the new ALB instance.
ImportantYou can only bind a pay-as-you-go (pay-by-traffic) EIP that is not added to an Internet Shared Bandwidth instance.
The EIPs assigned to different zones of the same ALB instance must be of the same type.
In the Confirm Order step, confirm the configuration of the ALB instance, select the Pricing/Billing checkbox, and then click Start Migration.
In the Complete step, wait for the migration task to finish. You can then perform the following actions:
The migration task takes about 1 to 10 minutes. This task is performed by Resource Orchestration Service (ROS). You can follow the prompts to the ROS console to view the task's progress in the stack.
Click View Instance to see the details of the migrated ALB instance.
Click CLB Instance List to view the list of CLB instances.
Click ALB Instance List to view the list of ALB instances.
After the migration is complete, check whether the new ALB instance has backend servers.
In the left-side navigation pane, choose .
On the Instances page, find the migrated ALB instance and click its ID.
Click the Listener tab, find the target listener, and click View Details in the Actions column.
On the Listener Details tab, in the Server Group (Default Forwarding Rule) section, click View/Modify Backend Server. You are redirected to the Backend Servers tab. Check whether any backend servers are listed.
If no backend servers are listed, click Add Backend Server to add at least two backend servers with deployed applications to the ALB instance. This ensures the ALB instance can correctly distribute client requests. In this topic, the ECS01 and ECS02 backend servers have been added to the ALB instance.
For more information about how to create an ECS instance, see Create an instance by using the wizard.
The following are examples of how to deploy test applications on ECS01 and ECS02:
Step 2: Test traffic
Enable access logs (optional)
ALB, integrated with Simple Log Service (SLS), provides an access log feature. You can use access logs to monitor your ALB instance load and diagnose issues.
Log on to the ALB console.
In the top navigation bar, select the region where the ALB instance is deployed.
On the Instances page, find the target ALB instance and click its ID.
On the instance details page, click the Access Logs tab. On the Access Logs tab, click Create Access Log.
In the Create Access Log dialog box, configure the Project and Logstore. Then, click OK. In the confirmation dialog box that appears, click OK again.
Parameter
Description
Project
A resource management unit in Simple Log Service used for resource isolation and control.
Select Project: Select an existing Project from the drop-down list.
Create Project: Enter a name for the new Project in the text box.
Logstore
A unit for log data collection, storage, and querying in Simple Log Service.
Select Logstore: Select an existing Logstore from the drop-down list.
Create Logstore: Enter a name for the new Logstore in the text box. If you create a new Project, you must also create a new Logstore.
Notes on Creating Service-linked Role
This action automatically creates the service-linked role required to enable the feature.
Test traffic
Remotely log on to ECS03.
NoteA public IP address was assigned to the ECS03 instance upon purchase.
Run the following command to modify the hosts file.
sudo vi /etc/hostsIn the hosts file, add the following entry to map the ALB instance's EIP to the domain name. Then, save and close the file.
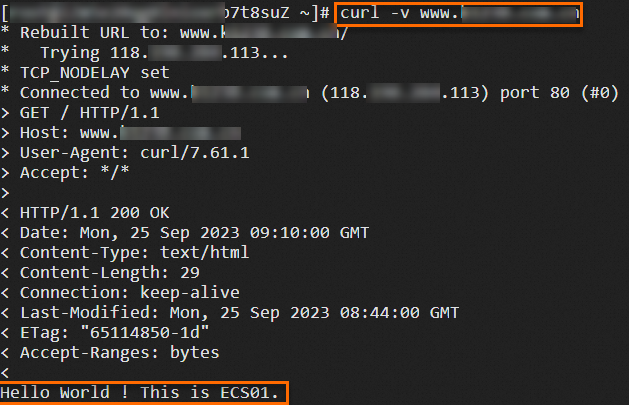
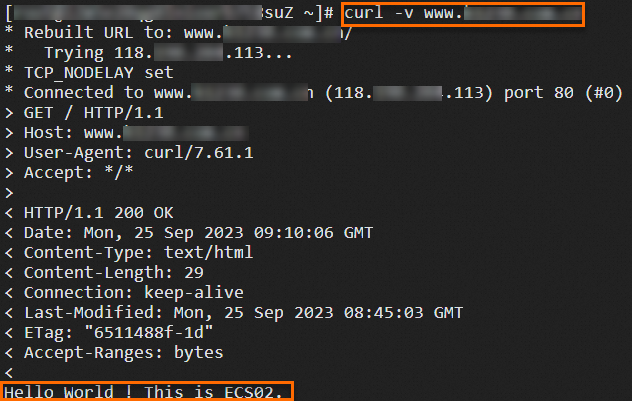
118.XX.XX.113 www.example.netRun the following command to test ALB traffic forwarding.
curl -v www.example.netThe following figure shows the command output:
(Optional) Return to the ALB console, find the Access Logs tab for the target ALB instance, and click the link to the right of Simple Log Service to view the access logs.
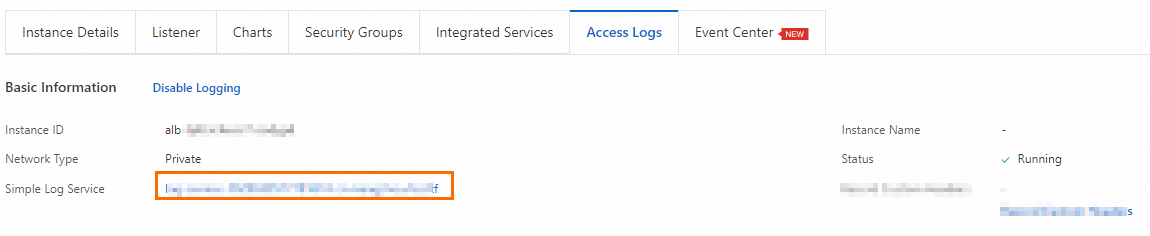 In the Simple Log Service console, you can also query fields such as request_uri, http_host, upstream_addr, and status to view the runtime logs of the ALB domain or path-based forwarding rules.
Step 3: Migrate traffic to the ALB instance
Due to semantic differences in how CLB and ALB forwarding rules handle domain names and URLs, we strongly recommend that you carefully compare your CLB forwarding policies and ALB forwarding rules before you migrate traffic. To ensure that their functionalities are identical, you may need to adjust the forwarding rules in ALB based on the differences between CLB and ALB forwarding rules. All configurations must be thoroughly tested and validated to prevent unexpected impacts on your business during the migration.
To minimize impact, migrate traffic from the CLB instance during off-peak hours.
This topic assumes that you have already configured DNS resolution for your CLB instance. You have used an A record to point your domain name to the service address of the CLB instance. After you verify the configuration of the ALB instance, this topic describes how to migrate traffic from CLB to ALB by using Alibaba Cloud DNS as an example. For more information about Alibaba Cloud DNS, see Public authoritative resolution.


Step 1: Configure a temporary domain and CNAME record
We recommend using a CNAME record for the ALB instance. To meet the condition for enabling weighted DNS records, you must add a CNAME record for a temporary domain name and point it to the service address of the CLB instance to be migrated. In this topic, the business domain name configured for the CLB instance is www.example.net.
To enable weighted DNS records, you must have multiple A, CNAME, or AAAA records for the same hostname and query source under the domain.
Log on to the Alibaba Cloud DNS console.
On the Public Zone page, find and click the domain name
example.netused by the CLB instance.On the Settings page, find the A record that points to the service address of the CLB instance and click Edit in the Actions column.
In the Edit Record panel, modify the Hostname and click OK. In this topic, change the Hostname to web0. Keep the other parameters unchanged.
On the Settings page, click Add Record. In the Add Record panel, configure the following parameters and click OK.
Parameter
Description
Record Type
Select CNAME from the drop-down list.
Hostname
The prefix of your domain name. Enter www.
DNS Query Source
Select Default.
TTL
TTL (Time To Live) indicates how long a DNS record is cached on a DNS server. In this topic, it is set to 5 seconds.
Record Value
Enter the temporary domain name. In this topic, enter web0.example.net.
Step 2: Add a CNAME record for the ALB instance
On the Settings page, click Add Record. In the Add Record panel, configure the following parameters and click OK.
Parameter | Description |
Record Type | Select CNAME from the drop-down list. |
Hostname | The prefix of your domain name. Enter www. |
DNS Query Source | Select Default. |
TTL | TTL (Time To Live) indicates how long a DNS record is cached on a DNS server. In this topic, it is set to 5 seconds. |
Record Value | Enter the DNS name of the ALB instance that you copied. |
Step 3: Set weights to start a canary release
On the Settings page, find the CNAME record added in Step 2, click the drop-down arrow next to Edit, and click Edit Record Set.
In the Edit Record panel, under the Record Values section, set the weights for the DNS records of the CLB and ALB instances. Set the weight of the record for the CLB instance to 100 and the weight of the record for the ALB instance to 0. Click OK.

Once you confirm your services are unaffected, gradually decrease the weight of the DNS record for the CLB instance while gradually increasing the weight for the ALB instance.
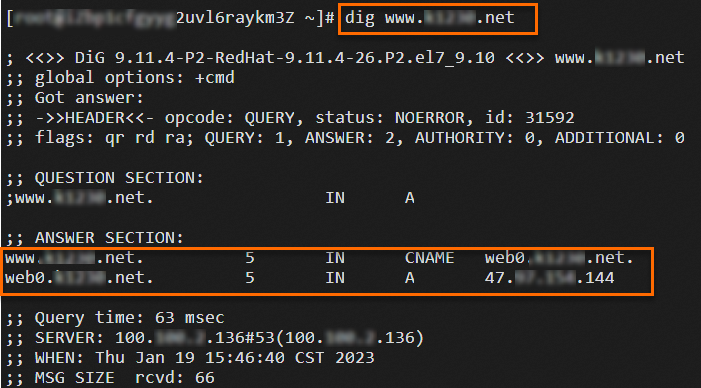
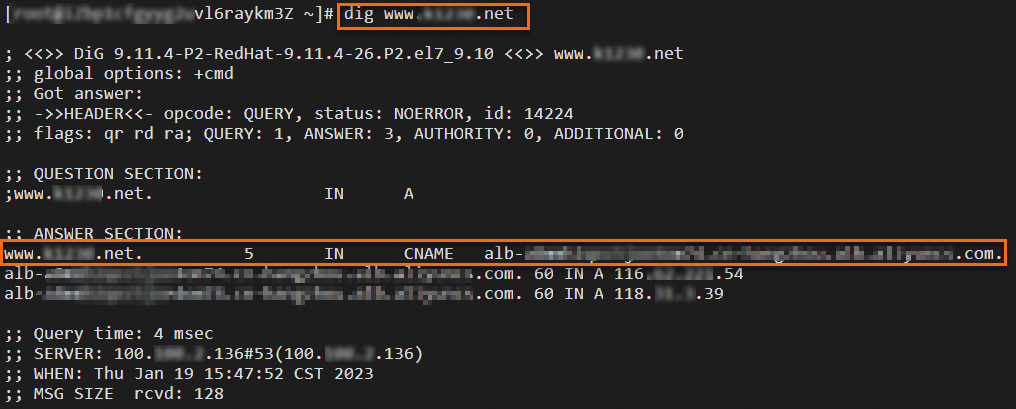
Log on to the ECS04 instance, which is in the same VPC as the ALB instance. Run the
digcommand multiple times to verify the traffic migration.NoteThis ECS04 instance is assigned a public IP address and has the dig command installed by running
yum install bind-utils.dig www.example.netThe command output is shown in the following figure. By running the command multiple times, you can observe that requests are distributed to either the ALB or CLB instance based on the configured weights.
Step 4: Complete the traffic migration
Based on the traffic migration verification results, gradually decrease the weight of the DNS record for the CLB instance to 0 while gradually increasing the weight of the DNS record for the ALB instance to 100. This completes the traffic migration from the CLB instance to the ALB instance. After all long-lived connections to the CLB instance are processed and the CLB instance receives no new traffic, you can monitor the instance for a period of time based on your business scenario and then release the CLB instance. For more information about how to release a CLB instance, see Release a CLB instance.

FAQ
How are CLB redirect and forwarding policies migrated?
After migration, forwarding rules for redirection and domain/path-based routing are automatically configured for the ALB instance.
Due to semantic differences in how CLB and ALB forwarding rules handle domain names and URLs, we strongly recommend that you carefully compare your CLB forwarding policies and ALB forwarding rules before you migrate traffic. To ensure that their functionalities are identical, you may need to adjust the forwarding rules in ALB based on the differences between CLB and ALB forwarding rules.
What are the differences between CLB and ALB forwarding rules?
CLB and ALB forwarding rules have semantic differences in how they process domain names and URL paths:
Domain name
CLB domain forwarding rules support exact and wildcard matches. The matching order is: exact match, then narrower wildcard, then broader wildcard. This ensures that the most specific rule is applied first.
ALB domain forwarding rules support exact, wildcard, and regex matches. The matching order is determined by a user-defined priority.
URL path
CLB URL path forwarding rules are based on the longest prefix match of the URL path.
ALB URL path forwarding rules support exact, wildcard, and regex matches.
The following table illustrates how CLB and ALB forwarding rules match certain special characters in URL requests. You can use this as a reference to adapt your forwarding rules when migrating from CLB to ALB.
Rule URL
Request
CLB match
ALB match
Description
??No
No
The
?in a request typically separates the URL from the query string and is removed during path matching.Any valid character
No
Yes
ALB supports
?as a single-character wildcard. CLB does not.%%No
- (Not allowed)
The
%in a request is typically used for URL encoding. For example,%61is decoded toa.%61%61No
- (Not allowed)
In a request, the
%character is typically used for escaping, where%61is escaped toa.aNo
No
-
a%61Yes
Yes
The
%character in a request is typically used for escaping, where%61is escaped toa.ab,abc, etc.Yes
No
CLB performs prefix matching by default. ALB requires an exact match unless a wildcard rule (for example, /a*) is used.
test/*test- (Not supported)
No
ALB supports explicit wildcard syntax (*). CLB's prefix matching does not use the * character in its rules.
test/- (Not supported)
Yes
test/a- (Not supported)
Yes
How are certificates for a CLB HTTPS listener migrated?
You must manually specify the certificates during the migration. If you do not have certificates, you must first purchase or upload them in the Certificate Management Service console.
For server certificates, see Purchase an SSL certificate and Upload, sync, and share SSL certificates.
For CA certificates, see Purchase and enable a private CA.
After the migration, the system automatically configures the corresponding certificates based on the server certificate, additional certificates, and CA certificate that you specified.
ALB can distribute traffic across multiple domains. For more information, see Serve multiple HTTPS domains by using a single ALB instance.
ALB supports both one-way and two-way HTTPS authentication. For more information, see Achieve end-to-end encryption by configuring full-link HTTPS access and Deploy an HTTPS business by using ALB (two-way authentication).
Migrating backend servers from different VPCs
An ALB server group is tied to a specific VPC. The wizard creates a new server group in the ALB instance's VPC, and you must manually add backend servers from the same VPC to this group.
An IP-based server group for an ALB instance can have servers across different VPCs. To add ECS instances from different VPCs, create an IP-based server group for the ALB instance after the migration and add the instances to it. For more information, see Attach servers from cross-region VPCs by using ALB.