Certificate Management Service centralizes SSL certificates from multiple sources. Upload certificates obtained from any CA, sync certificates from an Alibaba Cloud private certificate authority (CA), and share certificates across accounts—all from a single console for unified monitoring and cloud product deployment.
Certificate sources
| Source | Description |
|---|---|
| Uploaded certificates | Certificates downloaded from Alibaba Cloud or obtained from any third-party CA |
| Certificates from private CA | Certificates issued by your Alibaba Cloud private CA and synced to the console |
| Shared certificates | Certificates shared from another Alibaba Cloud account that belongs to the same verified entity |
After bringing certificates into the console, you can:
Track status, validity period, and deployments from a single view
Deploy certificates directly to Server Load Balancer (SLB), Content Delivery Network (CDN), Web Application Firewall (WAF), Elastic Compute Service (ECS), and Simple Application Server
Upload certificates
Pre-upload checklist
Before uploading, confirm that your certificate meets all of the following requirements:
Format: PEM format (
.pemor.crt). To convert PFX, JKS, PKCS8, or P12 files, use the Convert Certificate Format tool under Common Certificate Tools > Convert Certificate Format in the console.Complete certificate chain: Include the server certificate plus the intermediate certificate. For mutual TLS, also include the root certificate.
No private key password: Remove any passphrase before uploading. Run
openssl rsa -in encrypted.key -out decrypted.keyto strip the password.Matched key pair: The certificate and private key must form a matched pair. See Verify the certificate and private key match.
Verify the certificate and private key match
Run the appropriate commands for your certificate algorithm. The hashes from both commands must be identical.
RSA certificates
# Compare the MD5 hashes of the modulus from the certificate and the private key
openssl x509 -noout -modulus -in certificate.pem | openssl md5
openssl rsa -noout -modulus -in private.key | openssl md5
ECC certificates
# Compare the MD5 hashes of the public key extracted from the certificate and the private key
openssl x509 -in certificate.pem -pubkey -noout | openssl pkey -pubin -pubout -outform der | openssl md5
openssl pkey -in private.key -pubout -outform der | openssl md5
If the hashes do not match, the private key may be password-protected. Run openssl rsa -in encrypted.key -out decrypted.key to remove the password and retry.
Upload a certificate
Log on to the Certificate Management Service console.
In the left navigation pane, choose Certificate Management > SSL Certificate Management.
On the Manage Uploaded Certificates tab, click Upload Certificate.
In the Upload Certificate panel, configure the parameters based on your certificate algorithm and click OK.
International standard
| Parameter | Description |
|---|---|
| Certificate algorithm | Select Internationally Accepted Algorithm. |
| Certificate name | Enter a descriptive name, such as example.com-2024-rsa. |
| Certificate file | Enter the certificate content (PEM encoded). Click Upload and Parse File to select the file from your computer—the system parses the content automatically. Alternatively, open the .pem or .crt file in a text editor and paste the content. <br><br> For server-side trust only: include the server certificate (①) and intermediate certificate (②). 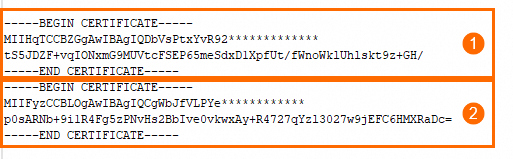 <br> For mutual TLS (server + client trust): include the server certificate (①), intermediate certificate (②), and root certificate (③). If the certificates are in separate files, concatenate the intermediate and root certificates in the order shown and paste the combined content into the Certificate chain field. <br> For mutual TLS (server + client trust): include the server certificate (①), intermediate certificate (②), and root certificate (③). If the certificates are in separate files, concatenate the intermediate and root certificates in the order shown and paste the combined content into the Certificate chain field. 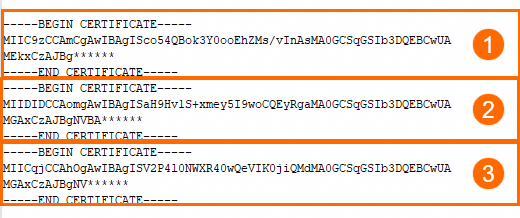 |
| Certificate key | Enter the private key content (PEM encoded). Click Upload and Parse File to select the key file, or open the .key file in a text editor and paste the content. <br><br> RSA format:  <br> ECC format: <br> ECC format:  <br><br> Alternatively, select an existing CSR from Certificate Management Service console. The system automatically matches it with the corresponding certificate. For CSR operations, see Manually create or upload a CSR. <br> <br><br> Alternatively, select an existing CSR from Certificate Management Service console. The system automatically matches it with the corresponding certificate. For CSR operations, see Manually create or upload a CSR. <br>Note If you see a "Certificate and private key do not match" error, the key file may be malformed or password-protected. Run |
| Certificate chain | (Optional) Enter the intermediate or root certificate (PEM encoded) if not already included in the Certificate file field. Click Upload and Parse File or paste the content manually. <br><br> Intermediate certificate or root certificate only:  <br> Intermediate certificate (①) and root certificate (②): <br> Intermediate certificate (①) and root certificate (②):  |
| Resource group | (Optional) Assign to a resource group based on your management policy. |
| Tag key, Tag value | (Optional) Tag the certificate based on your resource management policy. |
SM2 standard
| Parameter | Description |
|---|---|
| Certificate algorithm | Select SM2 Algorithm. |
| Certificate name | Enter a descriptive name, such as example.com-2024-sm2. |
| Certificate file | Enter the content of the signing certificate file (PEM encoded). Click Upload and Parse File or paste the content from the .pem or .crt file. |
| Certificate key | Enter the content of the signing certificate private key (PEM encoded). Click Upload and Parse File or paste the content from the .key file. |
| Encryption certificate | Enter the content of the encryption certificate file (PEM encoded). Click Upload and Parse File or paste the content from the .pem or .crt file. |
| Encryption private key | Enter the content of the encryption certificate private key (PEM encoded). Click Upload and Parse File or paste the content from the .key file. |
| Resource group | (Optional) Assign to a resource group based on your management policy. |
| Tag key, Tag value | (Optional) Tag the certificate based on your resource management policy. |
Verify the upload
After a successful upload, the certificate appears in the Manage Uploaded Certificates list.
Deleting a certificate (clicking Delete in the Actions column) is irreversible. Existing deployments that use the certificate are not affected.
Sync private CA certificates
Sync certificates from an Alibaba Cloud private CA to eliminate manual uploads. Synced certificates appear on the Manage Uploaded Certificates tab for centralized management.
Sync certificates
Log on to the Certificate Management Service console.
In the left navigation pane, choose Certificate Management > PCA Certificate Management. Select the region where your private CA resides.
Click the Private CAs tab. In the list, expand the target root CA. In the Actions column for the intermediate CA, click Certificates.
Select the certificates to sync and click Batch Synchronize to SSL Certificates. In the dialog box, click OK. Wait for the sync to complete. The Status column displays Uploaded when done.

Verify the sync
Go to Certificate Management > SSL Certificate Management and click the Manage Uploaded Certificates tab. The synced private CA certificates appear in the list.
Share SSL certificates with another account
Share certificates purchased from Alibaba Cloud for free with other Alibaba Cloud accounts that belong to the same verified entity. This enables certificate reuse and centralized billing.
Sharing requirements
Before sharing, confirm the following:
Identity verification: Both the sharing account and the receiving account must belong to the same verified legal entity—individual or enterprise.
Certificate source: Only certificates purchased and issued by Alibaba Cloud can be shared. Uploaded and synced certificates are not supported.
Single-share limit: A certificate can only be shared once. The receiving account cannot reshare it.
Same site: Sharing between the Alibaba Cloud China site (aliyun.com) and the international site (alibabacloud.com) is not supported.
Share a certificate
Log on to the Certificate Management Service console.
In the left navigation pane, choose Certificate Management > SSL Certificate Management.
On the Official Certificate tab, find the issued certificate you want to share. In the Actions column, click More.
On the Share Certificate tab, enter the recipient's Alibaba Cloud account ID in the Account ID field and click Confirm and Share.
Verify the sharing
Log on as the recipient and go to the Manage Uploaded Certificates tab on the SSL Certificate Management page. The shared certificate appears in the list, identified by the ![]() icon in the Status column.
icon in the Status column.
The receiving account cannot download or reshare shared certificates.
More operations
Manage pending tasks
When you open the Manage Uploaded Certificates tab, the Action Items dialog box appears automatically if the system detects pending tasks for your certificates, such as:
Expiration notification disabled
Remaining amount/Required amount (notification resource quota)
No cloud services deployed
Pending renewal

To reopen the dialog box later, click Pending Items on the Manage Uploaded Certificates tab.

To reduce reminder frequency, select Do Not Remind Me Again for 7 Days and click Close.
Available actions per task type:
Notifications are disabled The Remaining Amount/Required Amount field shows your current notification resource quota. If the quota is insufficient, click Purchase to buy more. To enable notifications in bulk: filter certificates with notifications disabled, select them, and click Notification below the list.
Enabling notifications consumes your notification resource quota. If the quota is insufficient, purchase notification resources.

No cloud services deployed Click Deploy to create a cloud product deployment task. See Deploy certificates to Alibaba Cloud products.
To be renewed Filter certificates with the To Be Renewed status. Click Update in the Actions column to complete renewal.

View certificate risk warnings
Private CA certificates with a validity period longer than one year display a Leakage Risk tag in the Validity Period column. Hover over the tag to view details and recommended actions.

Set private CA certificate validity periods to one year or less to reduce the risk of key compromise.
Best practices
Naming conventions: Use a consistent scheme that includes the domain, year, and algorithm—such as
example.com-2024-rsa2048. This simplifies identification and auditing.Tag management: Tag certificates by project and environment (production/test) to enable resource categorization and cost allocation.
Validity period: Set private CA certificate validity to one year or less. Enable expiration reminders and plan renewals at least 30 days before expiry.
FAQ
What do I do if I get a "Certificate and private key do not match" error?
The most common cause is a password-protected private key. Run the following command to remove the password and try uploading again:
openssl rsa -in encrypted.key -out decrypted.keyIf that doesn't resolve it, confirm you are not mixing files from different domains—for example, uploading the certificate for domain A with the private key for domain B. Then use the openssl verification commands in Verify the certificate and private key match to confirm the modulus or public key fingerprints are identical.
Why did my upload fail with a "Certificate format is incorrect" error?
The service accepts only PEM-encoded files. If your certificate is in PFX, P12, or another format, convert it first using the Convert Certificate Format tool under Common Certificate Tools in the console, then upload the converted .pem file.
Make sure the content you paste includes the complete -----BEGIN...----- and -----END...----- markers without any extra lines or spaces.
Why did sharing my certificate fail?
Check the following:
Mismatched identity verification: The sharing and receiving accounts must belong to the same verified individual or enterprise entity.
Unsupported certificate source: Only certificates purchased from Alibaba Cloud can be shared. Uploaded or synced certificates are not eligible.
Cross-site sharing: Sharing between the Alibaba Cloud China site (aliyun.com) and the international site (alibabacloud.com) is not supported.