Container workloads face runtime threats that image scanning alone cannot catch — malware injected into running containers, programs launched outside the original image, and kernel exploits that break out of the container boundary. Proactive Defense for Containers addresses these threats by monitoring image security, runtime behavior, and running environment security from the moment a container starts. Configure rules to block at-risk images from running, stop untrusted processes, and prevent container escapes.
Three rule types are available:
| Rule type | What it protects against |
|---|---|
| At-risk Image Blocking | Images that carry vulnerabilities, malware, or misconfigurations — stopped before pods start |
| Non-image Program Defense | Programs launched inside a container that were not part of the original image — indicators of malware intrusion |
| Container Escape Prevention | Attempts by container processes to exploit the host kernel and break out of the container boundary |
Edition requirement
Only the Ultimate edition of Security Center supports this feature. For more information about purchasing and upgrading, see Purchase Security Center and Upgrade and downgrade Security Center.
At-risk image blocking
At-risk Image Blocking intercepts image deployments that match your defined risk criteria. When a pod creation request triggers a matching rule, Security Center evaluates the image and applies the rule action — Alert, Block, or Allow — before the pod starts.
Supported cluster types
At-risk Image Blocking supports only Container Service for Kubernetes (ACK) clusters. The following table shows which ACK cluster types are supported.
| ACK cluster type | Supported |
|---|---|
| ACK managed cluster | Yes |
| ACK dedicated cluster | Yes |
| ACK Serverless cluster | No |
| Managed edge Kubernetes cluster | No |
| Registered cluster | No |
How it works
When you create an At-risk Image Blocking rule for a cluster, Security Center intercepts each pod creation request and scans the image against the risk types you selected. If the image matches, Security Center applies the rule action and generates a security event (for Alert and Block actions).
If multiple rules apply to a cluster, all rules are evaluated. A single image can trigger multiple rules and generate multiple alerts.
Within a single rule that has multiple risk policies configured, Security Center evaluates risk types in the following sequence and stops at the first match:
Unscanned image
Baseline risks
Malicious Internet image
Malicious sample
Vulnerability
Sensitive file
Image build command risks
Create a rule
Before creating a rule, install the required policy governance components in the ACK console: gatekeeper, policy-template-controller, and logtail-ds. For installation instructions, see Install or update the policy governance components.
Each cluster supports up to 40 rules.
Log on to the Security Center console. In the top navigation bar, select the region of the asset to manage — China or Outside China.
In the left-side navigation pane, choose Protection Configuration > Container Protection > Proactive Defense for Containers.
Set Rule Type to At-risk Image Blocking, then click Create Rule. To reuse an existing rule as a starting point, find the rule and click Copy in the Actions column. Modify the parameters in the Copy Rule panel and click OK.
In the Create Rule panel, configure the following parameters and click Next.
ImportantFor the Unscanned Image risk type, set Rule Action to Alert initially. Switch to Block only after observing alerts for a period and confirming that your business is not affected. For other risk types: if an image matches any risk in a policy, Security Center applies the rule action immediately. Multiple conditions within a policy are evaluated with logical OR — for example, a rule set to High Risk severity OR a specific CVE ID triggers if the image meets either condition.
Parameter Description Rule Name Select a rule template from the drop-down list and enter a name. Use Blank template to build a rule from scratch, or select an existing template with preconfigured risk detection settings. Rule Description Enter a description for the rule. Rule Configuration Select the risk types to detect. Security Center evaluates selected types and skips cleared types. Supported risk types: Unscanned Image (images not scanned by container image scan), Malicious Internet Image (images marked as malicious on the Internet, including images pulled from Docker Hub or public repositories that contain webshells or trojans), Baseline (checks against predefined standard security configurations and best practices), Vulnerability (vulnerabilities that may affect container environments and application-related vulnerabilities in images), Malicious Sample (malicious files, code, and behaviors in container images and container runtime), Sensitive File (common sensitive files in images), Built Risks Exist (risks of image build commands). Rule Action The action Security Center takes when the rule is triggered: Alert (generate an alert), Block (block the image and generate an alert), or Allow (allow the image and generate an alert). Add to Whitelist Images added to the whitelist are skipped entirely — Security Center does not scan them. Click Create Rule and enter an image tag keyword. Up to 20 images are supported. Fuzzy match is supported. For an image at yundun-example-registry.cn-hangzhou.aliyuncs.com/yundun-example/yun-repo:test, any of the following keywords match:yun-repo,test,yun-repo:test,repo:test.Select the protection scope by clicking the Cluster, Image, or Tag tab, then select the assets to protect. Click OK.
View alerts
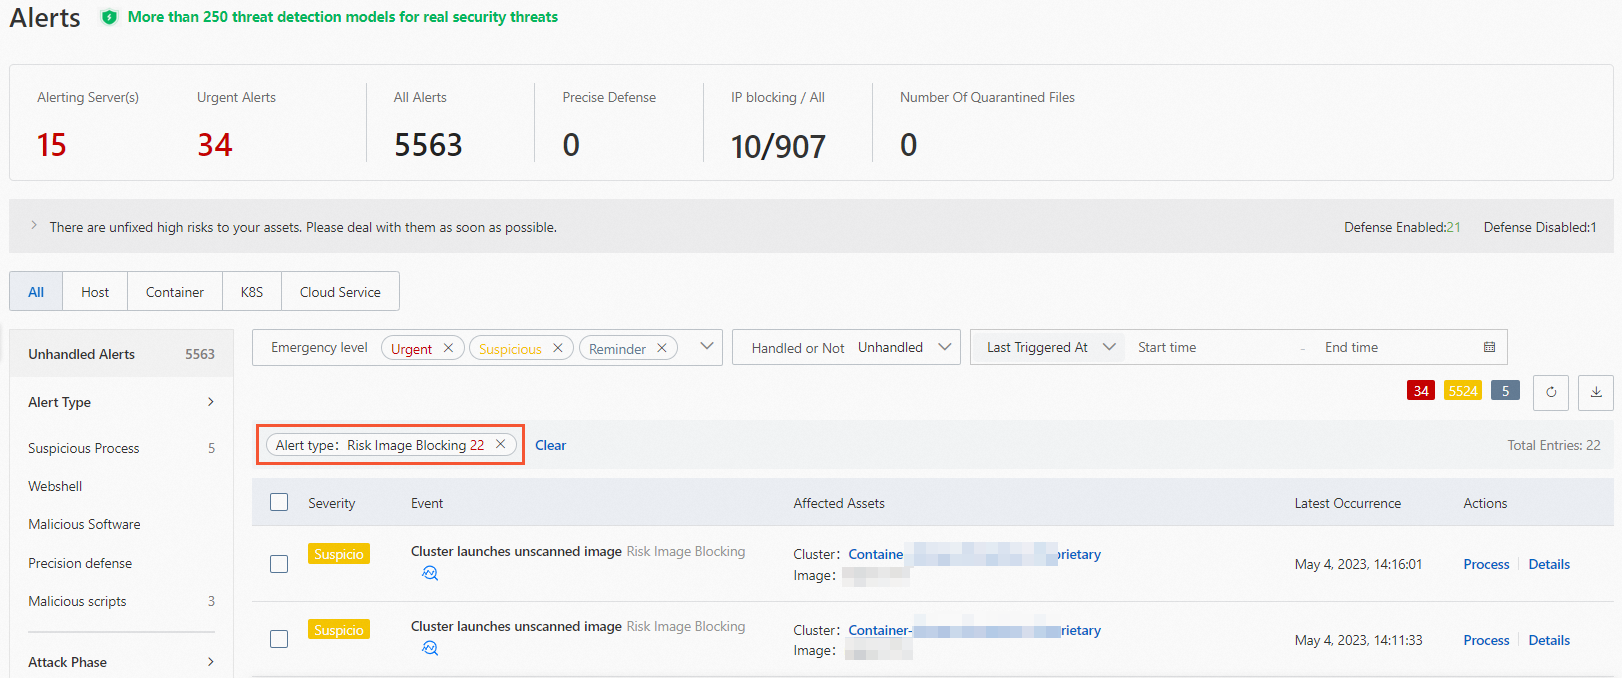
After creating an At-risk Image Blocking rule, view triggered alerts by navigating to Detection and Response > Alerts in the Security Center console. Filter by Alert Type > Risk Image Blocking, find the alert, and click Details in the Actions column. Handle the alert based on the Suggestions on the Details tab.
Manage rules
After creating an At-risk Image Blocking rule, the following operations are available in the rule list:
| Operation | Steps |
|---|---|
| View protection scope | Click the number in the Protection Scope column to see the clusters, images, and tags covered by the rule. |
| Edit | Click Edit in the Actions column to modify rule parameters and protection scope. |
| Copy | Click Copy in the Actions column to create a new rule based on an existing one. |
| Delete | Click Delete in the Actions column and confirm. |
Deleting a rule removes protection from all assets in its scope. The rule cannot be restored. Proceed with caution.
Non-image program defense
Containers are designed to be immutable at runtime — all software a container needs is baked into the image at build time. When a process starts inside a running container that was not part of the original image, this indicates abnormal behavior. Attackers who gain access to a running container often download and execute malware or other tools that were never in the image. Non-image Program Defense detects and optionally blocks these processes.
Image requirements
For defense rules to activate correctly, container images and their environments must meet the following requirements:
The path length of programs running in the container must not exceed 1,023 characters.
The namespace length of the container cluster must not exceed 287 characters.
For images in whitelist rules, the container image name must not exceed 287 characters.
The Security Center agent processes inside the container must meet minimum version requirements:
AliYunDun: aegis_12_13 or later
AliHips: 00_43 or later
System rule
Security Center provides a default system rule for Non-image Program Defense. It is automatically enabled for clusters that have no custom rules configured and generates alerts when non-image programs start in any protected cluster.
The system rule action is Alert — it generates alerts but does not block processes. You can manually enable or disable the system rule, and you can modify which clusters it applies to. However:
Whitelists and the Block action are not available in the system rule. To use these, create a custom rule.
When you create a custom rule, the system rule is automatically disabled and cannot be re-enabled until all custom rules are deleted.
The first time you use the non-image program defense feature, we recommend that you check whether false positive alerts are generated by the system rule before taking further action.
View the system rule by navigating to Protection Configuration > Container Protection > Proactive Defense for Containers, selecting Non-image Program Defense for Rule Type, and clicking the System Rules tab.
Create a custom rule
Only one custom rule can be configured per cluster. If a custom rule already covers a cluster, that cluster cannot be selected for another rule.
Log on to the Security Center console. In the top navigation bar, select the region of the asset to manage — China or Outside China.
In the left-side navigation pane, choose Protection Configuration > Container Protection > Proactive Defense for Containers.
Set Rule Type to Non-image Program Defense.
On the Custom Rules tab, click Create Rule.
In the Create Rule panel, configure the following parameters and click Next.
Set Defense Action to Alert first. Switch to Block only after confirming that no legitimate executable programs are being started outside of your container images during normal operations — this prevents false positives from blocking expected processes.
Parameter Description Rule Name Enter a name for the rule. Rule Description Enter a description. Status On enables the rule immediately after creation. Off creates the rule in a disabled state. Defense Action Alert: generates an alert when an untrusted process is detected. Block: generates an alert and terminates the process. Create File Directory Whitelist Processes running from whitelisted directories are excluded from detection. Click Create Rule and enter the directory path, for example: /user/name1.Create Image Whitelist Images added here are excluded from detection. Fuzzy match is supported using keywords. For example, for yundun-example-registry.cn-hangzhou.aliyuncs.com/yundun-example/yun-repo:test, any of these keywords match:yun-repo,test,yun-repo:test,repo:test.In the confirmation message, click OK. The system rule is automatically disabled after the custom rule is created.
Select the clusters to apply the rule to and click OK.
View alerts
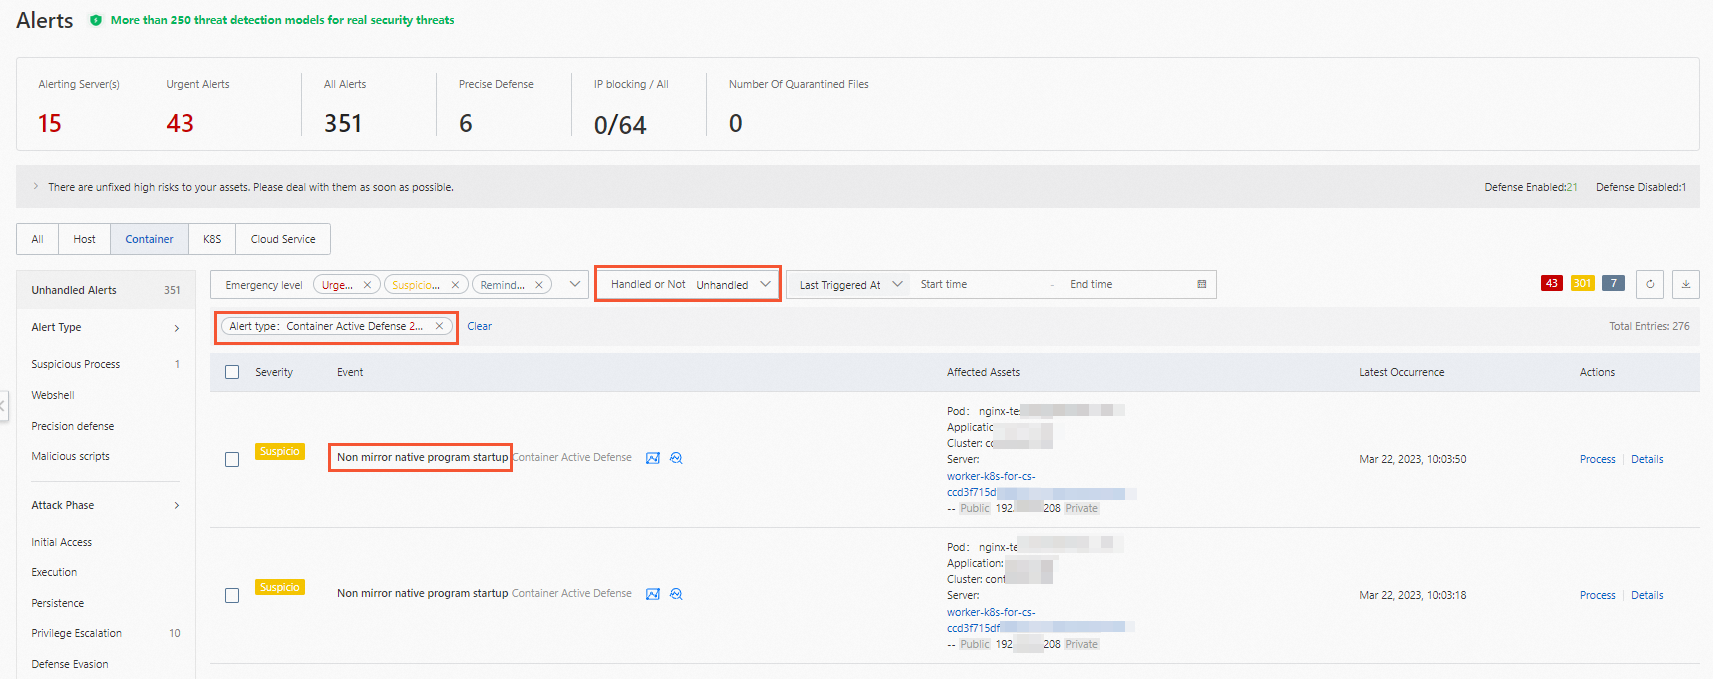
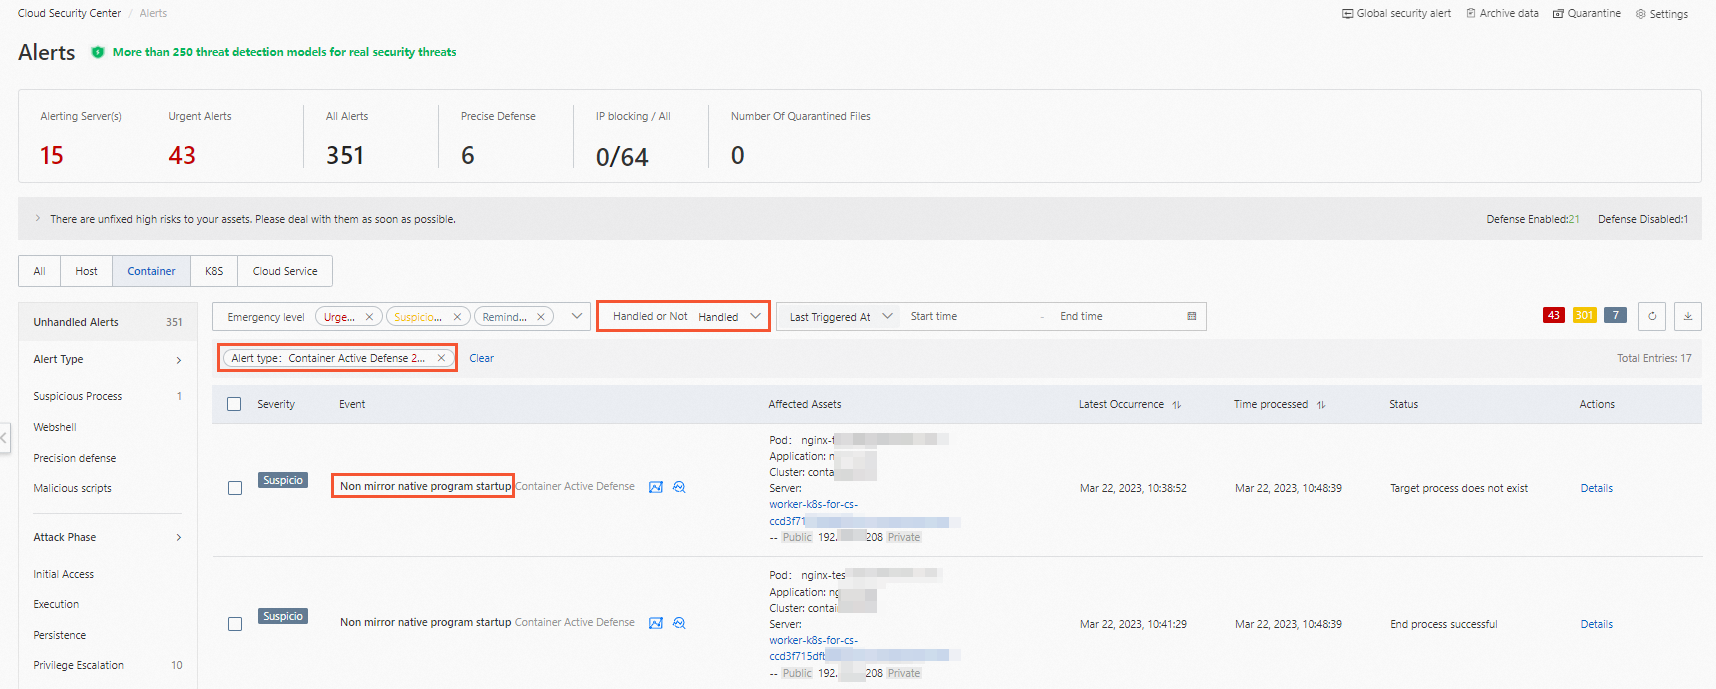
After creating and enabling a Non-image Program Defense rule, view alerts by navigating to Detection and Response > Alerts and filtering by Alert Type > Container Active Defense. Alert names appear as Non mirror native program startup.
Alert states vary based on the Defense Action set in the rule:
Alert action: Alerts appear in the Unhandled state. Handle these alerts promptly. For handling instructions, see View and handle alerts.
Block action: Alerts appear in the handled alert list with one of the following states:
Process Not Exists: The process ran briefly and exited before Security Center intervened. No action required.
Process Terminated: Security Center blocked the process. No action required.
Manage rules
After creating a Non-image Program Defense rule, the following operations are available in the rule list:
| Operation | Steps |
|---|---|
| View protection scope | Click the number in the Protection Scope column to see the clusters covered. |
| Enable or disable | Click the switch in the Enable column to toggle the rule on or off. |
| Edit | Click Edit in the Actions column to modify the rule name, description, status, defense action, whitelist settings, and protection scope. |
| Delete | Click Delete in the Actions column and confirm. |
The system rule cannot be deleted. After a custom rule is deleted, it cannot be restored. Verify that the rule is no longer needed before deleting it.
Container escape prevention
A container shares the host operating system kernel with other containers on the same host. When an attacker exploits a container vulnerability to break out of the container boundary, they can gain access to the host OS and all other containers on it. Container Escape Prevention detects risky operations across processes, files, and system calls to block escape behaviors before they succeed.
Supported clusters
Container Escape Prevention supports clusters that meet both of the following conditions:
The servers running the clusters are added to Security Center.
The clusters are ACK managed clusters, ACK dedicated clusters, or self-managed Kubernetes clusters connected to Security Center.
Prerequisites
Before you begin, ensure that:
The Malicious Host Behavior Prevention or Webshell Prevention switch is turned on. For details, see Proactive Defense.
The Container Escape Prevention switch is turned on. For details, see Container Escape Prevention.
System rules
Security Center ships with built-in system rules for Container Escape Prevention, enabled by default for all clusters protected by Security Center. System rules generate alerts when escape behaviors are detected but do not block them.
You can manually enable or disable individual system rules, and modify which clusters they apply to. However:
Whitelists and the Block action are not available in system rules. To use these, create a custom rule.
When you create a custom rule of a specific type, the system rule of the same type is automatically disabled.
The first time you use the container escape prevention feature, we recommend that you check whether false positive alerts are generated by the system rules. If no false positive alerts are generated, you can change the rule action to Block.
View system rules by navigating to Protection Configuration > Container Protection > Proactive Defense for Containers, clicking Container Escape Prevention in the Rule Type section, and then clicking the System Rules tab.
Create a custom rule
Custom rules support the same rule types as system rules, and additionally allow whitelist configuration and the Block defense action.
Container escape rules may trigger in normal business scenarios. Set Defense Action to Alert initially and monitor for false positives. Switch to Block only after confirming no legitimate operations are being flagged.
Log on to the Security Center console. In the top navigation bar, select the region of the asset to manage — China or Outside China.
In the left-side navigation pane, choose Protection Configuration > Container Protection > Proactive Defense for Containers.
In the Rule Type section, click Container Escape Prevention.
On the Custom Rules tab, click Create Rule.
In the Create Rule panel, configure the following parameters and click Next. After completing this step, the rule appears in the rule list.
ImportantAdding an image to the whitelist disables all escape detection for that image. Proceed with caution.
Parameter Description Rule Name Enter a name for the rule. Rule Type Select a rule type from the drop-down list. After selecting a type, all supported check items are selected by default. Clear any check items that are not required. View all supported rule types and check items in the Security Center console. Defense Action Alert: generates alerts when matching risks are detected. Block: generates alerts and terminates the related processes or operations. Add to Whitelist Images added to the whitelist are excluded from escape behavior detection. Click Create Rule and enter the image tag keyword. Up to 20 images are supported. Fuzzy match is supported. For example, for yundun-example-registry.cn-hangzhou.aliyuncs.com/yundun-example/yun-repo:test, any of these keywords match:yun-repo,test,yun-repo:test,repo:test.Select the clusters to protect and click OK. Only clusters connected to Security Center can be selected. To protect a self-managed Kubernetes cluster, connect it first. For instructions, see Add a self-managed Kubernetes cluster to Security Center.
View alerts
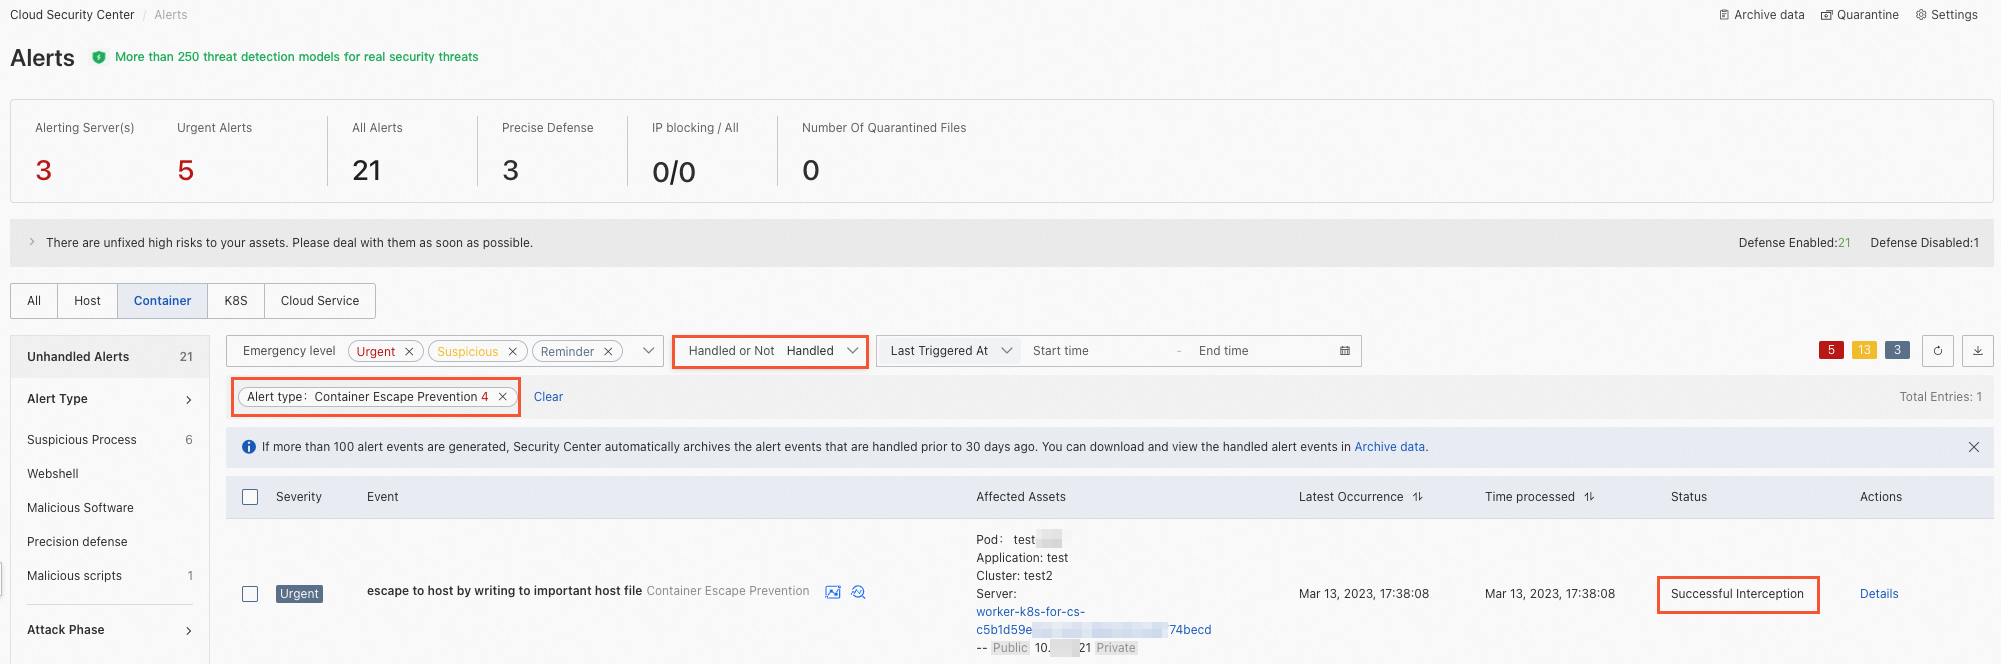
After creating and enabling a Container Escape Prevention rule, view alerts by navigating to Detection and Response > Alerts and filtering by Alert Type > Container Escape Prevention.
Alert states vary based on the Defense Action set in the rule:
Alert action: Alerts appear in the Unhandled state. Handle these alerts promptly. For handling instructions, see View and handle alerts.
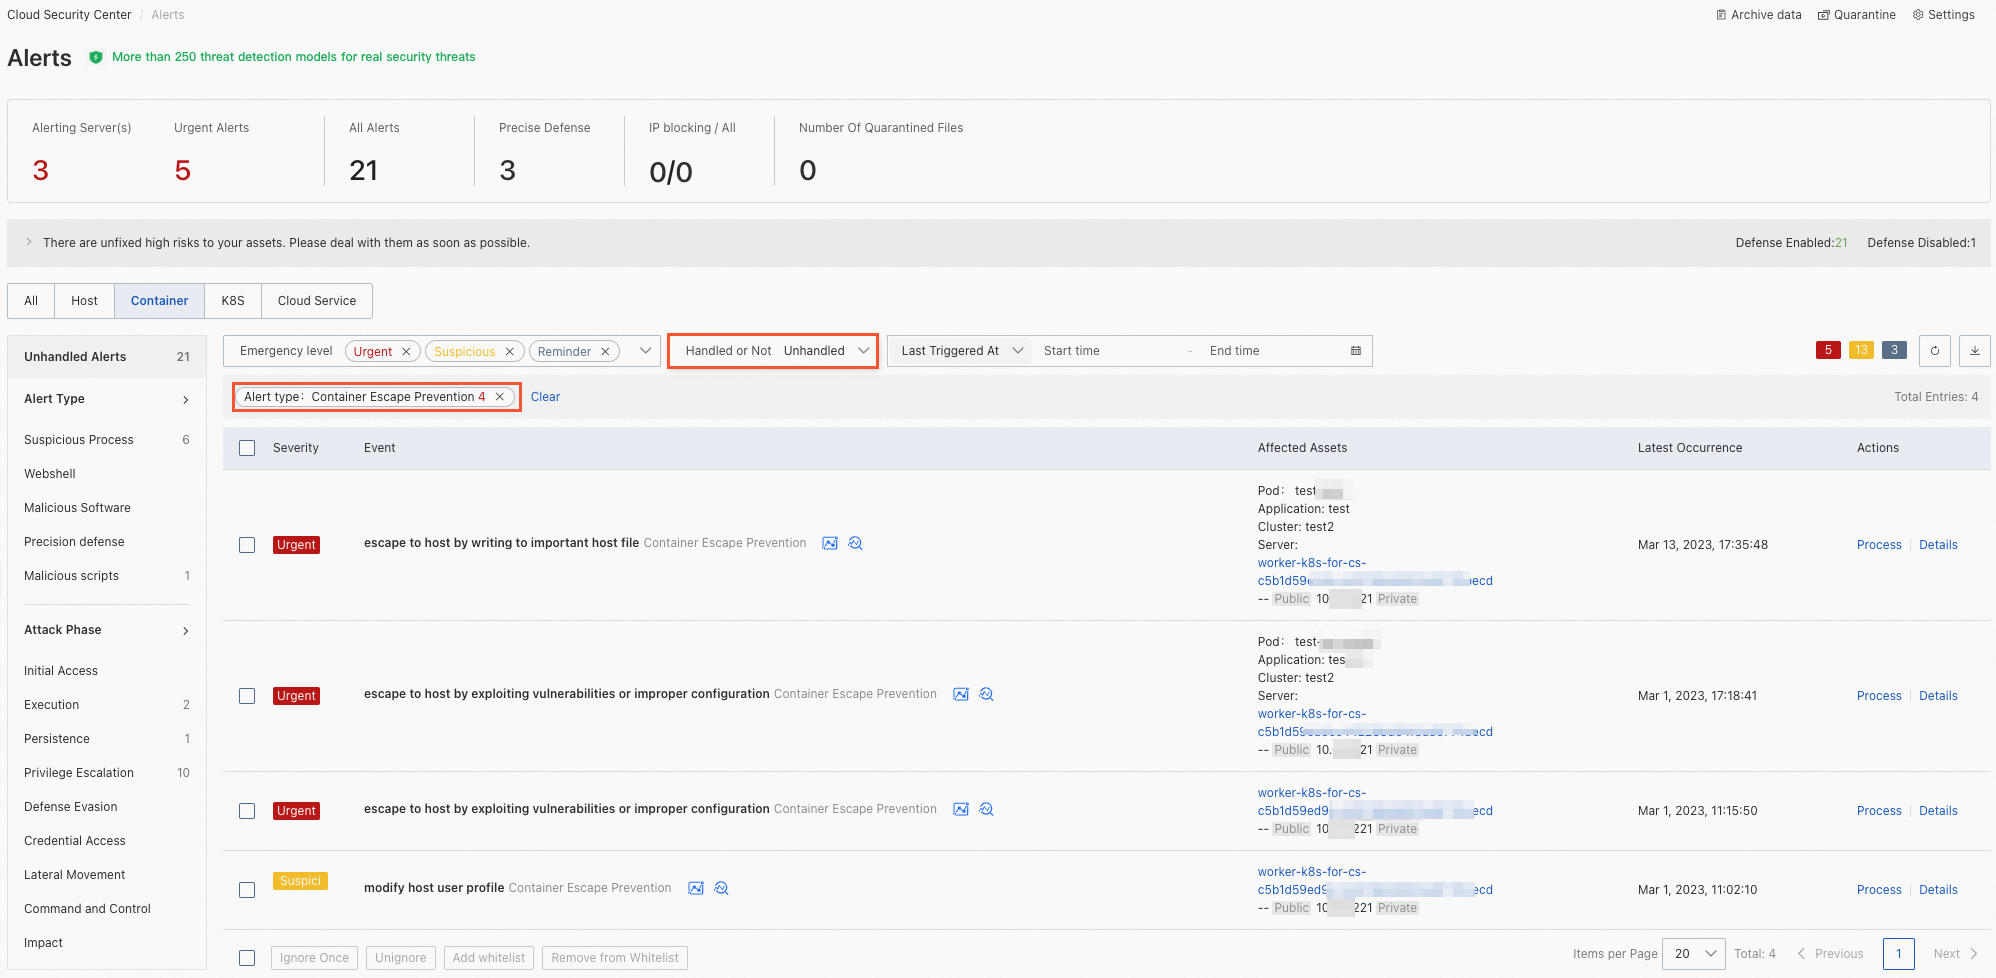
Block action: Alerts appear in the Blocked state, indicating Security Center successfully stopped the escape attempt. No further action required.
Manage rules
After creating a Container Escape Prevention rule, the following operations are available:
| Operation | Steps |
|---|---|
| View protection scope | Click the number in the Protection Scope column to see the clusters covered. The Interceptable Status column shows the agent status on the servers running those clusters. Rules take effect only when the agent is in the Normal state. If the status is Abnormal, turn on Malicious Host Behavior Prevention or Webshell Prevention on the Feature Settings page. For details, see Enable features on the Host Protection Settings tab. |
| Enable or disable | Click the switch in the Enable column to toggle the rule on or off. |
| Edit | Click Edit in the Actions column to modify the rule name, type, status, defense action, and protection scope. Changes take effect within 10 minutes. |
| Delete | Click Delete in the Actions column and confirm. |
System rules cannot be deleted. After a custom rule is deleted, it cannot be restored. Verify that the rule is no longer needed before deleting it.