Managing security assets across Alibaba Cloud and Amazon Web Services (AWS) is often fragmented. This makes it difficult to gain a unified security view, leading to inefficient risk detection and response. By onboarding your AWS account to Security Center, you can centrally manage core AWS assets like EC2, RDS, and S3. This allows you to monitor your multi-cloud security posture, identify configuration risks, detect security events, and establish consistent security policies across all your clouds.
Choose an onboarding plan
Choose an onboarding plan based on your security requirements, supported features, and environment type. You can choose between a quick configuration plan and a manual configuration plan.
Comparison item | Quick configuration plan | Manual configuration plan |
Authorization account type | This plan uses the root user's access key for the initial authorization only. | This plan uses a new IAM user with least-privilege permissions. |
Supported features | Supports only Host. |
|
Configuration complexity | Simple | Medium |
Plan 1: Quick configuration (for host assets only)
Step 1: Create credentials for your AWS root user
The access key of your root user is used only for the initial authorization. This allows Security Center to automatically create a dedicated IAM user with limited permissions in your AWS account. The username of this IAM user is prefixed with AlibabaSasSubAccount_. After you successfully onboard the assets, you must immediately delete the access key of your root user.
Log on to the AWS IAM console
Log in to the AWS IAM console. On the dashboard, click My Security Credentials.
ImportantOnly the root user can configure security credentials.
Create an access key
On the My Security Credentials page, after you complete the configuration as described below, click Create Access Key.
Use case: Select a use case based on your business scenario. If no option is suitable, select Other.
The tag can contain up to 256 characters, including letters, numbers, spaces, and the following symbols: _ . : / = + - @.
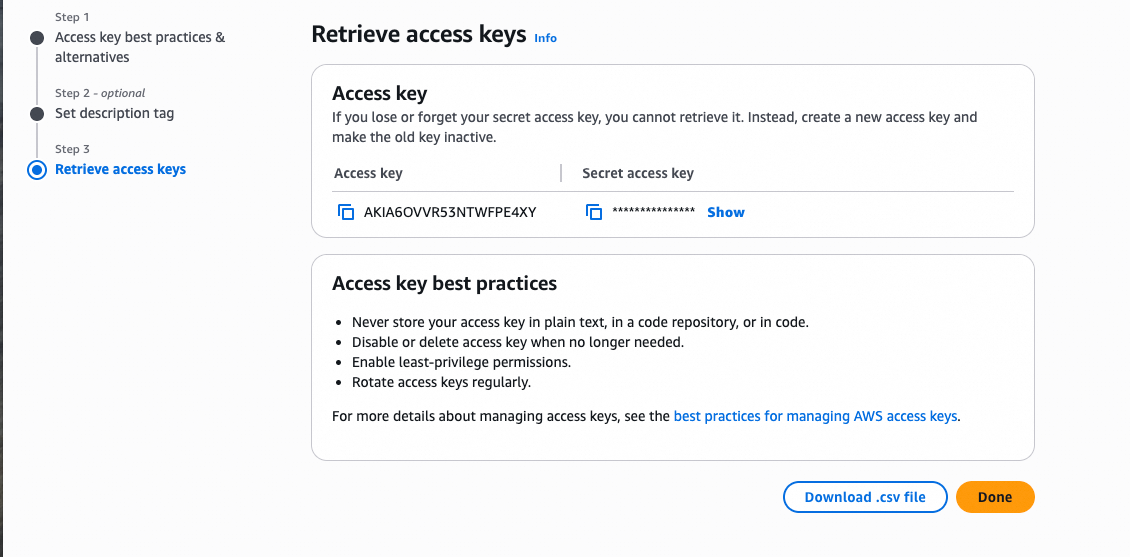
Save the key
After the creation is complete, go to the Retrieve Access Key page to view and save the Access Key (Access Key ID) and Secret Access Key (Secret Access Key).
NoteYou can click Download .csv file to save the key locally.
Step 2: Onboard your assets in Security Center
Go to the authorization page:
Navigate to the AWS asset onboarding page in one of the following ways:
Recommended path:
Log on to the Security Center console.
In the left-side navigation pane, choose . In the upper-left corner of the console, select the region where the assets you want to protect are located: Chinese Mainland or Outside Chinese Mainland.
On the tab, click Grant Permission, and then select AWS.
Other paths:
In the Multi-cloud Service Access or Add Multi-cloud Asset area on the following page, find and click the Access or Authorize button below the
 icon:
icon:
Configure access credentials:
In the Add Assets Outside Cloud panel, select the Quick Configuration, select the features you want to use, and then click Next.
On the Submit AccessKey Pair page, enter the credential information that you created in AWS.
Sub-user SecretID and Sub-user SecretKey: Enter the credentials from Step 1: Create root user authorization credentials in AWS.
Provisioning Region: Select an available AWS Region. The system will use the selected region to verify that your assets are accessible.
Domain: Set this parameter based on the selected Provisioning Region. Select "China version" for AWS China agents and "International version" for all other users.
After you enter the information, click Next. The system automatically checks the credentials and permissions.
NoteIf the check fails, see What do I do if the automatic credential and permission check fails after I enter the access key?
Configure the synchronization policy:
Select region: Select the regions containing the AWS assets that you want to onboard.
NoteSynchronized asset data is stored in the data center corresponding to the region selected in the Security Center console.
Chinese Mainland: Data centers in the Chinese mainland.
Outside Chinese Mainland: The data center in Singapore.
Region Management: This option is recommended. If you select this option, assets in new regions under this AWS account are automatically synchronized without manual intervention.
Host Asset Synchronization Frequency: Set the interval for automatically synchronizing AWS host (EC2) assets. To disable synchronization, select Off.
AK Service Status Check: Set the interval at which Security Center automatically checks the validity of the API key for the AWS account. You can set this to Off to disable the check.
After you complete the configuration, click Synchronize Assets. The system automatically synchronizes the host assets from your AWS account to Security Center.
ImportantAfter you complete these operations, Security Center automatically creates an IAM user in AWS with a username prefixed with
AlibabaSasSubAccount_for authorization. Do not delete or disable the automatically created IAM user account or its API key. Otherwise, asset onboarding and security monitoring will be interrupted.
Step 3: Delete the root user access key
After the assets are successfully onboarded, immediately delete the root user's access key used for the initial authorization to reduce security risks.
Sign in to the AWS IAM console as a root user, and on the dashboard, click My Security Credentials.
In the AccessKey Pair section, locate the key used for this authorization. In the Actions column, click the Delete button and confirm the deletion.
Plan 2: Manual configuration
This plan provides high security and full feature support by onboarding assets through a limited-permission IAM user created in AWS.
Step 1: Create IAM credentials in AWS
Create an IAM user with least-privilege permissions for Alibaba Cloud Security Center integration and obtain its access key.
For more information, see the official AWS documentation for creating a user and adding permissions.
Log on to the AWS IAM console
Sign in to the AWS IAM console. In the left navigation bar, click Users. On the User list page, click Create user.
Specify user details
Username: Enter a custom name that is easy to identify (for example,
aliyun-security-center-user).Provide user access to the AWS Management Console: Do not select. This user is for API access only.
Set user permissions
Select Attach policies directly.
Select the permission policies for the Security Center features you want to use.
Feature
AWS policy
Notes
Host
AmazonEC2ReadOnlyAccessIAMReadOnlyAccessNone
CSPM (CSPM)
ReadOnlyAccessIAMReadOnlyAccessTo perform comprehensive risk detection based on audit logs, see Configure AWS service audit logs for CSPM to configure the relevant service audit logs in AWS.
Agentless Detection
You must create a custom policy.
You must create a log delivery pipeline in AWS that consists of CloudTrail, S3, and SQS. For more information, see Create a custom policy for agentless detection.

Review and create
Confirm that the user information and permission policy are correct, and then click Create User.
Create and save the API key
After the user is successfully created, return to the User list and click the username that you just created to open its details page.
In the Summary section, click Create Access Key and configure the key as described below.
Use Cases: Select a use case based on your business scenario. If none of the use cases are suitable, select Others.
Description tag: You can leave this blank or specify a custom tag (such as
for-aliyun-sasc).
Click Create Access Key. On the Retrieve Access Key page, view and save the Access Key ID and Secret Access Key.
Step 2: Complete configuration in Security Center
After you create an API key for the IAM user in AWS, return to the Security Center console to complete the onboarding configuration.
Go to the authorization page
NoteFor information about other entry points, see Other paths.
Log on to the Security Center console.
In the left-side navigation pane, choose . In the upper-left corner of the console, select the region where the assets you want to protect are located: Chinese Mainland or Outside Chinese Mainland.
On the tab, click Grant Permission, and then select AWS.
Configure access credentials
In the Add Assets Outside Cloud panel, select the Manual Configuration, select the features you want to use, and then click Next.
Host: Allows Security Center to automatically discover and synchronize your AWS EC2 host assets.
CSPM: Uses the cloud security posture management feature to scan the configurations of your AWS cloud products to discover and manage configuration risks.
Agentless Detection: Uses the agentless detection feature to scan your AWS assets for vulnerabilities and risks.
On the Submit AccessKey Pair page, enter the credential information that you created in AWS.
Sub-account SecretID and Sub-account SecretKey: Enter the credentials that you obtained in Step 1: Create sub-account authorization credentials in AWS.
Provisioning Region: Select an available AWS Region. The system will use the selected region to verify that your assets are accessible.
Domain: Set this parameter based on the selected Provisioning Region. Select "China version" for AWS China agents and "International version" for all other users.
After you enter the information, click Next. The system automatically checks the credentials and permissions.
NoteIf the check fails, see What do I do if the automatic credential and permission check fails after I enter the access key?
Configure audit logs (optional)
If you need to use the log audit feature of Cloud Security Posture Management (CSM), configure it here. Otherwise, click Skip.
ImportantBefore you proceed, you must complete all the required configurations in the AWS console. For more information, see Configure AWS service audit logs for CSPM.
AWS Region: Enter the Region ID of the AWS queue. For a list of Region IDs, see AWS Region IDs.
SQS Queue Name: Enter the name of the created SQS queue.
Configure the synchronization policy
On the Policy Configuration page, configure the following settings based on your needs:
Select region: Select the regions containing the AWS assets you want to onboard.
NoteSynchronized asset data is stored in the data center corresponding to the region selected in the Security Center console.
Chinese Mainland: Data centers in the Chinese mainland.
Outside Chinese Mainland: The data center in Singapore.
Region Management: This option is recommended. If you select this option, assets in new regions under this AWS account are automatically synchronized without manual intervention.
Host Asset Synchronization Frequency: Set the interval for automatically synchronizing AWS host (EC2) assets. To disable synchronization, select Off.
NoteThis parameter is required only if you chose to onboard Host.
Cloud Service Synchronization Frequency: Set the interval for automatically synchronizing AWS cloud product configurations. To disable synchronization, select Off.
NoteThis parameter is required only if you chose to onboard Cloud Security Posture Management.
AK Service Status Check: Set the interval at which Security Center automatically checks the validity of the API key for the AWS account. You can select Off to disable this check.
After you complete the configuration, click Synchronize Assets. The system automatically synchronizes data from your AWS account to Security Center.
Manage onboarded assets
Host assets
Go to the page. In the Add Multi-cloud Asset section, click the ![]() icon to view the onboarded AWS hosts. You can manage the onboarded AWS EC2 hosts and enhance their protection as follows.
icon to view the onboarded AWS hosts. You can manage the onboarded AWS EC2 hosts and enhance their protection as follows.
For more information, see Host assets.
Install the client: Install the Security Center client on your AWS hosts. When you run the installation command, you must select AWS as the Service Provider. For more information, see Install the client.
Upgrade to a paid edition for enhanced protection: The default Free edition provides only basic security checks. To get comprehensive security capabilities, such as anti-virus, vulnerability fixing, and intrusion prevention, upgrade the protection for your AWS hosts to a paid edition (Anti-virus or higher). For more information, see Manage security authorizations for hosts and containers.
Cloud security posture management (CSPM)
In the Security Center console, go to the page. In the All Alibaba Cloud Services navigation pane, click AWS to view your onboarded AWS assets. You can use the following CSPM features for the onboarded AWS assets:
For more information, see View cloud product information.
Perform a configuration risk check: Check your AWS products for configuration risks. For more information, see Configure and run a cloud platform configuration risk check policy.
Handle risk items: View and fix failed risk items based on the check results to improve the compliance and security of your cloud assets. For more information, see View and handle failed cloud platform configuration risk check items.
Agentless detection
In the Security Center console, go to the page. In the Add Multi-cloud Asset section, click the ![]() icon to view the number of onboarded AWS assets. After the assets are onboarded, you can use the agentless detection feature to scan AWS hosts for vulnerabilities and baselines.
icon to view the number of onboarded AWS assets. After the assets are onboarded, you can use the agentless detection feature to scan AWS hosts for vulnerabilities and baselines.
Advanced AWS configuration (for Agentless Detection and CSPM)
Agentless detection policyAgentless Detection
For more information, see the AWS documentation for creating a user and adding permissions.
Log in to the AWS IAM console, go to the Policies page, and click Create policy.
In the Policy Editor area, select JSON, and copy the following JSON to the editor.
{
    "Version": "2012-10-17",
    "Statement":
    [
        {
            "Effect": "Allow",
            "Action":
            [
                "ec2:DeleteSubnet",
                "ec2:DeleteVpcEndpoints",
                "ec2:DeleteInternetGateway",
                "ec2:TerminateInstances",
                "ec2:StopInstances",
                "ec2:DeleteSecurityGroup",
                "ec2:DeleteVpc"
            ],
            "Resource": "*",
            "Condition": {
                "StringLike": {
                    "ec2:ResourceTag/Name": "alibaba-cloud-security-scan*"
                }
            }
        },
        {
            "Effect": "Allow",
            "Action":
            [
                "ec2:DeleteSnapshot"
            ],
            "Resource": "*",
            "Condition": {
                "StringLike": {
                    "ec2:ResourceTag/Name": "SAS_Agentless*"
                }
            }
        },
        {
            "Effect": "Allow",
            "Action":
            [
                "ec2:CopySnapshot",
                "ec2:AuthorizeSecurityGroupIngress",
                "ec2:DescribeInstances",
                "ec2:CreateImage",
                "ec2:CreateVpc",
                "ec2:AttachInternetGateway",
                "ec2:CopyImage",
                "ec2:ModifyImageAttribute",
                "ec2:DescribeSnapshots",
                "ec2:ModifySubnetAttribute",
                "ec2:DescribeInternetGateways",
                "ec2:ModifySnapshotAttribute",
                "ec2:DescribeInstanceTypeOfferings",
                "ec2:DescribeAvailabilityZones",
                "ec2:CreateInternetGateway",
                "ec2:CreateSecurityGroup",
                "ec2:DescribeVolumes",
                "ec2:CreateSnapshot",
                "ec2:AuthorizeSecurityGroupEgress",
                "ec2:RunInstances",
                "ec2:DetachInternetGateway",
                "ec2:DescribeSecurityGroups",
                "ec2:DescribeImages",
                "ec2:CreateVpcEndpoint",
                "ec2:CreateSnapshots",
                "ec2:DescribeVpcs",
                "ec2:DescribeImageAttribute",
                "ec2:DescribeVpcEndpoints",
                "ec2:CreateSubnet",
                "ec2:DescribeSubnets",
                "ec2:ModifyVpcEndpoint",
                "ec2:CreateTags",
                "ec2:DescribeRouteTables",
                "ec2:CreateRoute",
                "ec2:DescribeRegions",
                "kms:Decrypt",
                "kms:DescribeKey",
                "kms:CreateGrant",
                "kms:ListGrants",
                "kms:RevokeGrant",
                "kms:GenerateDataKey",
                "kms:ReEncrypt*",
                "iam:GetUser"
            ],
            "Resource": "*"
        }
    ]
}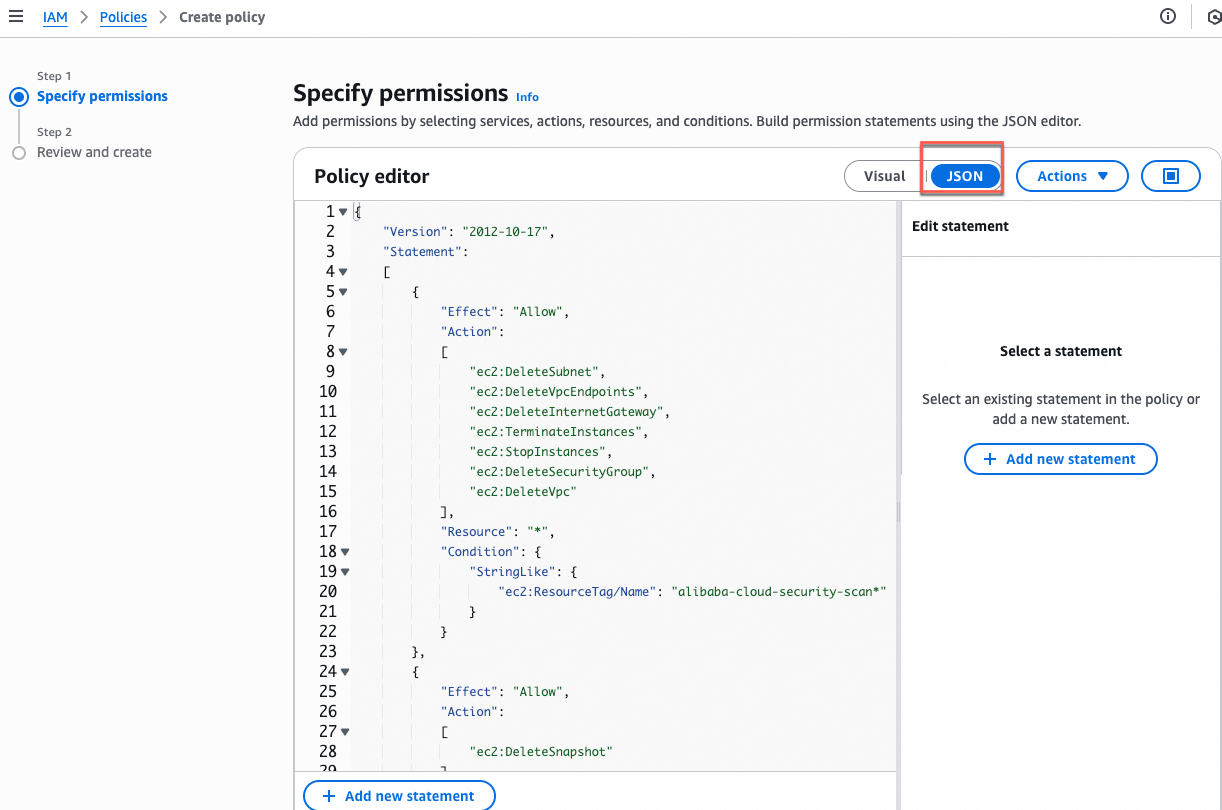
Click Next, enter a policy name such as
AliyunSASC-AgentlessScan-Policy, and click Create Policy.Attach this policy to the AWS IAM user. For more information, see Set user permissions.
CSPM audit logs
Step 1: Create a CloudTrail trail
This step creates a trail in AWS CloudTrail to record and store all management operations on cloud resources within a specified region. These logs provide the foundational data required for CSPM. For more information, see the official AWS documentation for creating a trail.
Log on to the AWS CloudTrail console
Log on to the AWS CloudTrail console. In the region selector in the upper-right corner, select the AWS region that you want to monitor.
On the Dashboard or in the left navigation bar, select Trace, and then click Create Trace.
Configure trail attributes
On the Choose Trail Attributes page, configure the following settings, and then click Next.
Trail Name: Specify a descriptive name (for example,
aliyun-sasc-audit-trail) for easy identification.Storage Location:
ImportantRecord the bucket name for later use.
Create New S3 Bucket: Enter a globally unique bucket name in all lowercase letters.
Use Existing S3 Bucket: In the Trail Log Bucket Name section, click Browse and select the target bucket from the dialog box.
Log File SSE-KMS Encryption: Clear this check box. Use the default Server-Side Encryption with Amazon S3-Managed Keys (SSE-S3) to encrypt log files.
Choose log events
On the Choose Log Events page, configure the following settings, and then click Next.
Event type: Management events.
API Activity: Read, Write.
Review and create
On the Review and Create page, review all configuration items. If the information is correct, click Create Trail.
Step 2: Create an SQS queue
This queue receives log file event notifications from an S3 bucket and serves as the target message channel for log delivery. For more information, see the official AWS documentation for creating a message queue.
Log on to the AWS SQS console.
Log on to the AWS SQS console, select a region, and then click Create queue.
WarningMake sure that the selected region is the same as the region where you created the CloudTrail trail.
Configure queue information
Type: Standard.
Name: Enter an easily identifiable queue name, such as
aliyun-sasc-log-queue.ImportantThis queue name is used to generate its unique ARN and for subsequent access policy configuration. Make sure you enter it correctly.
Configure the access policy
This is the most critical step. This policy defines who can send messages to this queue and who can read messages from it.
In the Access Policy panel, select Advanced.
ImportantRecord the Account ID and Queue ARN in the default policy for subsequent access policy configuration.
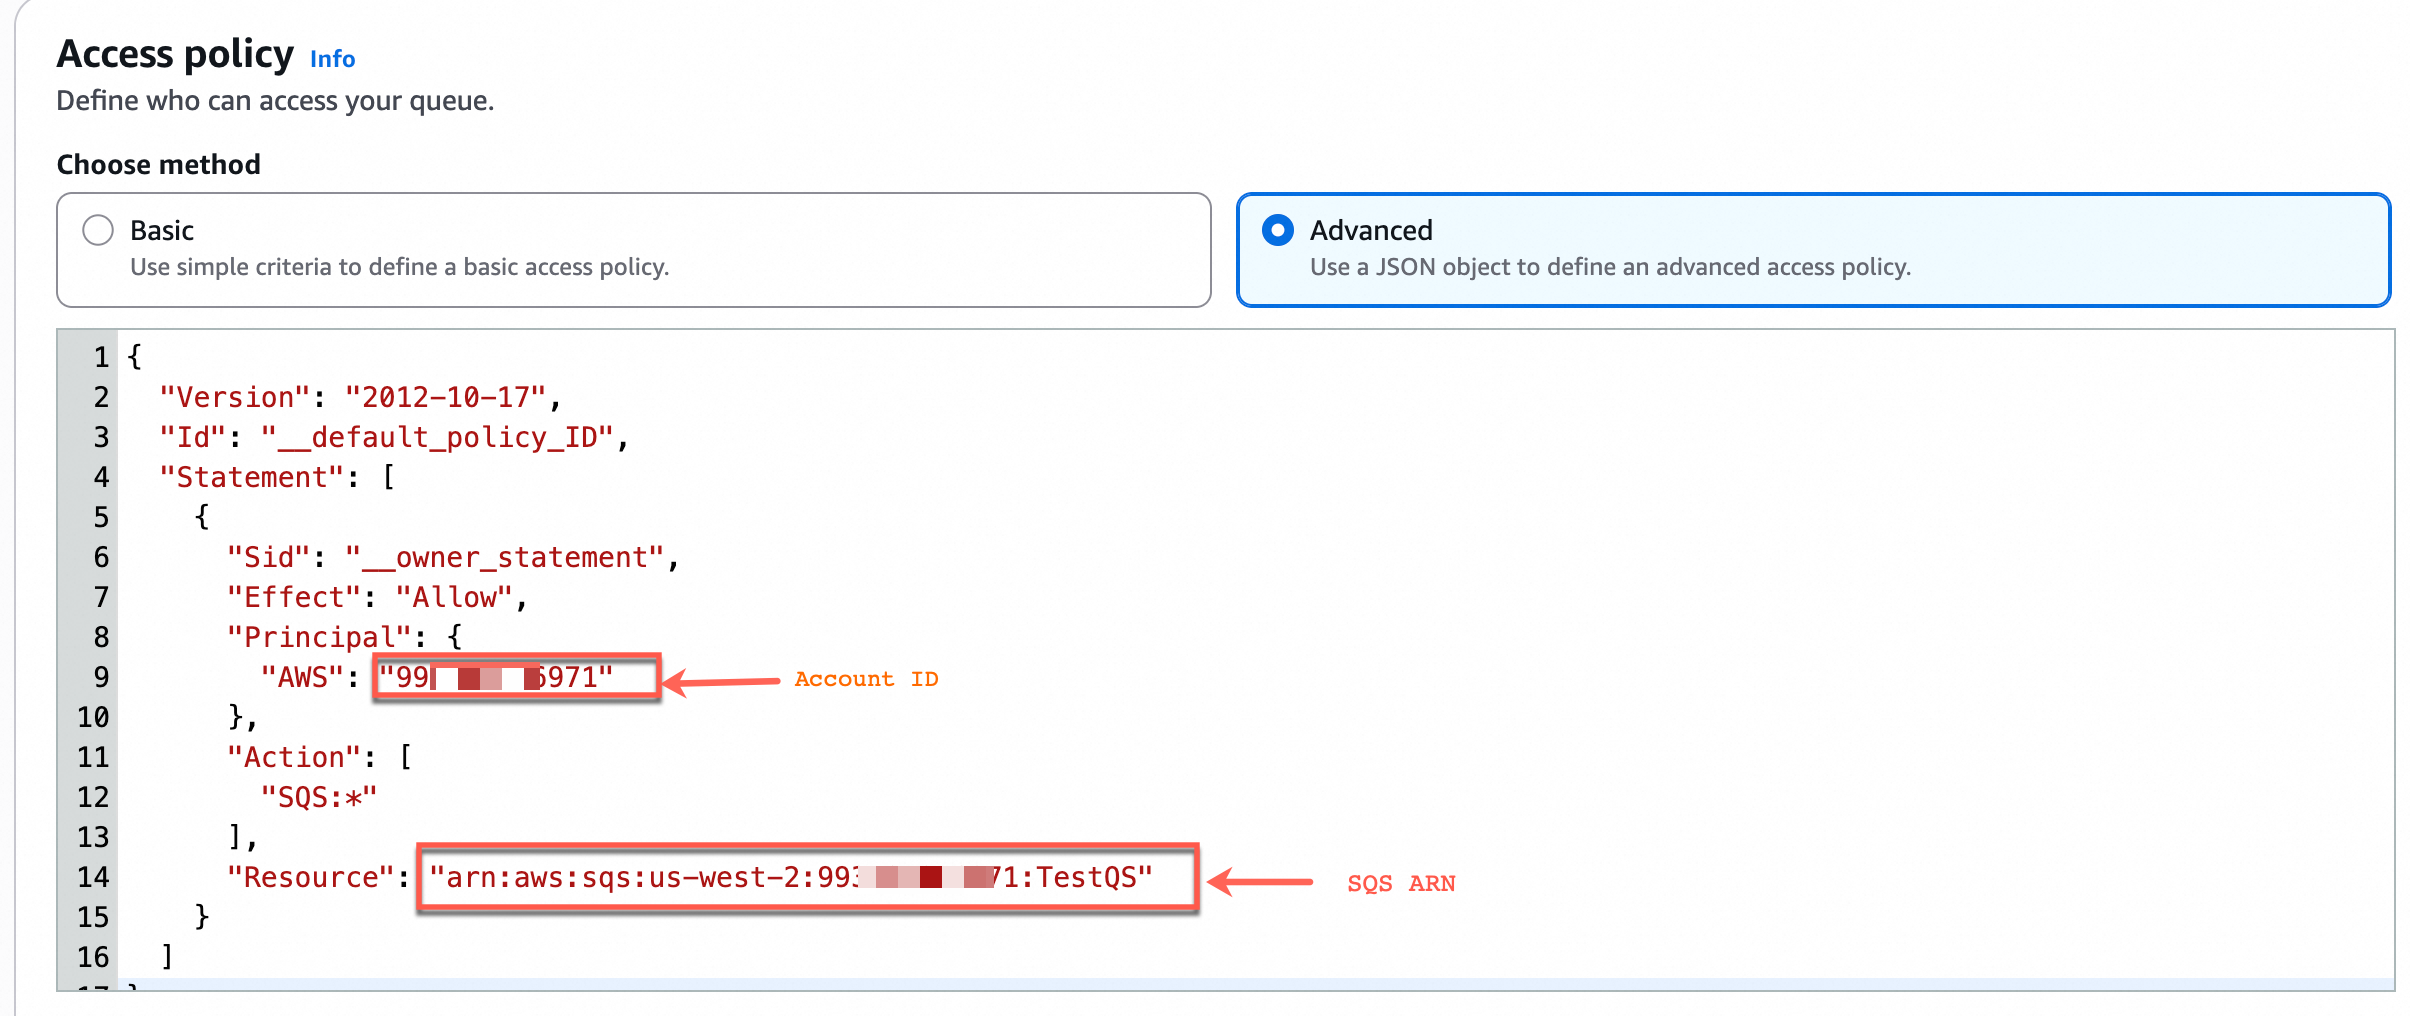
Copy the entire JSON template below and paste it into the policy editor, replacing all existing content.
{
  "Version": "2012-10-17",
  "Id": "__default_policy_ID",
  "Statement": [
    {
      "Sid": "__owner_statement",
      "Effect": "Allow",
      "Principal": {
        "AWS": "arn:aws:iam::${Account ID}:root"
      },
      "Action": "SQS:*",
      "Resource": "${SQS ARN}"
    },
    {
            "Sid": "example-statement-ID",
            "Effect": "Allow",
            "Principal": {
                "Service": "s3.amazonaws.com"
            },
            "Action": [
                "SQS:SendMessage"
            ],
            "Resource": "${SQS ARN}",
            "Condition": {
                "ArnLike": {
                    "aws:SourceArn": "arn:aws:s3:*:*:${S3 bucket name}"
                }
            }
        }
  ]
}
Important: Replace the placeholders in the template as described in the following table:
Placeholder
Description
Example
${Account ID}The Account ID that you saved in the previous step.
99********1${SQS ARN}The SQS ARN that you saved in the previous step.
arn:aws:sqs:ap-northeast-1:123******012:aliyun-sasc-log-queue${S3 bucket name}The name of the S3 bucket that you configured when creating a CloudTrail trail.
NoteYou can log on to the AWS S3 console, find the bucket in the corresponding region, and view its information on the details page.
aws-cloudtrail-logs-123******12-abcdefAfter completing the replacement, scroll to the bottom of the page and click Create Queue.
Step 3: Create an S3 event notification
This step configures an event notification rule for the S3 bucket. This rule automatically sends a notification to the specified SQS queue when a new log file is generated. For more information, see the official AWS documentation for Amazon S3 Event Notifications.
Log on to the AWS S3 console
Log on to the AWS S3 console. After selecting a region, click General purpose buckets.
WarningMake sure that the selected region is the same as the region where you created the CloudTrail trail.
On the General purpose buckets tab, locate the S3 bucket that you specified when you created the CloudTrail trail, and go to its details page.
Configure the event notification
On the Properties tab, in the Event notifications section, click Create event notification. Configure the settings as instructed below.
Event Type: Select Send.
Target: Select SQS Queue, and specify the SQS queue as the one created in Step 2: Create an SQS message queue.
After you complete the configuration, click Save Changes.
Step 4: Configure queue access permissions
This step grants the dedicated IAM user created for Security Center permission to read notification messages from the SQS queue.
Create an SQS policy:
Log on to the AWS IAM console. On the Policies page, click Create Policy.
Configure the settings as instructed below.
Service: SQS.
Effect: Allow.
Read: Select GetQueueUrl and ReceiveMessage.
Write: Select ReceiveMessage.
Resources: Click Add ARN. In the Resource ARN field, enter the Queue ARN.
NoteYou can log on to the AWS SQS console, find the queue in the corresponding region, and view its ARN on the details page.
Attach the policy to the IAM user:
Attach the SQS policy that you created to the target IAM user. For more information, see Set user permissions.
FAQ
Why can't I see some of my onboarded AWS resources in Security Center?
Region not selected: In the onboarding configuration in Security Center, check whether you have selected the AWS region where the resource is located.
Synchronization latency: Asset synchronization may be delayed after initial onboarding or configuration changes. Wait for the synchronization to complete.
What do I do if the automatic credential and permission check fails after I enter the access key?
Permission issues: The IAM user may have insufficient permissions. Go to the AWS console to modify or add the required permission policies. For more information, see Set user permissions.
Account issues: If you use the quick configuration plan, the access key must be generated for the root user. Log on to the AWS console as the root user and create an API access key. For more information, see Step 1: Create credentials for your AWS root user.
Region issues: The selected region may be unavailable. Switch to another region or domain and try again.