When an Alibaba Cloud account has multiple RAM users, create approval rules to reduce O&M risks. These rules require RAM users to obtain approval from permissions before they can operate on important features in SAE. This allows intensive control over the permissions of RAM users. This topic describes how to configure approval rules, deploy approval requirements for applications, and manage approval records.
Prerequisites
Make sure:
An application is created and the application is running.
Contacts are created. Only contacts can be approvers.
Step 1: Add approval permissions to RAM users
If the account is an Alibaba Cloud account, skip this step.
If the account is a RAM user and has the
AliyunSAEFullAccesspermission, skip this step.
1. Create a custom permission policy
Use an Alibaba Cloud account to log on to the RAM console. In the left-side navigation pane, choose . On the Policies page, click Create Policy.
On the Create Policy page, click the JSON tab. Paste the following into the console, then click OK.
{
  "Version": "1",
  "Statement": [
    {
      "Effect": "Allow",
      "Action": [
        "sae:*OperationApproval*"
      ],
      "Resource": [
        "acs:sae:*:*:*"
      ]
   }
  ]
}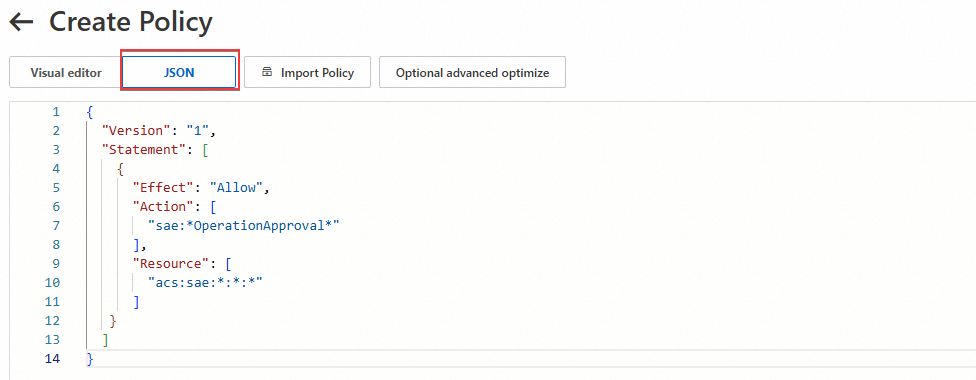
In the Create Policy dialog box, customize the Policy Name and Description of the permission, then click OK.
2. Grant permissions to RAM users
In the left-side navigation pane, choose . On the Users page, click the name of the user to add permissions.
On the user details page, click the Permissions tab. On the Individual tab, click Grant Permission.

In the Grant Permission panel, in the Policy section, select Custom Policy from the permission type drop-down list Select the custom permission that you created in the previous step, and then click Grant permissions.
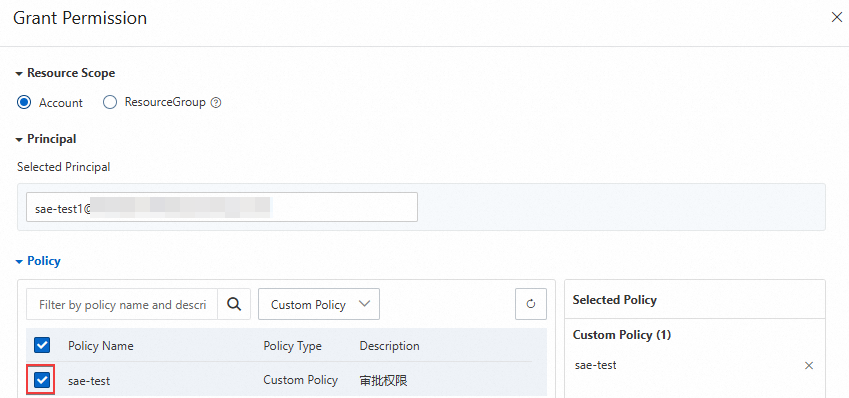
After the authorization is complete, you can view all the permissions granted to the user on the Individual tab of the RAM user.
Step 2: Create an approval rule
Both the Alibaba Cloud account and RAM users need to create approval rules. To do this:
Log on to the SAE console. In the left-side navigation pane, choose .
In the left-side navigation pane, click Approval Settings. On the Approval Settings page, click Create Approval Setting.
In the Create Approval Setting panel that appears, configure the following parameters and click OK.
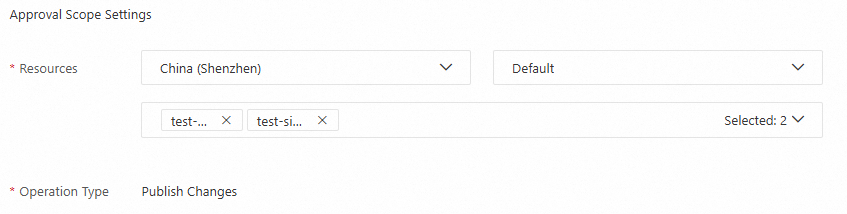
Approval Scope Settings:
Resources: You can filter resources by selecting Region, Namespace, and Application from the drop-down list.
Region: You can select All Regions or a specific region.
If you select All Regions, all applications in all namespaces in all regions are selected by default.
If you select a specific region, you can filter by selecting namespaces and applications.
Namespace: You can select All Namespaces or a specific namespace.
If you select All Namespaces, all applications in all namespaces in the destination region are selected by default.
If you select a specific namespace, you can filter specific applications.
Application or Task: You can select all applications or one or more specific applications.
Operation Type: Only Publish Changes. Includes two behaviors: Deploy application and Rollback to previous version.
Whitelist Settings: Select the target RAM users from the drop-down list. Supports multiple RAM users or perform fuzzy search.
The RAM users in the whitelist can manage the applications without the approval.

Approver Settings: Select approvers from the drop-down list next to Approver. Supports add multiple approvers.
 Note
NoteOnly contacts can be approvers. If an account is not in the drop-down list, click Contact Management to add. For more information, see Contact management.
The Alibaba Cloud account is the default approver for all rules. It can receive all approval notifications and manage all records. If the contact information of the Alibaba Cloud account owner was not added, the owner will not receive approval notifications but can still approve.
The Alibaba Cloud account can add all RAM users as approvers. If a RAM user does not have the
ListUserspermission, it can add only itself as a contact. If it has, the RAM user can add other RAM users as contacts. For more information about how to add permissions, see Grant permissions to RAM users.
Optional: On the Approval Settings page, you can Edit or Delete created approval rules.

Edit: In the Actions column, click Edit. In the Change approval settings panel, modify parameters.
Delete: In the Actions column, click Delete. In the pop up dialog box, click Confirm.
Step 3: Use a RAM user to change an application
About how setting approval rules will affect other RAM users' deploying applications:
Not set: No deployment approvals needed.
Set: If a RAM user is not in the whitelist, the user need to obtain approval from an approver. RAM user can operate only after the approval is granted. These are steps:
If you created contacts, the system will send you a notification of the approval result, rejected or approved. For more information, see Contact management.
Use a RAM user to log on to the SAE console. In the left-side navigation pane, choose . Select the destination region and namespace, then click the name of the target application.

Operate the application that you want to change.
Deploy an application
On the Basic Information page of the target application, click Deploy Application. Then, modify the configuration information as needed and select a release policy.
SAE supports the Phased Release and Canary Release (Grayscale) policies. For more information, see Deploy an application in a single batch, Deploy an application in batches, and Deploy an application in canary mode.
Click Confirm.
Roll back an application to a previous version
On the Basic Information page of the target application, click Roll Back to Previous Version.
In the Rollback to previous version panel that appears, select the historical version to which you want to roll back the application and set a release policy. Then click Confirm. For more information, see Roll back an application to a previous version.
After initiating a change to deploy an application, the Deploy Application Request dialog box appears. It will indicate your change and initiated a request. Click OK and then view the approval progress in Approval Records.
If you perform Roll Back To Previous Version, the following dialog box does not appear. You can directly view the specific information in Change Details.
 Note
NoteAfter you initiate an approval request, view the Change Details of the application. The execution status of this change remains Waiting for approval. Only after the approval can you operate. The following is the process:
After the approver approves: The Execution Status changes to Approved. Click Deploy Application and wait for the application to complete.
After the approver rejects the change: The Execution Status in Change Details automatically changes to Execution Terminated. You can view the reason for the rejection in Approval Records. For more information, see the following optional steps.
Optional: In the left-side navigation pane, choose . On the Approval Records page, click the Initiated by Me tab to view the approval progress.
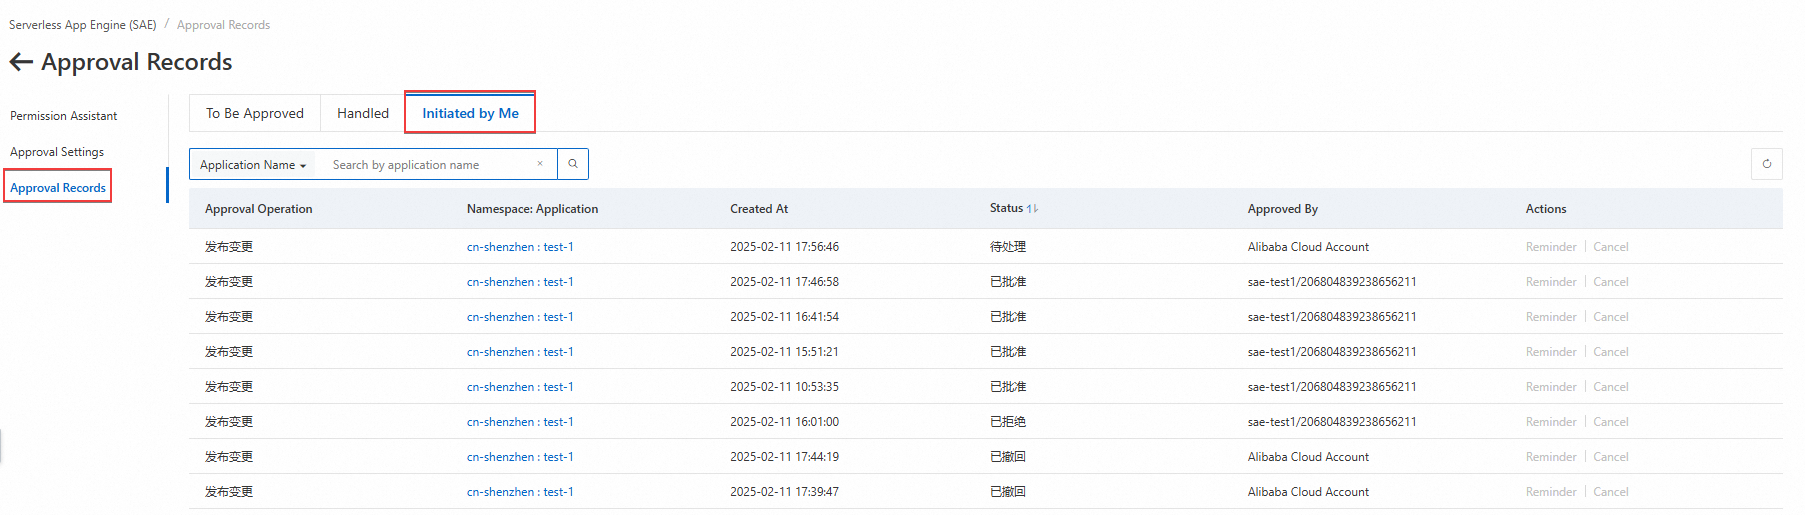
On the Approval Records page, do the following on the Initiated by Me tab:
Reminder: Click Reminder in the Actions column. In the pop up dialog box, click OK to complete.
Cancel: Click Cancel in the Actions column. In the pop up dialog box, click OK to cancel.
View the application for this change operation: Click the application name in the Namespace: Application column to go to the Basic Information page of the target application.
View the rejection reason: Hover over the
 icon to view the reason for the rejection.
Step 4: Manage approval records in an account with permissions
Use an account with approval permissions to log on to the SAE console. In the left-side navigation pane, choose .
In the left-side navigation pane, click Approval Records. On the To Be Approved tab, manage the requests initiated from other RAM users.

Optional: do the following on this page:
View Details: Click View Details in the Actions column of the target record to view the detailed information about the application change.
Agree: Click Agree in the Actions column of the target record. In the pop up box, click OK to approve the request.
Reject: Click Reject in the Actions column. In the Confirm Rejection dialog box, enter the reason and click OK to reject.
Transfer: Click Transfer in the Actions column of the target record. In the Confirm Transfer dialog box, select the approver and click OK.
NoteIf you receive multiple records, select the check boxes to the left of the target records and perform Batch Approve, Batch Reject, or Batch Transfer.
Related operations: On the Approval Records page, click the Handled tab to view the approved change requests. You can also click the application name in the Namespace: Application column to go to the Basic Information page, and view the detailed information.
