SAE enables you to establish permission rules for specific contacts and configure features such as notification dispatch. When permission approval or alert activation is necessary, SAE will dispatch notifications to the appropriate contacts via email, DingTalk Robot, or WeCom Robot. This guide explains how to create, view, edit, and delete contacts in the SAE console.
Background information
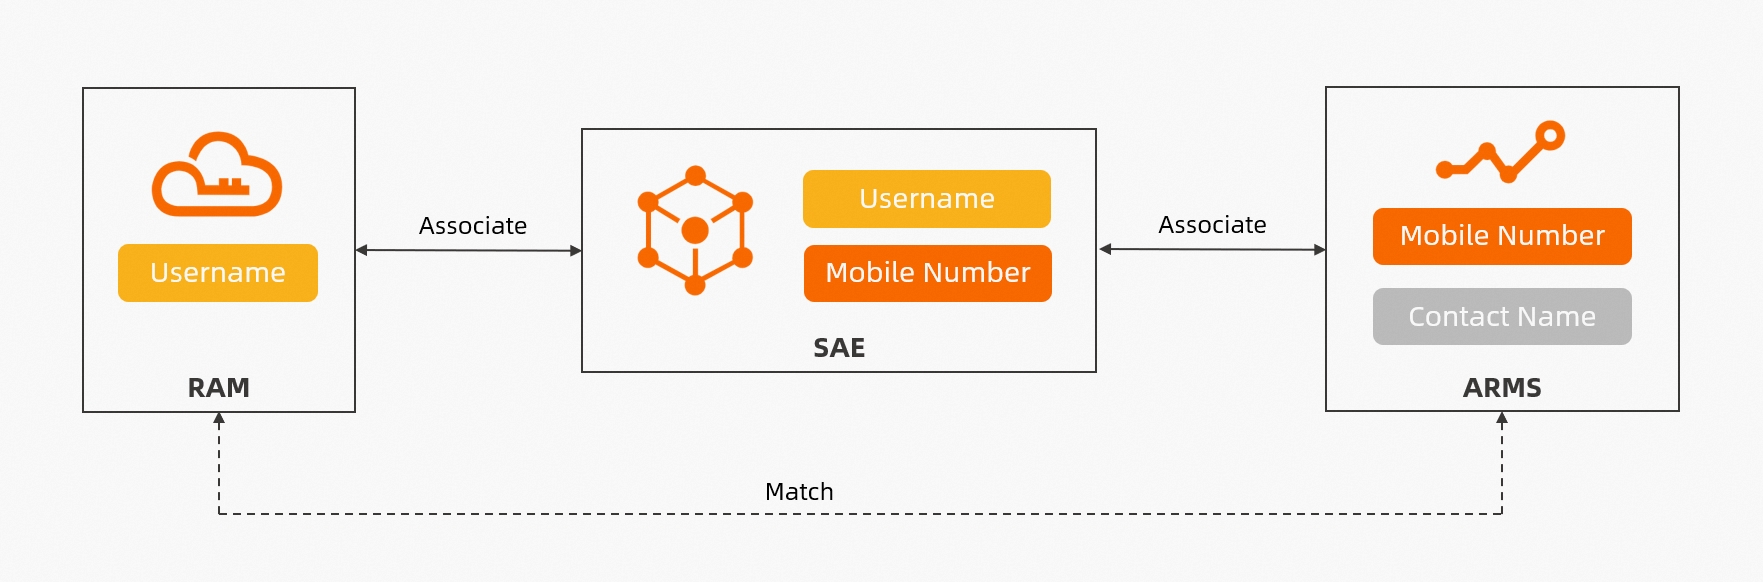
An Alibaba Cloud account can create multiple RAM users, corresponding to employees, systems, or applications within an enterprise. ARMS contacts are operations personnel handling alerts, and contacts can view, handle, and resolve alerts through the set contact methods. Among them, SAE contacts play a bridging role. By setting SAE contacts, SAE connects originally independent RAM users with ARMS contacts, achieving information exchange among the three cloud products. The specific process is as follows.
When setting up contacts in SAE, you must enter the username (Alibaba Cloud account or RAM user) and phone number. Associating the phone number allows you to link existing ARMS contacts with SAE contacts. The ARMS contact's name will be updated to reflect the RAM user's name.
When creating a new contact in SAE, the following scenarios may arise:
-
If the phone number is not already associated with an ARMS contact, a new ARMS contact will be created and linked to the SAE contact.
-
If the phone number is already associated with an ARMS contact and has not been linked by other SAE contacts under the same Alibaba Cloud account, the SAE contact will be linked to the existing ARMS contact.
-
If the phone number is already associated with an ARMS contact and has been linked by other SAE contacts under the same Alibaba Cloud account, the creation will fail, prompting you to change the phone number.
Once a contact is linked, as long as no re-linking (merging contacts) occurs, any subsequent changes to contact details (including phone numbers) in the SAE console will not affect the linkage and will update the ARMS contact's details.
The contact details for SAE contacts are synchronized with ARMS. The following precautions should be taken to avoid disrupting SAE event notifications.
-
Avoid manually deleting contacts, contact groups, or notification policies with the
sae:prefix in the ARMS console. -
Exercise caution when modifying contact groups in the ARMS console.
Step 1: Grant ListUsers permission to RAM users
If you are operating as a sub-account and need to add multiple sub-accounts as contacts, follow these steps to grant the ListUsers permission to the sub-account.
If you are operating the Alibaba Cloud account, you do not need to add the following permissions to the main account. Please skip this step.
1. Create a custom permission policy
-
Log on to the RAM console using the Alibaba Cloud account. In the left-side navigation pane, select . On the Policy page, click Create Policy.
-
On the Create Policy page, click the Script Editor tab, paste the following policy into the console, and then click Confirm.
{
  "Version": "1",
  "Statement": [
    {
      "Effect": "Allow",
      "Action": [
        "ram:ListUsers",
        "ram:GetUser"
      ],
      "Resource": "*"
    }
  ]
}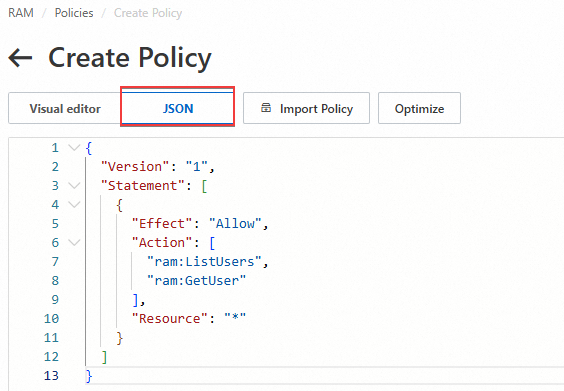
-
In the pop-up Create Policy dialog box, customize the Name and Description of the permission, and then click Confirm.
2. Grant authorization to RAM users
-
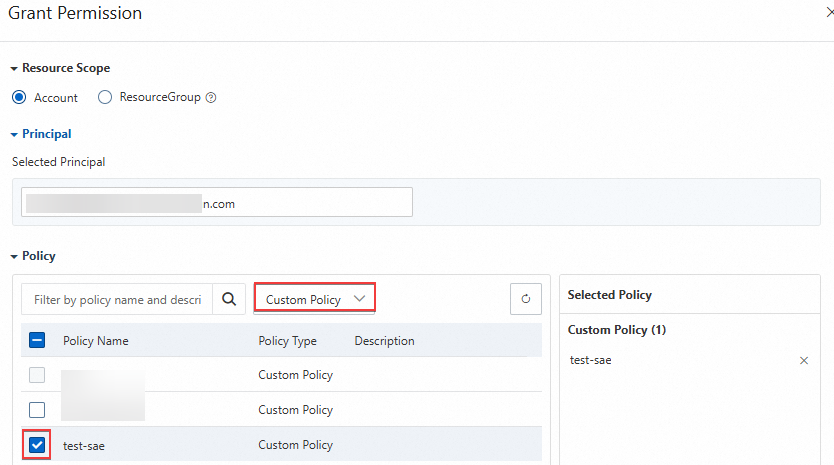
In the left-side navigation pane, select . On the Users page, click the login name of the user you want to authorize.
-
On the user's details page, click the Permission Management tab, and then click Add Authorization on the Personal Permissions tab.

-
In the pop-up Add Authorization panel, in the Policy area, select Custom Policy from the drop-down list of permission types, check the custom permission created in the previous step, and then click Confirm Add Authorization.
After authorization is complete, you can view all the permissions granted to the user on the Personal Permissions tab of the RAM user.
Step 2: Create contacts
-
Log on to the SAE console. In the left-side navigation pane, select .
-
On the Contact Management page, click Create Contact.
-
In the pop-up New Contact panel, enter the parameter information according to the instructions provided in the table, and then click Confirm.
Configuration Item
Description
Username (alibaba Cloud Login Account)
Supports adding account information in the following two ways:
Alibaba Cloud account: Enter manually.
RAM user: Select from the drop-down list.
Supports creating up to 100 contacts.
ImportantThe Alibaba Cloud account can create all sub-accounts as contacts and manage contacts created by all sub-accounts.
If a sub-account (RAM user) does not have
ListUserspermission, it can only add itself as a contact. If it hasListUserspermission, it can add other RAM users as contacts. For detailed steps to add permissions, see Grant ListUsers permission to RAM users.
Phone Number
Each phone number can only be used for one contact. Enter a valid phone number from the Chinese mainland (excluding Hong Kong, Macao, and Taiwan), such as 1381111****.
Mailbox
Enter the email address used to receive message notifications. Enter a valid email format, such as username@example.com.
Dingtalk Robot
Enter the webhook URL of the DingTalk Robot. For information on how to obtain the DingTalk Robot URL, see Obtain the DingTalk Robot webhook URL.
Wecom Robot
Enter the webhook URL of the WeCom Robot. For information on how to obtain the WeCom Robot, see WeCom Robot.
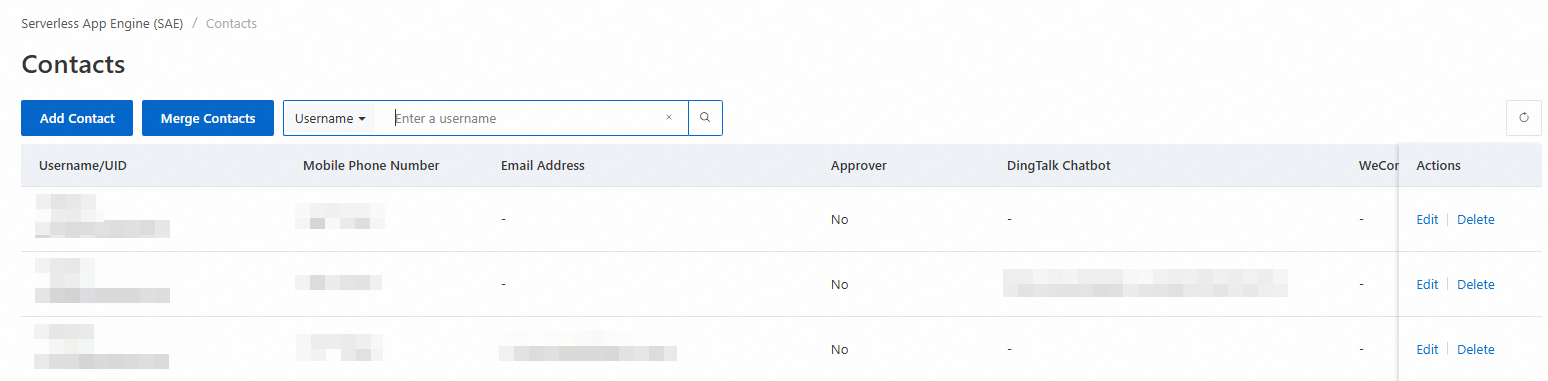
Step 3: Manage contacts
After creating contacts, you can manage them by querying, Edit, Delete, or Merge Contacts on the Contact Management page.
-
Query: Supports filtering by Username, Phone Number, or Mailbox. By default, the username is the filter condition. You can select other conditions from the drop-down list and enter the specific content in the text box.
-
Edit: Click Edit in the Actions column. In the Edit Contact dialog box, modify the information, and then click Confirm.
-
Delete: Click Delete in the Actions column, and then click Confirm in the Delete Contact dialog box.
ImportantAfter successfully deleting a contact, the corresponding ARMS contact will also be removed.
-
Merge Contacts: Click Merge Contacts, and then click Confirm in the Merge Contacts dialog box.
Merging contacts will link RAM users with existing ARMS alert notification contacts by phone number and update the ARMS contact name with the RAM username. If the phone number in the RAM user information is not present in ARMS contacts, a new contact will be created with that number.