Canary release lets you test a new application version on a small subset of instances while the current version continues serving traffic. After each batch completes, you review business metrics and decide whether to continue the rollout or roll back—giving you a controlled, low-risk upgrade path.
Prerequisites
Before you begin, make sure that:
The target application has more than one instance
How canary release works
A canary release follows a repeating cycle: deploy a small batch, observe, then decide whether to continue or roll back.

The canary batch is capped at 50% of total instances. The remaining instances roll out in the number of batches you specify. After each batch completes, you manually trigger the next batch—or roll back.
SAE supports two traffic-routing strategies for canary releases:
By traffic ratio: Route a percentage of traffic to the new version—for example, 20% to V2 and 80% to V1.
By request content: Route traffic based on request attributes—for example, send requests from specific user IDs to V2 and all other traffic to V1.
Example: An application with 10 instances running V1 performs a canary release on 2 instances (20%), then releases the remaining 8 instances in 3 batches.
For the phased release method (no canary batch), see Perform a phased release for an application.
Perform a canary release
Redeploying an application restarts it. To avoid business interruptions, deploy during off-peak hours.
On the SAE Application List page, select a region and namespace, then click the application ID to open the application details page.
On the Basic Information page, click Deploy Application.
Update the deployment artifact based on your deployment method.
The deployment method is fixed to whichever method you selected when the application was first deployed.
Deployment method Action WAR package Upload a new WAR package or enter the path to the new package, then configure the runtime environment. JAR package Upload a new JAR package or enter the path to the new package, then configure the runtime environment. ZIP package Upload a new ZIP package or enter the path to the new package, then configure the runtime environment. Image In the Configure Image section, click Modify Image. In the Modify Image panel, select a different image repository or image version. In the Release Policy Settings section, configure the canary release parameters.
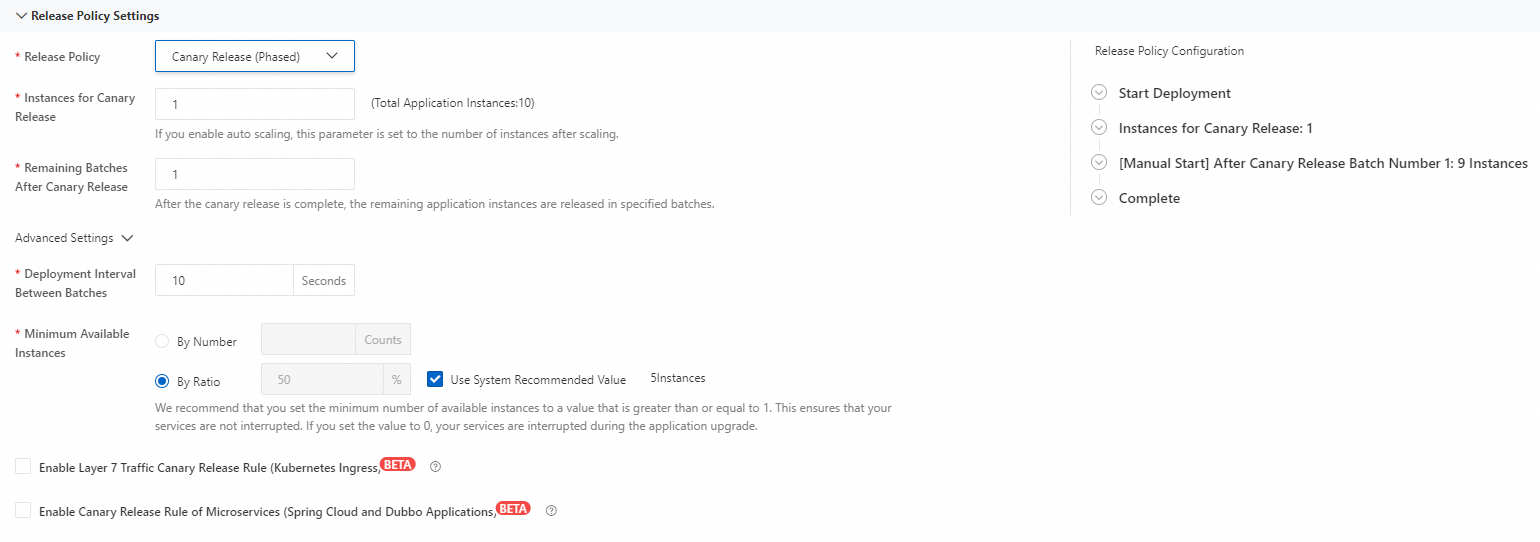
Configuration item Description Release Policy Select Canary Release (Phased). Instances for Canary Release The number of instances to include in the canary batch. Cannot exceed 50% of total instances. Remaining Batches After Canary The number of batches for rolling out the remaining instances after the canary batch completes. Minimum Available Instances The minimum number of instances that must remain available during the rolling upgrade. Choose By Number to enter an absolute count (selecting Use System Recommended Value sets this to 25% of existing instances, rounded up), or choose By Ratio to enter a percentage. Setting this to 0 causes business interruptions during the upgrade. Enable Layer 7 Traffic Canary Release Rule (Kubernetes Ingress) Applies a Layer 7 canary traffic rule. Takes effect only after you create a Kubernetes Ingress canary release rule. Enable Canary Release Rule of Microservices (Spring Cloud and Dubbo Applications) Applies a microservices canary traffic rule. Takes effect only after you create a microservices canary release rule. Example: For a 10-instance application, set Instances for Canary Release to
2and Remaining Batches After Canary to3. SAE updates 2 instances in the canary batch, then releases the remaining 8 in 3 roughly equal batches.Click OK to start the canary release. SAE upgrades the canary instances immediately.
After the canary batch completes, check whether it is healthy.
On the Change Records page, view the change details and release status. If all batches show as executed, the upgrade is complete.
On the Basic Information page, click the Instances tab. If the Status column shows Running for all instances, the deployment succeeded.
On the Change Details page, trigger the next batch or roll back.
If the canary batch is healthy, trigger the next batch. Repeat this review-and-release cycle for each subsequent batch.
If the canary batch shows issues, click Roll Back Now to revert. See Roll back an application for details.
Roll back an application
While one or more instances are still being upgraded, the application status shows Executing.
| Rollback scenario | Action |
|---|---|
| The first release batch returns no response due to an exception | Click Roll Back Now on the Change Details page. SAE reverts the upgraded instances to the previous version and restores the original application configuration. |
| An upgrade fails due to an exception (for example, a deployment package is unavailable or a health check fails) | SAE automatically stops and rolls back the application. No manual action required. |
| The upgrade times out (approximately 30 minutes) | SAE reports a timeout exception and stops the change process. Manually terminate the release and roll back on the Change Details page. |
What's next
| Operation | Reference |
|---|---|
| Manage the application lifecycle (update, start, stop, delete, scale in, scale out) | Manage the lifecycle of an application |
| Configure auto scaling policies | Configure an auto scaling policy |
| Bind a CLB instance to an application | Bind a CLB instance to an application, and generate a public or private IP for it |
| Create scheduled start and stop rules | Create a scheduled start and stop rule |
| Manage distributed configuration | Distributed configuration management |
| Change instance specifications | Change instance specification |
| View logs | Log management |
| View monitoring data | Monitoring management |
| View application events | View application events |
| View change records | View change records |
| Check application health via webshell | Use the webshell feature to check the health status of applications |