When a subscription RDS MySQL instance expires, or a pay-as-you-go or Serverless instance is released due to overdue payments or manual release, the instance moves to the recycle bin. From there, you can unlock, rebuild, or destroy it depending on the instance state and how much time has elapsed.
When an instance is being deleted, it enters a backup state. If deletion is not yet complete (the instance status is Deleting), recycle bin operations are unavailable for that instance. Deletion time varies based on data size and configuration.
-
When you delete an instance, it first enters a backup state. If a backup is running during the deletion (the instance status is Deleting), the recycle bin is unavailable for that instance. The deletion process may take some time, depending on the amount of data and the instance's configuration. Wait until the instance status changes to Deleted.
-
The features to rebuild and restore or destroy an instance are not supported on virtual merchant sites.
-
On virtual merchant sites, subscription instances are permanently released after being locked for 7 days and cannot be recovered.
Which instances go to the recycle bin
The following primary instance types move to the recycle bin when released:
-
Pay-as-you-go primary instances (manually released or released due to overdue payments)
-
Serverless primary instances (manually released or released due to overdue payments)
-
Subscription primary instances (manually unsubscribed or released after expiration)
Dedicated cluster instances and read-only instances never go to the recycle bin.Dedicated cluster instances and
After an instance is released, the following backups are retained separately and are not affected by recycle bin operations:
Cross-region backups for RDS MySQL, RDS SQL Server, and RDS PostgreSQL, if within the retention period
Data backups for instances with a backup retention policy after release configured — these can be downloaded after the instance is released
Available operations and time windows
Depending on how and when the instance was released, the recycle bin offers up to three operations:
| Operation | Description | When available |
|---|---|---|
| Unlock | Restore a locked instance to normal operation by renewing a subscription or settling overdue payments | While the instance is locked, before release |
| Rebuild | Restore the data of a released instance to a new instance | Within the rebuild window after release (see time-window examples below) |
| Destroy | Permanently delete the instance and all its backups except cross-region backups. This operation cannot be undone. | Any time the instance is in the recycle bin (after a 10-minute cache delay) |
To export data from a recycle bin instance, first unlock or rebuild it. Some locked instances are read-only — you can run queries but cannot export data. For details, see How do I resolve the issue that the instance status is "Locked"? For data export, see Data exporting.
Subscription instances

A subscription instance that expires enters a locked state. Renew it within seven days to unlock it before it is released. Once released, you can rebuild it within the rebuild window shown in the example below. After that, the instance is permanently destroyed.
Example: An instance expired at 00:00:00 on January 4, 2024, and was released at 00:00:26 on January 11, 2024.
| State | Time range | Available operation |
|---|---|---|
| Locked | January 4 – January 11, 2024 | Unlock (renew) |
| Released | January 11 – January 19, 2024 | Rebuild |
| Destroyed | After January 19, 2024 | None |
Pay-as-you-go and Serverless instances
Manual release:
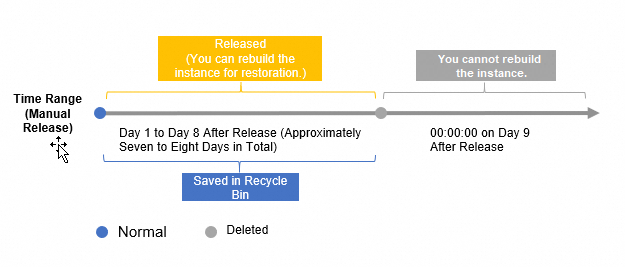
A manually released instance moves directly to the recycle bin and can be rebuilt within the rebuild window shown in the example below.
Example: An instance was released at 21:38:33 on January 12, 2024.
| State | Time range | Available operation |
|---|---|---|
| Released | January 12 – January 20, 2024 | Rebuild |
| Destroyed | After January 20, 2024 | None |
Locked due to overdue payments:

Settle the overdue balance to unlock the instance before it is released. If not unlocked in time, you can still rebuild it within the rebuild window shown in the example below.
Example: An instance was suspended at 21:25:13 on January 5, 2024, and released at 21:38:33 on January 12, 2024.
| State | Time range | Available operation |
|---|---|---|
| Locked | January 5 – January 12, 2024 | Unlock (settle overdue payments) |
| Released | January 12 – January 20, 2024 | Rebuild |
| Destroyed | After January 20, 2024 | None |
Unlock an instance
Pay-as-you-go or Serverless instance
Settle the overdue balance through your Alibaba Cloud payment method.
Subscription instance
-
Open the RDS instance list.
-
In the left-side navigation pane, click Recycle Bin. Select the region where the instance is located.
-
Find the locked instance and click Unlock to renew it.
The instance is restored to normal immediately after renewal.
Rebuild an instance
Rebuilding restores the data of a released instance to a new RDS instance. The new instance does not inherit the ID or endpoint of the original.
Before rebuilding, review the following constraints:
Steps:
-
Open the RDS instance list. Select the region where the instance is located.
-
Click Recycle Bin.
-
Find the instance and click Rebuild.
-
Select the service agreement and click Confirm Order.
-
Click Purchase (subscription instances only).
Why is the rebuilt instance more expensive than the original?
If the original specifications are no longer available, you must select new specifications when rebuilding. The cost difference reflects the new specifications and any expanded storage capacity.
Destroy an instance
Destroying an instance permanently deletes all backups — including regular data backups, archived backups, and log backups. Cross-region backups are the only exception. This operation cannot be undone.
If an instance is locked due to overdue payments or expiration, you can destroy it directly from the recycle bin.
Billing stops immediately when an instance enters the recycle bin. Due to a system cache delay, wait approximately 10 minutes after an instance enters the recycle bin before destroying it.
-
Open the RDS instance list.
-
In the left-side navigation pane, click Recycle Bin. Select the region where the instance is located.
-
Find the instance, click Destroy, and then click OK in the confirmation dialog.