Quick BI subscriptions deliver report screenshots or attachments on a schedule through email, DingTalk, Lark, WeCom, or custom webhook channels.
Limitations
-
The subscription feature is available only in Quick BI Pro and Quick BI Enterprise Standard.
-
Only Quick BI Pro supports empty data handling, which suppresses notifications when reports contain no data.
Procedure
-
Log in to the Quick BI console.
-
In the top navigation bar, click the
 icon and select Subscriptions.
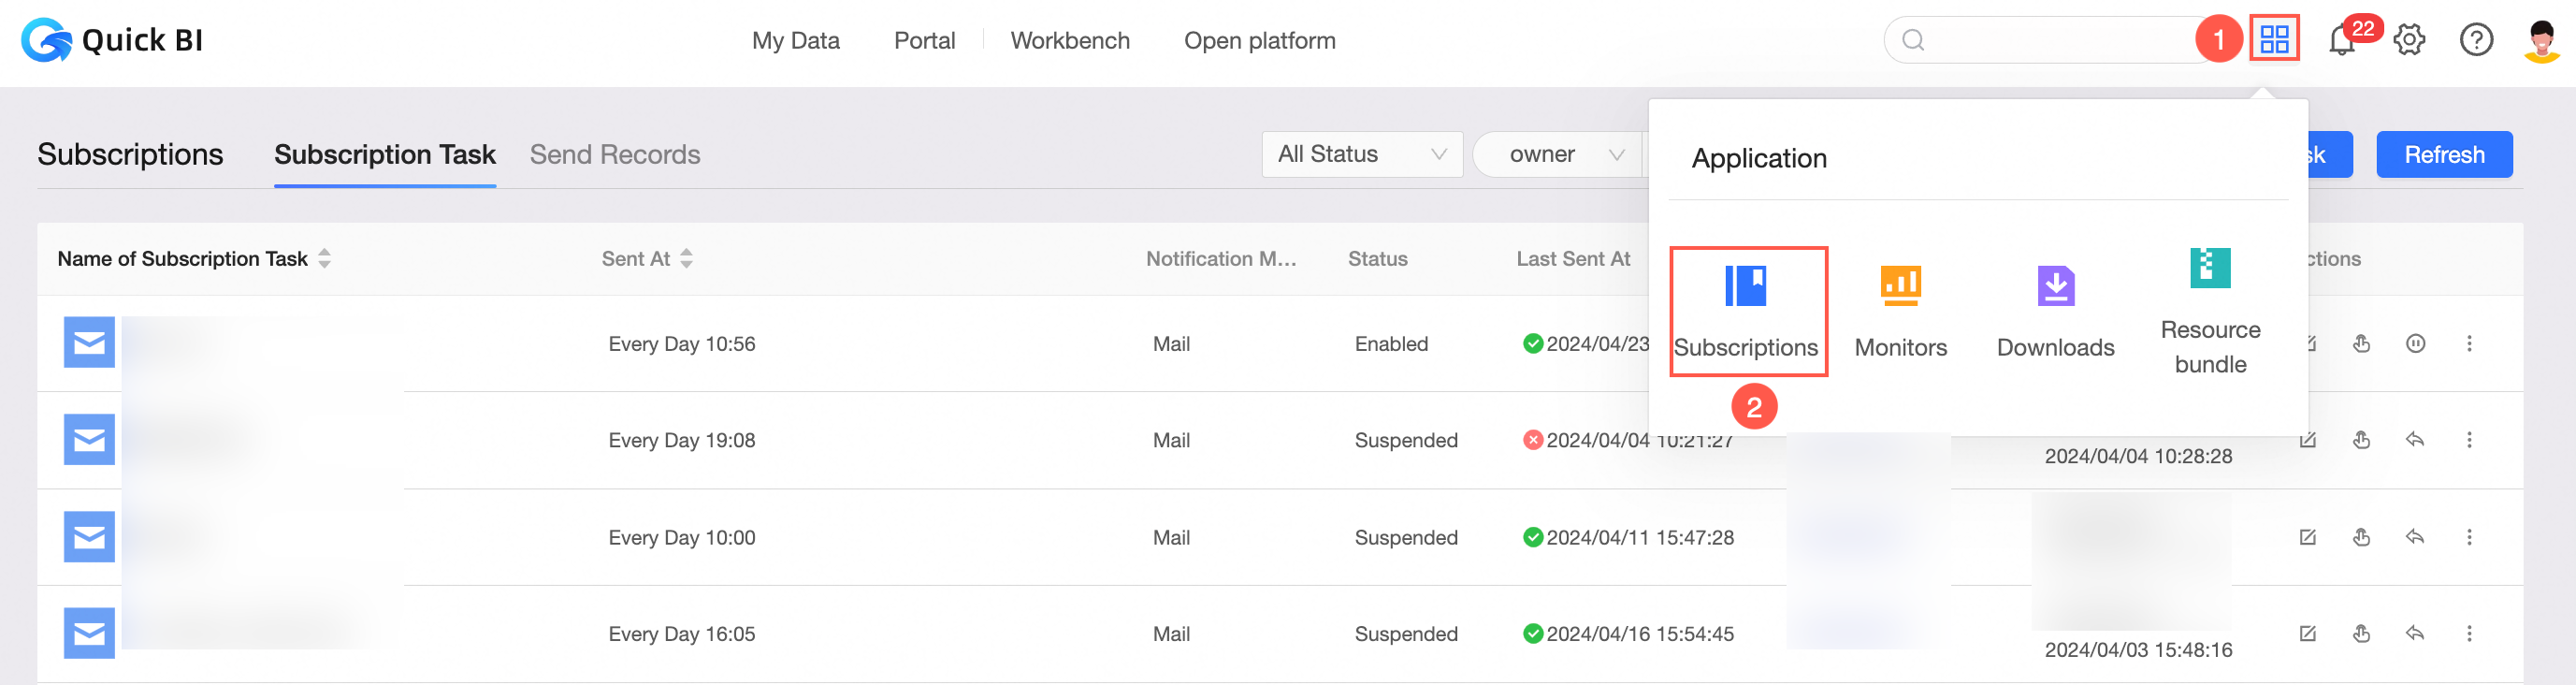
-
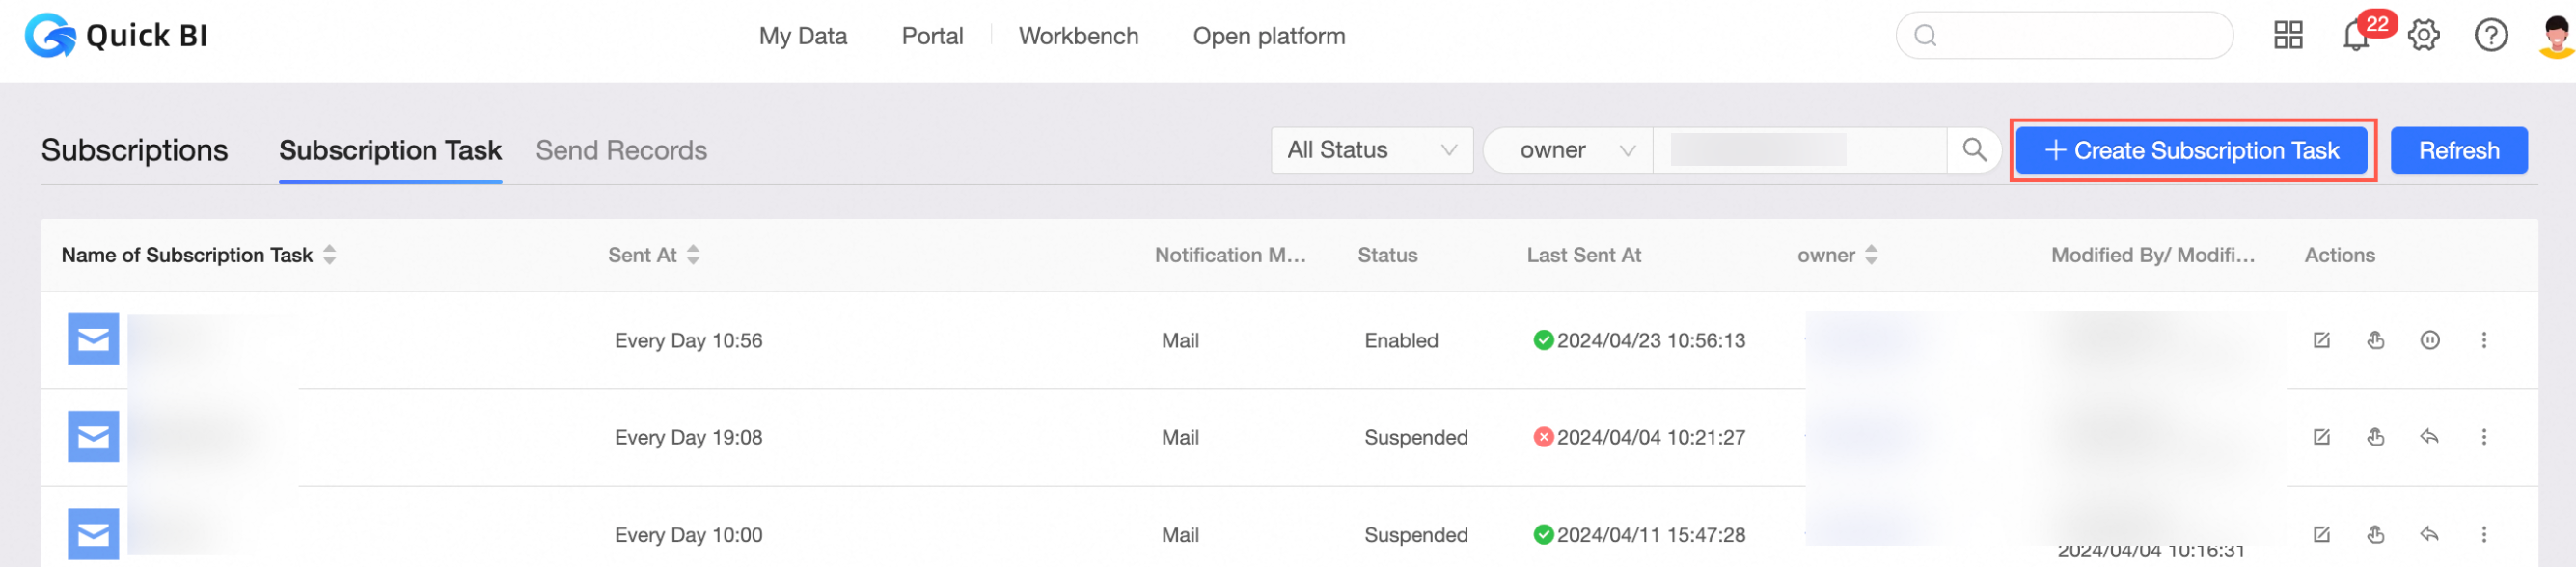
On the Subscriptions page, click the Subscription Task tab, and then click + New Subscription Task.
-
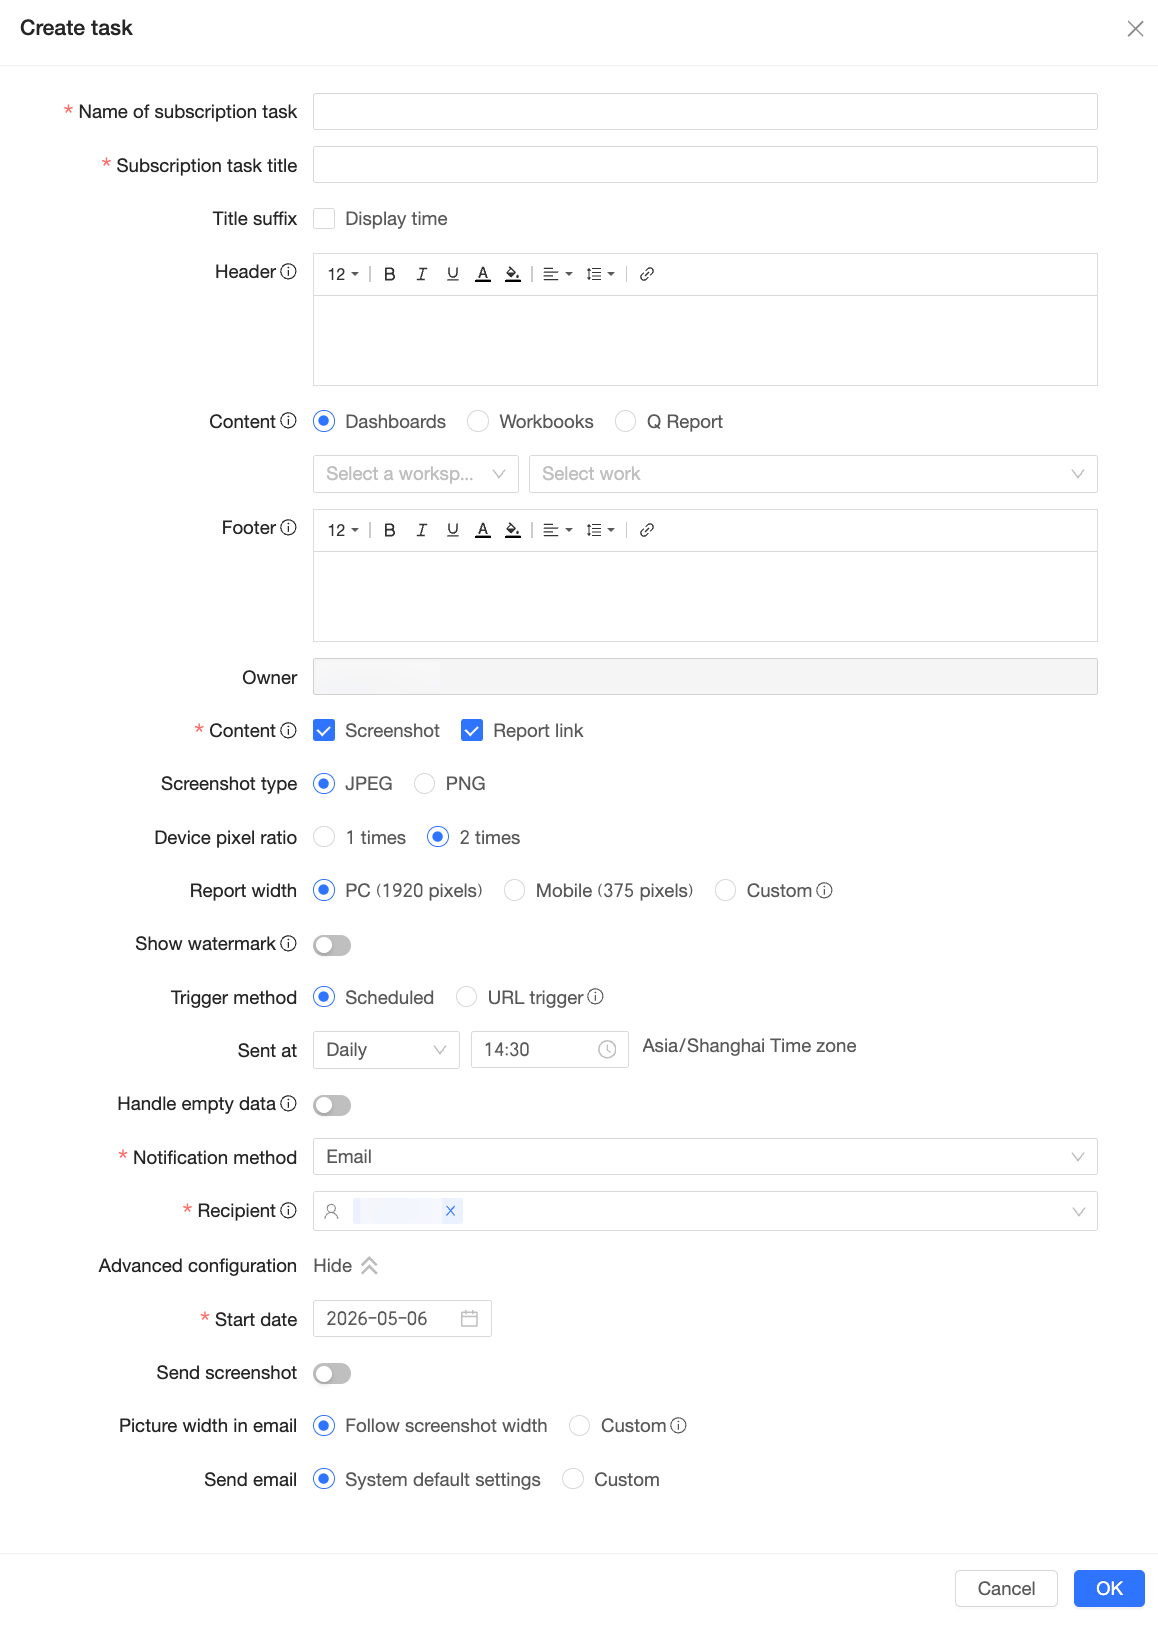
On the New Task page, configure the following parameters.
Parameter
Description
Subscription Task Name
Name the subscription task descriptively for easier management. Example: Finance Department Daily Business Report.
Subscription Task Title
The title shown in the subscription notification.
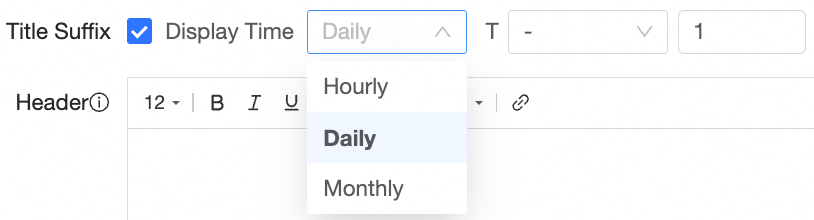
Title Suffix
Appends a timestamp suffix to the task title.
Granularity options: month, day, or hour. The timestamp is relative to the execution time.
Header
Text displayed before the report content in the notification body.
Supports font size, style (bold, italic, underline), font color, background color, alignment, line spacing, and hyperlinks.

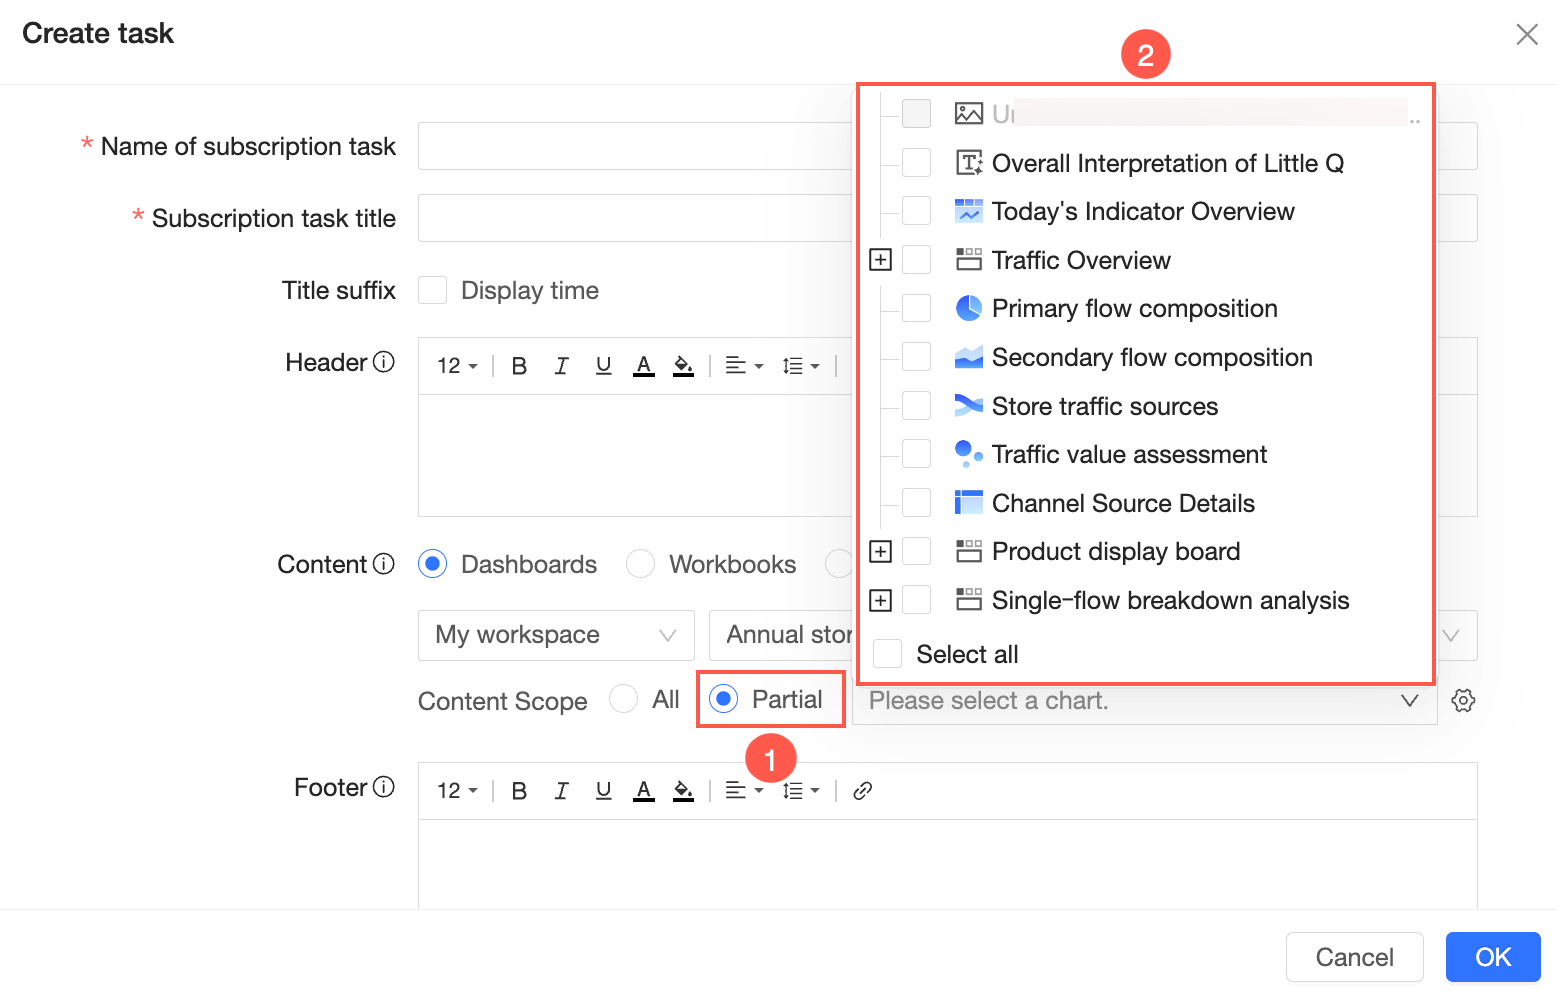
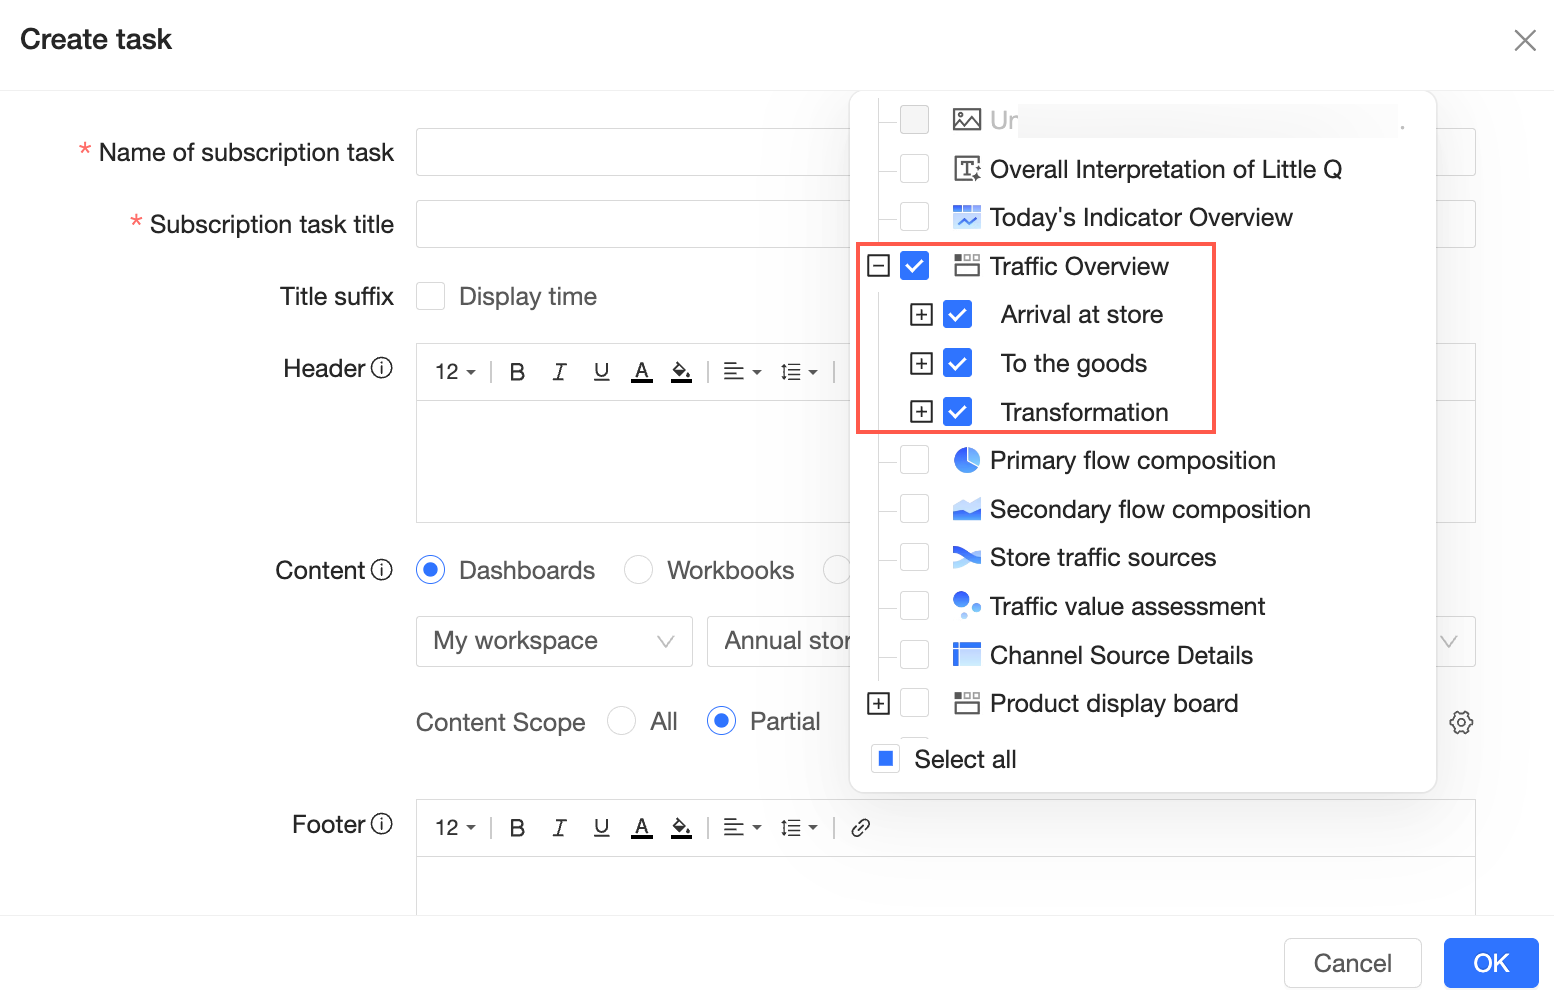
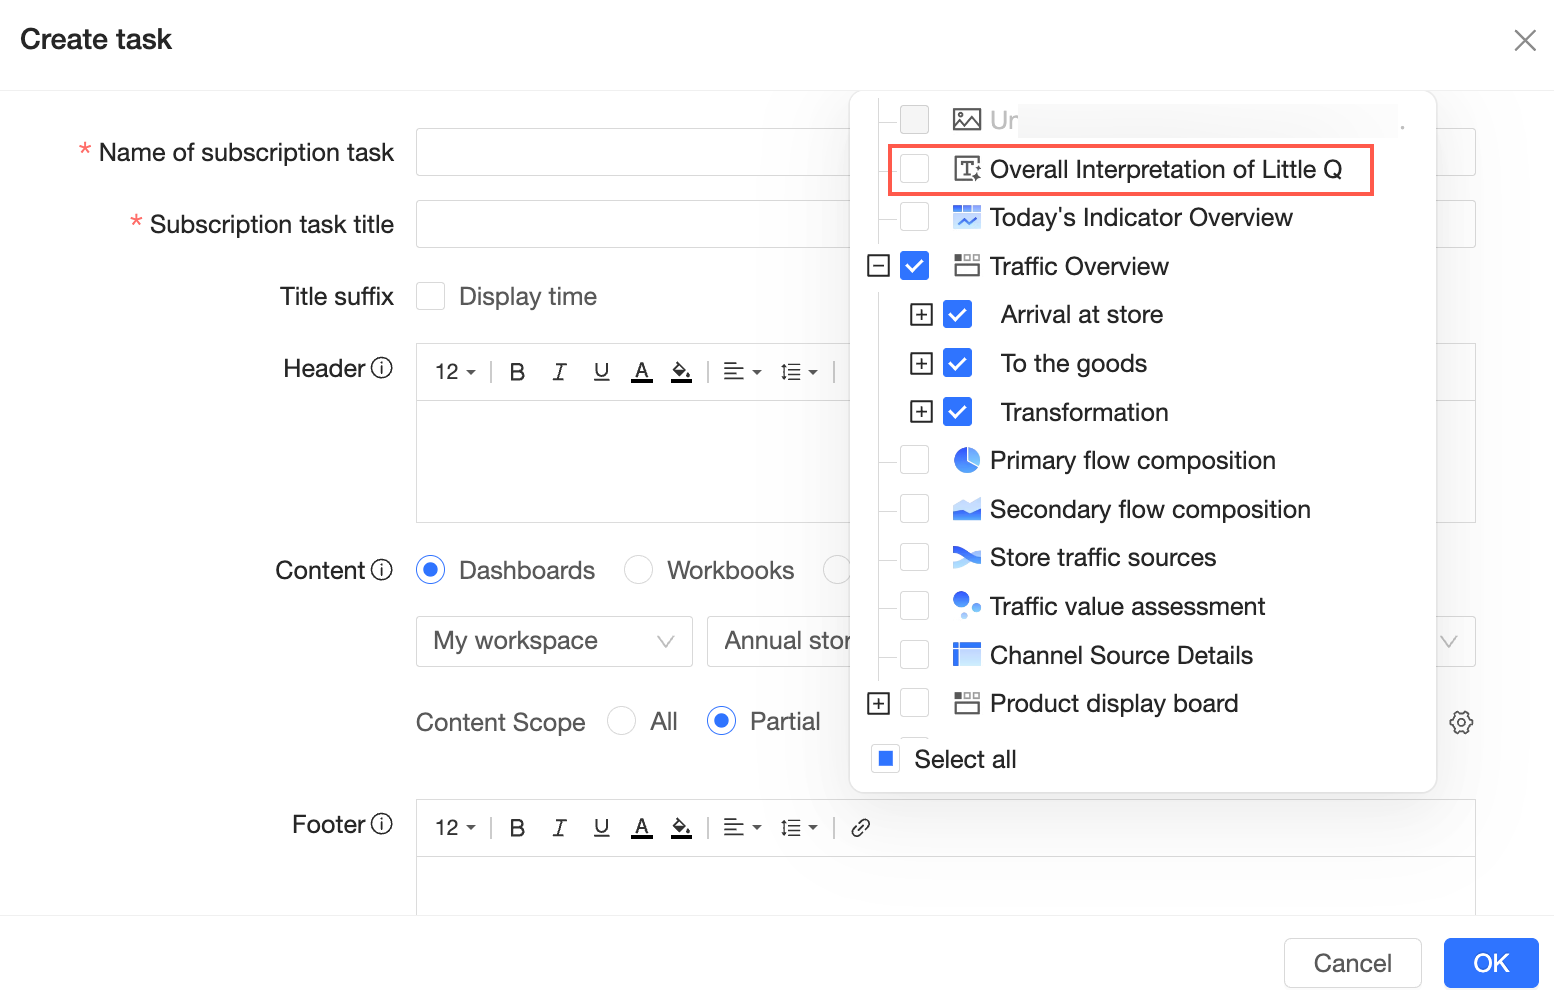
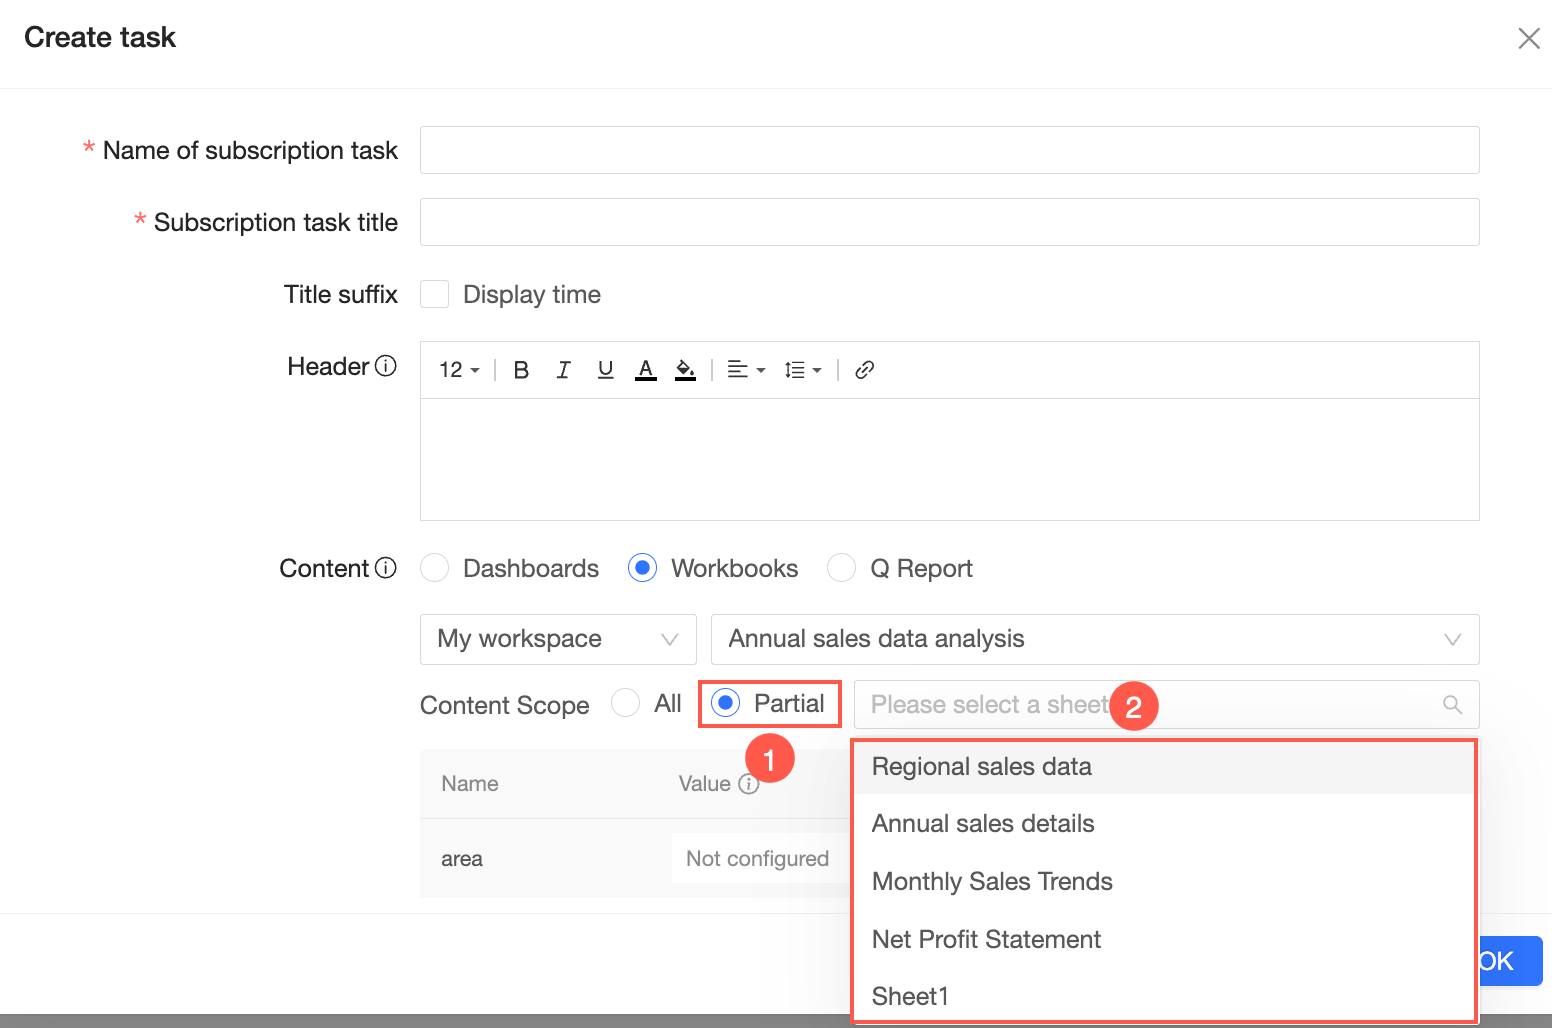
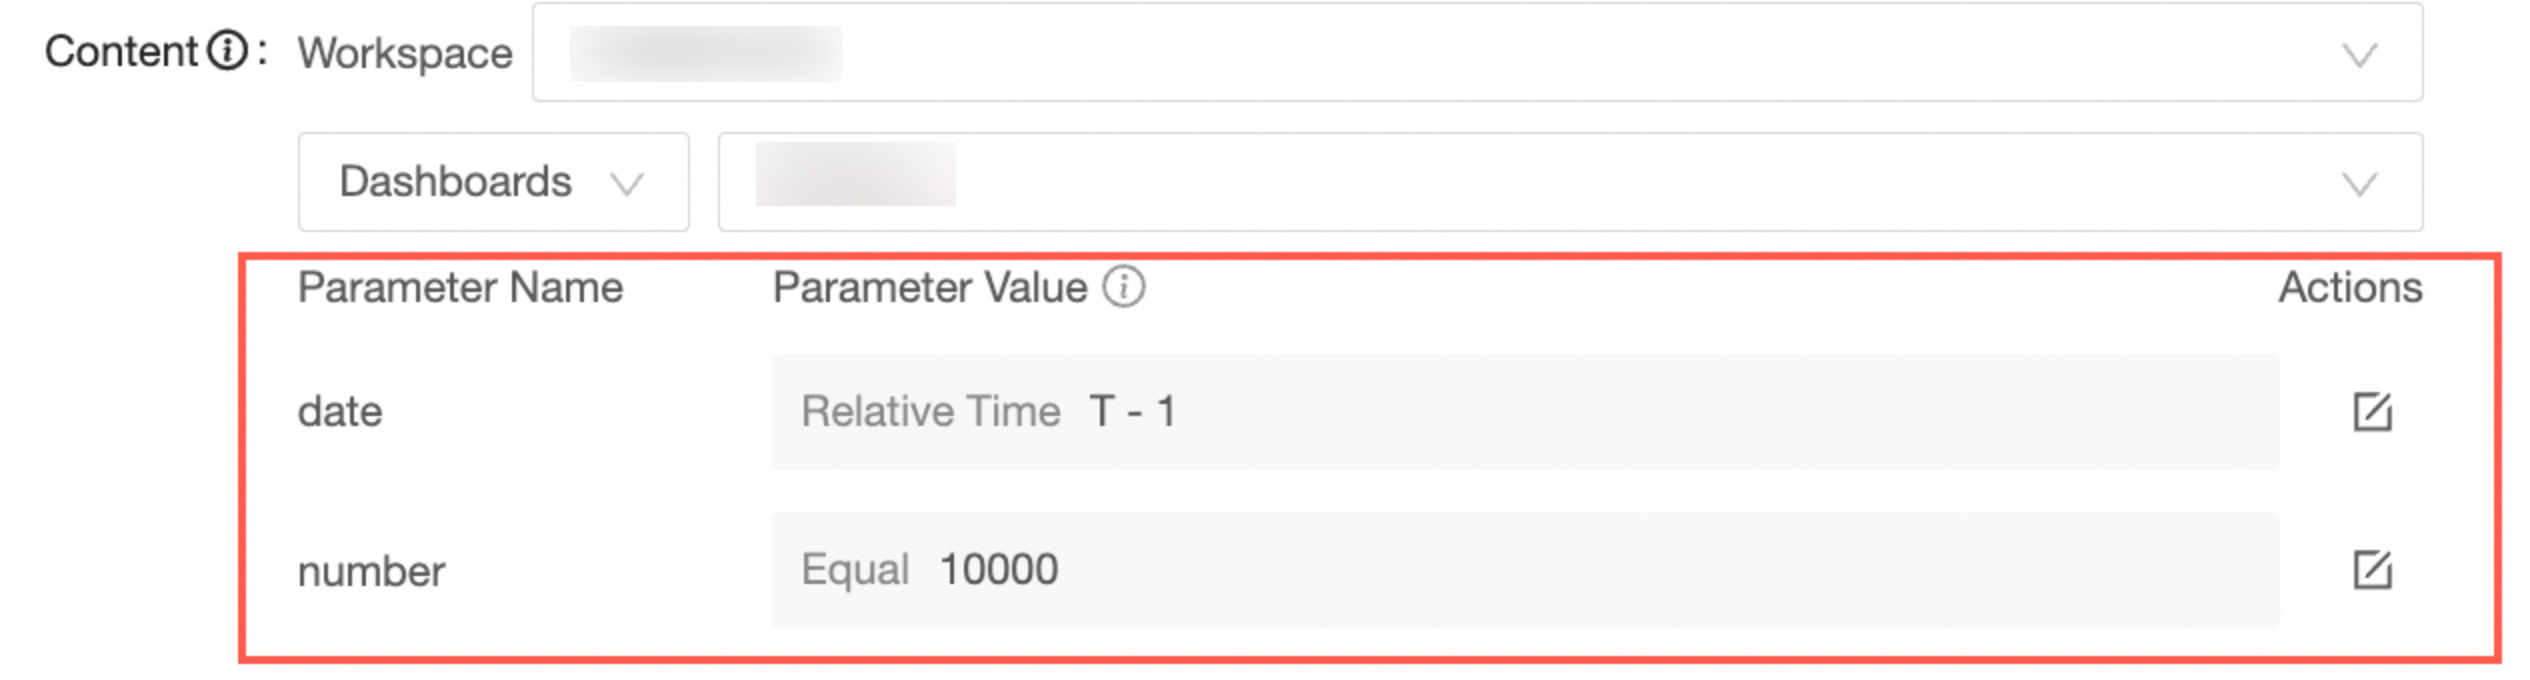
Content
Select the workspace and report type. Supported types: dashboard and workbook.
For dashboard subscriptions, choose entire content or partial content for component-level selection.
-
Entire content: Subscribes to all dashboard components.
-
Partial content: Select specific chart components and dashboard interpretation components.
NoteYou can select up to 50 components.
-
Chart components
Select charts on the canvas or within tabs. Selecting a tab includes all its charts.
-
Dashboard interpretation components
Select Dashboard Interpretation components.
-
Apply query controls
Toggle the
 icon to enable Apply query controls.
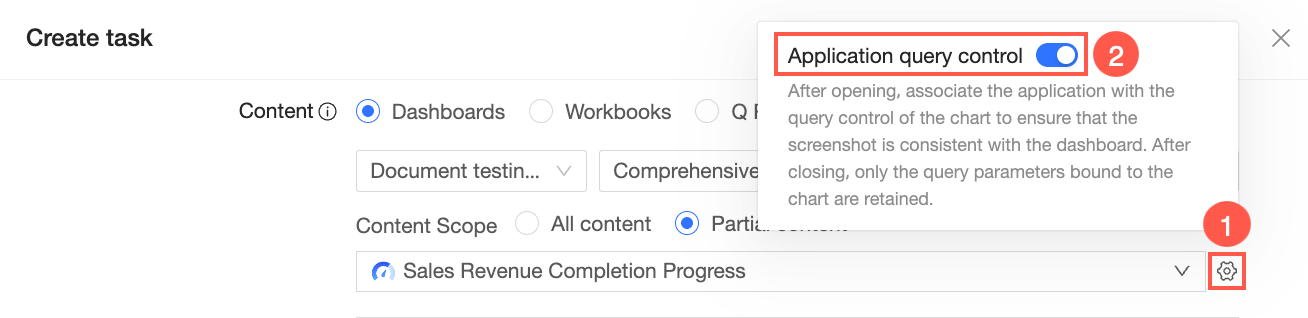 Note
NoteEnabled: query controls associated with the charts apply, so the screenshot reflects the dashboard's current view.
Disabled: only the query parameters bound to the charts are retained.
-
-
For workbook subscriptions, select the workspace and specific workbook.

Subscribe to entire content or partial content for sheet-level selection.
-
Entire content: Subscribes to all sheets in the workbook.
-
Partial content: Select specific sheets.
Note-
You can select up to 50 sheets.
-
Legacy workbooks do not support this feature. Upgrade the workbook to the latest version before creating the subscription.
-
-
-
For Q Report, a list of reports you have View permissions for appears. Select a report.

NoteUse a global parameter to dynamically control subscription results. Configure global parameters.
Footer
Text displayed after the report content in the notification body.
Supports font size, style (bold, italic, underline), font color, background color, alignment, line spacing, and hyperlinks.

Owner
Defaults to the task creator. Transfer ownership from the subscription task list. Transfer task ownership.
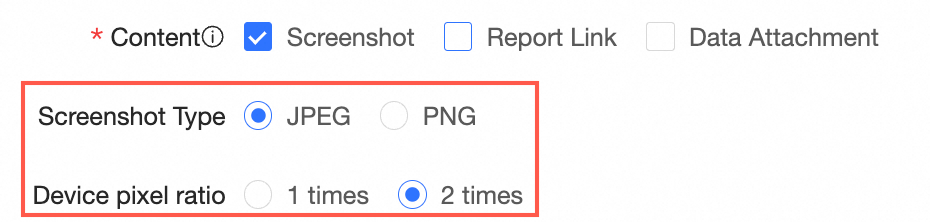
Delivery Content
Select the delivery format: Screenshot, Report Link, or Data Attachment.
NoteYou can send a data attachment only if the notification method is mail, the report allows attachment downloads, and you have export permissions for the workbook.
Screenshot type
When Delivery Content is Screenshot, set the image format (JPEG or PNG) and pixel ratio (1x or 2x).
Attachment Type
Data attachment format. Supported formats: Excel and PDF.
NoteThis option appears only if you select Data Attachment in the Delivery Content field.
Excel Content, Data Format
For Excel attachments, configure the following:
-
Excel Content: For dashboard subscriptions, choose to include all dashboard data or data from a specific chart.

-
Data Format: Choose export with formatting or plain data.
-
Export with formatting preserves data formats and styles from crosstabs or detail tables.
NoteOnly crosstabs and detail tables support formatted export. This option is unavailable if the dashboard contains no such chart types.
-
Plain data exports only plain text data.
-
Page Orientation
For PDF attachments, set Page Orientation to Portrait or Landscape.
Use Portrait for charts with many rows, and Landscape for charts with many columns.

Report Width
Image resolution.
-
Dashboard: default width is 1920 px (PC) or 375 px (mobile).
-
Workbook: default PC width is 1920 px. Customize the mobile width based on the number of data columns.
Display Watermark
Adds the task creator's watermark to screenshots and attachments. Ensure watermarks are enabled for the report itself.
Trigger type
Trigger type for the subscription task: scheduled or URL trigger.
-
Scheduled: Runs at a specified time, for example, daily at 16:35.

-
URL trigger: Generates a unique webhook URL. Send a request to this URL to trigger the task.
After you click OK, the webhook URL appears in the Configure URL trigger dialog box. You can also copy it later from the Trigger type column on the Subscriptions page. Get a URL trigger address.
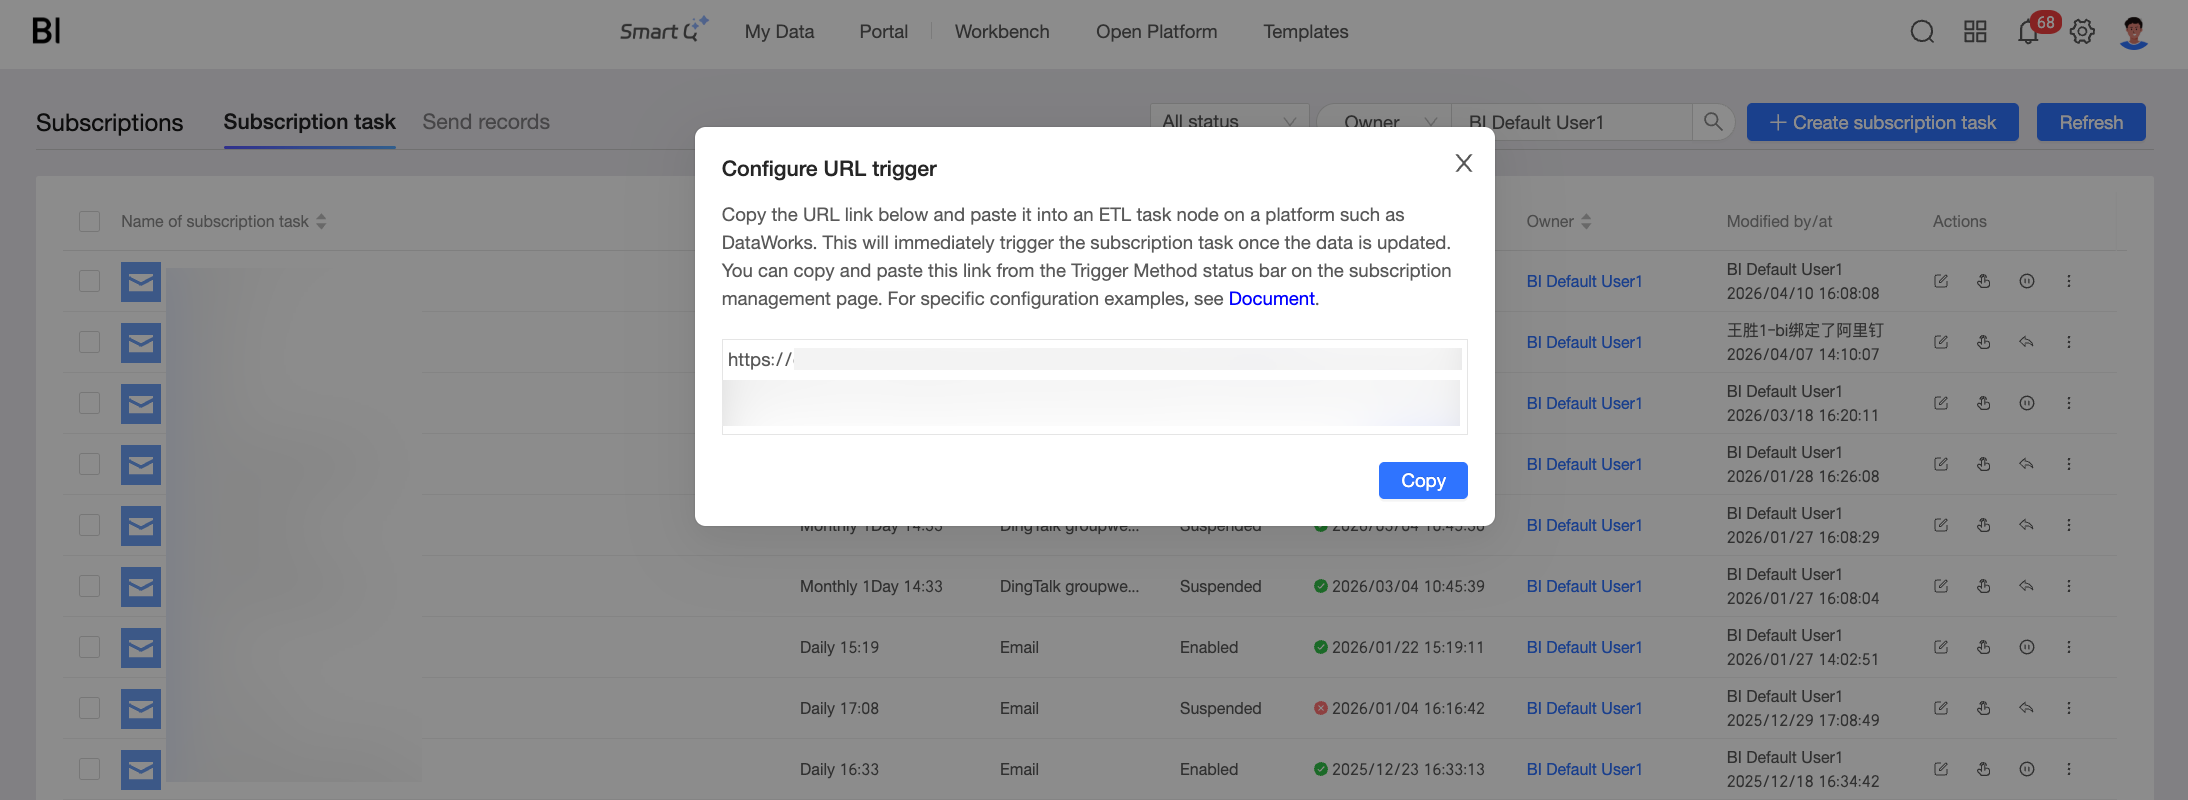
Integrate this URL into external systems or automation workflows to trigger the subscription on demand.
Empty data handling
Available when the subscribed content is a dashboard and the trigger type is scheduled. Prevents sending notifications for empty reports.
Toggle (
 ) to enable empty data handling, and click the settings icon (
 ) to configure rules.
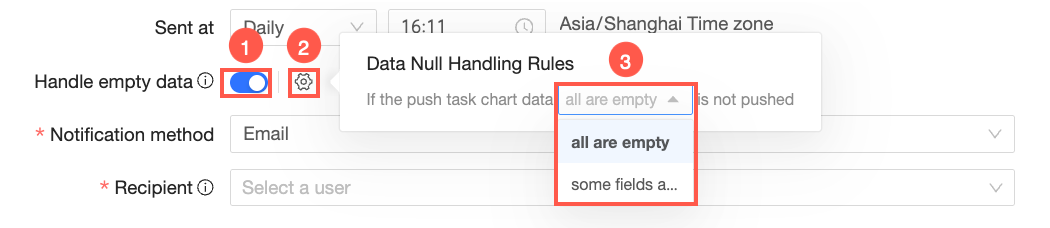
When enabled, if a chart's data is empty, delivery is delayed and retried every 30 minutes. The retry count (up to four) depends on the delivery cycle. If data remains empty after all retries, the task fails and the owner is notified.
NoteThe following dashboard components are not checked for empty data:
-
Query controls
-
Rich text
-
Q interpretation components
-
Storylines
-
Notes or endnotes in chart components
Notification method
Delivery channel. Quick BI supports five methods: mail, DingTalk notification, Lark notification, WeCom notification, and custom channel. DingTalk, Lark, and WeCom support sending to an individual or a group.
 Note
NoteQuick BI Enterprise Standard supports only the mail method.
Recipient, Recipient group
For mail notifications:
-
Select multiple recipients. Recipients must be Alibaba Cloud accounts within the same organization.
NoteA grayed-out recipient name indicates the account has no associated email address. Ensure all recipients have configured their email addresses.
-
Bind an email address for subscriptions in Personal settings:
-
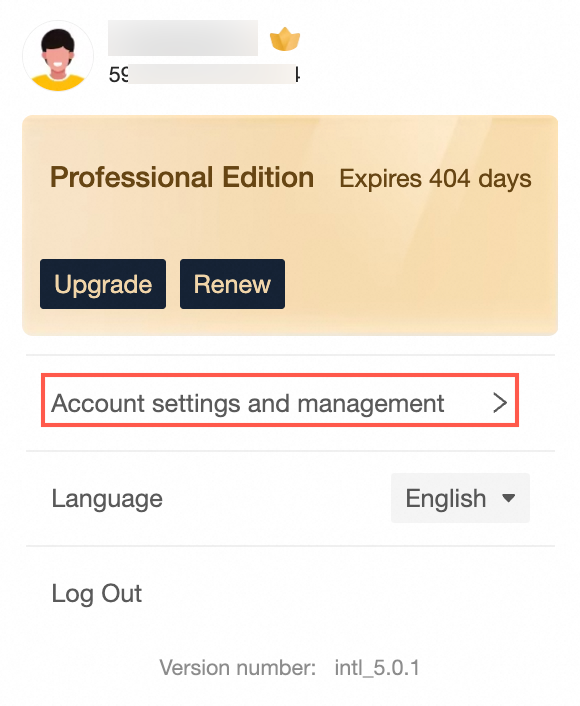
Hover over your profile picture in the upper-right corner.
-
Select Account Settings & Management from the drop-down menu.
On the Account Settings & Management page, go to the Account Binding tab to bind your subscription email address.
-
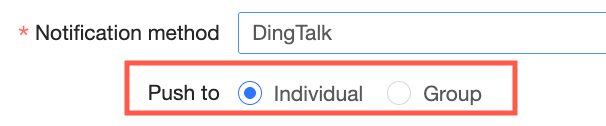
For DingTalk/Lark notifications:
-
Send to individual
-
Select multiple recipients. Recipients must be Alibaba Cloud accounts within the same organization.
-
-
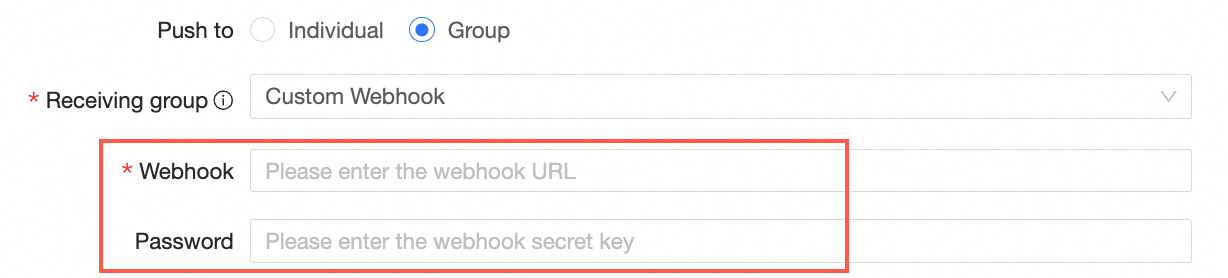
Send to group
-
Select a recipient group and choose a custom webhook.

-
Enter the webhook URL and secret key. To obtain a DingTalk group bot webhook URL, see DingTalk bot channel.
-
The secret key is the signature value obtained from the custom channel.
-
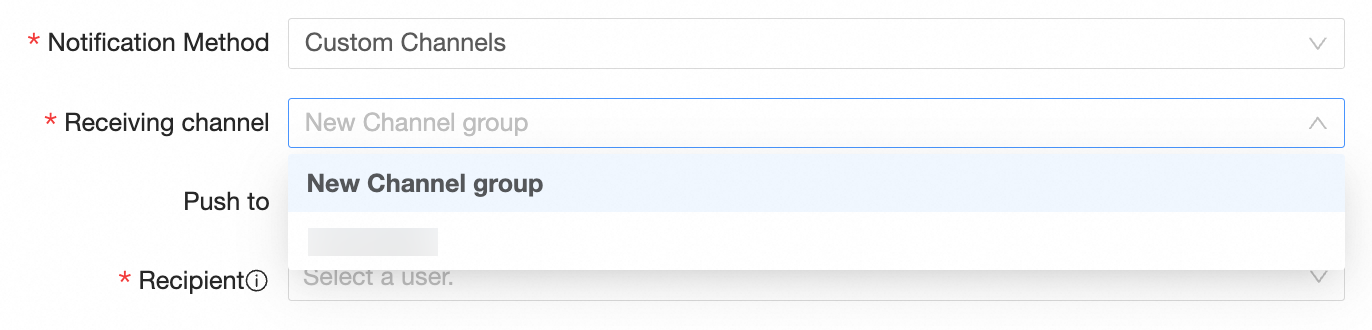
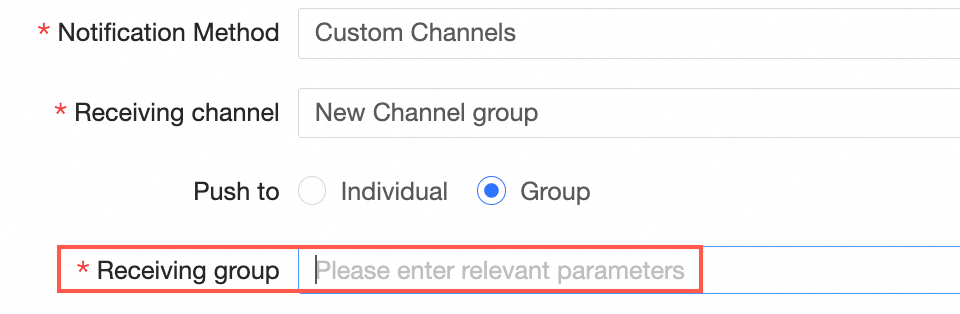
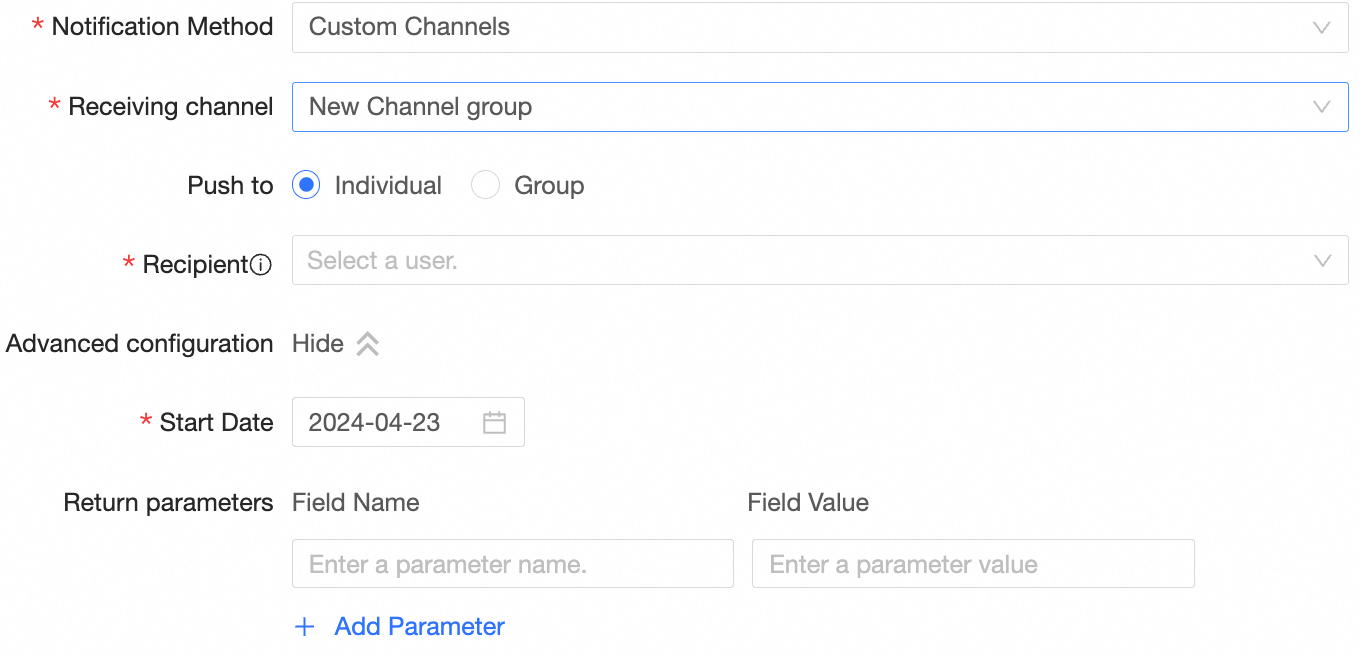
For custom channel notifications:
-
Receiving Channel
Select a pre-configured custom receiving channel. To create one, see Custom channel.
-
Send to individual
-
Select multiple recipients. Recipients must be Alibaba Cloud accounts within the same organization.
-
-
Send to group
-
Enter the parameters defined in the custom channel.
-
Advanced configuration
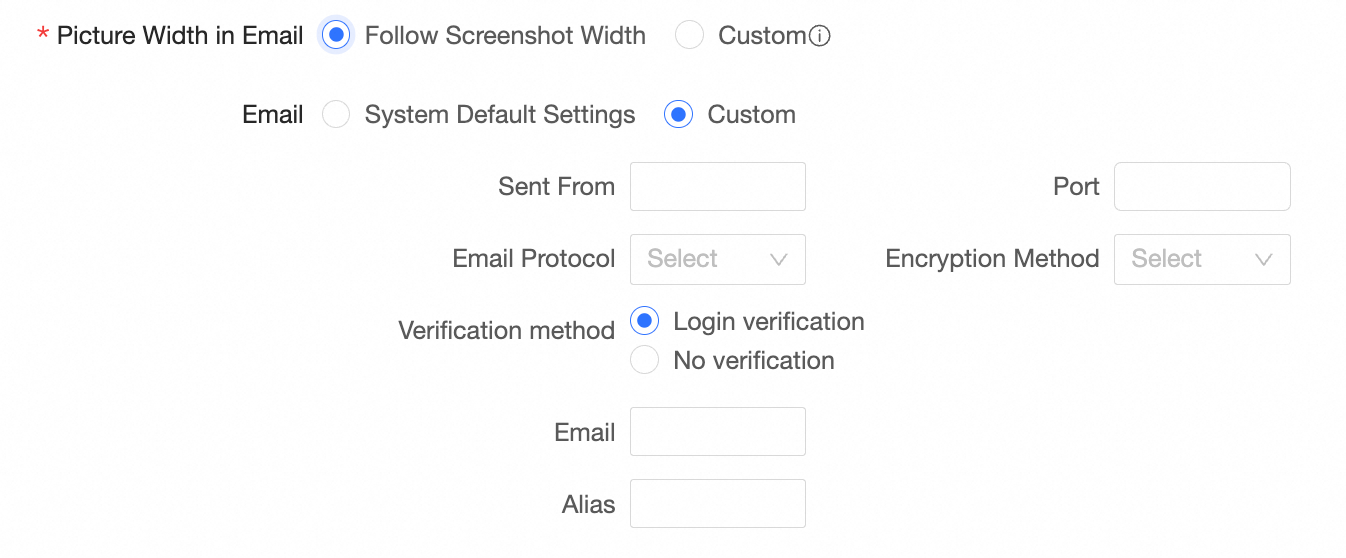
For mail notifications, configure the following advanced parameters:
-
Start Date: Date when the subscription task becomes active.
-
Split large images: Improves image quality in email clients that compress large images. Large images are split into a seamless mosaic of smaller images.
-
Email Image Width: Sets a fixed width for email images that are not responsive.
-
Sender email: Use the data platform's email service or a custom email.
For custom email, configure:
-
Sender email and Password: Email account and password for sending subscriptions.
-
Sending server and Port: SMTP server address and port.
-
Email protocol: SMTP or SMTPS.
-
Encryption method: SSL, STARTTLS, or none.
-
For Login Verification authentication, enter the sender email, password, and nickname. For No Authentication, no password is required.
 Note
NoteThe split large images and sender email options are available only when the notification method is set to mail.
-
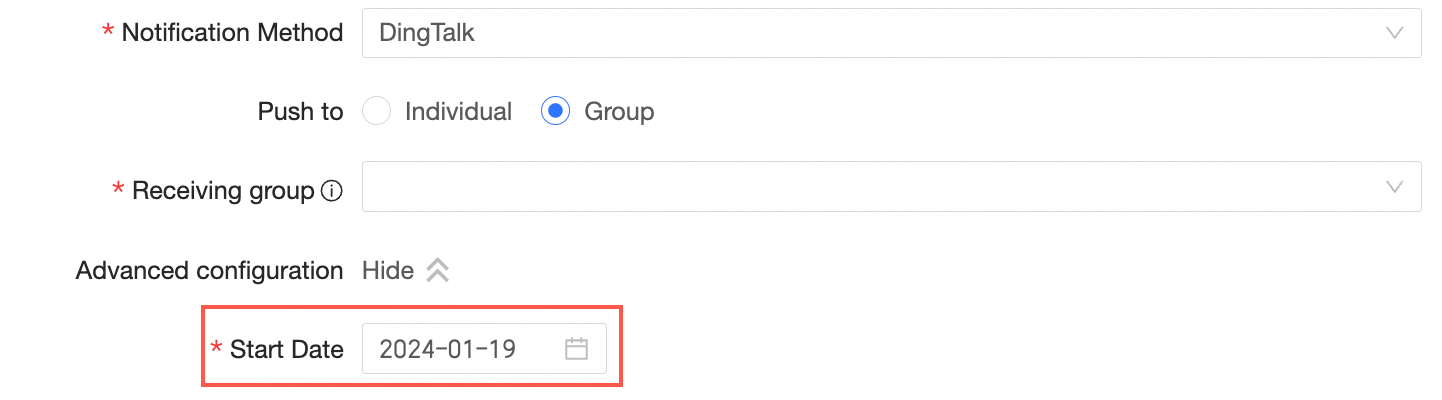
For DingTalk or Lark notifications:
-
Start date: Date when the subscription task becomes active.
For custom channel notifications:
-
Start date: Date when the subscription task becomes active.
-
Callback parameters: Add custom parameters (name-value pairs), up to 5.
-
-
Click Save to create the subscription task.
Next Steps
After creating a subscription task, manage the task and view delivery records. Manage Subscription Tasks.