Quick BI's bot channel manages enterprise message channels for sending alerts and approval notifications. You can configure external ports to receive these messages across multiple channels.
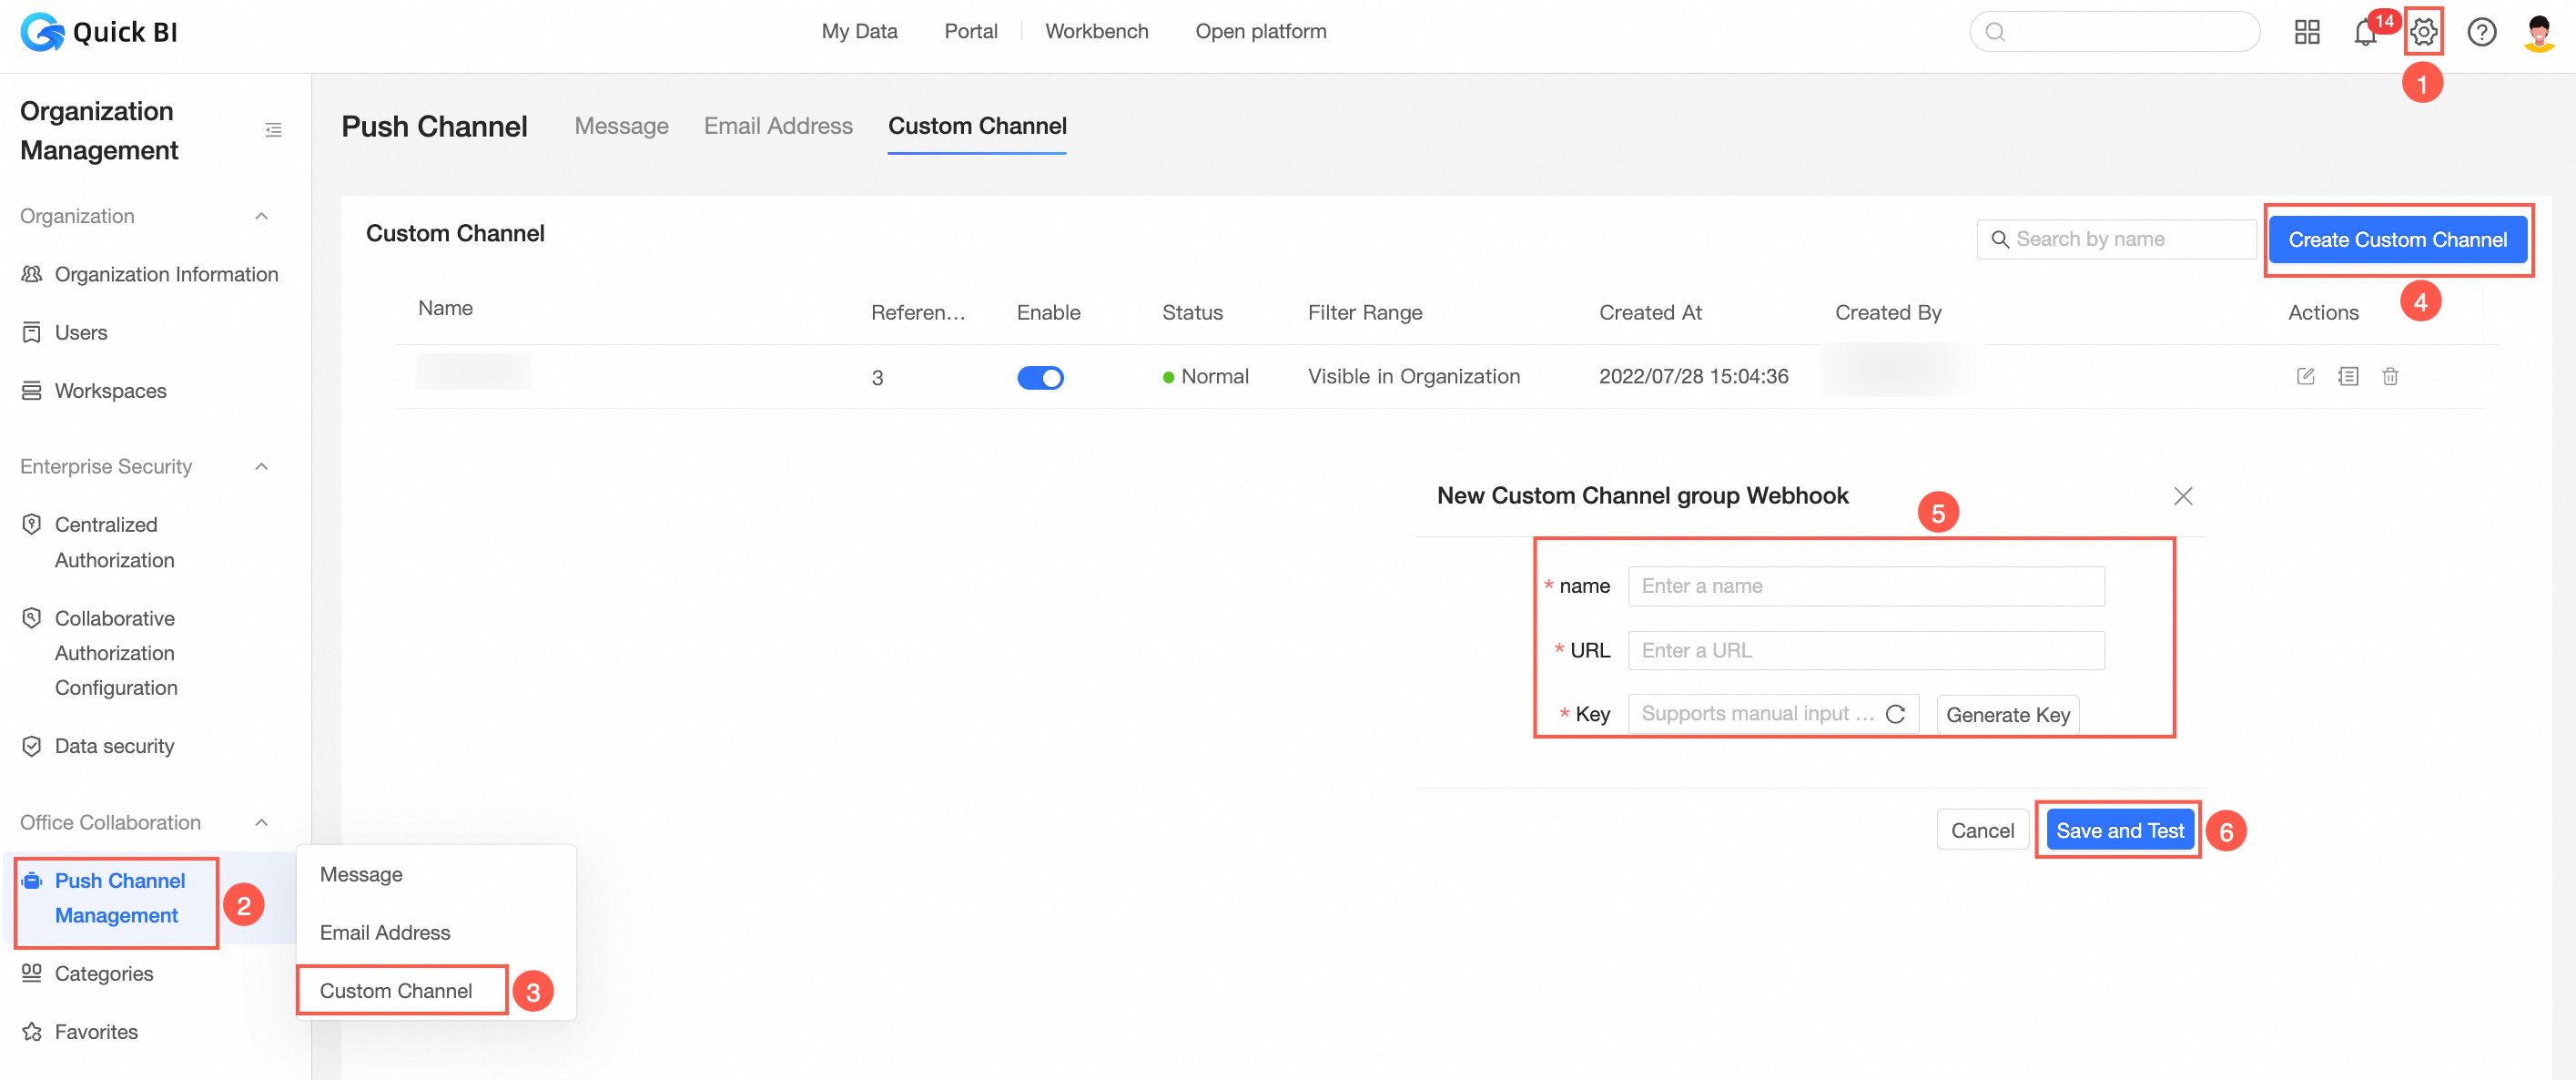
Create a Custom Channel
-
Log on to the Quick BI console.
-
Navigate to the custom channel creation page from the Quick BI product home page as shown in the figure below.

-
In the Create Custom Channel dialog box, set the following parameters.

Parameter
Description
Name
Enter a name for the custom channel.
Push Address
Enter the endpoint URL of the custom channel that will receive messages.
The endpoint must support the
POSTrequest method.Request Add Key
Enter the signing key of the custom channel to verify request signatures.
You can enter the key manually or click Auto-generate Key to generate one automatically.
The receiver must verify the signature of incoming messages.
-
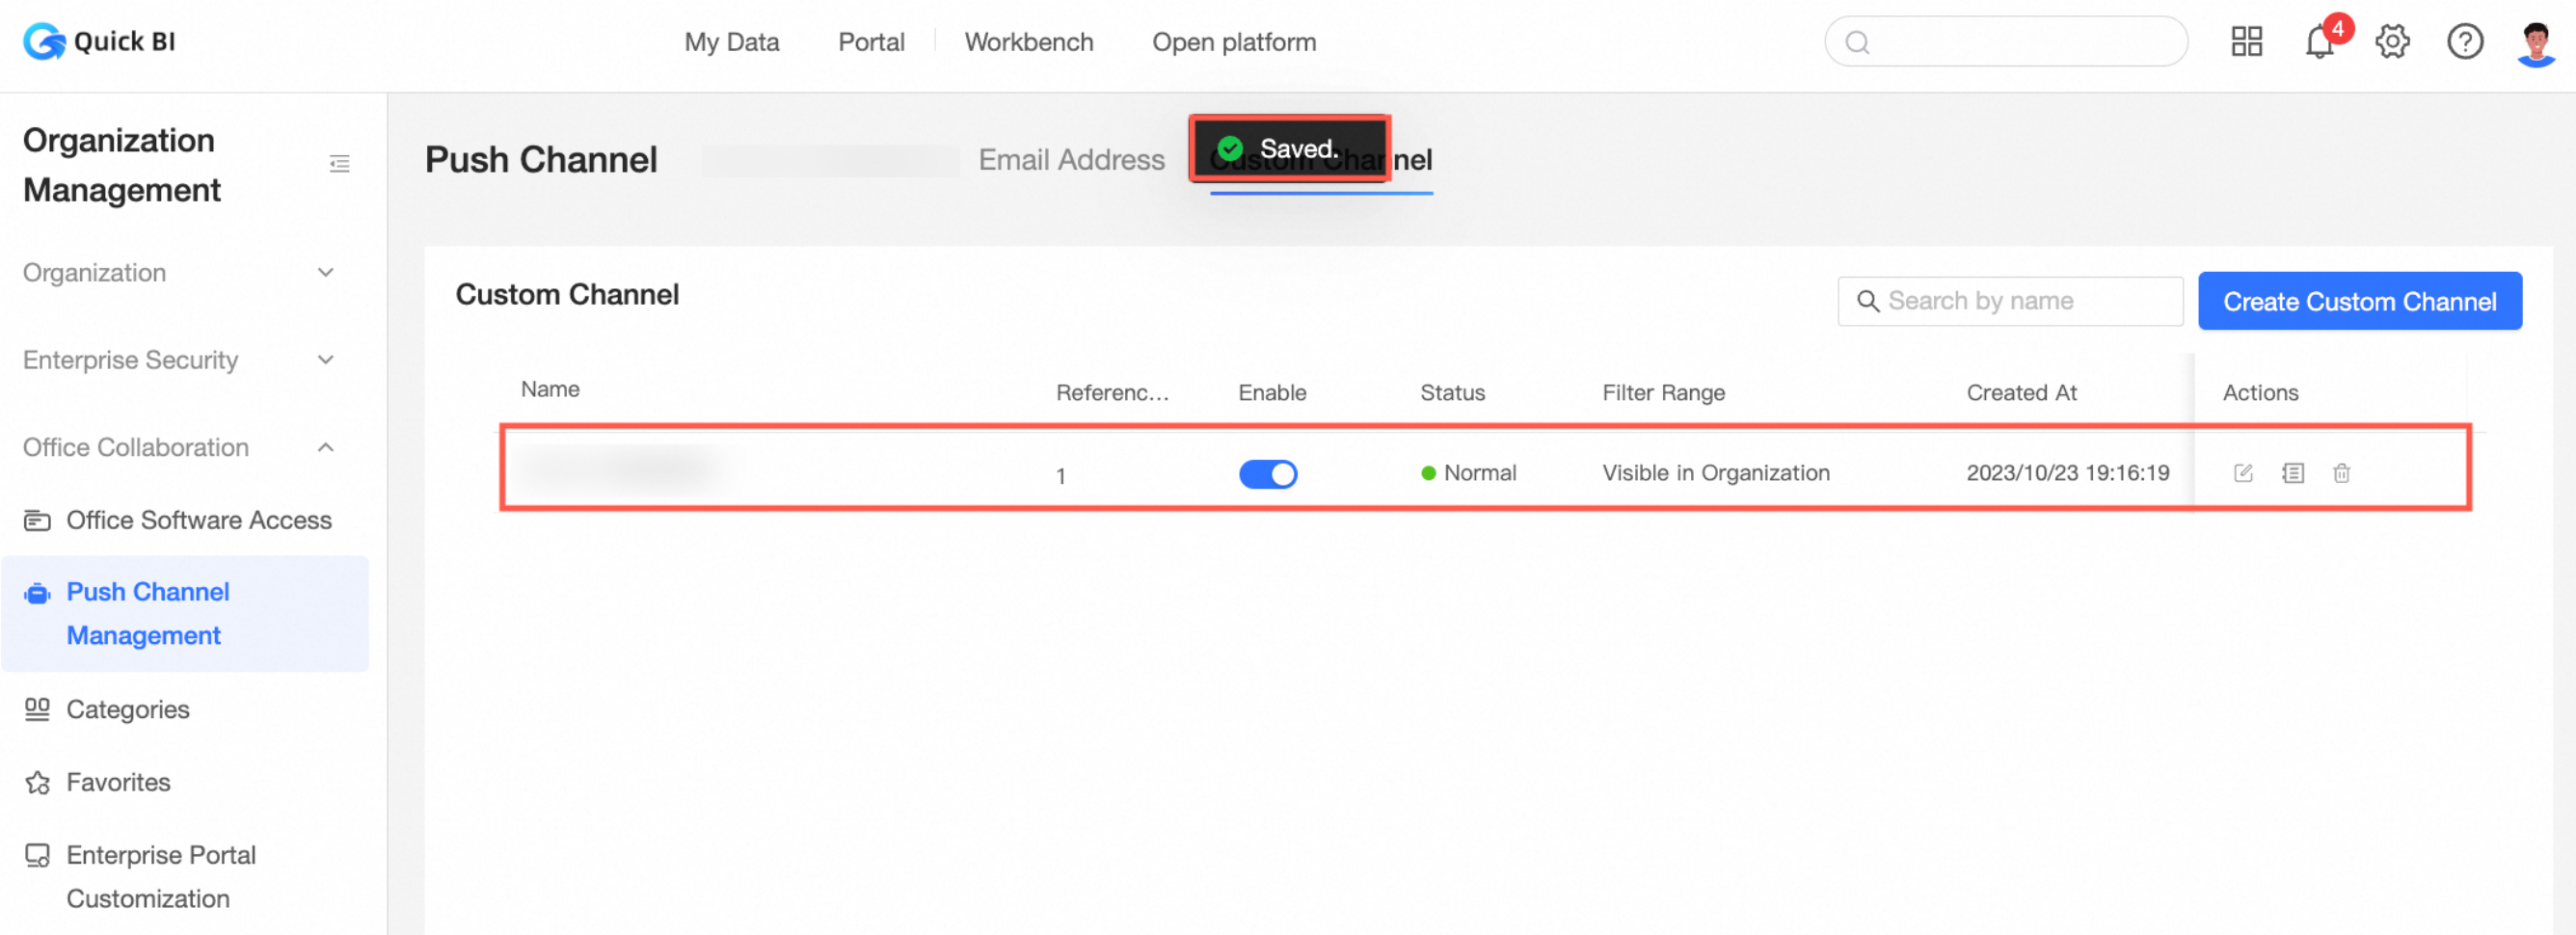
Click Save And Test.
After the channel is saved, it appears in the bot channel list.
Configure a Custom Channel When Receiving Subscriptions
When creating a subscription, include the custom channel in the alert method configuration.
-
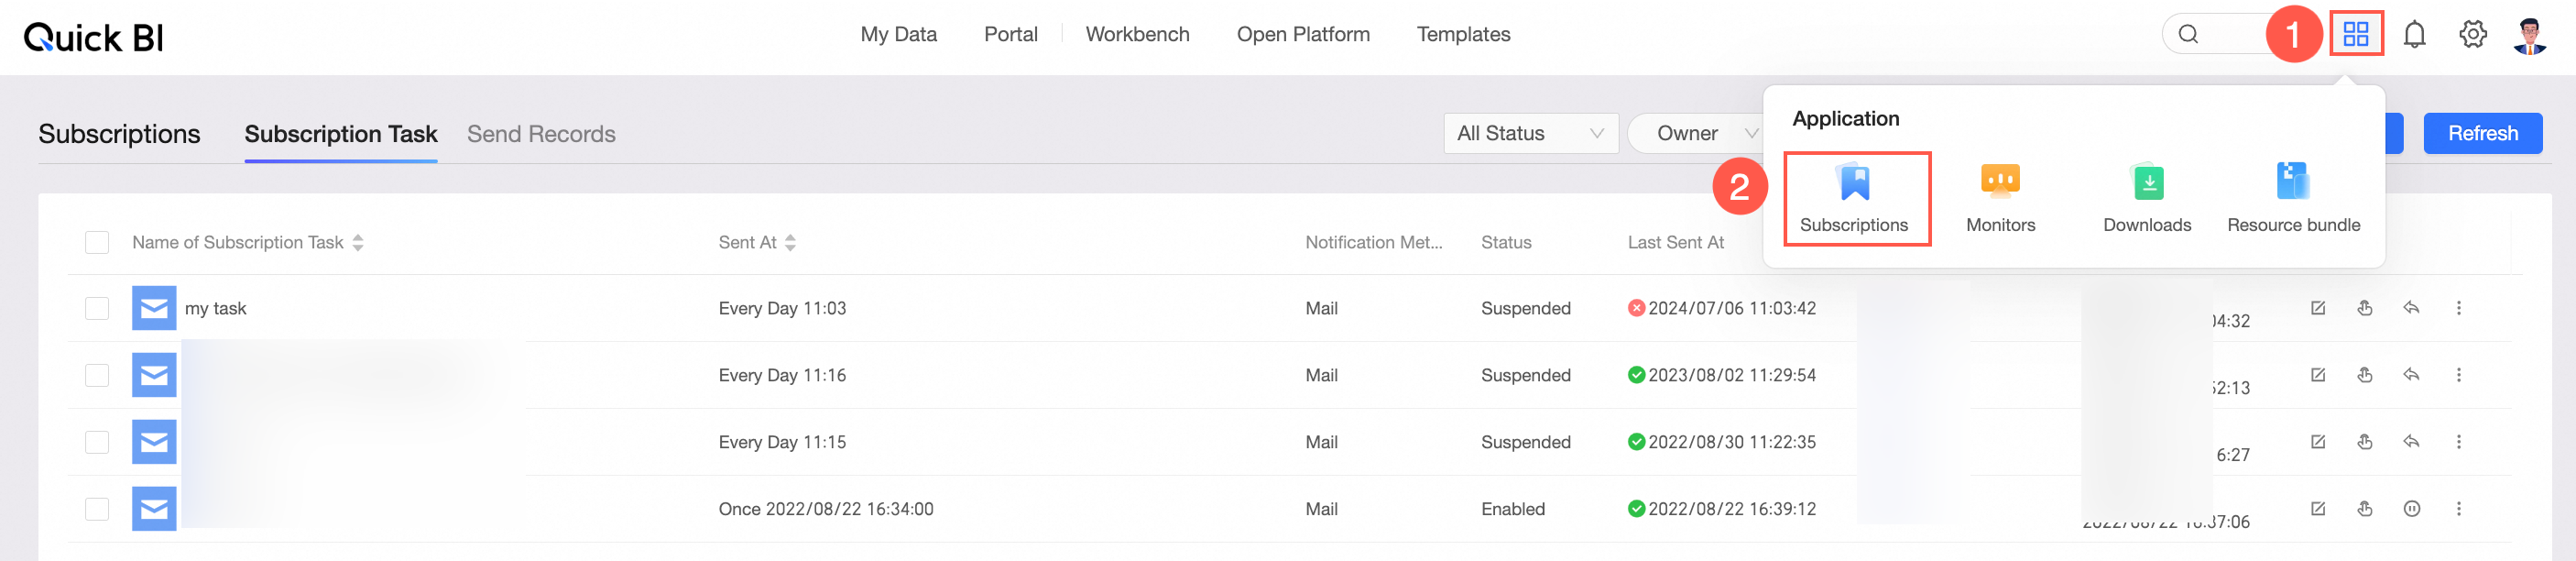
Access the subscription management page from the Quick BI home page.
-
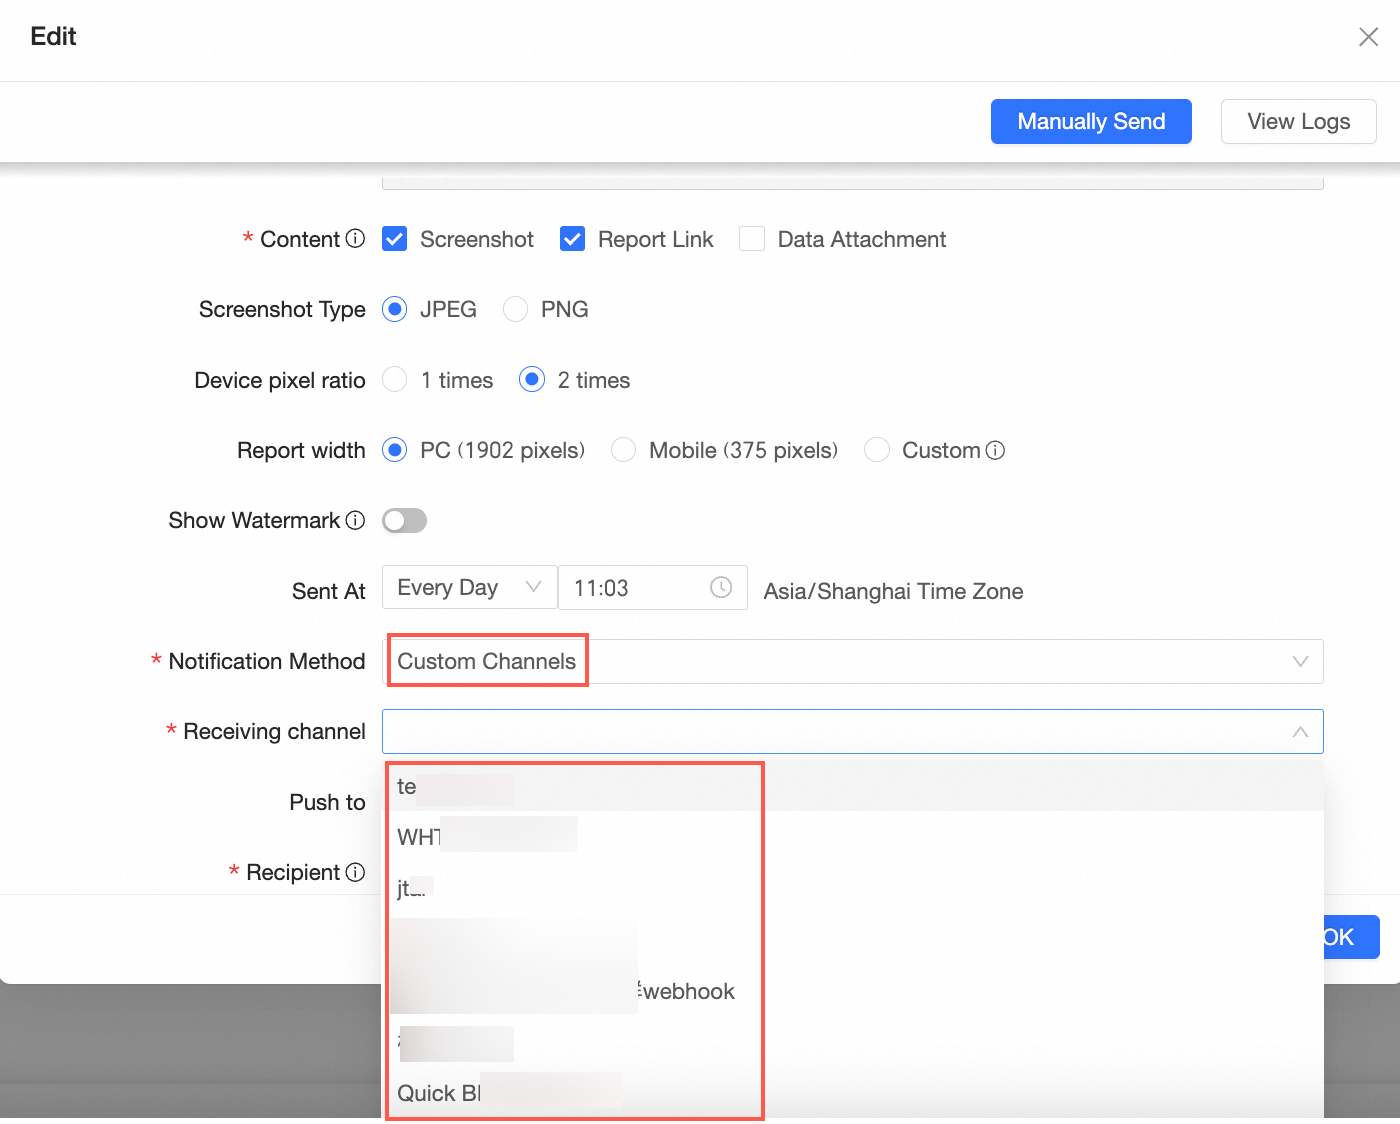
During subscription task creation, choose Custom Channel as the Receiving Method to see the custom channel under Receiving Channel.
For more information, see Create a Subscription Task.
-
The message format for subscription notifications to custom channels is as follows:
{
    "schema":"1.0",
    "header":{
        "organizationId":"b5fb3d10xx",  # Organization ID
        "eventId":"bc679418-9e7xx",      # Unique Event ID
        "createTime":"1705398011696",
        "eventType":"SUBSCRIBE"  # Event type, subscribe; used to determine business logic
    },
    "event":{
        "createTime":"1705397830000",
        "customParams":"{\"param\":\"this is a test\"}",   # Custom parameters in the subscription. JSON format, key structure.
        "customReceiveGroups":"xxx",   # Custom receiving groups
        "customReceiveUsers":[   # Custom recipients.
            {
                "nick":"Zhang San",     # Nickname
                "accountId":"cQUPAaY81L", # Third-party account ID saved in Quick BI
                "accountType":4,   # Account type.
                "userId":"053da9"   # Quick BI userId
            }
        ],
        "worksInfo":{              # Report-related information
            "components":[        # Component information
                {
                    "componentId":"123",
                    "componentName":"Cross Table",
                    "componentType":4
                }
            ],
            "worksId":"0458e831-0250-486",   # Report ID
            "worksName":"Ranking List",             # Report name
            "worksType":"PAGE",
            "workspaceName":"Li Si Resource Plan Import",    # Workspace name
            "workspaceId":"3e60ee7f-a99f-4231-913",   # Workspace ID
            "worksUrl":"https://baidu.com/xxxx"       # Report preview URL

        },
        "subscribeId":"73a1d0b2420",          # Subscription ID
        "taskId": "4899407788885930938",      # Subscription task ID
        "ownerId":"fec0741443204",            # Subscription task owner
        "title":"Custom Webhook Push Channel",        # Subscription task title
        "subject":"Custom",                     # Subscription task subject
        "content":{         # Subscription task text
            "head":"<p style=\";\">Custom Webhook Push Channel</p>",
            "tail":"<p style=\";\">Custom Webhook Push Channel</p>"
        },
        "snapshot":{
            "images":[           # Screenshot attachments
                {
                    "name":"2467699471858258259-1.jpeg",
                    "url":"https://qbi-dev.cn-shanghai.aliyuncs.com/xxxx"
                }
            ],
            "pdfs":[            # PDF attachments
                {
                    "name":"2467699471858258259-1.pdf",
                    "url":"https://qbi-dev.cn-shanghai.aliyuncs.com/xxxx"
                }
            ],
            "excels":[          # Excel attachments
                {
                    "name":"2467699471858258259-1.xlsx",
                    "url":"https://qbi-dev.cn-shanghai.aliyuncs.com/xxxx"
                }
            ]
        }
    }
}
Configure a Custom Channel When Receiving Alerts
Add the custom channel to the alert method when monitoring metrics.
-
Go to the metric monitoring page from the Quick BI home page as shown in the figure below.

-
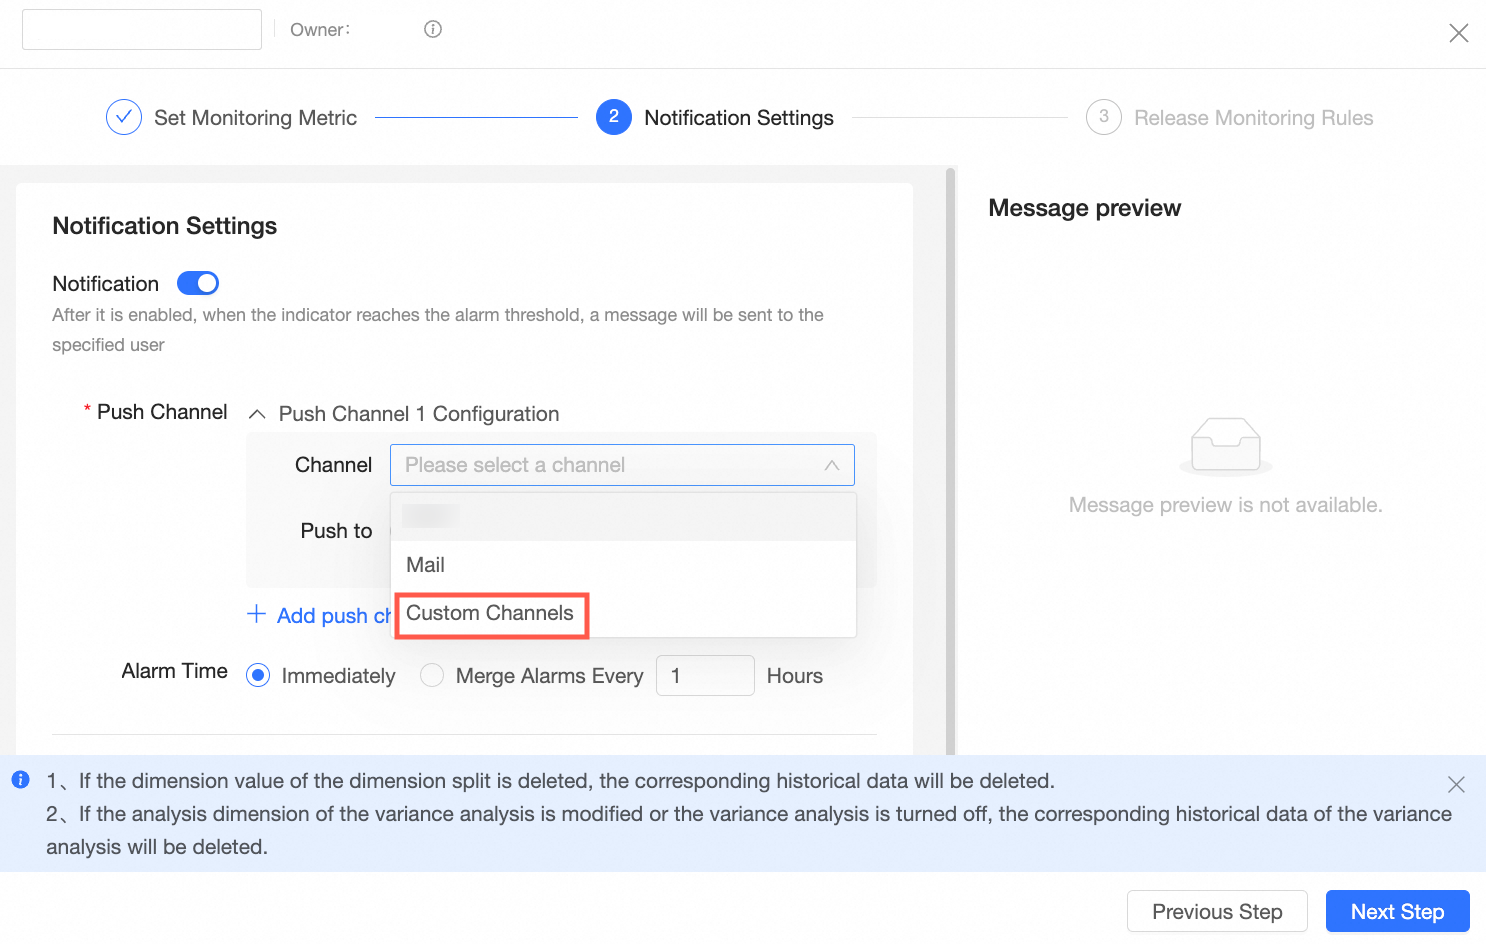
In the Monitor Alert Settings dialog box, select Custom Channel as the alert method to view the custom channel under Custom Channel.
 For more details, see Configure Monitoring.
Configure a Custom Channel in Report Task Issuance
-
Select Custom Channel when setting up Report Task Issuance for data reporting.

-
The message format for report task notifications to custom channels is as follows:
{
 "deadlineTime": "2024-07-26 20:00:00", # Reporting deadline
 "taskUrl": "https://bi.aliyun.com/xxx", # Reporting link
 "taskTitle": "Report Task Name", # Report task name
 "sendTime": "2024-07-04 19:19:20", # Report task issuance time
 "dashboardName": "Wang Wu's Report" # Report name
}
Configure a Custom Channel in External Approval Electron Stream
Organization administrators can integrate the custom channel into external approval processes.
-
Create a custom channel in the configuration management page as shown in the figure below.
-
Enable the custom approval channel on the collaboration configuration page.
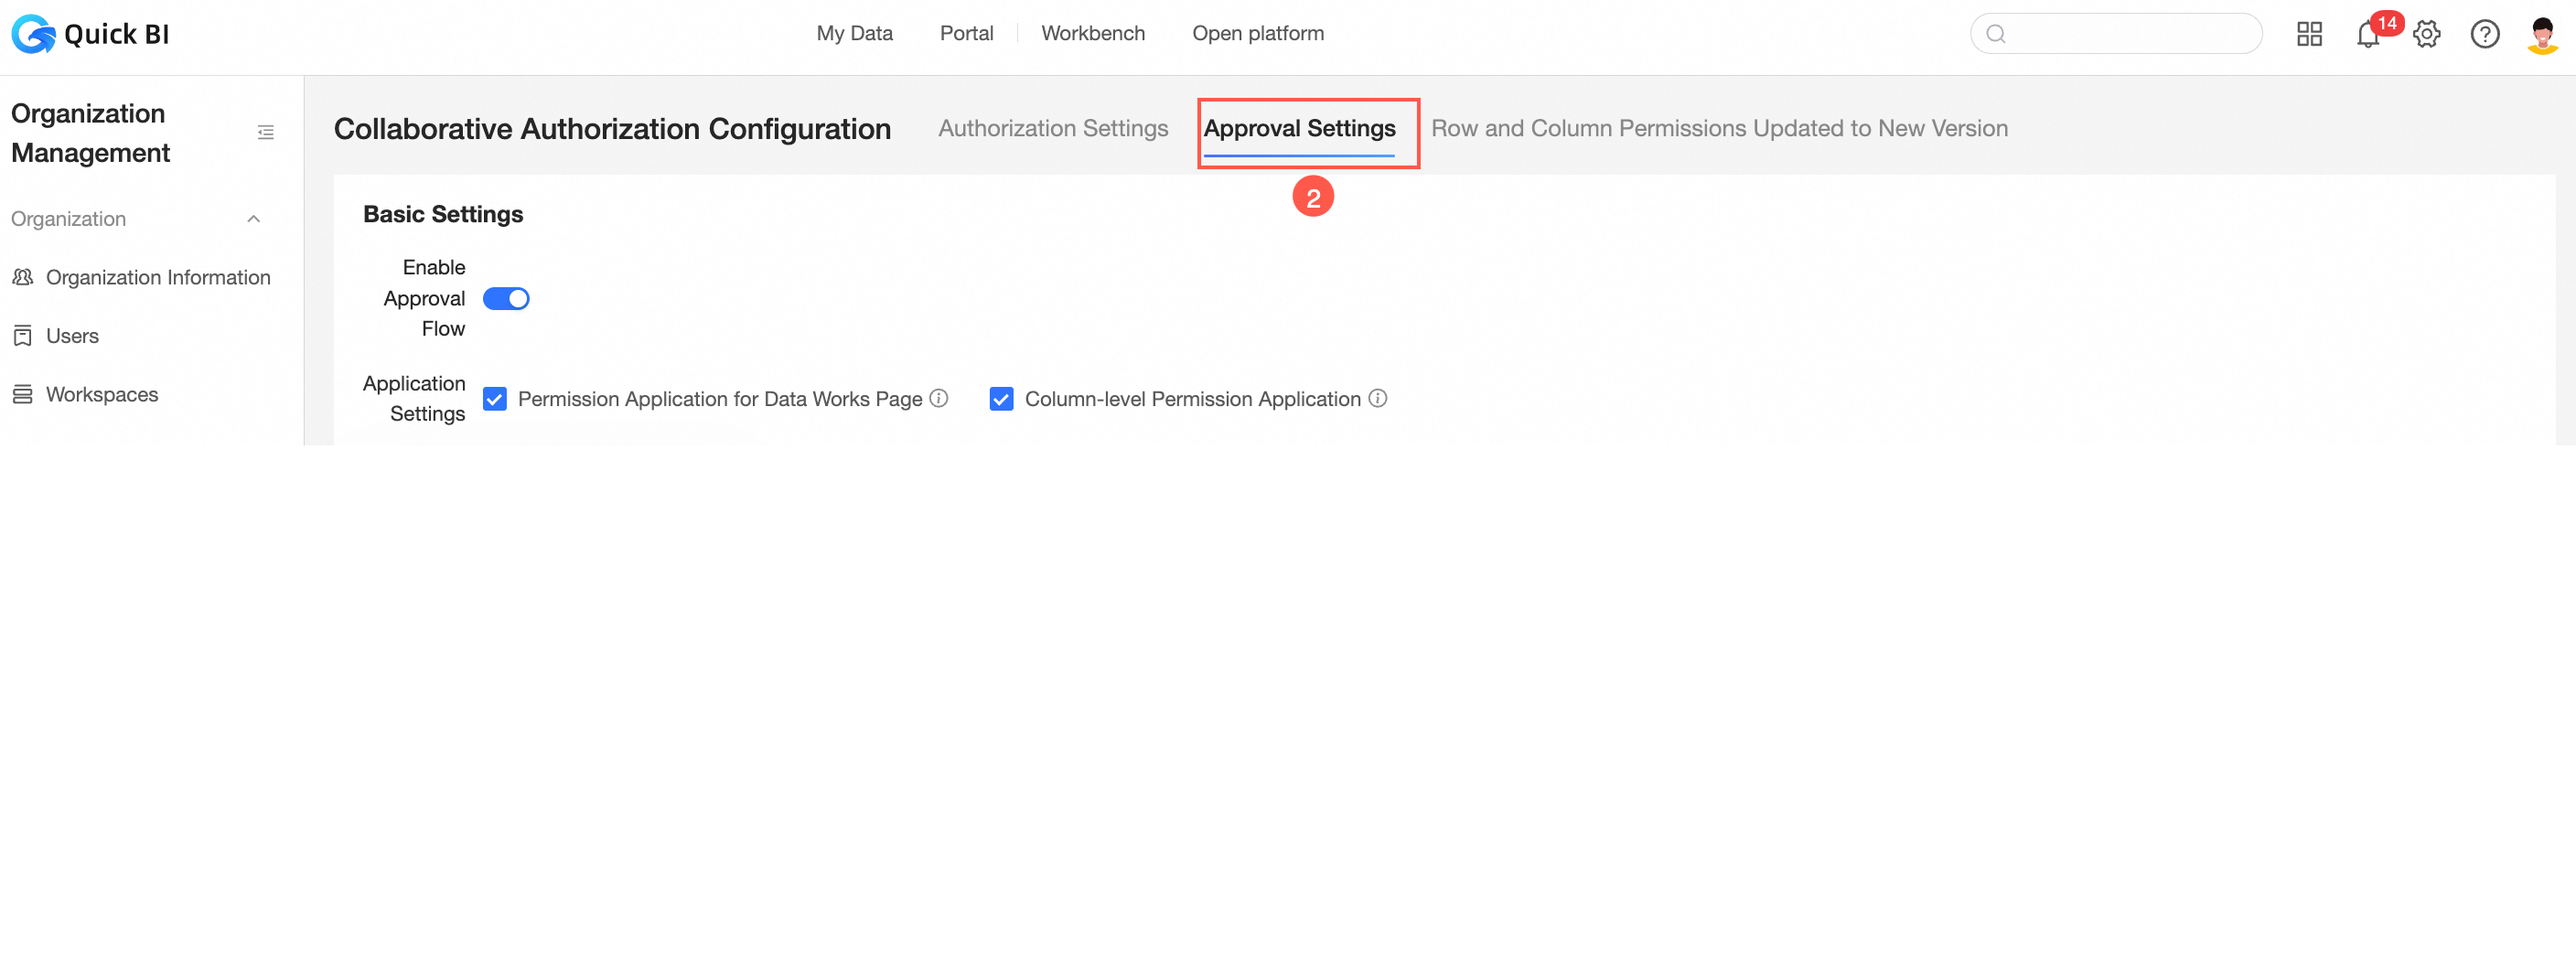
After you enable this option, the custom channel receives application notifications when users request access to Quick BI resources.
-
The message format for Quick BI approval notifications to custom channels is as follows:
{
    "authPointsValue":3,    # Permission points.
    "resourceId":"b8b5392b-bb44-4bd8-e9642787e8d",   # The ID of the resource for which permissions are requested.
    "resourceName":"20 widgets on the first screen (8 on the mobile client's first screen)",     # The report resource name.
    "approverId":"e52b777a1dde4bfb94f91e18128bcfb0",  # The approver UID.
    "roleId":0,
    "applyReason":"123123",              # The reason for the request.
    "extInfo": [                         # Extended information. If the resource type is dataFormInsertData, this field displays the name, type, and submitted information for each control in the user-submitted form.
      {
          "data": {                     # The data entry information of the control.
            "63912418-e311-4573-84be-1f732ffd9f35": 20,   # The control ID and its submitted value.
            "f9a46753-98a1-4709-9327-949c6a03af08": "test",
            "ffe8327a-9de8-4699-a23a-097088a22d2e": "test1"
          },
          "dataId": null,               # The data record ID.
          "dataWithComponent": {        # The details of the control.
            "63912418-e311-4573-84be-1f732ffd9f35": {   # The control ID.
            "componentType": "number",  # The control type.
            "data": 20,                 # The value submitted by the user in this control.
            "label": "Age"              # The control name.
          },
            "f9a46753-98a1-4709-9327-949c6a03af08": {
            "componentType": "text",
            "data": "test",
            "label": "Remarks"
          },
            "ffe8327a-9de8-4699-a23a-097088a22d2e": {
            "componentType": "text",
            "data": "test1",
            "label": "Name"
          }
        }
      }
    ],
    "resources": [                       # Menu information. This field is available only for BI portals.
      {
          "resourceId": "a8d78c04-df99-42c3-a0a2-dbe7350b077c",  # The menu ID.
          "resourceName": "Level-3 menu",     # The menu name.
          "resourceType": "0"            # The menu type.
      }
    ],
    "applicantName":"Mr. Zhang",                 # The requester nickname.
    "gmtCreate":1705399339000,               # The creation time.
    "approverName":"Ms. Wang",                  # The approver nickname.
    "expireDate":1708077734000,              # The permission validity period.
    "workspaceName":"Quick BI Assessment Workspace",        # The workspace name.
    "applicantId":"e9a40c524ef8471faefbd",   # The requester UID.
    "applicationId":"b31c8cf5-aa31-42f7-927a-da3cb2feefd4",  # The approval ID.
    "resourceType":"dashboard"               # The resource type.
}
Note 1: The resources field, which contains menu information, is available only for BI portal approvals. The resourceType in resources supports only the following types:
The resourceType in resources supports only the following types:
-
0: Dashboard
-
2: Workbook
-
5: Data Entry
-
6: Downloads
-
7: Ad hoc analysis
-
8: Data dashboard
Note 2: The following table describes the resource types. The resource types are case-insensitive.
-
dataProduct: BI portal
-
portal_menu: BI portal menu
-
dashboard: Dashboard
-
screen: Data dashboard
-
report: Workbook
-
ANALYSIS: Ad hoc analysis
-
dashboardOfflineQuery: Downloads
-
dataForm: Data Entry
-
cube: Dataset
-
datasource: Data source
-
dataFormInsertData: Data entry to storage
Note 3: The following table describes the authPointsValue permission points for each resource type.
Resource type
Description of authPointsValue permission points
Data Entry
-
1: Submit data
-
9: Manage own data
-
10: Manage all data
-
11: Edit
Dataset, Data source, Data preparation
-
1: Use
-
11: Edit
Data dashboard, Workbook, Dashboard, Downloads
-
1: View only
-
2: Export
-
3: View and export
-
11: Edit
BI portal
-
BI portal permissions
-
11: Edit
-
-
Menu content permissions
-
Same as above
-
Important
Note: For data entry, the value for managing your own data is 3.
-
-
Appendix: External System Reception and Signature Verification Method
Quick BI uses the POST method for content delivery and appends the following details to the request. The receiving system can verify the sign value for signature authentication.
-
Request Header:
X-TaskId, the unique task ID, allows users to confirm a task request once, perform anti-replay checks, or provide it to Quick BI support for troubleshooting.
-
Request Parameters:
-
timestamp: Timestamp -
nonce: Random string -
sign: Signature information
-
These request parameters are designed for security, allowing the receiving system to perform anti-replay and tamper-proofing checks. The signature is generated as follows:
sign = SHA256.digest(timestamp + nonce + token)-
The
tokenvalue is the Request Add Key generated during channel creation. The receiver must verify thesignagainst expected values. -
Webhooks have a 30-second timeout limit. Process messages asynchronously after reception to prevent retries or failure. Quick BI requires only an HTTP 200 status code and any non-empty text as acknowledgment.