The administrator can configure a Webhook to connect to your first-party system (such as CRM) or third-party system by using the Webhook to send coupons to users in the Quick Audience console. Both the touch marketing and automated marketing modules support Webhooks.
Perform the following steps:
For more information about how to develop a Webhook for one or three systems, see Webhook Integration Documentation.
If the Webhook parameter needs to be called by using character-based parameters, such as using constants or calling the operation, the administrator must configure the parameters before creating a Webhook. For more information, see Parameter Management.
The administrator creates a Webhook to connect to one or more systems. For more information, see New Webhook.
The administrator tests the delivery. Make sure that the delivery is successful. For more information, see Test Sending.
The administrator grants the Webhook permission to non-administrators who need to use the Webhook. For more information, see Authorization.
The administrator or authorized member creates a Webhook task in the Touch Marketing module, or configures a Webhook component in the Automated Marketing module to call one or three systems to send marketing messages. For more information, see New Webhook Task and Data Configuration - Webhook Component.
Add a Webhook
Procedure
Choose Workspace> Configuration Management > Marketing Configuration > Webhook Management.
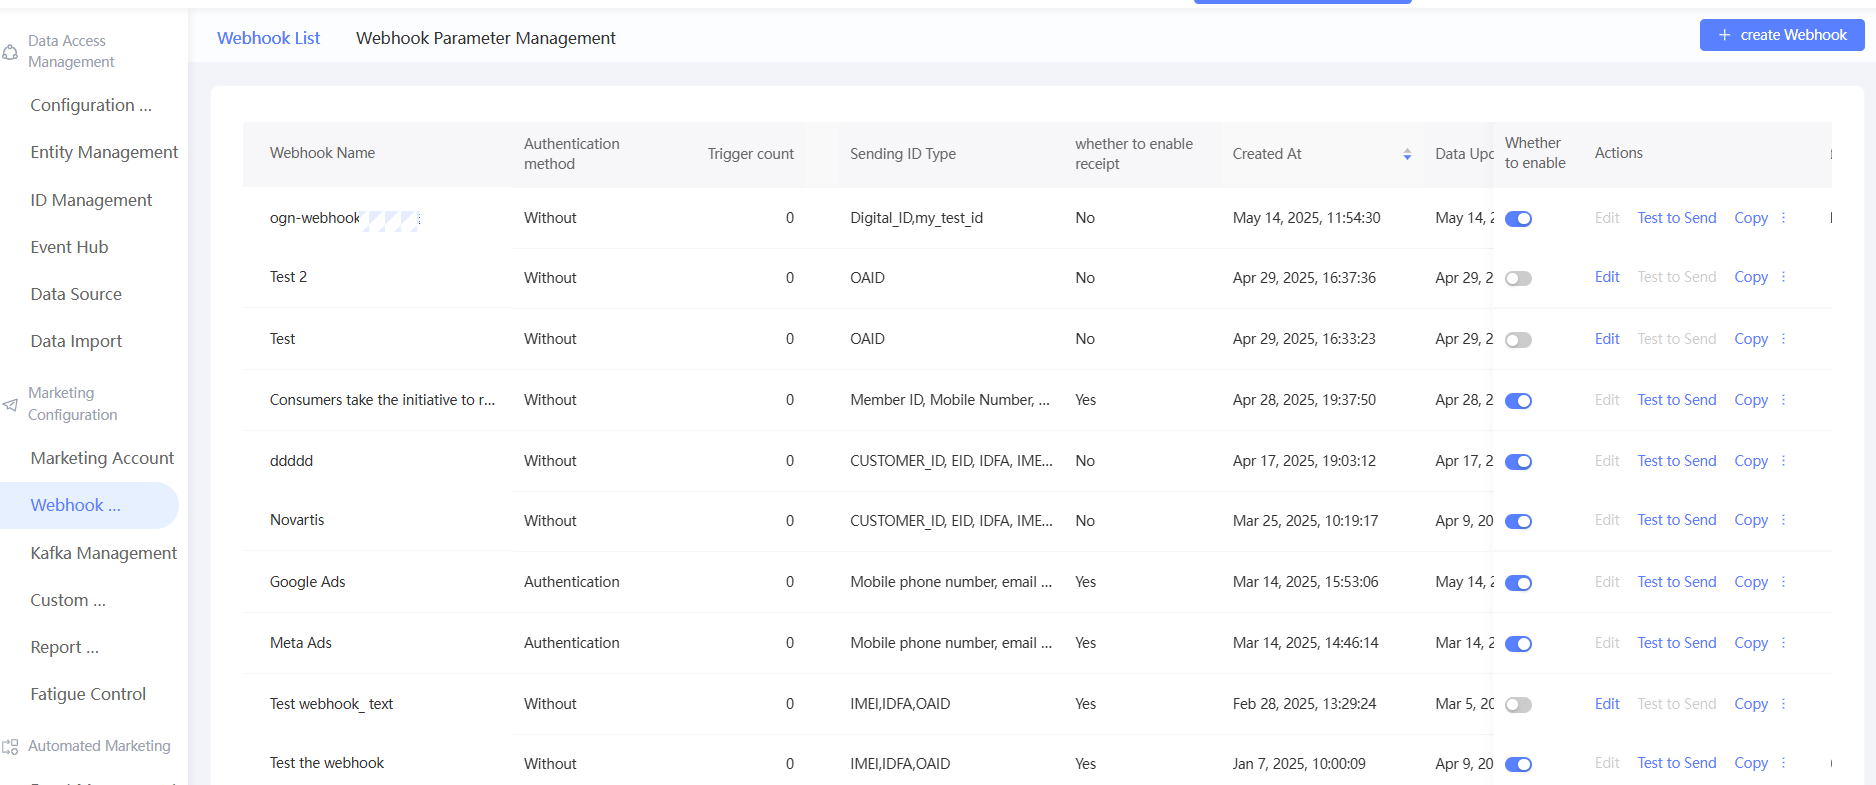
Click Create Webhook in the upper-right corner.
In the dialog box that appears, configure the parameters, as shown in the following table.
Item
Example value
Webhook name
Enter a Webhook name.
The authentication method.
Select an authentication method:
None: No authentication is performed.
Key: The verification key is used for authentication. You need to enter the key below.
Request address
Enter the URL of the API that you want to push messages to. The URL must start with http or https.
We recommend that you use HTTPS to improve the security of information transmission.
Send ID Type
Select the ID types that can be sent. You can select multiple ID types. However, when creating a task, each task can only choose to send one ID.
You can select all ID types that are enabled in the ID Type Management section.
Webhook parameters
You can define Webhook parameters. You can flexibly define the values of these parameters when you use this Webhook to create different marketing tasks. For example, the content that is set by one or three systems is "Discount in {address}". {address} is a parameter that needs to be specified as the specific content when you create a marketing task.
Parameter
Display Name: the name of the parameter that is displayed on the marketing task creation page.
parameter type: the data type of the parameter, which can be character, numeric, text, date, or character.
For character-based calls, you must select a constant or an API. For more information about how to configure a constant or an API, see Parameter Management.
Required: specifies whether the parameter is required.
Click Add Template Parameter to add a Webhook parameter.
Whether to enable receipt settings
Choose whether to enable the Receipt Settings to enable one-party or three-party systems to return the sending results to the analytics source of this space through a report receipt, displayed on the marketing task details page, or used for the results multi-branch component of automated marketing.
If this is enabled, you need to set:
Data reclaim cycle: After this cycle is exceeded, Quick Audience no longer receives and sends results.
Status code and status value: In the receipt, the status code is the sending result code, such as 200; the status value is the corresponding sending result, such as success.
The status code and status value can have multiple pairs. Click Add Status to add a pair.
Click Message Format Preview. The message body format of the HTTP Post request is displayed based on the configured parameters. For more information, see Webhook Integration Documentation.
Click OK.
Delivery Test
Before using Webhooks for marketing, you need to test the sending to ensure its availability.
You can also test the delivery when you create a marketing task. For more information, see Create A Webhook Task and Data Configuration - Webhook Component.
Procedure
Click the
 icon.
icon. In the dialog box that is added, select the type of the ID that you want to test. In the dialog box that is added, set the Test ID and Test Webhook parameters.
NoteOnly one ID type can be tested at a time. Test the ID type to be sent for the marketing task.
Click OK. The system sends a message to the test ID by using a Webhook.
A pop-up window will show whether the test is sent successfully.
Test sent successfully: Check whether the system of one party or the system of the three parties has received the Webhook request and whether the test ID has received the message. If not, click Download Log to troubleshoot the cause.

If the test fails to be sent, click Download Log in the message to troubleshoot the cause.
At the same time, the latest test sending information will also be displayed in the Webhook list, as shown in the following figure.

Authorization
If space members other than the administrator need to use a Webhook to create marketing tasks, they must be added to a role with the "User Marketing-Touch Marketing-Webhook" permission and granted the permission to use the Webhook by the administrator.
Authorization procedure:
Click
 /> Authorize to go to the authorization page, as shown in the following figure.
Set the Authorization Method parameter to By Member or By Member Group.
NoteTo add a member group, click
 in the upper-right corner and choose Space Management > Space Member Group. The two authorization methods are mutually exclusive, and only one of them can be selected for authorization. If you have been authorized by one method and select another method for re-authorization, the authorization using the old authorization method will be canceled and only the authorization using the new authorization method will take effect.
 The following section displays the authorized member accounts or member groups and the validity period of the authorization.
To remove the authorization from an account or member group, click Remove in the Actions column corresponding to the account or member group. The authorization immediately takes effect.
Authorization: Select the account or member group to which you want to grant permissions. You can select multiple accounts or member groups, specify a validity period, and then click OK.
Disable /Enable
After a Webhook is created, it is enabled by default. In this case, you can test and use the Webhook. To edit or delete the Webhook, you must disable the Webhook first.
You can turn off  and turn on
  Webhook.
Modify an inbound rule
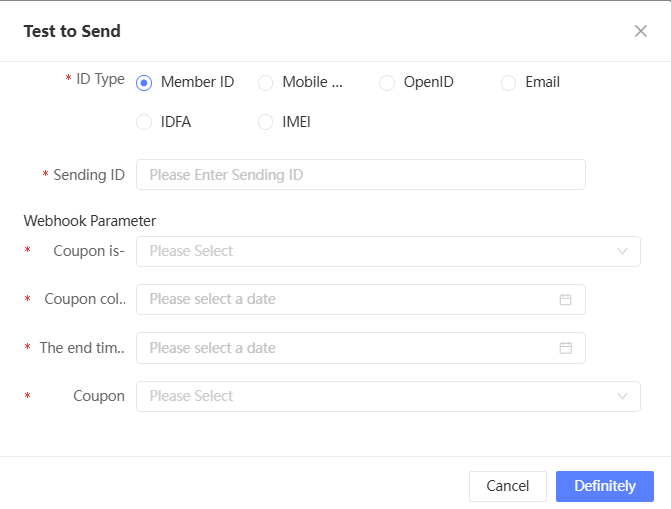
After you disable a Webhook, you can edit it.
Click Edit to go to the editing page. The subsequent operations are the same as those performed during creation.
You cannot edit a Webhook that is in the enabled state. Disable it first.
If receipt settings have been enabled before editing, you cannot modify or delete the configured status code and status value.
Copy
Click /> Copy to go to the new configuration page. By default, you have entered the same configuration items as the original Webhook and can be modified. Click OK to complete the copy.
The new Webhook that is generated by copying is disabled by default. You need to manually enable it before you can test and use it.
Deletion
After you disable a Webhook, you can delete the Webhook if the Webhook is not used for any marketing tasks.
Click /> Delete to delete the Webhook.
Parameter management
If Webhook parameters need to be called by using character parameters, such as using constants or passing parameters through the API, the administrator needs to configure the parameters before creating a Webhook.
API type: parameter values are passed through APIs. When you create a Webhook task, Quick Audience reads the values of all parameters in the operation for selection.
For more information, see Webhook API Parameter Integration Documentation.
Constant: The parameter value is fixed. You can set multiple fixed parameter values when you create a Webhook task.
Create parameters
Choose Workspace> Configuration Management > Marketing Configuration > Webhook Management > Webhook Parameter Management.

In the upper-right corner, click Create Webhook Parameter.
Configure parameters in the pop-up window. The configuration methods of constant and API parameters are different:
API Type:

Item
Example value
Parameter
Enter the API name.
Parameter Type
Select API Type.
References
Enter the address of the API where the parameters are passed.
Description
The description of the input parameter.
The authentication method.
Select an authentication method:
None: No authentication is performed.
Key: The verification key is used for authentication. You need to enter the key below.
Whether to associate other parameters
Select associated parameters:
No: not associated
Yes:
Parameter value settings (You can add multiple parameters, up to 20):
Parameter Name: The parameter name must be in English, and can be up to 32 characters in length and can contain letters, digits, and underscores.
Display name: up to 32 characters
Parameter value:
Drop-down options, supported options: associated parameter selection, manual input
Associated Parameter Selection
Drop-down full parameters under parameter management
If you need to set a cascade relationship for API-type parameters, the API must contain the cascade relationship between parameters.
Manual Input: If you select Manual Input, you can manually enter multiple parameter values.
If you need to pass multiple values for one parameter, you can fill in one parameter value, separate multiple values with the delimiter agreed by the three parties, and separate them after receiving
Constant type:
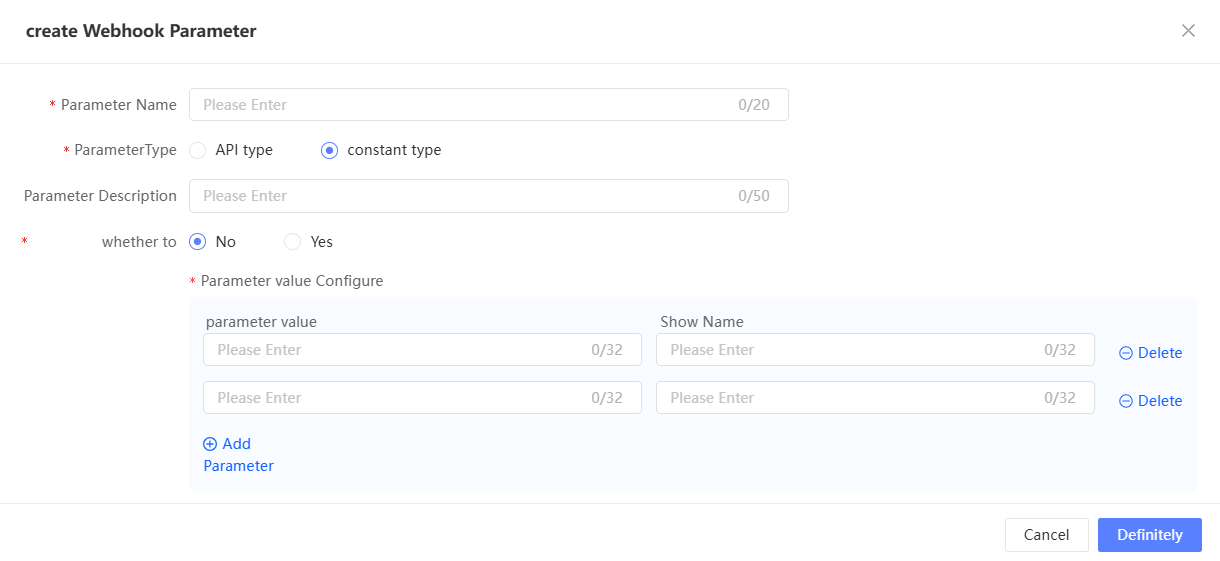

Item
Example value
Parameter
Enter the API name.
Parameter Type
Select Constant Type.
Description
The description of the input parameter.
Whether to associate other parameters
Select associated parameters:
No: parameter value setting (multiple can be added, up to 20)
Parameter Value: At least one template parameter is configured. The parameter name must be in English and cannot be empty. The parameter name must be up to 32 characters in length.
Display name: up to 32 characters
Yes: parameter values and associated parameter settings (you can add multiple parameters, up to 20)
Click OK.
Parameter management
The parameter list provides the following action buttons:
Details: Click it to view the parameter details.
Edit: Click it to edit the parameters. The configuration method is the same as when you created the parameter.
Delete: Click to delete the parameter. In the dialog box that appears, click OK. You can delete only the parameters that are not in use.
Webhook access documentation
Webhook access development includes the following aspects. For more information, see the message formats and examples.
HTTP Endpoint Server
To connect to the Webhook of Quick Audience, you need to develop an HTTP server. Quick Audience initiates a Post request with a timeout period of 10 seconds. The following table provides common parameters for Post requests initiated by Quick Audience and receiving requests. The parameters are required.
URL Configuration | Description | Example |
timestamp | The end time. The value is a timestamp in seconds. | 1631865523 |
nonce | 32-bit random string | 2e6eceb5737b473284c930c8ef79090e |
Sample request URL:
{Webhook configured url}?timestamp=1631865523&nonce=2 e6eceb5737b473284c930c8ef79090eHeader | Configuration | Description |
X-QA-Hmac-Signature | Authentication signature | Used when authentication is enabled. For more information about the authentication method, see. If authentication is not enabled, this header is filled with an empty string "". |
The authentication method.
The key is used for authentication. Authentication is enabled during Webhook configuration, and the user fills in the key.
Quick Audience uses the timestamp and nonce request parameters the key and URL to sign the HmacSHA256Hex signature and generate a signature. The signature is passed to the request header for authentication. After your service receives the request, it uses the HmacSHA256Hex algorithm to encrypt the request based on the URL parameters and the key that is configured for the Webhook channel. If the calculated value is the same as the signature that is passed in the Request header, you can determine that the request is sent from Quick Audience. The same is applied when submitting a receipt.
Value | Description | Example |
key | Key for Webhook Configuration | 123456789 |
Sample signature algorithm:
import org.apache.commons.codec.digest.HmacUtils;

public String makeSignature(String key, String timestamp, String nonce) {
    String str = generateStr(key, timestamp, nonce);
    return HmacUtils.hmacSha256Hex(key, str.replaceAll("\\s+", ""));
}

/**
 * Sign the concatenation of strings to be processed.
 */
public static String generateStr(String key, String timestamp, String nonce) {
    String[] array = new String[]{key, timestamp, nonce};
    StringBuilder sb = new StringBuilder();
    Arrays.sort(array);/* Sort strings * /
    for (int i = 0; i < 3; i++) {
        sb.append(array[i]);
    }
    return sb.toString();
}
Webhook Request
The request is an HTTP Post request initiated by Quick Audience to the access party. The request body is the trigger request information of a single user. When sending a request, all fields of any type (such as integers, strings, and text variables) are converted into strings for processing.
Parameter | Type | Description |
user_profile | Map<String,String> | The value of the KV type. The value of target_type indicates the ID type. The supported ID types are shown below. The value of target_id indicates the specific target ID value. |
params | Map<String,Object> | The KV type. The specific KV is specified during Webhook configuration. If the text type contains variables, the variable value is directly entered in the params parameter. For more information, see the following example. |
callback_params | Map<String,String> | For Quick Audience request parameters, you must bring back the receipt as it is when you report it. |
process_info | Map<String,String> | Some instance information in the process information, because this information is different for each person. |
Post Body structure example (1 to 100 for a single user):
[
    {
        "user_profile": {
            "target_type": "OPEN_ID",
            "target_id": "1917810",
            "customer_id": "The unique ID of the customer. This ID is required for event reporting"
        },
        "params": {
            "define_item1": "Coupon ID",
            "define_item2": "Sample coupon content. The user's address is Beijing"
        },
        "callback_params": {
            "Webhook_id": "13312313",
            "send_time": "1625037472000",
            "nodeId": "Node Id",
            "instanceId": "Instance Id",
            "batchId": "The ID of the batch in which the action is executed. The ID can be the idempotent ID of the batch",
            "actionId": "The ID of the action instance. This parameter can be a single idempotent ID",
            "customerId": "User Id,customerId"
        },
        "process_info": {
            "processInstanceId": "New version: Journey instance ID of each user in a journey cycle",
            "processInstanceStartTime": "New version: the start time of the journey instance for each user in the journey period, in timestamp format",
            "processNodeInstanceId": "New version: journey node instance ID (different each time)",
            "processNodeInstanceStartTime": "New version: The node instance start time of each user's journey in the journey period, in timestamp format",
            "groupName":"nodeId:nodeName:groupResult(node.result),groupName(node.resultExt);nodeId:nodeName:groupResult(node.result),groupName(node.resultExt)",
            "@comment":{
              "groupName" : "node id: node name (configured on the API): grouping result (percentage number of random grouping, two decimal places): group name (configured on the API); separate multiple with semicolon"
            }
        }
    }
]
Supported ID types:
ID Type | Description |
ONEID | OneID |
The email address. | |
MOBILE | Mobile phone number |
TAOBAO_ID | Taobao ID |
TAOBAO_NICK | Taobao nickname |
IMEI | Mobile IMEI |
IMSI | Mobile IMSI |
IDFA | Mobile IDFA |
MAC_ORG | MAC address |
WEIBO_ID_ORG | Weibo ID |
ALIPAY_ID | Alipay ID |
UNION_ID | WeChat UnionID |
OAID | OAID |
OPEN_ID | WeChat OpenID |
After receiving the request, the access party returns a response message to Quick Audience.
Response body format:
{
 "code":"OK", // Request status code: If OK is returned, the request is successful and must be in uppercase. Otherwise, the error code is returned and is customized by the access party.
  "message":"", // The description of the status code. This field is optional.
}
Receipt Reporting
After the access point executes the marketing task, the access point reports the receipt to Quick Audience to feedback the sending result of the marketing message.
For more information, see Quick Audience Open Platform API.
Usage notes
API description | Receipt Reporting | ||||
URL | /openapi/cloud/Webhook/receiveWebhookCallBack | ||||
Request method | POST | ||||
Parameter | Data type | Parameter Type | Required | Description | |
nonce | String | Query Params | No | Random number | |
X-QA-Hmac-Signature | String | Headers | No | Authentication signature | |
callBackMessageList | List<WebhookCallBackMessage> | Request Body | Yes | For List, the receipt information of multiple users is merged together, and the WebhookCallBackMessage format is as follows | |
status code | Description | ||||
200 | The API request is successful. | ||||
Others | Failed to request |
Return property name | Type | Description | |||
1.traceId | string | Unique id,qa developers use this to locate problems on the link. | |||
2.success | boolean | Whether the server processing is successful | |||
3.errorCode | string | The error code. | |||
4.errorDesc | string | The description of the error. | |||
5.data | WebhookCallBackResult | WebhookCallBackResult | |||
The WebhookCallBackMessage is as follows:Parameter | Limit | Migration description |
msg_id | String | The 32-bit unique ID of the message, which is generated for the access party. |
status | String | The result status, which is the status code defined in the Webhook configuration, such as 200. |
cst_id | String | The user ID of the touch. The value is user_profile.customer_id. |
send_time | String | The timestamp that is accurate to the millisecond. |
callback_params | Map<String,String> | The callback_params carried in the Webhook request. Just wait for a moment. |
The WebhookCallBackResult is as follows:
Parameter | Type | Parameters |
fieldId | String | The ID of the field. |
fieldName | String | The name of the field. |
fieldAlias | String | Field alias (column name) |
fieldClassify | Integer | Field classification: dimension metric (0:ID,1: dimension field, 2: statistical time, 3: metric field) user behavior (0:ID,3: statistical metric, 11: behavior time, 12: behavior channel, 13: behavior type, 14: behavior object, 15: behavior attribute, 16: statistical metric) |
fieldType | Integer | Field type (0: enumeration, 1: text, 2: numeric, 3: time, 4: multi-value): required |
fieldSeparator | String | The multi-value field delimiter is not required. The multi-value type of the tag field is required. |
identityType | String | Customer identity type /ID type (oneid,email,mobile,taobao_id,taobao_nick,imei,imsi,mac_org,weibo_id_org,alipay_id,union_id,open_id) |
encryptionType | String | identityType |
The OemImportTaskInfoResponse is as follows:
Parameter | Type | Parameters |
code | String | The response code. |
message | String | Receipt Result Status |
Sample requests
curl -H "X-QA-Hmac-Signature: 12" -H "Authorization: 57a824b183e54ddbca79170c00dd3f72" -H "Content-Type: application/json" -H "Cookie: csrf_token=f5013e65-0661-41ba-b2ad-8a396a775533" --data-binary "[
{
\"msgId\": \"1\"
}
]" --compressed "http://qa.qa-env09.aliyun.com/openapi/cloud/Webhook/receiveWebhookCallBack?nonce=12&appId=686219778252592361&accessKey=c76f6d5cb309478ab9929616dba64148×tamp=1718352394665"Sample response:
{
"data": {
"code": 200,
"message": "Success"
},
"errorCode": null,
"errorDesc": null,
"exStack": null,
"opers": [],
"solution": null,
"success": true,
"traceId": "0ada03af17183523948084322d00b4"
}
FAQ
What are the differences between Webhook parameters, variables, constants, and APIs?
A: There are multiple types of Webhook parameters. The following figure shows their differences and usage. 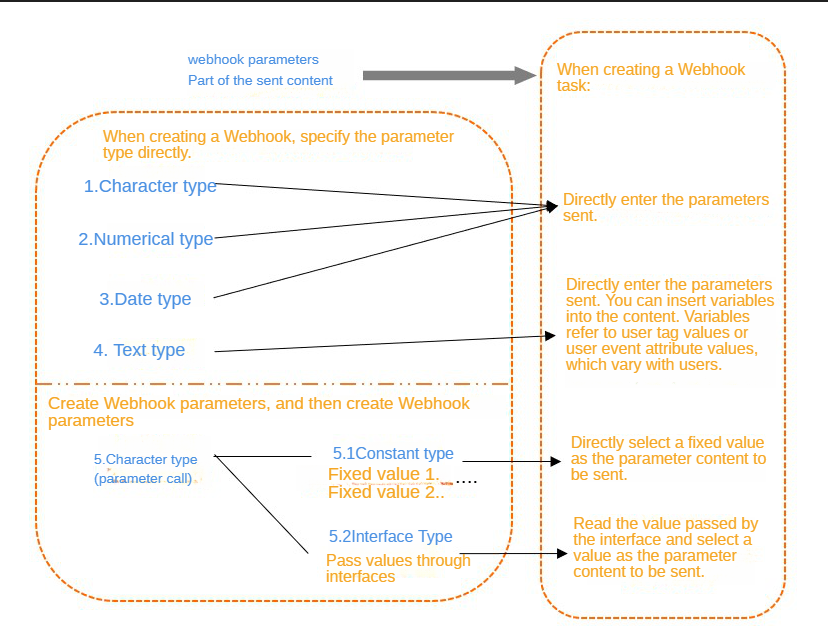
Description:
Constants and APIs are two ways to assign values to character (parameter call) parameters.
Variables are inserted in text-type parameters and can be changed by user.