Administrators can add and manage user ID types supported by Quick Audience and configure policies for ID participation in ID mapping. ID mapping identifies users and consolidates data across source channels and ID types. For more information, see ID Mapping and User Unique Identifier QAID.
Read ID Mapping and User Unique Identifier QAID and fully understand the ID mapping logic before you manage ID types or change the default configurations. Otherwise, user identification results may be irreversibly affected.
Choose Workspace> Configuration Management > Data Ingestion Management > ID Type. The list displays user ID types supported by Quick Audience, including system preset IDs and custom IDs. 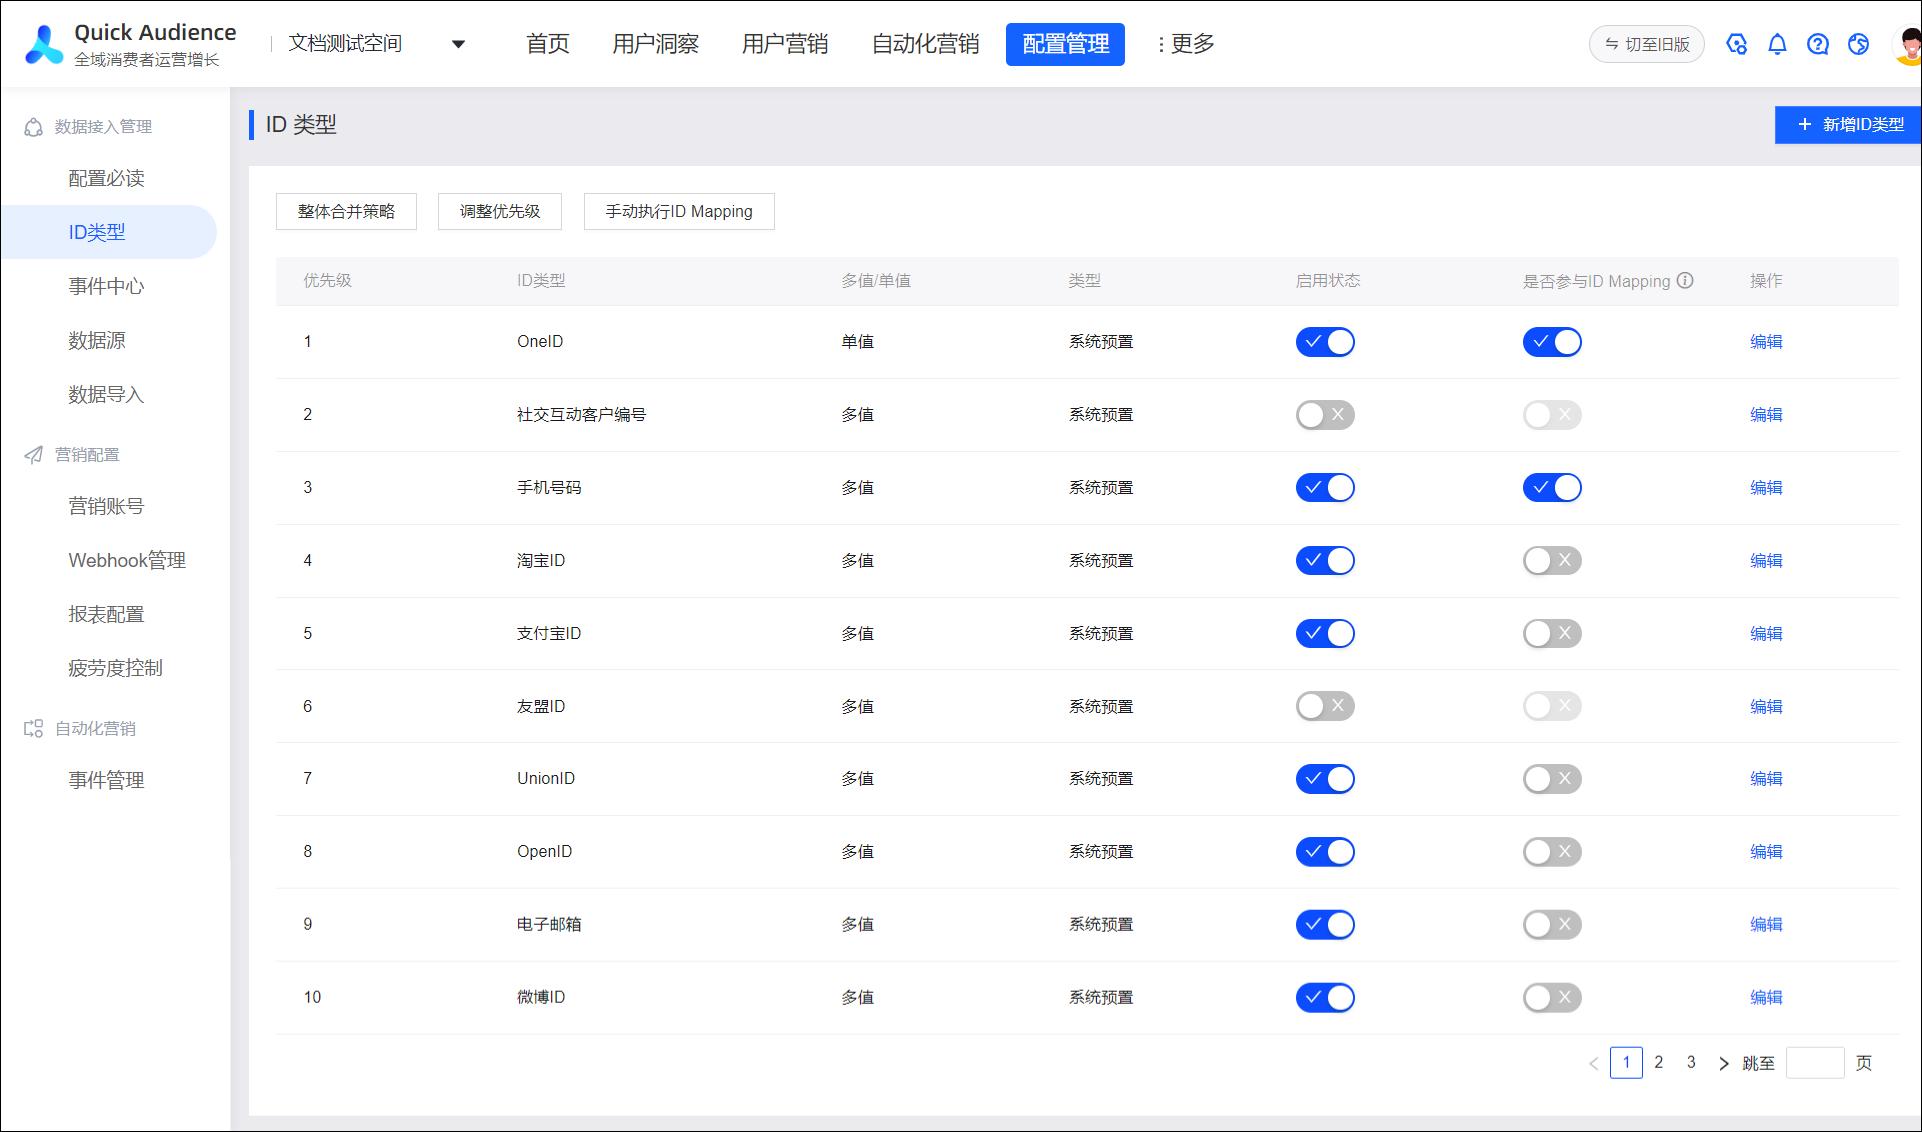
In the list:
-
Priority: A smaller number indicates a higher priority. The list is sorted by priority. For more information about ID precedence in ID mapping, see ID Mapping documentation.
-
Multi-value/single-value: A single-value ID can have only one value per user at a time. If a single-value ID conflict occurs during ID mapping user merges, only one value is retained based on the Overall Merge Strategy. For more information about multi-value and single-value IDs in ID Mapping, see the ID Mapping documentation.
-
Enabled: When data enters Quick Audience, user IDs can only be recognized as enabled ID types, and only enabled IDs can be used.
-
Participate in ID Mapping: IDs that do not participate are not used for user identification. You can enable ID mapping for up to five IDs at the same time.
Preset ID
The system includes multiple preset ID types. The following table lists their initial configurations.
All configuration items except ID type encoding can be modified. The actual configuration on your interface may differ from the initial configuration in the following table.
|
ID Type |
ID Type Encoding |
Priority |
Single-value /Multi-value |
Status |
Participate in ID Mapping |
|
OneID |
ONEID |
1 |
Single value |
Enabled |
Yes |
|
Social Interaction Customer Number |
MAISCRM_ID |
2 |
Multi-value |
No This ID is unique to the Social Interaction module. If you purchase the Social Interaction Feature Pack, the customer ID is enabled. |
No |
|
Phone number |
MOBILE |
3 |
Retained |
Yes |
|
|
Taobao ID |
TAOBAO_ID |
4 |
No |
||
|
Alipay ID |
ALIPAY_ID |
5 |
|||
|
Umeng ID |
UMENG_ID |
6 |
No |
||
|
UnionID |
UNION_ID |
7 |
Yes |
||
|
OpenID |
OPEN_ID |
8 |
|||
|
|
|
9 |
|||
|
Weibo ID |
WEIBO_ID_ORG |
10 |
|||
|
IDFA |
IDFA |
11 |
|||
|
OAID |
OAID |
12 |
|||
|
IMEI |
IMEI |
13 |
|||
|
IMSI |
IMSI |
14 |
|||
|
MAC address |
MAC_ORG |
15 |
|||
|
Taobao nickname |
TAOBAO_NICK |
16 |
|||
|
Taobao OUID |
OUID |
17 |
Add a custom ID
In addition to preset IDs, you can add custom ID types based on your business requirements. Up to 50 ID types (including system preset IDs) are supported.
Procedure
-
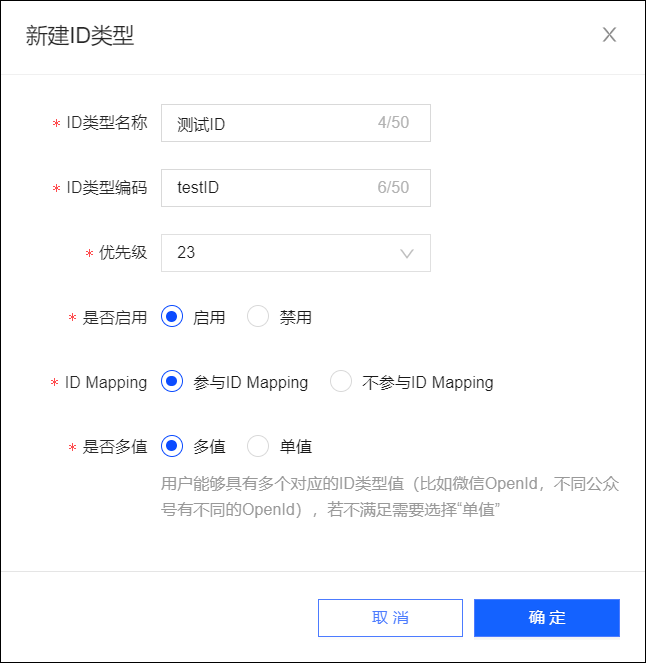
Choose Workspace> Configuration Management > Data Ingestion > ID Type to go to the ID type management page.
-
Click Add ID Type in the upper-right corner.
-
In the dialog box that appears, configure the parameters as described in the following table.
Item
Example value
ID Type Name
Enter the Chinese name of the user ID.
ID Type Encoding
Enter the English encoding name for the user ID.
Priority
The priority of the user ID. Priority levels already assigned to other IDs cannot be selected.
Enable
Specify whether to enable the ID.
ID Mapping
For enabled IDs, specify whether the ID participates in ID Mapping.
NoteYou can enable ID mapping for up to five IDs at the same time.
Multi-value
-
For IDs that participate in ID mapping, select multi-value type or single-value type.
-
For IDs that do not participate in ID mapping, multiple values are supported by default.
-
-
Click OK.
The new ID types are added to the list, in order of priority.
Modify ID configurations
You can modify the configurations of preset IDs and custom IDs, including the ID type name, priority, enabled status, ID mapping participation, and multi-value setting. However, you cannot modify the ID type encoding.
After you modify the ID configuration, users already merged based on this ID type in historical QAID data are not split. Disabled ID types that no longer participate in ID mapping are also retained. The new configuration takes effect from the next ID Mapping execution.
-
You can toggle the Enabled and Participate in ID Mapping settings.
NoteYou can enable ID mapping for up to five IDs at the same time.
-
Click Edit. In the dialog box that appears, modify all configurations except the ID type encoding. For more information, see Add A Custom ID.
-
Click Adjust Priority above the list. A panel appears on the right side of the page. You can click Move Up or Move Down to shift an ID by one priority level, or drag the
 icon on the left to move the ID to the desired position. After adjusting, click OK or OK and Execute to apply the changes. If you click OK and Execute, ID mapping also starts immediately. Otherwise, the priority remains unchanged.
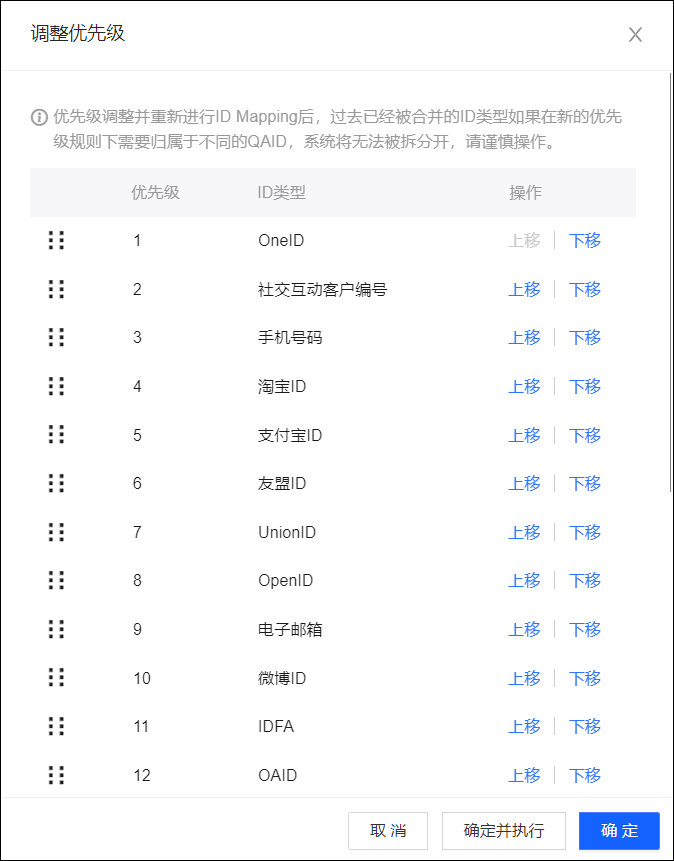
Delete a custom ID
Click Delete to remove a custom ID.
After an ID is deleted, users already merged based on this ID type in historical QAID data are not split, and the deleted ID type is retained. The deletion takes effect from the next ID Mapping execution.
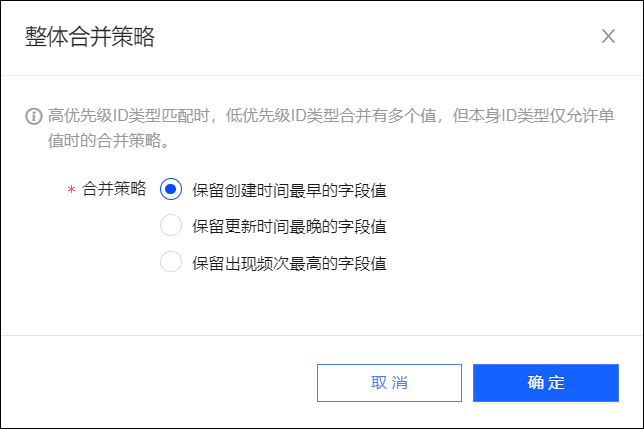
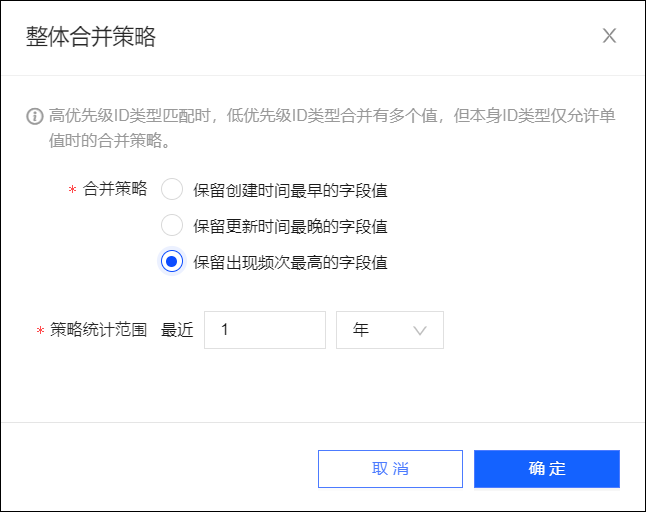
Select the overall consolidation strategy
The overall merge strategy resolves single-value ID conflicts when ID Mapping merges users. It determines which value to retain for single-value IDs that have multiple candidate values. The default policy retains the field value with the earliest creation time. The creation time is based on when the Quick Audience computing source was accessed.
Procedure
-
Choose Workspace> Configuration Management > Data Ingestion > ID Type to go to the ID type management page.
-
Click Overall Consolidation Policy above the list.
-
In the dialog box that appears, select a merge policy.
-
Retain the field value with the earliest creation time.
-
Retain the value of the field with the latest update time.
-
Retain the field value with the highest frequency of occurrence within the statistical range.
You can set the statistical range to the last N years or N months, up to a maximum of 20 years or 20 months.
-
-
Click OK.
Manually perform ID Mapping
The system automatically performs ID mapping after each data import task.
You can also manually trigger ID mapping. On the ID Type Management page, click Manually Execute ID Mapping above the list.