Data Push-Webhook Component
Use the Webhook component to connect to your own system or a third-party system, such as a CRM, and instruct it to send messages.
For example, instruct your CRM to issue coupons to the member list provided by Quick Audience.
-
Regardless of whether the link starts from the behavioral event component or the target audience component, users entering the process use their QAID to match the ID type required by the Webhook across all data sources.
-
Before you configure the Webhook component, you must complete Webhook integration development for your own or third-party system. Then, the organization administrator and workspace administrator of Quick Audience configure the Webhook. For more information, see Webhook Management.
-
If a non-administrator user needs to configure the Webhook component, the user must be assigned a role with the "User Marketing-Reach Marketing-Webhook" permission, and the administrator must grant the user Usage Permission for the Webhook.
To configure a universal filter, perform the following steps:
-
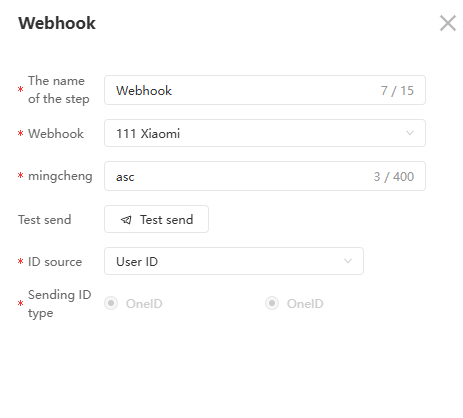
Click the Webhook component and configure it in the panel that appears on the right.
-
Enter a step name.
-
Select the configured Webhook from the drop-down list.
-
If the content contains parameters, enter or select a parameter value for each parameter. The parameter name is replaced with the specified value during sending. For example, if the sending content configured in your system or the third-party system is "Discount activity at {parameter 1 character}", and you set {parameter 1 character} to "abc", the message "Discount activity at abc" is sent.
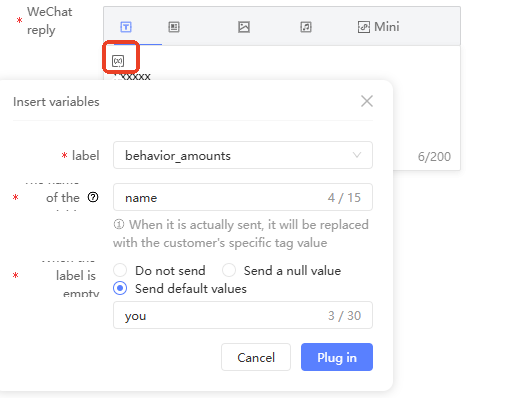
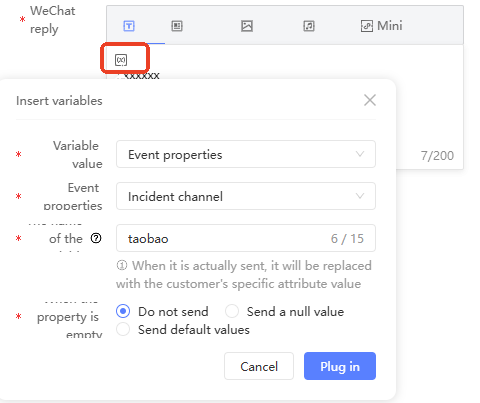
For text parameters, you can insert variables in the parameter value to send different content for different users:
-
Click the
 icon where you want to insert a variable. In the dialog box that appears, configure the variable.
-
For links starting from the Target population component: Select a user label as the variable value.
-
For links that start from the behavior event component: Select an event attribute that corresponds to the event report as the variable value.
If the following conditions are met, you can also select a user tag as the variable value. The user reported by the event uses their QAID to match the tag value provided by all data sources:
NoteIf the first component is a behavioral event component and you need to use tags as variable values, you must purchase a Tablestore instance and activate the feature first. Contact the Alibaba Cloud sales manager. The Tablestore instance can be shared with the Tablestore instance in Tablestore Authorization Configuration.
-
-
Enter the variable name.
-
Specify whether to send no content or a default value at the variable position if the property or tag is empty.
For example, based on the configuration in the above figure, the content is "Dear ${name} Hello". If the nickname of the member reported in the corresponding event is Zhang San, the message "Dear Zhang San Hello" is sent. If the nickname is not reported in the event, the message "Dear Member Hello" is sent.
-
Click Insert to complete the settings.
-
-
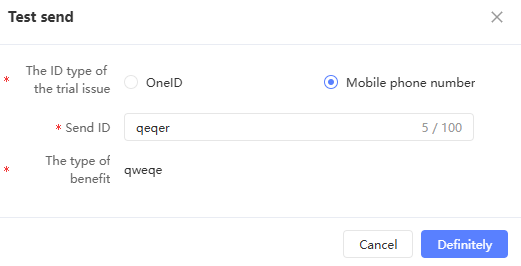
Click Test Send. In the dialog box that appears, select the ID type for test sending, enter the test ID, set the variable values, and then click OK.
NoteIf the test is successful on the Webhook Management page, you can skip this step.
 A pop-up window shows whether the test sending succeeded.
-
Test sent successfully: Verify that your system or the third-party system received the Webhook request and that the test ID received the message. If not, troubleshoot using the error message.
-
Test sending failed: Troubleshoot the cause using the error message.
-
-
Select the ID type to send and the ID type to use to reach the user.
-
Click OK.