Configure and use Alibaba Cloud Model Studio Token Plan Team Edition in Claude Code.
Installation and usage
Manual installation
macOS/Linux
-
Install or update Node.js (v18.0 or later).
-
Run the following command in your terminal to install Claude Code.
npm install -g @anthropic-ai/claude-code -
Run the following command to verify the installation. If a version number is displayed, the installation was successful.
claude --version
Windows
To use Claude Code on Windows, install WSL or Git for Windows, then run the following command in WSL or Git Bash.
npm install -g @anthropic-ai/claude-codeFor more information, see the Windows setup guide in the Claude Code official documentation.
Guided installation with Qwen Code
Claude Code installation depends on the Node.js environment, and manual installation may encounter environment configuration issues. You can use Qwen Code to complete the installation and verification.
-
Install and configure Qwen Code.
-
Enter the following command in your terminal to start Qwen Code.
qwen -
Enter the following instruction in the Qwen Code dialog.
macOS/Linux
Please help me install Claude Code. 1. Prerequisite: Node.js (v18.0 or later) must be installed first. 2. If Node.js is already installed, run the command: npm install -g @anthropic-ai/claude-code. After installation, run claude --version to verify that the installation was successful.Windows
Please help me install Claude Code. 1. Prerequisites: Node.js (v18.0 or later) and Git for Windows must be installed first. If they are not installed, please install them for me. 2. If all prerequisites are met, run the command: npm install -g @anthropic-ai/claude-code. After installation, run claude --version to verify that the installation was successful. -
Authorize Qwen Code to execute commands until the installation is complete.
-
Enter /exit to quit Qwen Code.
/exit
Configure Token Plan Team Edition
To connect Claude Code with Alibaba Cloud Model Studio Token Plan Team Edition, configure the following information:
-
ANTHROPIC_BASE_URL: Set tohttps://token-plan.ap-southeast-1.maas.aliyuncs.com/apps/anthropic. -
ANTHROPIC_AUTH_TOKEN: Set to the Token Plan Team Edition dedicated API Key. -
ANTHROPIC_MODELand other model environment variables: Set to a model supported by Token Plan Team Edition. Claude Code internally uses multiple model slots to handle different tasks. All slots must be configured with a model supported by Token Plan Team Edition. Otherwise, unconfigured slots will attempt to call official Anthropic models, causing requests to fail.NoteDeepSeek V3.2 does not support the Anthropic protocol interface and cannot be used through Claude Code. You can use tools that support the OpenAI-compatible protocol, such as OpenCode. Image generation models use a separate API and must be integrated through extension mechanisms. See Integrate multimodal generation models.
macOS/Linux
-
Create and open the configuration file
~/.claude/settings.json.~represents the home directory of the current system account. If the.claudedirectory does not exist, create it first. Runmkdir -p ~/.claudein the terminal to create it.nano ~/.claude/settings.json -
Edit the configuration file. Replace YOUR_API_KEY with the Token Plan Team Edition dedicated API Key.
{
    "env": {
        "ANTHROPIC_AUTH_TOKEN": "YOUR_API_KEY",
        "ANTHROPIC_BASE_URL": "https://token-plan.ap-southeast-1.maas.aliyuncs.com/apps/anthropic",
        "ANTHROPIC_MODEL": "qwen3.6-plus",
        "ANTHROPIC_SMALL_FAST_MODEL": "qwen3.6-plus",
        "ANTHROPIC_DEFAULT_HAIKU_MODEL": "qwen3.6-plus",
        "ANTHROPIC_DEFAULT_SONNET_MODEL": "qwen3.6-plus",
        "ANTHROPIC_DEFAULT_OPUS_MODEL": "qwen3.6-plus",
        "CLAUDE_CODE_SUBAGENT_MODEL": "qwen3.6-plus"
    }
}
Save the configuration file, then open a new terminal for the changes to take effect.
-
Edit or create the
~/.claude.jsonfile. Set thehasCompletedOnboardingfield totrueand save the file.{ "hasCompletedOnboarding": true }hasCompletedOnboardingmust be a top-level field. Do not nest it under other fields.This step prevents the error
Unable to connect to Anthropic serviceswhen starting Claude Code.
Windows
-
Create and open the configuration file
C:\Users\<username>\.claude\settings.json.CMD
-
Create the directory
if not exist "%USERPROFILE%\.claude" mkdir "%USERPROFILE%\.claude" -
Create and open the file
notepad "%USERPROFILE%\.claude\settings.json"
PowerShell
-
Create the directory
mkdir -Force $HOME\.claude -
Create and open the file
notepad $HOME\.claude\settings.json
-
-
Edit the configuration file. Replace YOUR_API_KEY with the Token Plan Team Edition dedicated API Key.
{
    "env": {
        "ANTHROPIC_AUTH_TOKEN": "YOUR_API_KEY",
        "ANTHROPIC_BASE_URL": "https://token-plan.ap-southeast-1.maas.aliyuncs.com/apps/anthropic",
        "ANTHROPIC_MODEL": "qwen3.6-plus",
        "ANTHROPIC_SMALL_FAST_MODEL": "qwen3.6-plus",
        "ANTHROPIC_DEFAULT_HAIKU_MODEL": "qwen3.6-plus",
        "ANTHROPIC_DEFAULT_SONNET_MODEL": "qwen3.6-plus",
        "ANTHROPIC_DEFAULT_OPUS_MODEL": "qwen3.6-plus",
        "CLAUDE_CODE_SUBAGENT_MODEL": "qwen3.6-plus"
    }
}
Save the configuration file, then open a new terminal for the changes to take effect.
-
Edit or create the
C:\Users\<username>\.claude.jsonfile. Set thehasCompletedOnboardingfield totrue, and save the file.{ "hasCompletedOnboarding": true }
Use Claude Code
-
Open a terminal, navigate to your project directory, and run the following command to start Claude Code:
cd path/to/your_project claude -
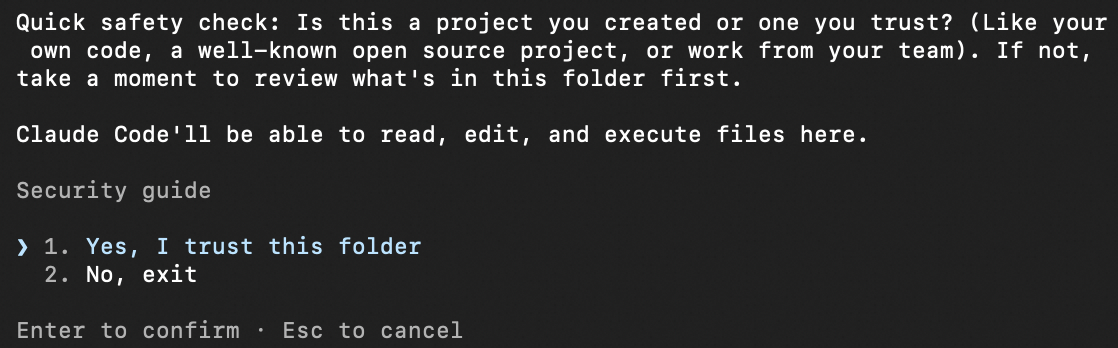
After startup, authorize Claude Code to execute files.
-
Enter
/statusto verify that the model, Base URL, and API Key are configured correctly. -
Start a conversation in Claude Code.
Switch models
-
When starting Claude Code: Run
claude --model <model name>in the terminal to specify a model and start Claude Code. For example,claude --model glm-5. -
During a session: Enter
/model <model name>in the dialog to switch models. For example,/model MiniMax-M2.5.
The --model and /model commands switch the primary conversation model (ANTHROPIC_MODEL). To use a different model permanently, update all model slots in settings.json.
Common commands
|
Command |
Description |
Example |
|
/init |
Generates a CLAUDE.md file in the project root directory for defining project-level instructions and context. |
/init |
|
/status |
Displays the current configuration status including model, API Key, and Base URL. |
/status |
|
/model <model name> |
Switches the model. |
/model glm-5 |
|
/clear |
Clears the conversation history and starts a new conversation. |
/clear |
|
/plan |
Enters planning mode to analyze and discuss solutions without modifying code. |
/plan |
|
/compact |
Compresses the conversation history to free up context window space. |
/compact |
|
/config |
Opens the configuration menu for settings such as language and theme. |
/config |
For more commands and usage details, see the Claude Code official documentation.
Use the Claude Code IDE extension
The Claude Code IDE extension supports VS Code, VS Code-based IDEs (such as Cursor and Trae), and JetBrains IDEs (such as IntelliJ IDEA and PyCharm).
VS Code
-
First, configure Token Plan Team Edition. On Windows, you also need to install WSL or Git for Windows.
-
Open VS Code, search for
Claude Code for VS Codein the Extensions Marketplace, and install it.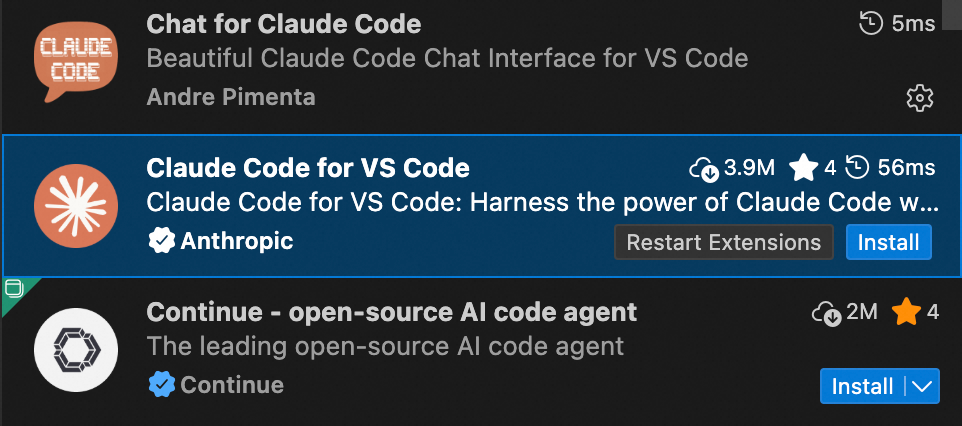
-
After installation, restart VS Code. Click the icon in the upper-right corner to open Claude Code and start a conversation.

If an Anthropic login screen appears during a conversation, Token Plan Team Edition has not been configured yet. Complete the configuration first.
-
To switch models: Switch the model configuration in Claude Code, then start a new conversation in the IDE extension for the change to take effect.
JetBrains
-
First, install Claude Code and configure Token Plan Team Edition.
-
Open a JetBrains IDE (such as IntelliJ IDEA or PyCharm), search for
Claude Codein the plugin marketplace, and install it.
-
After installation, restart the IDE. Click the icon in the upper-right corner to start using it. You can switch models with the
/model <model name>command.
If the error
Not logged in. Please run /loginappears during a conversation, Token Plan Team Edition has not been configured yet. Complete the configuration first.
Error codes
See FAQ.
FAQ
Error: API Error: Unable to connect to API (ECONNRESET)
This error is caused by a network connection issue in the Claude Code client and is unrelated to configuration. It usually resolves on its own. Suggestions:
-
Wait a few minutes and try again.
-
Check that your network connection is working properly.
-
If you are using a proxy or VPN, disable it and try again.
-
Upgrade Claude Code to the latest version:
npm install -g @anthropic-ai/claude-code@latest.
Error: Unable to connect to Anthropic services. Failed to connect to api.anthropic.com: ERR_BAD_REQUEST
This error indicates that Claude Code is trying to connect to the official Anthropic service rather than the Token Plan Team Edition service. This is usually because environment variables are not configured correctly or have not taken effect. Follow these steps to troubleshoot:
-
Check the configuration file: Verify that
~/.claude/settings.jsonhasANTHROPIC_BASE_URLandANTHROPIC_AUTH_TOKENconfigured correctly.# View the current configuration cat ~/.claude/settings.jsonVerify that the configuration looks like the following (replace with your actual API Key):
{ "env": { "ANTHROPIC_AUTH_TOKEN": "YOUR_API_KEY", "ANTHROPIC_BASE_URL": "https://token-plan.ap-southeast-1.maas.aliyuncs.com/apps/anthropic", "ANTHROPIC_MODEL": "qwen3.6-plus", "ANTHROPIC_SMALL_FAST_MODEL": "qwen3.6-plus", "ANTHROPIC_DEFAULT_HAIKU_MODEL": "qwen3.6-plus", "ANTHROPIC_DEFAULT_SONNET_MODEL": "qwen3.6-plus", "ANTHROPIC_DEFAULT_OPUS_MODEL": "qwen3.6-plus", "CLAUDE_CODE_SUBAGENT_MODEL": "qwen3.6-plus" } } -
Check for environment variable conflicts: If
ANTHROPIC_BASE_URLis set through both environment variables and the configuration file, ensure both point to the same Token Plan Team Edition address to avoid conflicts. Run the following command to check:echo $ANTHROPIC_BASE_URLIf the output is empty or points to an address other than the Token Plan Team Edition endpoint, clear the environment variable or set it to the correct Token Plan Team Edition Base URL.
-
Verify hasCompletedOnboarding: Check that
~/.claude.jsonhashasCompletedOnboardingset totrue. Otherwise, Claude Code will attempt to connect to the official Anthropic service for login verification on startup. -
Open a new terminal: After modifying the configuration file, open a new terminal window and run the
claudecommand for the configuration to take effect.
For more frequently asked questions, see FAQ.
Best practices
1. Context management
-
Clean up regularly: Use
/clearto periodically reset conversations, preventing old context from interfering with new tasks and saving tokens. -
Proactive compression: Use the
/compactcommand to have Claude summarize key decisions and modified files, preserving core memory. -
Specify files explicitly: Use
@to reference files when asking questions (e.g.,write a test for @auth.py) to avoid the model scanning the entire project unnecessarily. -
Leverage sub-agents: For large-scale tasks, let Claude spawn sub-agents to execute them. Sub-agents return refined conclusions after completing tasks, preserving context space in the main conversation.
2. Plan first, then execute
-
Enable Plan mode: Before complex tasks, analyze the solution first without actually modifying files.
-
Prompt constraint: Explicitly request in your prompt to "output a detailed implementation plan first; only modify files after I confirm."
-
-
Reduce trial-and-error costs: Ensure the logic is sound before making code changes.
3. Document core project knowledge: Write a CLAUDE.md
-
Include key information: CLAUDE.md is automatically loaded at the start of each session. Include build commands, code conventions, and workflow rules.
-
Maintain dynamically: Keep the content concise and readable. Only record broadly applicable global conventions, and continuously update with new rules as the project evolves.
4. Extend capabilities: MCP and Skills
-
MCP: Install mature MCP servers to connect to external services.
-
Skills: Write detailed skill descriptions. Claude decides whether to invoke a tool based on the definition of its purpose.
-
Skills vs MCP: Skills teach Claude "how to do things" (workflow knowledge), while MCP gives Claude "the tools to do things" (external interfaces). The two are complementary, and Skills can also integrate external interfaces.
5. Automated guardrails: Hooks
-
Use Hooks: Hooks are deterministic rules. They automatically run local scripts at specific lifecycle points in the Claude workflow (such as PreToolUse for pre-execution validation), ensuring critical checks or operations are executed 100% of the time.
-
Configuration methods:
-
Run
/hooksfor interactive configuration. -
Directly edit
.claude/settings.json. -
Ask Claude to write one for you, such as: "Write a hook that runs eslint after every file edit."
-
6. Establish a self-verification loop
-
Enforce verification: Require Claude to run relevant test cases (such as
pytestornpm test) after modifying code. -
Define success criteria: "After making the changes, ensure the code compiles and run a
curlcommand to verify the API returns a 200 status code." -
Visual feedback: When modifying the frontend, ask Claude to take browser screenshots to confirm the UI result.