Hardcoding database passwords in Flink application code is a security risk — credentials stored in source files can be leaked through version control, build artifacts, or unauthorized code access. This tutorial shows you how to encrypt a database password with Key Management Service (KMS) and decrypt it at runtime inside a Flink JAR deployment that reads from an ApsaraDB RDS for MySQL database.
How it works

-
Encrypt the plaintext password with a KMS key and store the resulting ciphertext in your application code.
-
At job startup, pass your AccessKey ID and AccessKey secret as entry point arguments. Flink reads these arguments and calls KMS over the virtual private cloud (VPC) to decrypt the ciphertext.
-
The decrypted password is used in-memory to connect to ApsaraDB RDS for MySQL. No plaintext password appears in your code or deployment configuration.
Prerequisites
Before you begin, ensure that you have:
-
IntelliJ IDEA and Maven 3.6.3 or later installed
-
A Realtime Compute for Apache Flink workspace. See Create a workspace.
-
An ApsaraDB RDS for MySQL instance. See Step 1: Create an ApsaraDB RDS for MySQL instance and configure databases.
-
A KMS instance with a default key created. See Purchase and enable a KMS instance and Manage a key.
The ApsaraDB RDS for MySQL instance, the KMS instance, and the Flink workspace must all reside in the same VPC. If they do not, establish network connectivity first. See How do I access other services across VPCs? and How do I access the Internet?
(Optional) Step 1: Set up a baseline Flink job
Skip this step if you already have a working Flink JAR deployment connecting to ApsaraDB RDS for MySQL with plaintext credentials. This step helps you validate the connection before adding KMS encryption.
Create the MySQL data source
-
In the ApsaraDB RDS for MySQL instance, create a database named
schooland a standard account namedflink_rds_userwith read and write permissions. See Step 1: Create an ApsaraDB RDS for MySQL instance and configure databases. -
Log on to the database:
-
On the instance details page, click Log On to Database in the upper-right corner.
-
Enter the account credentials and click Login.
-
In the left-side navigation pane, double-click the
schooldatabase.
-
-
In the SQL editor, run the following DDL to create a table and insert sample data:
CREATE TABLE `student` ( id INT not null primary key, username VARCHAR(255), age BIGINT ); INSERT INTO student VALUES (001, 'lily', 15), (002, 'leilei', 18), (003, 'xiaoming', 17), (004, 'huahua', 15); SELECT * FROM student; -
Click Execute(F8). On the panel that appears, click Execute.
Build and deploy the baseline JAR
-
In IntelliJ IDEA, create a new project and add the following code to
JavaDemo.javaandpom.xml. Update the MySQL connection values to match your instance. JavaDemo.javaParameter Description Example hostnameEndpoint of the ApsaraDB RDS for MySQL instance rm-bp****2ye09w72zjq.mysql.rds.aliyuncs.comportPort of the instance 3306databaseListDatabase name schooltableListTable name school.studentusernameDatabase account flink_rds_userpasswordDatabase password flink_rds_password@123JavaDemo
package org.example;

import com.ververica.cdc.connectors.mysql.source.MySqlSource;
import com.ververica.cdc.debezium.table.RowDataDebeziumDeserializeSchema;

import org.apache.flink.api.common.eventtime.WatermarkStrategy;
import org.apache.flink.streaming.api.datastream.DataStreamSource;
import org.apache.flink.streaming.api.environment.StreamExecutionEnvironment;
import org.apache.flink.table.api.DataTypes;
import org.apache.flink.table.data.RowData;
import org.apache.flink.table.runtime.typeutils.InternalTypeInfo;
import org.apache.flink.table.types.DataType;
import org.apache.flink.table.types.logical.LogicalType;
import org.apache.flink.table.types.logical.RowType;
import org.apache.flink.table.types.utils.TypeConversions;


public class JavaDemo {

    public static void main(String[] args) throws Exception {
        final StreamExecutionEnvironment env = StreamExecutionEnvironment.getExecutionEnvironment();

        // Build a deserializer.
        DataType dataType =
                DataTypes.ROW(
                        DataTypes.FIELD("id", DataTypes.INT()),
                        DataTypes.FIELD("username", DataTypes.STRING()),
                        DataTypes.FIELD("age", DataTypes.INT()));

        LogicalType logicalType = TypeConversions.fromDataToLogicalType(dataType);
        InternalTypeInfo<RowData> typeInfo = InternalTypeInfo.of(logicalType);
        RowDataDebeziumDeserializeSchema deserializer =
                RowDataDebeziumDeserializeSchema.newBuilder()
                        .setPhysicalRowType((RowType) dataType.getLogicalType())
                        .setResultTypeInfo(typeInfo)
                        .build();

        // Configure the MySQL CDC data source.
        MySqlSource<RowData> mySqlSource =
                MySqlSource.<RowData>builder()
                        .hostname("rm-bp****2ye09w72zjq.mysql.rds.aliyuncs.com")
                        .port(3306)
                        .databaseList("school")
                        .tableList("school.student")
                        .username("flink_rds_user")
                        .password("flink_rds_password@123")
                        .deserializer(deserializer)
                        .build();

        // Add the MySQL source to the Flink DataStream program.
        DataStreamSource<RowData> mySQLSource = env.fromSource(mySqlSource, WatermarkStrategy.noWatermarks(), "MySQL Source");

        // Write to stdout.
        mySQLSource.print();

        env.execute("MySQL CDC Test");
    }
}
POM.xml
<?xml version="1.0" encoding="UTF-8"?>
<project xmlns="http://maven.apache.org/POM/4.0.0"
         xmlns:xsi="http://www.w3.org/2001/XMLSchema-instance"
         xsi:schemaLocation="http://maven.apache.org/POM/4.0.0 http://maven.apache.org/xsd/maven-4.0.0.xsd">
  <modelVersion>4.0.0</modelVersion>

  <groupId>com.aliyun</groupId>
  <artifactId>JavaDemo</artifactId>
  <version>1.0-SNAPSHOT</version>
  <name>Flink MySQL CDC Demo</name>

  <properties>
    <project.build.sourceEncoding>UTF-8</project.build.sourceEncoding>
    <maven.compiler.source>1.8</maven.compiler.source>
    <maven.compiler.target>1.8</maven.compiler.target>
    <flink.version>1.17.1</flink.version>
    <flink-cdc.version>2.4.2</flink-cdc.version>
    <log4j.version>2.17.1</log4j.version>
  </properties>

  <dependencies>
    <!-- Flink core dependencies (set scope to provided when packaging) -->
    <dependency>
      <groupId>org.apache.flink</groupId>
      <artifactId>flink-java</artifactId>
      <version>${flink.version}</version>
      <scope>provided</scope>
    </dependency>
    <dependency>
      <groupId>org.apache.flink</groupId>
      <artifactId>flink-streaming-java</artifactId>
      <version>${flink.version}</version>
      <scope>provided</scope>
    </dependency>
    <dependency>
      <groupId>org.apache.flink</groupId>
      <artifactId>flink-table-api-java-bridge</artifactId>
      <version>${flink.version}</version>
      <scope>provided</scope>
    </dependency>

    <!-- Realtime Compute for Apache Flink MySQL CDC connector -->
    <dependency>
      <groupId>com.alibaba.ververica</groupId>
      <artifactId>ververica-connector-mysql</artifactId>
      <version>1.17-vvr-8.0.4-1</version>
      <!-- Comment out the following line for local execution -->
      <!-- <scope>provided</scope> -->
    </dependency>

    <dependency>
      <groupId>org.apache.flink</groupId>
      <artifactId>flink-table-runtime</artifactId>
      <version>1.17.1</version>
      <scope>provided</scope>
    </dependency>

    <dependency>
      <groupId>org.apache.flink</groupId>
      <artifactId>flink-core</artifactId>
      <version>1.17.1</version>
      <scope>provided</scope>
    </dependency>
    <dependency>
      <groupId>org.apache.flink</groupId>
      <artifactId>flink-table-common</artifactId>
      <version>1.17.1</version>
      <scope>provided</scope>
    </dependency>

    <!-- Log dependencies -->
    <dependency>
      <groupId>org.apache.logging.log4j</groupId>
      <artifactId>log4j-core</artifactId>
      <version>2.17.1</version>
      <scope>runtime</scope>
    </dependency>

  </dependencies>

  <build>
    <plugins>
      <!-- Compiler plugin -->
      <plugin>
        <groupId>org.apache.maven.plugins</groupId>
        <artifactId>maven-compiler-plugin</artifactId>
        <version>3.13.0</version>
        <configuration>
          <source>${maven.compiler.source}</source>
          <target>${maven.compiler.target}</target>
          <encoding>UTF-8</encoding>
        </configuration>
      </plugin>

      <!-- Fat JAR plugin -->
      <plugin>
        <groupId>org.apache.maven.plugins</groupId>
        <artifactId>maven-shade-plugin</artifactId>
        <version>3.5.1</version>
        <executions>
          <execution>
            <phase>package</phase>
            <goals>
              <goal>shade</goal>
            </goals>
            <configuration>
              <artifactSet>
                <excludes>
                  <exclude>org.apache.flink:force-shading</exclude>
                  <exclude>com.google.code.findbugs:jsr305</exclude>
                </excludes>
              </artifactSet>
              <filters>
                <filter>
                  <artifact>*:*</artifact>
                  <excludes>
                    <exclude>META-INF/*.SF</exclude>
                    <exclude>META-INF/*.DSA</exclude>
                    <exclude>META-INF/*.RSA</exclude>
                    <exclude>META-INF/MANIFEST.MF</exclude>
                  </excludes>
                </filter>
              </filters>
              <transformers>
                <transformer implementation="org.apache.maven.plugins.shade.resource.ManifestResourceTransformer">
                  <mainClass>org.example.JavaDemo</mainClass>
                </transformer>
                <transformer implementation="org.apache.maven.plugins.shade.resource.ServicesResourceTransformer"/>
              </transformers>
            </configuration>

          </execution>
        </executions>
      </plugin>
    </plugins>
  </build>
</project>
MySQL connection parameters:
-
Build the project. Maven places
JavaDemo-1.0-SNAPSHOT.jarin thetargetdirectory. -
Deploy and start the job:
-
In the development console, go to Artifacts and upload
JavaDemo-1.0-SNAPSHOT.jar. -
Go to O&M > Deployments and choose Create Deployment > JAR Deployment.
-
Configure the deployment:
Parameter
Description
Example
Deployment Mode
The mode that you want to use to deploy the JAR deployment. Select Stream Mode.
Stream Mode
Deployment Name
Name for this deployment
javademoEngine Version
Select a version labeled RECOMMENDED or STABLE. See Release notes and Engine versions.
vvr-8.0.11-flink-1.17JAR URI
Select the uploaded JAR.
NoteIn Realtime Compute for Apache Flink using VVR 8.0.6 or later, OSS bucket access is restricted to the bucket bound to the workspace at creation.
JavaDemo-1.0-SNAPSHOT.jarEntry Point Class
Entry point class of the JAR. Required if no main class is specified in the JAR manifest.
-
Entry Point Main Arguments
Arguments passed to the main method
-
Deployment Target
Select a queue or session cluster.
ImportantDo not use session clusters in production — they do not support monitoring metrics, alerting, or Autopilot. See Manage queues and Debug a job.
default-queueFor full parameter details, see Deploy a job.
-
Click Deploy.
-
On the Deployments page, find
javademoand click Start in the Actions column. In the Start Job panel, select Initial Mode and click Start.
-
-
Verify the results. After the deployment reaches the RUNNING state, go to the deployment details page. On the Logs tab, select the Running Task Managers subtab. Click an item in the Path, ID column, switch to the Log List subtab, and open the log with the
.outsuffix. Search forlilyto confirm the data is being read.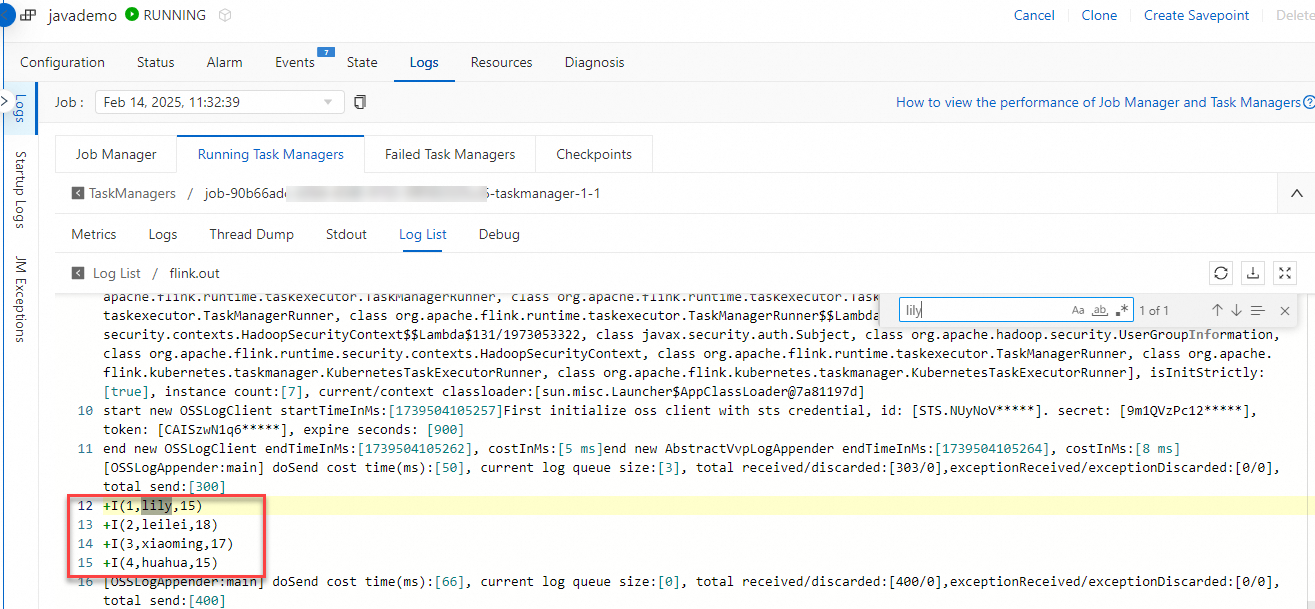
Step 2: Encrypt the plaintext password with KMS
Use KMS to encrypt the plaintext password flink_rds_password@123. The resulting ciphertext (example) is:
a2V5LWh6ejY3YTJmZTY5ejR2NTlpOHE1MC03d3ozYWU1anlzC6NLoC0JHHEXTJ4P/4iVOe/B+eniv8EcaviQDzZWWNPedOYkoFFYWA==Choose one of the following methods.
Method 1: Encrypt using the OpenAPI portal
-
Go to the KMS Encrypt API on Alibaba Cloud OpenAPI Portal and select your target region.
-
Set KeyId to your KMS key ID and set Plaintext to the password you want to encrypt.
-
Click Initiate Call.
-
Copy the
CiphertextBlobvalue from the response.
For details, see Encrypt.
Method 2: Encrypt from IntelliJ IDEA
-
Enable Internet access for your KMS key. KMS keys are only accessible over VPC by default. See Access KMS instance keys over the Internet.
-
Set the
ALIBABA_CLOUD_ACCESS_KEY_IDandALIBABA_CLOUD_ACCESS_KEY_SECRETenvironment variables. See How do I view the AccessKey ID and AccessKey secret? -
In your IntelliJ IDEA project, create a class file named
EncryptFlinkand paste the following code. Update the endpoint and key ID to match your setup.Parameter Description Example config.endpointKMS instance endpoint kms.cn-hangzhou.aliyuncs.comPlaintextThe plaintext password to encrypt flink_rds_password@123KeyIdYour KMS key ID key-hzz67ab1ff4e750h****package org.example; import com.aliyun.kms20160120.models.EncryptResponse; import com.aliyun.kms20160120.models.EncryptResponseBody; import com.aliyun.tea.*; public class EncryptFlink { public static com.aliyun.kms20160120.Client createClient() throws Exception { // Store credentials in environment variables, not in code. com.aliyun.teaopenapi.models.Config config = new com.aliyun.teaopenapi.models.Config() .setAccessKeyId(System.getenv("ALIBABA_CLOUD_ACCESS_KEY_ID")) .setAccessKeySecret(System.getenv("ALIBABA_CLOUD_ACCESS_KEY_SECRET")); // Replace with your KMS instance endpoint. config.endpoint = "kms.cn-hangzhou.aliyuncs.com"; return new com.aliyun.kms20160120.Client(config); } public static void main(String[] args_) throws Exception { java.util.List<String> args = java.util.Arrays.asList(args_); com.aliyun.kms20160120.Client client = EncryptFlink.createClient(); com.aliyun.kms20160120.models.EncryptRequest encryptRequest = new com.aliyun.kms20160120.models.EncryptRequest() .setPlaintext("flink_rds_password@123") .setKeyId("key-hzz67ab1ff4e750h****"); com.aliyun.teautil.models.RuntimeOptions runtime = new com.aliyun.teautil.models.RuntimeOptions(); try { EncryptResponse encryptResponse = client.encryptWithOptions(encryptRequest, runtime); EncryptResponseBody body = encryptResponse.getBody(); System.out.println(body.getCiphertextBlob()); } catch (TeaException error) { System.out.println(error.getMessage()); System.out.println(error.getData().get("Recommend")); com.aliyun.teautil.Common.assertAsString(error.message); } catch (Exception _error) { TeaException error = new TeaException(_error.getMessage(), _error); System.out.println(error.getMessage()); System.out.println(error.getData().get("Recommend")); com.aliyun.teautil.Common.assertAsString(error.message); } } }Key parameters:
-
Add the following dependencies to
pom.xml:<dependency> <groupId>com.aliyun</groupId> <artifactId>kms20160120</artifactId> <version>1.2.3</version> </dependency> <dependency> <groupId>com.aliyun</groupId> <artifactId>tea</artifactId> <version>1.3.2</version> </dependency> -
Run
EncryptFlinkand copy the ciphertext printed to stdout.
Step 3: Add KMS decryption to your Flink job
All modifications in this step use the KmsUtil decryption utility to fetch the plaintext password at runtime over VPC, then pass it to the MySQL connector.
Create the decryption utility class
In your IntelliJ IDEA project, create a class file named KmsUtil and paste the following code. Replace the endpoint and CA certificate with your KMS instance values.
package org.example;
import com.aliyun.kms20160120.Client;
import com.aliyun.kms20160120.models.DecryptRequest;
import com.aliyun.teaopenapi.models.Config;
public class KmsUtil {
public static String decrypt(String ak, String sk, String ciphertext) throws Exception {
Client client = new Client(new Config()
.setAccessKeyId(ak)
.setAccessKeySecret(sk)
// Replace with your KMS instance VPC endpoint.
.setEndpoint("kst-hzz67ab1e****f7hle9ab.cryptoservice.kms.aliyuncs.com")
// Replace with your KMS instance CA certificate.
.setCa("-----BEGIN CERTIFICATE-----\n" +
"MIIDuzCCAqOgAwIBAgIJA*****--\n"));
return client.decryptWithOptions(
new DecryptRequest().setCiphertextBlob(ciphertext),
new com.aliyun.teautil.models.RuntimeOptions()
).getBody().getPlaintext();
}
}| Parameter | Description | Example |
|---|---|---|
Endpoint |
VPC endpoint of your KMS instance | kst-hzz67ab1e****f7hle9ab.cryptoservice.kms.aliyuncs.com |
Ca |
CA certificate of your KMS instance. Download it from the KMS console. See Create access credentials. | -----BEGIN CERTIFICATE-----\nMIIDuzCCAqOgAwIBAgIJA*****--\n |
Update JavaDemo.java
Add the following lines to parse the AccessKey pair from job arguments and decrypt the ciphertext at startup. Replace the ciphertext string with the value you obtained in Step 2.
// Parse the AccessKey pair from job arguments.
final ParameterTool params = ParameterTool.fromArgs(args);
String ak = params.get("akid");
String sk = params.get("aksecret");
// Decrypt the database password at runtime.
String encryptedPassword = "a2V5LWh6ejY3YTJmZTY5ejR2NTlpOHE1MC03d3ozYWU1anlzC6NLoC0JHHEXTJ4P/4iVOe/B+eniv8EcaviQDzZWWNPedOYkoFFYWA==";
String decryptedPassword = KmsUtil.decrypt(ak, sk, encryptedPassword);Then change the MySQL connector password from the hardcoded string to the decrypted variable:
// Before:
.password("flink_rds_password@123")
// After:
.password(decryptedPassword)Update pom.xml
-
Add the KMS dependencies (same as in Step 2):
<dependency> <groupId>com.aliyun</groupId> <artifactId>kms20160120</artifactId> <version>1.2.3</version> </dependency> <dependency> <groupId>com.aliyun</groupId> <artifactId>tea</artifactId> <version>1.3.2</version> </dependency> -
(Optional) Change
artifactIdtoKmsJavaDemoto distinguish this JAR from the baseline. -
Build the project. Maven places
KmsJavaDemo-1.0-SNAPSHOT.jarin thetargetdirectory.
Complete code reference
KmsJavaDemo
package org.example;
import com.ververica.cdc.connectors.mysql.source.MySqlSource;
import com.ververica.cdc.debezium.table.RowDataDebeziumDeserializeSchema;
import org.apache.flink.api.common.eventtime.WatermarkStrategy;
import org.apache.flink.streaming.api.datastream.DataStreamSource;
import org.apache.flink.streaming.api.environment.StreamExecutionEnvironment;
import org.apache.flink.table.api.DataTypes;
import org.apache.flink.table.data.RowData;
import org.apache.flink.table.runtime.typeutils.InternalTypeInfo;
import org.apache.flink.table.types.DataType;
import org.apache.flink.table.types.logical.LogicalType;
import org.apache.flink.table.types.logical.RowType;
import org.apache.flink.table.types.utils.TypeConversions;
import org.apache.flink.api.java.utils.ParameterTool;
public class JavaDemo {
public static void main(String[] args) throws Exception {
final StreamExecutionEnvironment env = StreamExecutionEnvironment.getExecutionEnvironment();
// Parse the AccessKey pair from job arguments.
final ParameterTool params = ParameterTool.fromArgs(args);
String ak = params.get("akid");
String sk = params.get("aksecret");

// Decrypt the database password at runtime.
String encryptedPassword = "a2V5LWh6ejY3YTJmZTY5ejR2NTlpOHE1MC03d3ozYWU1anlzC6NLoC0JHHEXTJ4P/4iVOe/B+eniv8EcaviQDzZWWNPedOYkoFFYWA==";
String decryptedPassword = KmsUtil.decrypt(ak, sk, encryptedPassword);
// Build a deserializer.
DataType dataType =
DataTypes.ROW(
DataTypes.FIELD("id", DataTypes.INT()),
DataTypes.FIELD("username", DataTypes.STRING()),
DataTypes.FIELD("age", DataTypes.INT()));
LogicalType logicalType = TypeConversions.fromDataToLogicalType(dataType);
InternalTypeInfo<RowData> typeInfo = InternalTypeInfo.of(logicalType);
RowDataDebeziumDeserializeSchema deserializer =
RowDataDebeziumDeserializeSchema.newBuilder()
.setPhysicalRowType((RowType) dataType.getLogicalType())
.setResultTypeInfo(typeInfo)
.build();
// Configure the MySQL CDC data source.
MySqlSource<RowData> mySqlSource =
MySqlSource.<RowData>builder()
.hostname("rm-bp****2ye09w72zjq.mysql.rds.aliyuncs.com")
.port(3306)
.databaseList("school")
.tableList("school.student")
.username("flink_rds_user")
.password(decryptedPassword)
.deserializer(deserializer)
.build();
// Add the MySQL source to the Flink DataStream program.
DataStreamSource<RowData> mySQLSource = env.fromSource(mySqlSource, WatermarkStrategy.noWatermarks(), "MySQL Source");
// Write to stdout.
mySQLSource.print();
env.execute("MySQL CDC Test");
}
}POM.xml
<?xml version="1.0" encoding="UTF-8"?>
<project xmlns="http://maven.apache.org/POM/4.0.0"
xmlns:xsi="http://www.w3.org/2001/XMLSchema-instance"
xsi:schemaLocation="http://maven.apache.org/POM/4.0.0 http://maven.apache.org/xsd/maven-4.0.0.xsd">
<modelVersion>4.0.0</modelVersion>
<groupId>com.aliyun</groupId>
<artifactId>KmsJavaDemo</artifactId>
<version>1.0-SNAPSHOT</version>
<name>Flink MySQL CDC Demo</name>
<properties>
<project.build.sourceEncoding>UTF-8</project.build.sourceEncoding>
<maven.compiler.source>1.8</maven.compiler.source>
<maven.compiler.target>1.8</maven.compiler.target>
<flink.version>1.17.1</flink.version>
<flink-cdc.version>2.4.2</flink-cdc.version>
<log4j.version>2.17.1</log4j.version>
</properties>
<dependencies>
<!-- Flink core dependencies (set scope to provided when packaging) -->
<dependency>
<groupId>org.apache.flink</groupId>
<artifactId>flink-java</artifactId>
<version>${flink.version}</version>
<scope>provided</scope>
</dependency>
<dependency>
<groupId>org.apache.flink</groupId>
<artifactId>flink-streaming-java</artifactId>
<version>${flink.version}</version>
<scope>provided</scope>
</dependency>
<dependency>
<groupId>org.apache.flink</groupId>
<artifactId>flink-table-api-java-bridge</artifactId>
<version>${flink.version}</version>
<scope>provided</scope>
</dependency>
<!-- Realtime Compute for Apache Flink MySQL CDC connector -->
<dependency>
<groupId>com.alibaba.ververica</groupId>
<artifactId>ververica-connector-mysql</artifactId>
<version>1.17-vvr-8.0.4-1</version>
<!-- Comment out the following line for local execution -->
<!-- <scope>provided</scope> -->
</dependency>
<dependency>
<groupId>org.apache.flink</groupId>
<artifactId>flink-table-runtime</artifactId>
<version>1.17.1</version>
<scope>provided</scope>
</dependency>
<dependency>
<groupId>org.apache.flink</groupId>
<artifactId>flink-core</artifactId>
<version>1.17.1</version>
<scope>provided</scope>
</dependency>
<dependency>
<groupId>org.apache.flink</groupId>
<artifactId>flink-table-common</artifactId>
<version>1.17.1</version>
<scope>provided</scope>
</dependency>
<!-- Log dependencies -->
<dependency>
<groupId>org.apache.logging.log4j</groupId>
<artifactId>log4j-core</artifactId>
<version>2.17.1</version>
<scope>runtime</scope>
</dependency>
<dependency>
  <groupId>com.aliyun</groupId>
  <artifactId>kms20160120</artifactId>
  <version>1.2.3</version>
</dependency>

<dependency>
  <groupId>com.aliyun</groupId>
  <artifactId>tea</artifactId>
  <version>1.3.2</version>
</dependency>
</dependencies>
<build>
<plugins>
<!-- Compiler plugin -->
<plugin>
<groupId>org.apache.maven.plugins</groupId>
<artifactId>maven-compiler-plugin</artifactId>
<version>3.13.0</version>
<configuration>
<source>${maven.compiler.source}</source>
<target>${maven.compiler.target}</target>
<encoding>UTF-8</encoding>
</configuration>
</plugin>
<!-- Fat JAR plugin -->
<plugin>
<groupId>org.apache.maven.plugins</groupId>
<artifactId>maven-shade-plugin</artifactId>
<version>3.5.1</version>
<executions>
<execution>
<phase>package</phase>
<goals>
<goal>shade</goal>
</goals>
<configuration>
<artifactSet>
<excludes>
<exclude>org.apache.flink:force-shading</exclude>
<exclude>com.google.code.findbugs:jsr305</exclude>
</excludes>
</artifactSet>
<filters>
<filter>
<artifact>*:*</artifact>
<excludes>
<exclude>META-INF/*.SF</exclude>
<exclude>META-INF/*.DSA</exclude>
<exclude>META-INF/*.RSA</exclude>
<exclude>META-INF/MANIFEST.MF</exclude>
</excludes>
</filter>
</filters>
<transformers>
<transformer implementation="org.apache.maven.plugins.shade.resource.ManifestResourceTransformer">
<mainClass>org.example.JavaDemo</mainClass>
</transformer>
<transformer implementation="org.apache.maven.plugins.shade.resource.ServicesResourceTransformer"/>
</transformers>
</configuration>
</execution>
</executions>
</plugin>
</plugins>
</build>
</project>Step 4: Deploy the KMS-enabled JAR
-
Log on to the Realtime Compute for Apache Flink console. Find your workspace and click Console in the Actions column.
-
In the left-side navigation pane, click Artifacts. Click Upload Artifact and select
KmsJavaDemo-1.0-SNAPSHOT.jar. -
Go to O&M and choose Create Deployment > JAR Deployment.
-
Configure the deployment: For full parameter details, see Deploy a job.
Parameter Description Example Deployment Mode Select Stream Mode Stream Mode Deployment Name Name for this deployment kmsjavademoEngine Version Select a version labeled RECOMMENDED or STABLE. See Release notes and Engine versions. vvr-8.0.11-flink-1.17JAR URI Select the uploaded JAR. NoteIn Realtime Compute for Apache Flink using VVR 8.0.6 or later, OSS bucket access is restricted to the bucket bound to the workspace at creation.
KmsJavaDemo-1.0-SNAPSHOT.jarEntry Point Class Entry point class of the JAR - Entry Point Main Arguments Pass the AccessKey pair as arguments. To protect credentials, store them as variables using Variable management and reference them here. See How do I view the AccessKey ID and AccessKey secret? --akid ${secret_values.akid} --aksecret ${secret_values.aksecret}Deployment Target Select a queue or session cluster. ImportantDo not use session clusters in production. See Manage queues and Debug a job.
default-queue -
Click Deploy.
-
On the Deployments page, find
kmsjavademoand click Start in the Actions column. In the Start Job panel, select Initial Mode and click Start.
Step 5: Verify the results
After the deployment reaches the RUNNING state, go to the deployment details page. On the Logs tab, select the Running Task Managers subtab. Click an item in the Path, ID column, switch to the Log List subtab, and open the log with the .out suffix. Search for lily to confirm the job is reading data correctly.

If data appears in the log, the job has successfully decrypted the KMS-protected password and connected to ApsaraDB RDS for MySQL.