You can use variables to prevent security risks caused by information such as AccessKey pairs and passwords in plaintext. By using variables, you do not need to repeatedly write the same code or values. This simplifies configuration management. You can reference a variable in various scenarios, such as the development of SQL drafts and JAR or Python deployments, log output configuration, and UI-based parameter configuration. This topic describes how to create and use variables in different scenarios.
Background information
Each variable has a name and a value. The name reflects the meaning of the value and can be customized. The value is the actual data. Realtime Compute for Apache Flink supports deployment variables and namespace variables. The following section describes the differences between them:
Deployment variables: These variables can be used only in a single deployment. For example, they can be used in an SQL draft for extract, transform, load (ETL) or as the input parameters in the Main function of a JAR or Python deployment, in the format of
${Variable name}. For more information about how to use deployment variables, see the Deployment variables section in this topic.Namespace variables: These variables can be used in a namespace. For example, they can be used for data development, such as data ingestion, ETL, and script-based query. They can also be used as the input parameters in the Main function of a JAR or Python deployment, in the parameter configuration of a deployment, log configuration, and UI-based parameter configuration, such as the parameters of a catalog. Namespace variables are in the format of
${secret_values.Variable name}. For more information about how to create and use namespace variables, see the Namespace variables section in this topic.
Usage notes
You cannot configure multiple values for a variable name.
Do not use a keyword as the variable name.
In SQL drafts, you can reference a variable in a temporary table (defined with the CREATE TEMPORARY TABLE statement). If you reference a variable in a persistent table (defined by using the CREATE TABLE statement), the table that you create cannot be used.
Deployment variables
Deployment variable names must be unique within a single deployment.
Reference a variable in an SQL draft
You can use variables when you develop an SQL draft. For example, you can use variables as the input parameters of a custom function. You can also modify the variable values after the deployment for the draft is started.
In the left-side navigation pane of the Realtime Compute for Apache Flink console, choose .
In the SQL editor of the draft that you want to develop, create variables in the
${Variable name}format. The following sample code provides an example.If you reference a variable in the WITH clause, you must enclose the variable with a pair of single quotation marks ('), in the
'${Variable name}'format.If you reference a variable as a table name or field name in an SQL statement, you must enclose the variable with a pair of grave accents (`), in the
`${Variable name}`format.
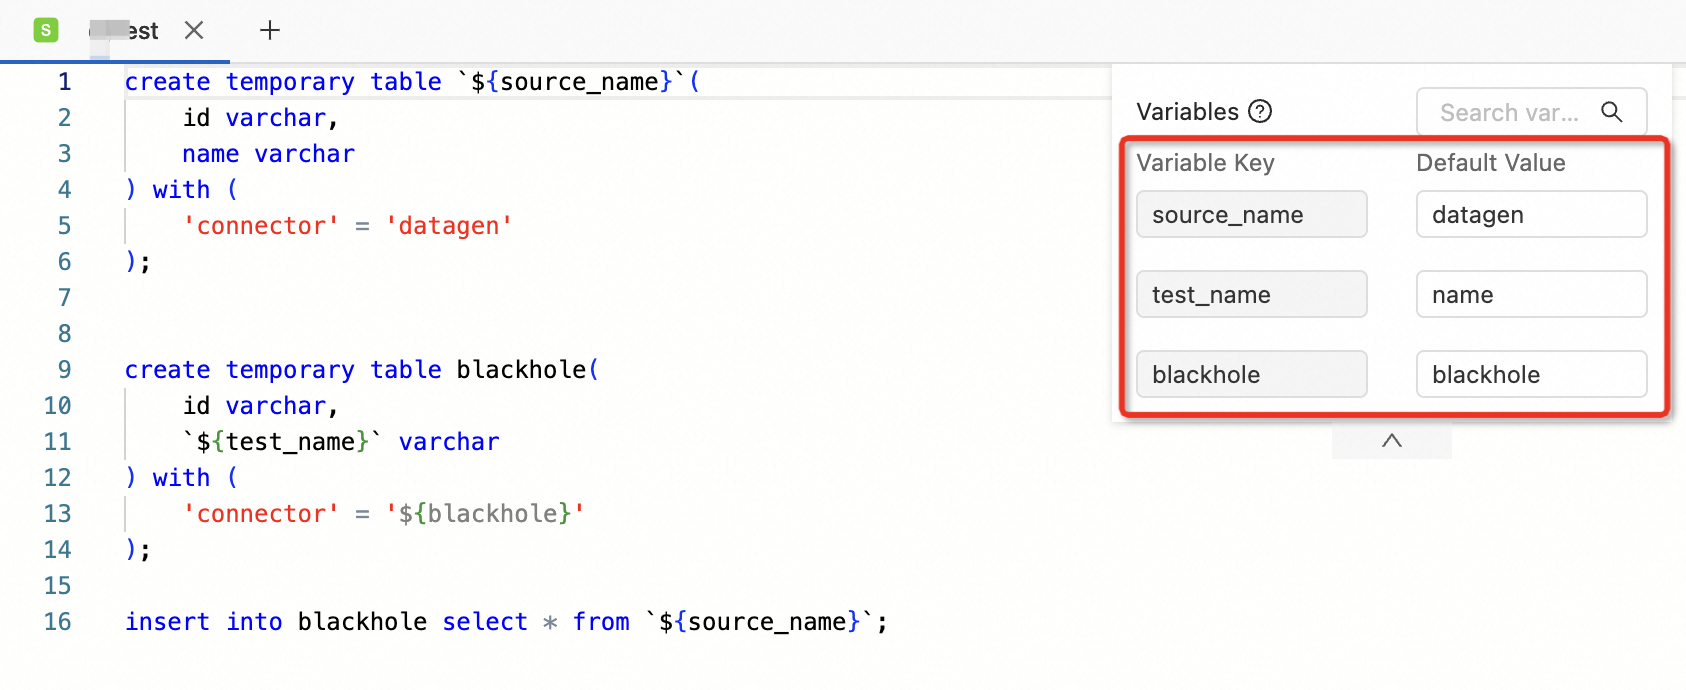
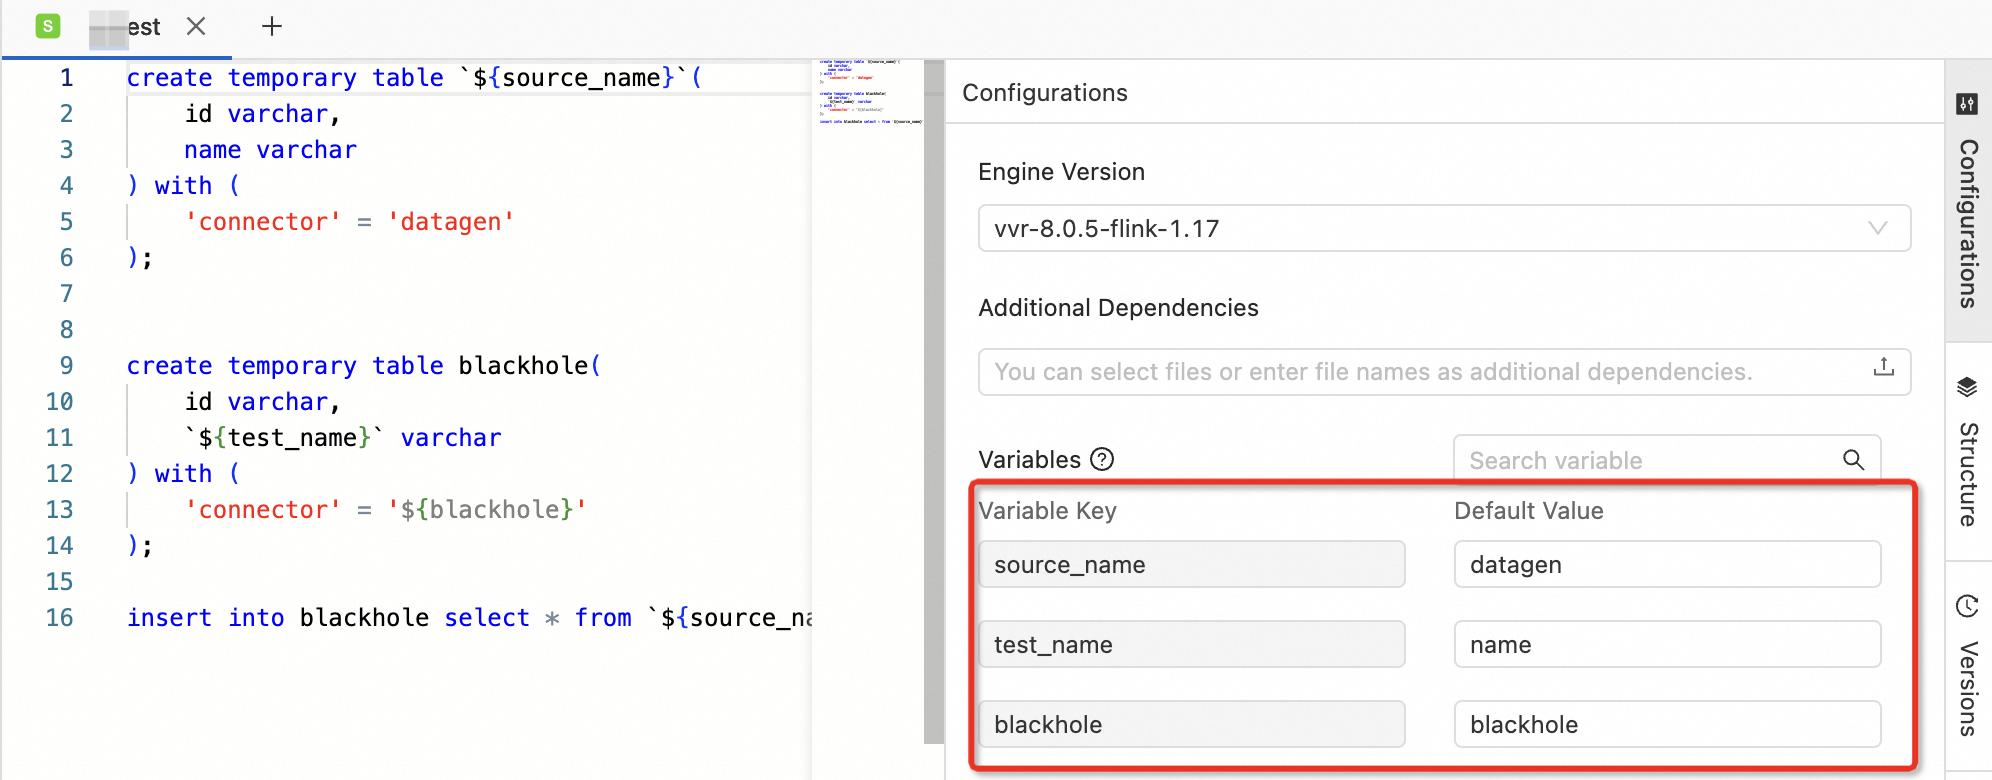
create temporary table `${source_name}`(
    id varchar,
    name varchar
) with (
    'connector' = 'datagen'
);


create temporary table blackhole(
    id varchar,
    `${test_name}` varchar
) with (
    'connector' = '${blackhole}'
);

insert into blackhole select * from `${source_name}`;
Realtime Compute for Apache Flink automatically identifies variables in the required format in the draft. You need to use one of the following methods to configure the variable values:
Method 1: Enter a variable value in the Variables panel of the SQL editor.
Method 2: Click the Configurations tab on the right side of the SQL editor. In the Configurations panel, enter variable values in the Variables section.
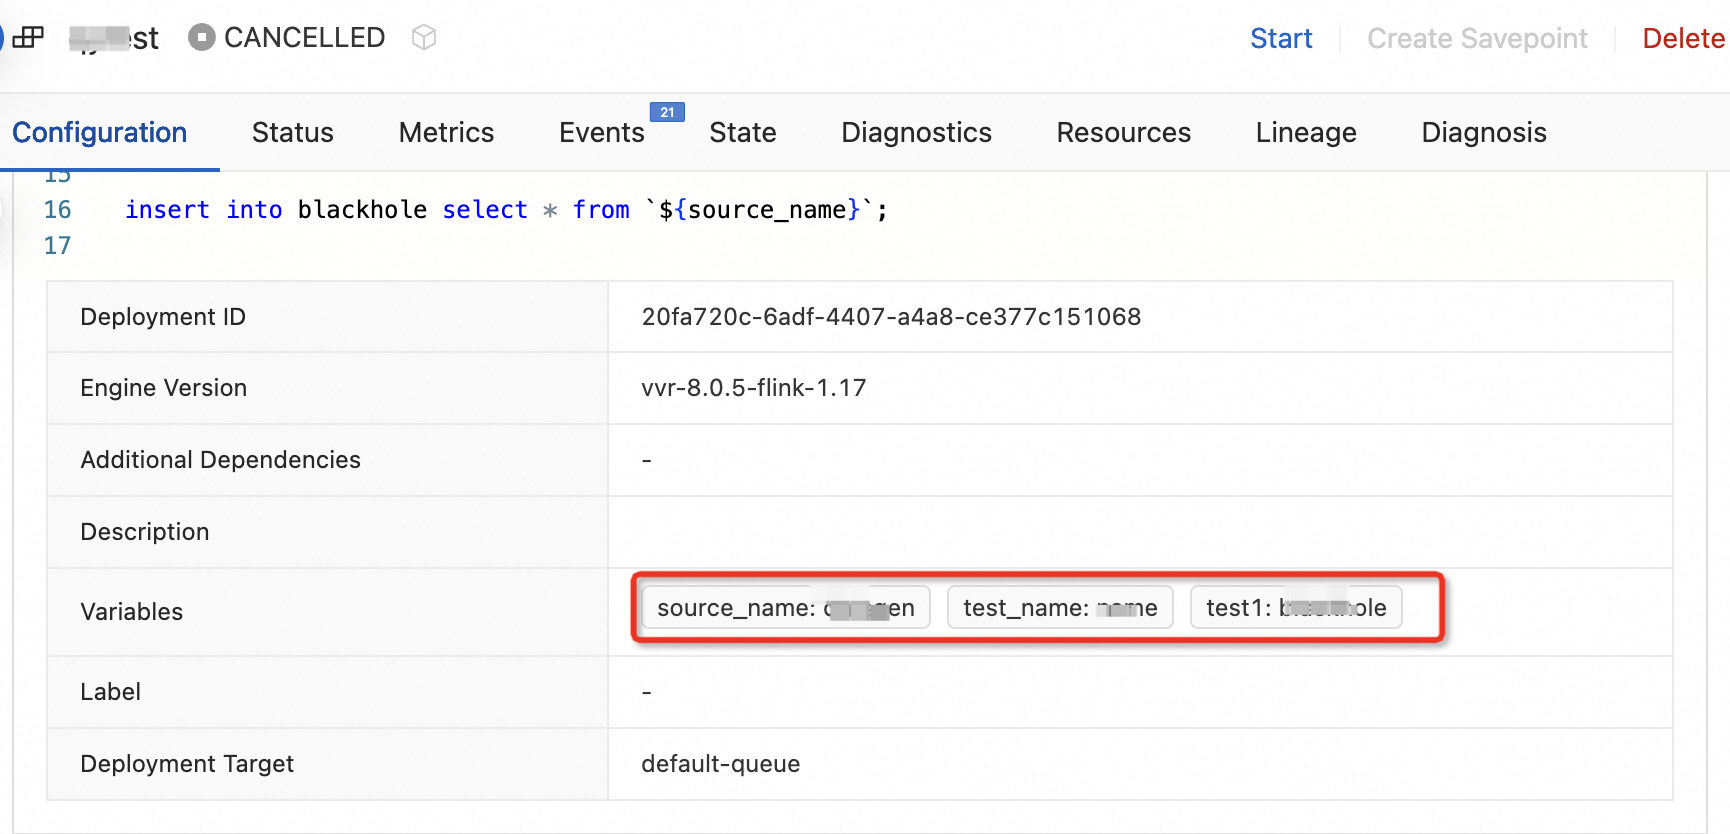
After the draft is deployed, view the variable that is referenced in the deployment on the Configuration tab of the Deployments page.
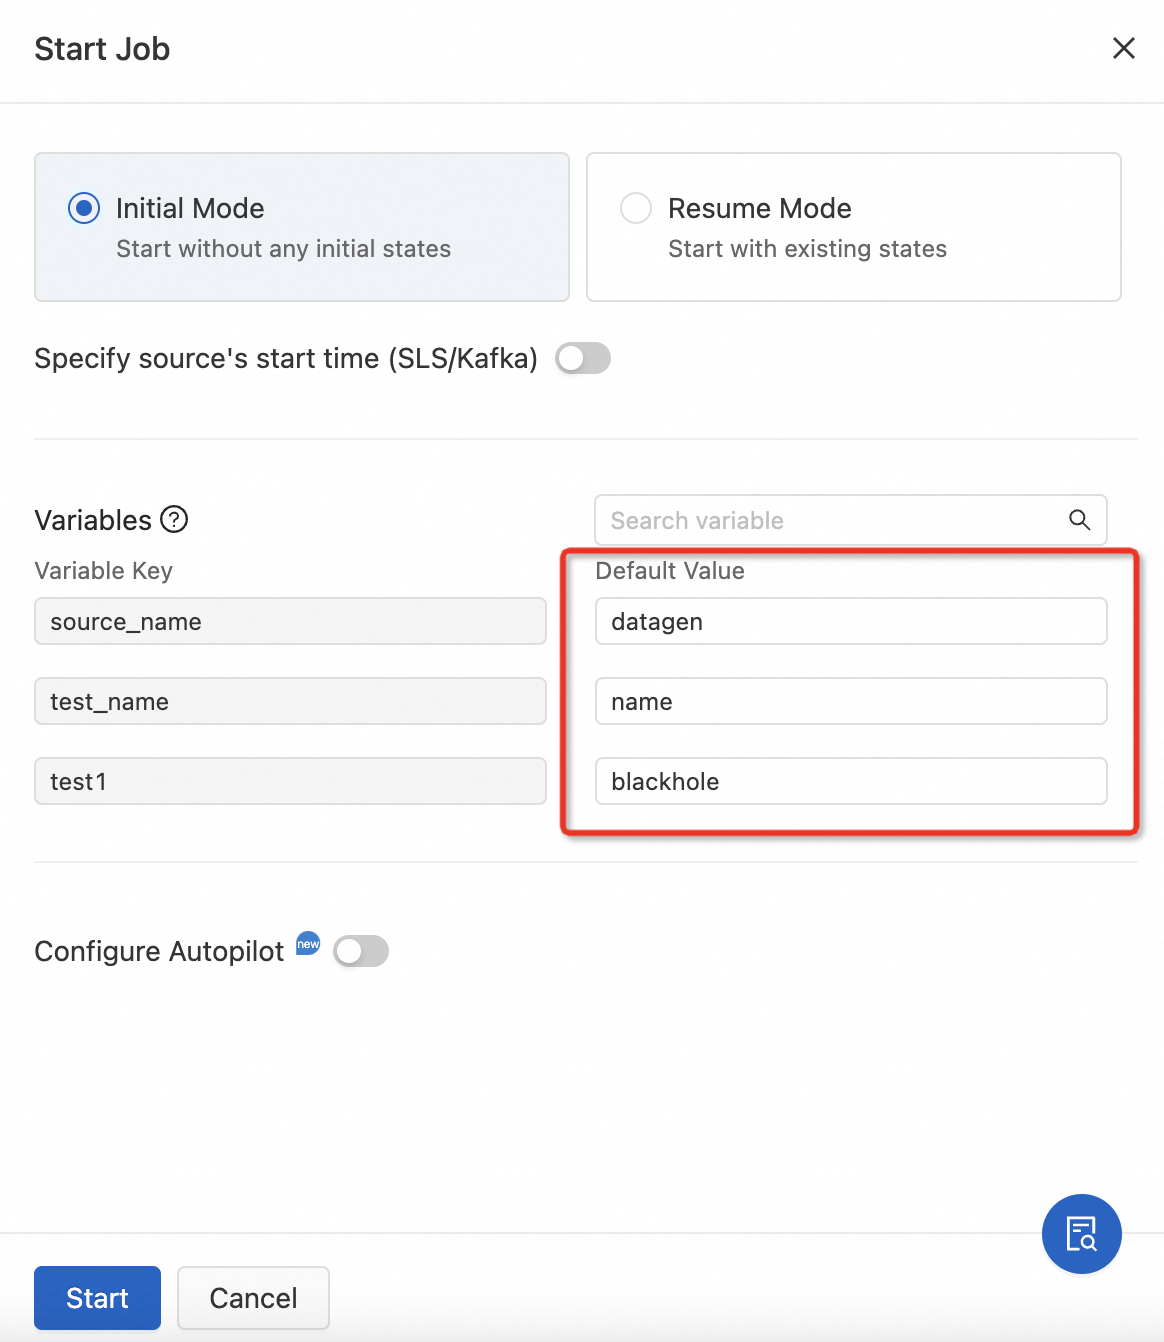
On the Deployments page, find the deployment that you want to start and click Start in the Actions column. You can change the variable value in the Start Job panel.
ImportantThe new variable values take effect only for this particular deployment to be started. Those defined in the SQL draft remain unchanged.
Reference a variable in a JAR or Python deployment
You can use variables as the input parameters in the Main function of a JAR or Python deployment.
Method 1
In the left-side navigation pane, choose . Then, create a variable.
Choose . On the Deployments page, click Create Deployment.
In the Entry Point Main Arguments field of the dialog box that appears, enter variable names in the format
--<Variable name specified in code> ${secret_values.<Variable name configured in the console>}, such as--akid ${secret_values.test1}.NoteTo configure variables in the console, go to .
If the variable name contains a special character, follow the instructions provided in How do I use special characters in Entry Point Main Arguments?.

Click Deploy.
Find the target deployment and click Start in the Actions column.
Method 2
In the left-side navigation pane of the development console, choose . On the Deployments page, click Create Deployment.
In the dialog box that appears, enter variable names in the Entry Point Main Arguments field. Then, enter the variable values in the Variables section below the field.
If the variable name contains a special character, follow the instructions provided in How do I use special characters in Entry Point Main Arguments?

For more information about other deployment parameters, see Deploy a job.
Click Deploy.
Go to . On the Deployments page, find the target deployment and click Start in the Actions column.
The Start Job panel appears. You can change the variable values for this particular Flink job.

Namespace variables
Create a variable
Only members with the editor or higher permissions, or members with the variable creation permission can create variables.
Log on to the development console of Realtime Compute for Apache Flink. Find the workspace that you want to manage and click Console in the Actions column.
In the left-side navigation pane, choose . On the Variables page, click Add Variable.
Parameter
Description
Variable Name
Variable names must be unique in the same namespace and cannot be modified after the variables are created.
Variable Value
Variable values are case-sensitive. Pay attention to the case when you enter letters in a variable value. You can change the value of a variable after it is created. For more information, see the Edit or delete a variable section in this topic.
Type
You cannot modify the type of a variable after it is created. Valid values:
Plaintext: You can directly view the variable value on the Variables page.
Ciphertext: You cannot view the variable value.

Click OK.
Reference a variable
After you create a variable, you can reference the variable in the ${secret_values.Variable name} format. The following section provides examples for referencing a variable in different scenarios.
Reference a variable in data development
You can reference namespace variables in the Development module of the Realtime Compute for Apache Flink console.
SQL draft for ETL
In the DDL statement of an SQL draft, you can reference a variable in the ${secret_values.Variable name} format. The following sample code provides an example.
If you reference a variable in the WITH clause, you must enclose the variable with a pair of single quotation marks ('), in the
'${secret_values.Variable name}'format.If you reference a variable as a table name or field name in an SQL statement, you must enclose the variable with a pair of grave accents (`), in the
`${secret_values.Variable name}`format.
create temporary table `${secret_values.source_name}`(
    id varchar,
    name varchar
) with (
    'connector' = 'datagen'
);


create temporary table blackhole(
    id varchar,
    `${secret_values.test_name}` varchar
) with (
    'connector' = '${secret_values.blackhole}'
);

insert into blackhole select * from `${secret_values.source_name}`;
Data ingestion
source:
  type: mysql
  name: Mysql Source
  hostname: localhost
  port: 3306
  username: test
  password: ${secret_values.mysqlpw}
  tables: app_db.\.*
  server-id: 5400-5404

···
Data query
USE CATALOG paimon;

CREATE DATABASE IF NOT EXISTS `${secret_values.test_name}`;

CREATE TABLE paimon.`${secret_values.test_name}`.ods_user_log
(
    item_id  int NOT NULL,
    `${secret_values.user}` varchar(50) NOT NULL,
    action  varchar(20)  NOT NULL,
    vtime   timestamp,
    ds      varchar(10) NOT NULL
)
PARTITIONED BY (ds);

SELECT * from paimon.`${secret_values.test_name}`.ods_user_log LIMIT 10;
Reference a variable in a JAR or Python deployment
You can use variables as the input parameters in the Main function of a JAR or Python deployment.
In the development console of Realtime Compute for Apache Flink, choose . On the Deployments page, click Create Deployment.
Enter a variable name in the Entry Point Main Arguments field. The following figure shows the configuration.
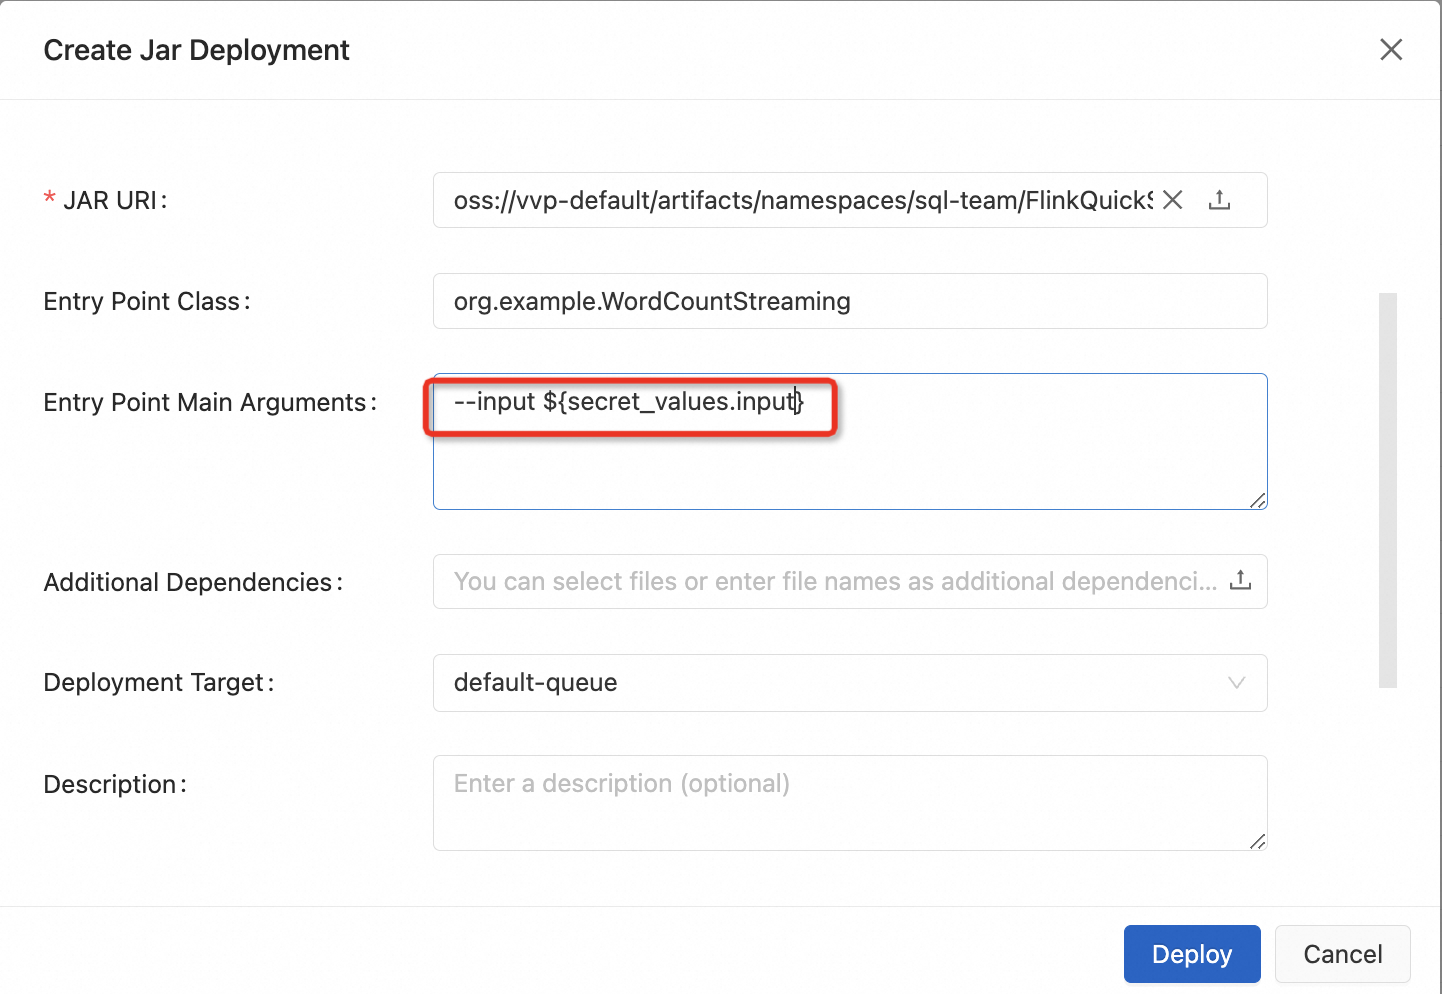
For more information about other deployment parameters, see Deploy a job.
Click Deploy.
Reference a variable in the parameter configuration of a deployment
You can use variables in the parameter configuration of a deployment.
In the development console of Realtime Compute for Apache Flink, choose . On the Deployments page, click the deployment that you want to mange.
On the Configuration tab, click Edit in the upper-right corner of the Parameters section and configure the parameters. You can use variables as the parameter values. The following figure shows the configurations.
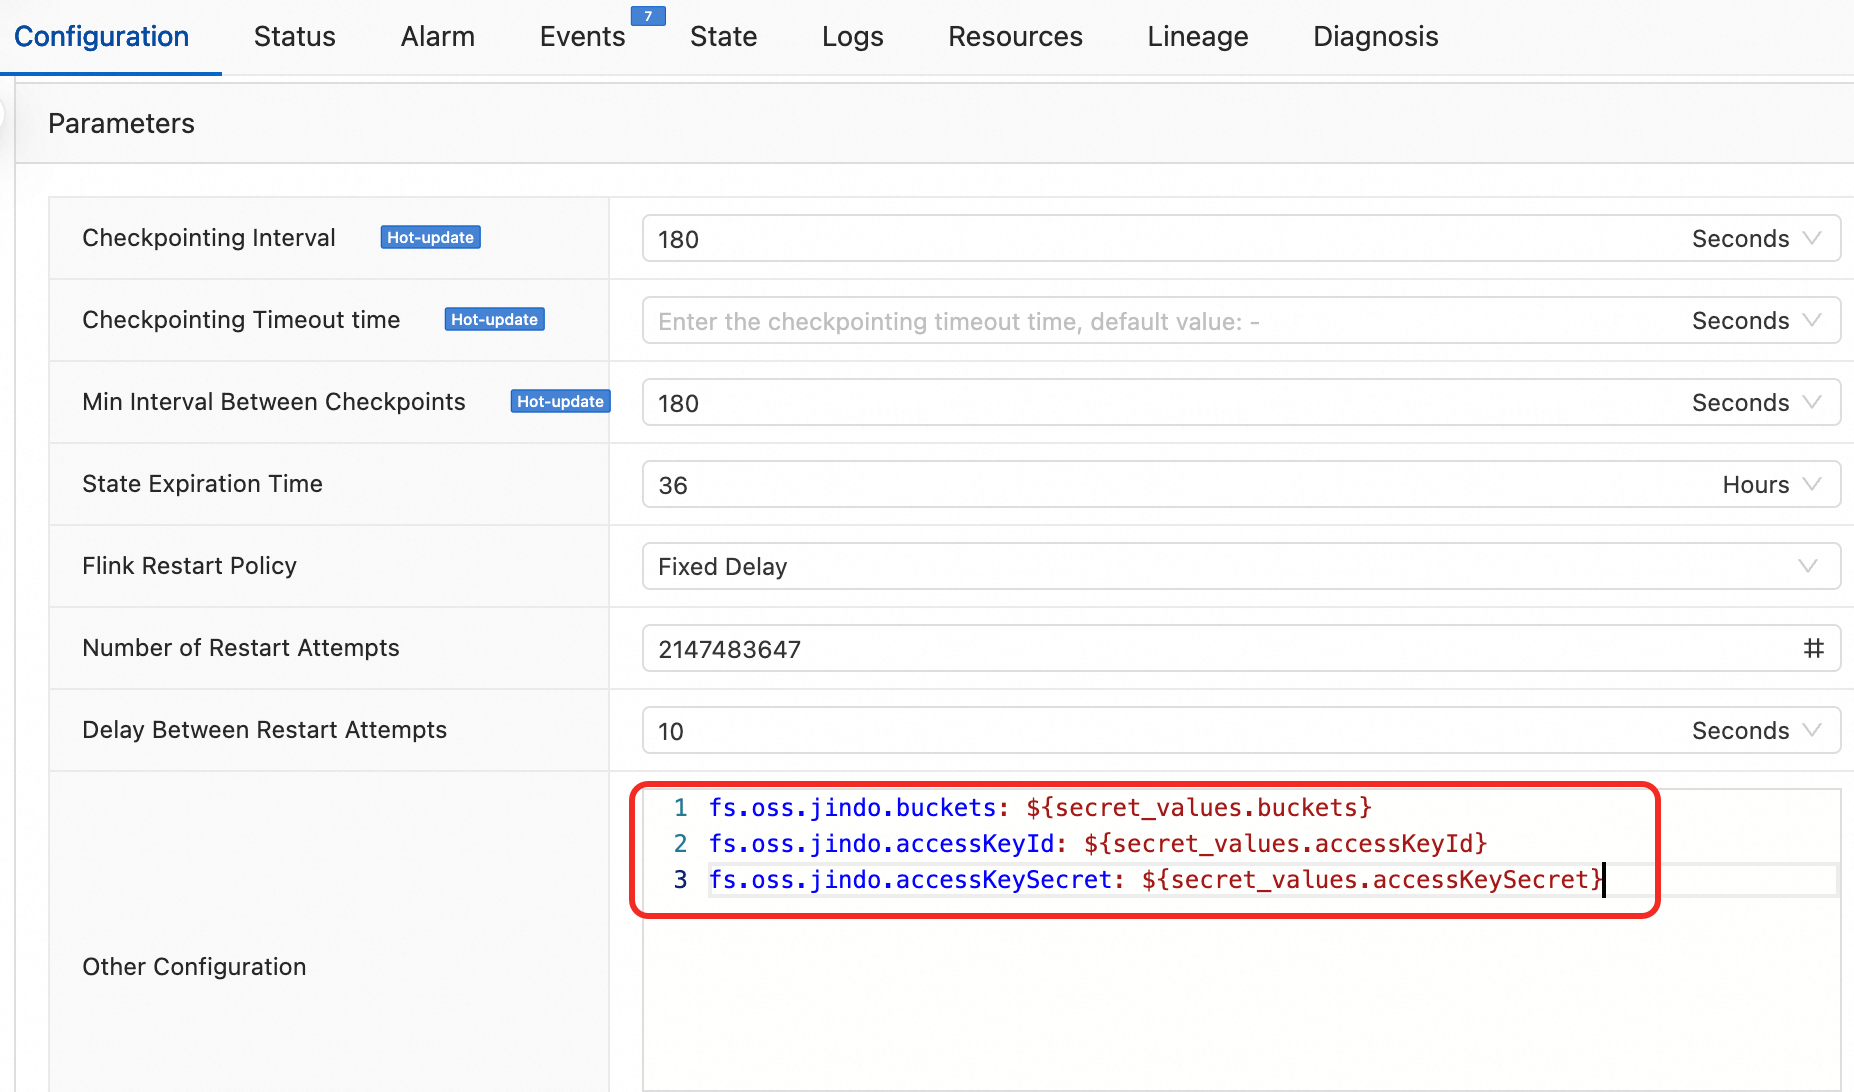
Click Save.
Reference a variable in the Logging section
Go to the Logging section.
For more information about how to configure parameters to export the logs of a deployment, see Configure log export for a single job.
For more information about how to configure parameters to export the logs of all deployments in a namespace, see Configure log export for all jobs.
Reference a variable in the Logging section.
In the following example, the variables named accessKeyId and accessKeySecret are used to export logs of deployments to Simple Log Service. For more information about the complete configuration, see Configure log export.
<Appender name="SLS" type="SLS">
  <Layout pattern="%d{yyyy-MM-dd HH:mm:ss,SSS}{GMT+8} %-5p %-60c %x - %m%n" type="PatternLayout" charset="UTF-8"/>

  <!-- The final effective log path is: ${baseUri}/logs/${namespace}/${deploymentId}/{jobId}/ -->
  <Property name="namespace">{{ namespace }}</Property> <!-- Do not modify this line -->
  <Property name="project">YOUR-SLS-PROJECT</Property>
  <Property name="logStore">YOUR-SLS-LOGSTORE</Property>
  <Property name="endpoint">YOUR-SLS-ENDPOINT</Property>
  <Property name="accessKeyId">${secret_values.accessKeyId}</Property>
  <Property name="accessKeySecret">${secret_values.accessKeySecret}</Property>
  <Property name="topic">{{ namespace }}:{{ deploymentId }}:{{ jobId }}</Property>
  <Property name="deploymentName">{{ deploymentName }}</Property>
  <Property name="flushIntervalSeconds">10</Property>
  <Property name="flushIntervalEventCount">100</Property>
</Appender>
Reference a variable in UI-based parameter configuration
When you create a catalog in the development console of Realtime Compute for Apache Flink, you can reference a variable in a configuration item.
In the development console of Realtime Compute for Apache Flink, click Catalogs in the left-side navigation pane.
Reference a variable in the Create Catalog dialog box. In this example, the variable named
mysqlpasswordis used for the password parameter when you create a MySQL catalog.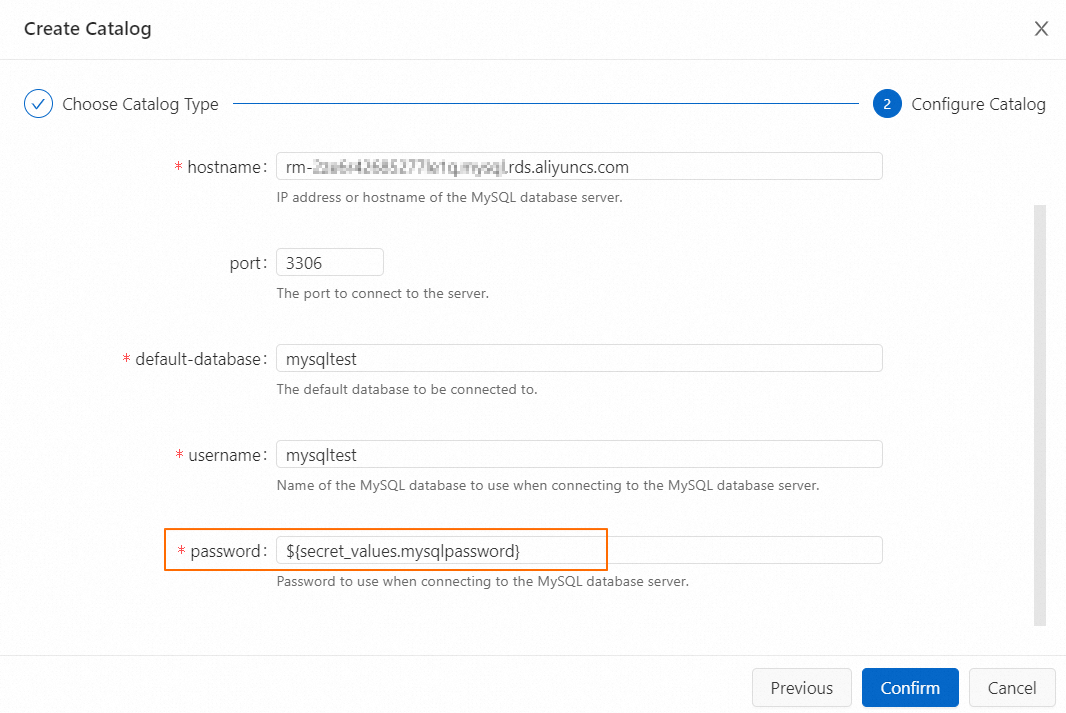
Edit or delete a variable
Exercise caution when you edit or delete variables. Accidental operations may lead to a draft deployment failure or the need to redeploy a draft. If you delete an existing variable, the deployments that are running remain unaffected.
Log on to the Realtime Compute for Apache Flink console. Find the workspace that you want to manage and click Console in the Actions column.
In the left-side navigation pane, choose . On the Variables page, find the variable that you want to edit or delete and click Edit or Delete in the Actions column.
Edit a variable
You can change the value of a variable. Only members with the editor or higher permissions can edit variables.
Delete a variable
Only members with the editor or higher permissions, or members with the variable deletion permission can delete variables.
References
For more information about how to develop an SQL draft, see Job development overview.
For more information about deployment parameters of a JAR or Python deployment, see Deploy a job.
For more information about how to create and use a catalog, see Catalogs.
For more information about the connectors that are supported by Realtime Compute for Apache Flink, see Supported connectors.