This topic describes how to create and start PyFlink jobs in the development console of Realtime Compute for Apache Flink.
Prerequisites
A RAM user or RAM role has the required permissions. This prerequisite must be met if you want to use the RAM user or RAM role to access the development console of Realtime Compute for Apache Flink. For more information, see Permission management.
A Realtime Compute for Apache Flink workspace is created. For more information, see Create a workspace.
Step 1: Prepare Python code files
Python packages cannot be developed in the management console of Realtime Compute for Apache Flink. Therefore, you must develop Python files in your on-premises environment. For more information about how to debug a deployment and use a connector, see Develop a Python job.
The Flink version that is used when you develop a Python package must be the same as the Flink version in the engine version that is selected in Step 3: Create a Python deployment. You can use dependencies in Python deployments. The dependencies include custom Python virtual environments, third-party Python packages, JAR packages, and data files. For more information, see Use Python dependencies.
To help you quickly perform various operations on a Python deployment in the development console of Realtime Compute for Apache Flink, a test Python file and input data file are provided for subsequent operations. This test Python file is used to collect the number of times a word appears in the input data file.
Download a test Python file based on the type of your deployment.
Download the test Python file for streaming deployments: word_count_streaming.py.
Download the test Python file for batch deployments: word_count_batch.py.
Download the input data file Shakespeare.
Step 2: Upload the test Python file and input data file
Log on to the Realtime Compute for Apache Flink management console.
Find the target workspace and click Console in the Actions column.
In the left-side navigation pane of the development console of Realtime Compute for Apache Flink, click Artifacts.
In the upper-left corner of the Artifacts page, click Upload Artifact and select the test Python file and the data file.
In this topic, the test Python file and the input data file that are downloaded in Step 1 are uploaded. For more information about the directories of the files, see Manage artifacts.
Step 3: Create a Python deployment
Streaming deployment
In the left-side navigation pane of the development console of Realtime Compute for Apache Flink, choose . In the upper-left corner of the Deployments page, choose .
In the Create Python Deployment dialog box, configure the parameters. The following table describes the parameters.

Parameter
Description
Example
Deployment Mode
The mode that you want to use to deploy the Python deployment. Select Stream Mode.
Stream Mode
Deployment Name
The name of the Python deployment.
flink-streaming-test-python
Engine Version
The engine version that is used by the current deployment.
We recommend that you use an engine version that has the RECOMMENDED or STABLE label. Versions with the labels provide higher reliability and performance. For more information, see Release notes and Engine version.
vvr-8.0.9-flink-1.17
Python Uri
The Python file. Download the test Python file word_count_streaming.py and click the
 icon on the right side of the Python Uri field to select and upload the test Python file.
 You can also select a Python file in artifacts.
-
Entry Module
The entry point class of the Python program.
If the file that you upload is a .py file, you do not need to configure this parameter.
If the file that you upload is a .zip file, you must configure this parameter. For example, you can set the Entry Module parameter to word_count.
Not required
Entry Point Main Arguments
The parameters that you want to call in the main method.
In this example, enter the directory in which the input data file Shakespeare is stored.
--input oss://<Name of the associated OSS bucket>/artifacts/namespaces/<Name of the workspace>/ShakespeareYou can go to the Artifacts page and click the name of the input data file Shakespeare to copy the complete directory.
Deployment Target
The destination in which the deployment is deployed. Select the queue or session cluster that you want to use from the drop-down list. We recommend that you do not use session clusters in the production environment. For more information, see Manage queues and Step 1: Create a session cluster.
ImportantMonitoring metrics of deployments that are deployed in session clusters cannot be displayed. Session clusters do not support the monitoring and alerting feature and the Autopilot feature. Session clusters are suitable for development and test environments. We recommend that you do not use session clusters in the production environment. For more information, see Debug a deployment.
default-queue
For more information about other deployment parameters, see Create a deployment.
Click Deploy.
Batch deployment
In the left-side navigation pane of the development console of Realtime Compute for Apache Flink, choose . In the upper-left corner of the Deployments page, choose Create Deployment > Python Deployment.
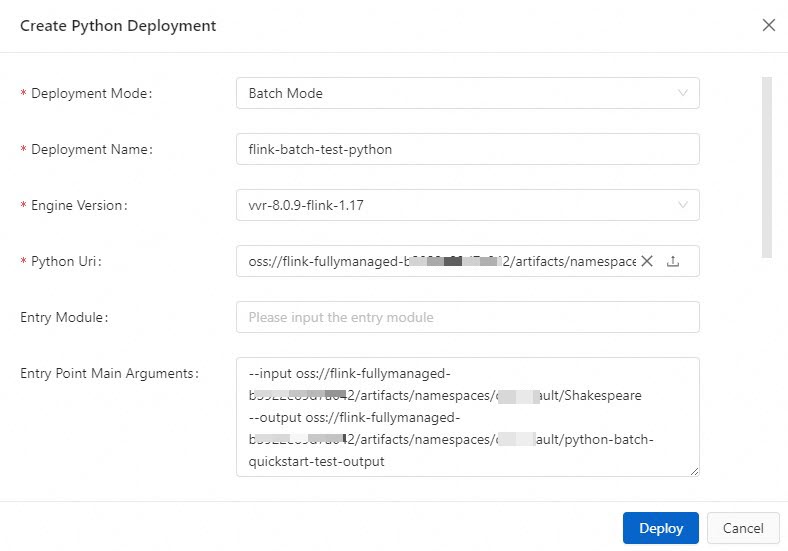
In the Create Python Deployment dialog box, configure the parameters. The following table describes the parameters.
Parameter
Description
Example
Deployment Mode
The mode that you want to use to deploy the Python deployment. Select Batch Mode.
Batch Mode
Deployment Name
The name of the deployment.
flink-batch-test-python
Engine Version
The engine version that is used by the current deployment.
We recommend that you use an engine version that has the RECOMMENDED or STABLE label. Versions with the labels provide higher reliability and performance. For more information, see Release notes and Engine version.
vvr-8.0.9-flink-1.17
Python Uri
The Python file. Download the test Python file word_count_batch.py and click the
icon on the right side of the Python Uri field to select and upload the test Python file. -
Entry Module
The entry point class of the Python program.
If the file that you upload is a .py file, you do not need to configure this parameter.
If the file that you upload is a .zip file, you must configure this parameter. For example, you can set the Entry Module parameter to word_count.
Not required
Entry Point Main Arguments
The parameters that you want to call in the main method.
In this example, enter the directory in which the input data file Shakespeare and the output data file batch-quickstart-test-output are stored.
NoteYou need to only specify the directory of the output data file. You do not need to create an output data file in the specified directory in advance. The parent directory of the output data file is the same as the directory of the input data file.
--input oss://<Name of the associated OSS bucket>/artifacts/namespaces/<Name of the workspace>/Shakespeare--output oss://<Name of the associated OSS bucket>/artifacts/namespaces/<Name of the workspace>/python-batch-quickstart-test-outputYou can go to the Artifacts page and click the name of the input data file Shakespeare to copy the complete directory.
Deployment Target
The destination in which the deployment is deployed. Select the queue or session cluster that you want to use from the drop-down list. We recommend that you do not use session clusters in the production environment. For more information, see Manage queues and Step 1: Create a session cluster.
ImportantMonitoring metrics of deployments that are deployed in session clusters cannot be displayed. Session clusters do not support the monitoring and alerting feature and the Autopilot feature. Session clusters are suitable for development and test environments. We recommend that you do not use session clusters in the production environment. For more information, see Debug a deployment.
default-queue
For more information about other deployment parameters, see Create a deployment.
Click Deploy.
Step 4: Start the deployment and view the computing result
Streaming deployment
In the left-side navigation pane of the development console of Realtime Compute for Apache Flink, choose . On the Deployments page, find the desired deployment and click Start in the Actions column.

In the Start Job panel, select Initial Mode and click Start. For more information about how to start a deployment, see Start a job deployment.
After you click Start, the deployment enters the RUNNING or FINISHED state. This indicates that the deployment runs as expected. If you upload the test Python file to create the deployment, the deployment is in the FINISHED state.
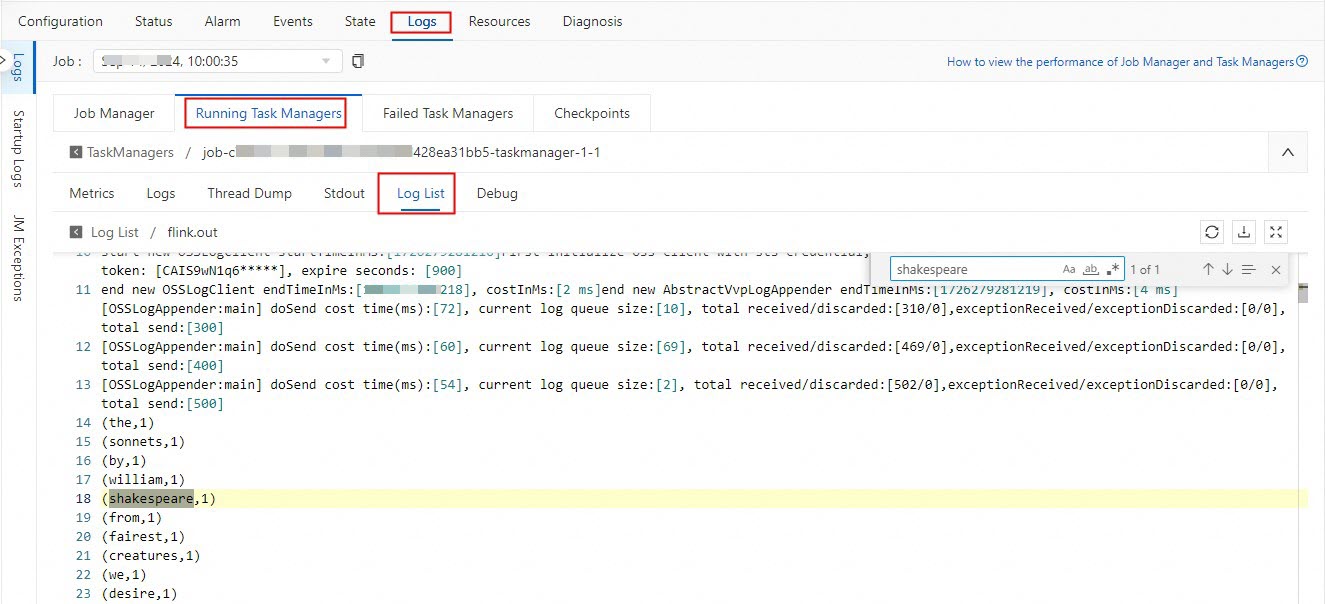
After the deployment enters the RUNNING state, view the computing result of the streaming deployment.
ImportantIf you upload the test Python file to create the deployment, the computing result of the streaming deployment is deleted when the streaming deployment enters the FINISHED state. You can view the computing result of the streaming deployment only when the streaming deployment is in the RUNNING state.
On the Deployments page, find the desired deployment and click the name of the deployment. On the page that appears, click Logs. On the Running Task Managers tab, click the value in the Path, ID column. On the page that appears, click the Log List tab. Find the log file whose name ends with .out in the Log Name column and click the name of the log file. Then, search for the shakespeare keyword in the log file to view the computing result.
Batch deployment
In the left-side navigation pane of the development console of Realtime Compute for Apache Flink, choose . On the Deployments page, find the desired deployment and click Start in the Actions column.

In the Start Job panel, click Start. For more information about how to start a deployment, see Start a job deployment.
After the deployment enters the FINISHED state, view the computing result of the batch deployment.
Log on to the OSS console and view the computing result in the oss://<Name of the associated OSS bucket>/artifacts/namespaces/<Name of the workspace>/batch-quickstart-test-output directory. Click the folder whose name is the start date and start time of the deployment and click the file that you want to manage. In the panel that appears, click Download.
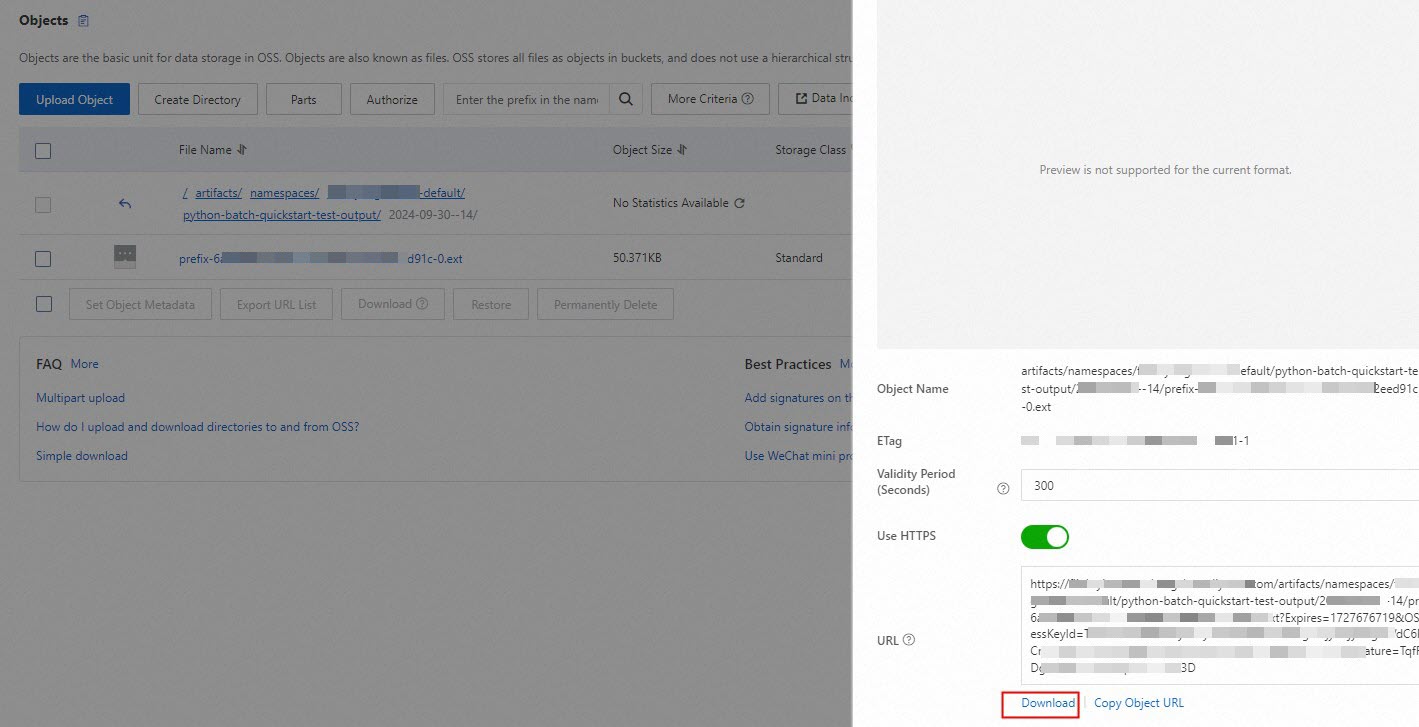
The computing result of the batch deployment is an .ext file. After you download the output data file, you can use Notepad or Microsoft Office Word to open the file. The following figure shows the computing result.

Step 5: (Optional) Cancel the deployment
In several circumstances, you may want to cancel a job: apply changes to the SQL draft, restart the job without states, or update static configurations. For more information, see Cancel a deployment.
References
You can configure resources for a deployment before you start the deployment. You can also modify the resource configurations of a deployment after you publish the draft for the deployment. Realtime Compute for Apache Flink provides the following resource configuration modes: basic mode (coarse-grained) and expert mode (fine-grained). For more information, see Configure resources for a deployment.
You can dynamically update the parameter configuration of a Realtime Compute for Apache Flink deployment. This makes the parameter configuration take effect more quickly and helps reduce the service interruption time caused by deployment startup and cancellation. For more information, see Dynamically update the parameter configuration for dynamic scaling.
You can configure parameters to export logs of a deployment to an external storage and specify the level of the logs that you want to export. For more information, see Configure log export.
For more information about how to create an SQL deployment for Realtime Compute for Apache Flink, see Flink SQL jobs.
You can build a real-time data warehouse by using Realtime Compute for Apache Flink and Hologres. For more information, see Build a real-time data warehouse with Flink and Hologres.
You can build an OpenLake-based streaming data lakehouse by using Realtime Compute for Apache Flink. For more information, see Build an OpenLake-based streaming data lakehouse by using Realtime Compute for Apache Flink.