If your service traffic fluctuates, leading to low resource utilization during off-peak hours, you can downgrade your Elasticsearch cluster to optimize costs and align resources with business needs. This involves reducing node specifications, decreasing the number of nodes, or adjusting storage types.
Prerequisite
You have migrated indices from nodes to remove.
Downgrade considerations and warnings
Downgrading a cluster carries risks of service delays, configuration conflicts, and billing changes. Carefully review the following notes before proceeding.
Service stability
Impact during configuration change:
Cluster
Impact
Countermeasures
High payload (CPU > 60%, heap > 50%) + no replicas
High concurrency for write or query operations may lead to occasional access timeouts.
Implement a retry mechanism on your client.
Before downgrading, ensure all indices have at least one replica.
Data nodes ≤ 2 after downgrade
Potential data loss.
Best practice: Always perform downgrade operations during off-peak hours.
Limitations
Storage space: Downgrading data node storage space is only supported for clusters using the V3 deployment architecture.
Version changes: You cannot upgrade the cluster version during a downgrade.
Node types: Only one node type (e.g., data nodes, master nodes) can be modified per single downgrade operation.
Elastic data nodes: Downgrading elastic data nodes is not supported.
Timing: Allow at least 30 minutes between consecutive downgrade operations on the same cluster.
CPU specs requirements
Basic rule: The target CPU and memory specs must be at least half of the current specifications.
Disallowed specifications:
1 vCPU, 4 GiB Memory,2 vCPUs, 2 GiB Memory,2 vCPUs, 4 GiB Memory,4 vCPUs, 4 GiB Memory.Exception for Kibana nodes: Kibana nodes can be downgraded to
2 vCPUs, 2 GiB Memory.Special case: If you must downgrade to a disallowed spec, you will need to create a new cluster and migrate your data.
Cost impact
Billing for the new configuration takes effect immediately after you submit the downgrade order.
For more information, refer to the billing documentation: Pay-as-you-go and Subscription.
Pre-downgrade checks
Failure to perform these checks before a downgrade may lead to cluster crashes, data loss, or service unavailability. Verify each item below.
Cluster health
Run
GET _cluster/healthto confirm the cluster status isGREEN.Cluster payload security
The cluster can only be safely downgraded if it meets the following conditions for CPU and JVM heap memory usage over the last 24 hours:
Node type
CPU usage (last 24h)
JVM heap memory usage (last 24h)
Dedicated master node
Peak usage of a single node < 30%
Peak usage of a single node < 25%
Other nodes (Data, etc.)
Both conditions must be met:
• Peak usage of a single node < 50%
• Average usage of all nodes < 30%
Both conditions must be met:
• Peak usage of a single node < 50%
• Average usage of all nodes < 30%
Index readiness
Closed indices:
Run
GET /_cat/indices?vto check for any closed indices.If found, run
POST /<index_name>/_opento temporarily open them.Why this is important:
Alibaba Cloud Elasticsearch requires a
GREENcluster status for sensitive configuration changes, like resharding.Closed indices cannot be reallocated during a configuration change, preventing the cluster from reaching
GREENstatus (it will remainYELLOWat best) and causing related operations to fail.
Replicas:
Run
GET _cat/indices?vto ensure that each index has at least 1 replica.For multi-zone instances, ensure the number of replicas for each index is less than the number of available zones. Setting replicas to 1 is generally recommended. You can increase replicas manually after the downgrade is complete.
The console
Downgrade specs, disk type, and disk space
Navigate to the Instances page, and click .
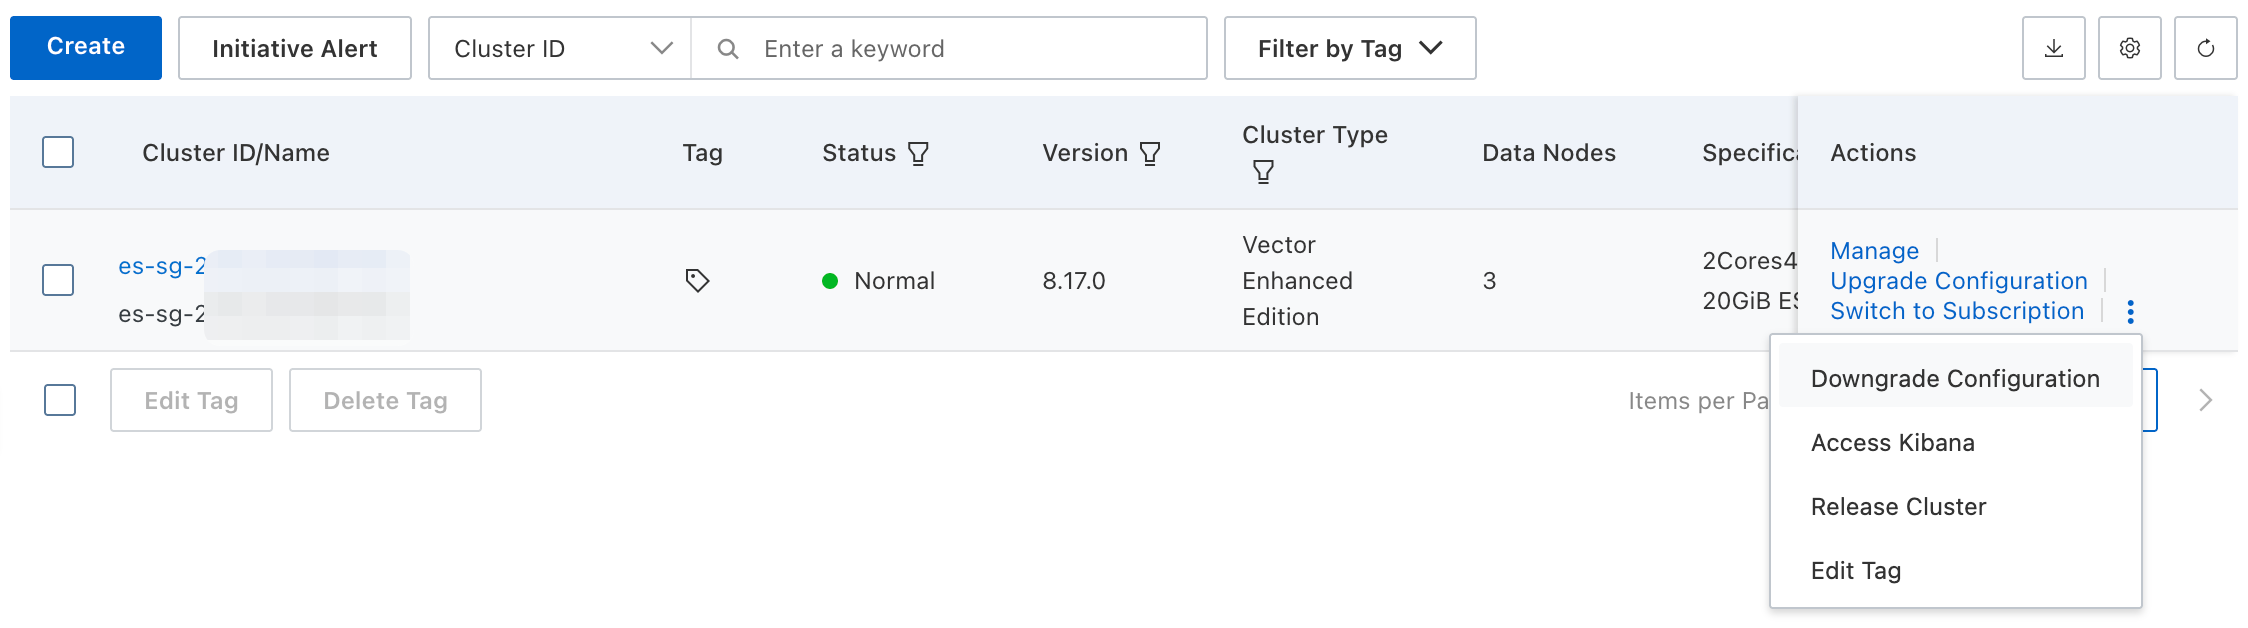
Alternatively, from the Basic Information page, click .
On the Downgrade Configuration page, adjust parameters as needed.
NoteAvailable parameters vary by cluster type and version. The console's displayed parameters take precedence.
Downgrade Data Node Disk Type (High to Low Performance):
ESSD: An enterprise SSD (ESSD) combines 25 GE networking and Remote Direct Memory Access (RDMA) technology to provide up to 1 million random read/write IOPS for a single disk and low single-link latency.
NoteESSD-PL0 cannot be downgraded to a standard SSD.
Previous-generation cloud disks: Standard SSD -> Ultra disk -> Basic disk.
NoteThese disks are being phased out; ESSDs are recommended.
Downgrade Data Node Storage Space:
Supported only for cloud-native control architecture (v3).
To ensure stability, disk usage after downgrade must be less than 60%. This means:
Current disk usage < (Post-downgrade disk space × 0.6)
To downgrade storage space for v2 clusters, contact technical support.
Choose an update method.
Intelligent Update (enabled by default): System automatically selects the optimal method based on configuration changes.
Forced Update (disabled by default, not recommended): Bypasses health checks and forces a cluster restart, potentially causing prolonged service interruption. Recovery time depends on data volume.
Review the Terms of Service and Service Level Agreement. If you agree, click Buy Now.
Alibaba Cloud Elasticsearch applies the optimal change policy and charges based on the new configuration.
During the change, the cluster status will be Initializing. Expect performance fluctuations and transient disconnections.
Once complete, the cluster status updates to Normal, and node IP addresses may change.
Reduce data nodes
From the Basic Information page, click .
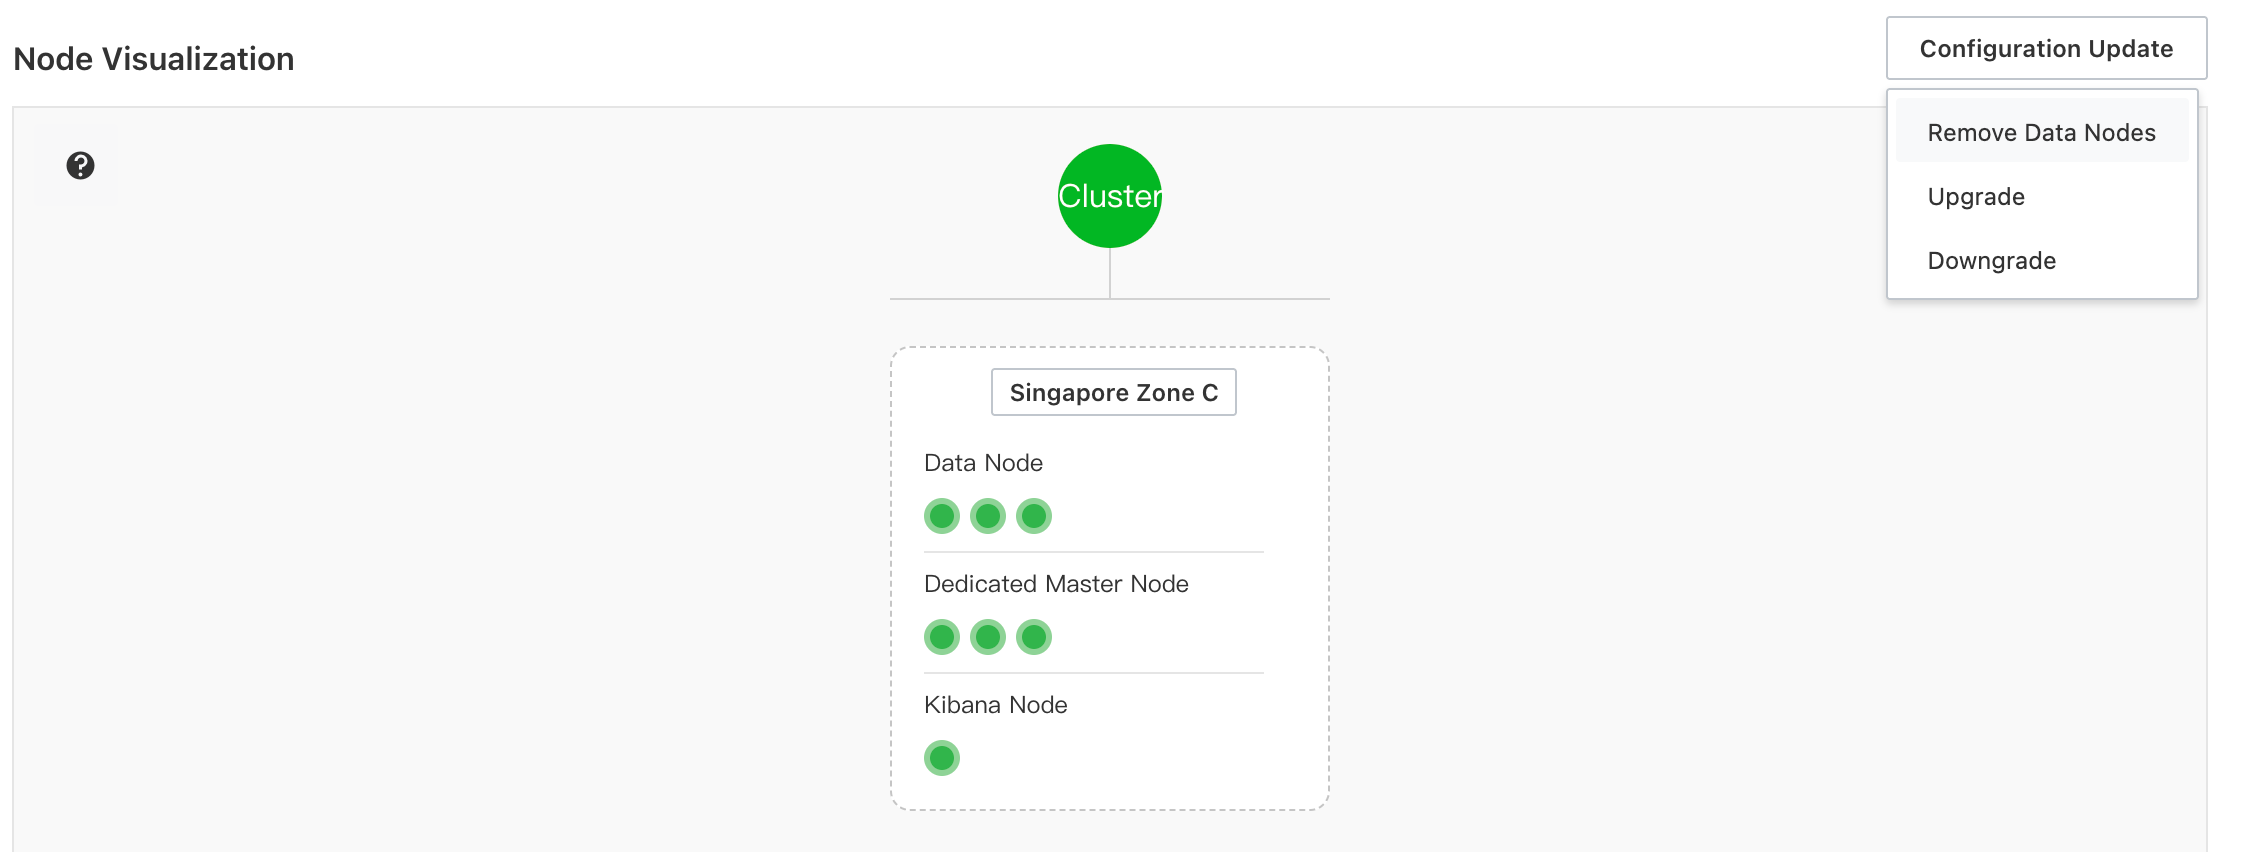
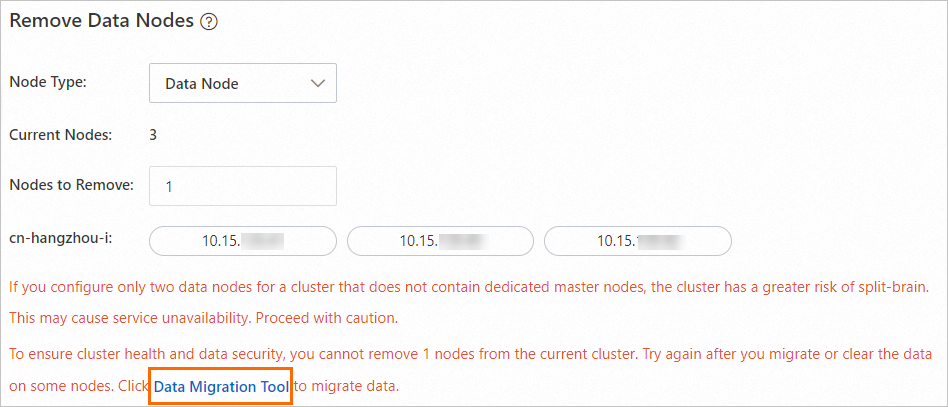
Select the node type and number of nodes to remove.
ImportantAlibaba Cloud Elasticsearch performs a security check before node removal. If it fails, troubleshoot the issue as per the error message, then retry.
Available parameters vary by cluster type and version. The console's displayed parameters take precedence.
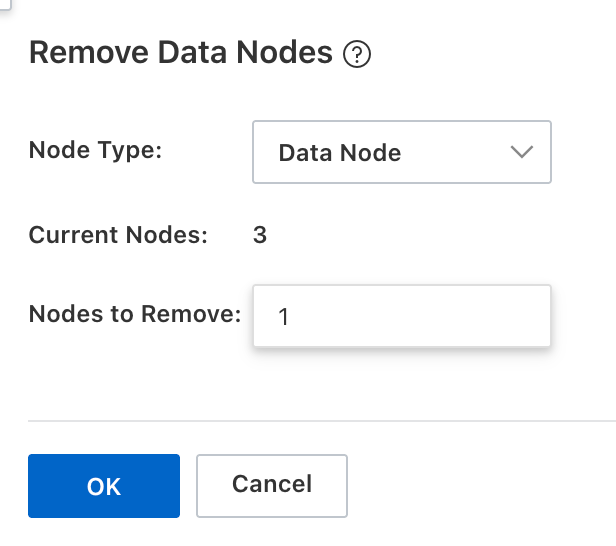
(Optional) Reference: Migrate indices from nodes to remove.
Click OK. Alibaba Cloud Elasticsearch removes the node(s) and updates your billing.
During the change, the cluster status will be Initializing. Expect performance fluctuations and transient disconnections.
Once complete, the cluster status updates to Normal, and and node IP addresses may change.
API
For programmatic cluster downgrades, refer to the UpdateInstance.
Reference: Migrate indices from nodes to remove
To safeguard data security, ensure the nodes to remove are empty. If selected data nodes contain data, you'll be prompted to migrate it. After migration, these nodes will contain no index data, and no new data will be written to them.
Migrate data
In the Remove Data Nodes section, click Data Migration Tool when prompted.
This tool utilizes Elasticsearch's shard allocation filtering for a smooth, service-transparent index migration.
In the Migrate Data dialog box, select a node migration method.
Parameter
Description
Smart Migration
Alibaba Cloud Elasticsearch automatically selects data nodes for migration.
Custom
Manually select the specific data nodes you want to migrate data from.
Accept the data migration agreement and click OK.
Roll back migrated indices
Data migration can be a lengthy process. If migration fails due to cluster status or data changes, or if you need to revert a completed migration, follow these steps to roll back migrated nodes. Monitor task details in the Task list.
Log on to the Kibana console of your Elasticsearch cluster.
For instructions, see Log on to the Kibana console.
NoteExamples here use Elasticsearch V6.7.0. Operations may vary slightly for other versions.
In the left navigation menu, choose .
In the Console section, run the following command to retrieve the IP addresses of migrated nodes:
GET _cluster/settingsExample response:
{
  "transient": {
    "cluster": {
      "routing": {
        "allocation": {
          "exclude": {
            "_ip": "192.168.xx.xx,192.168.xx.xx,192.168.xx.xx"
          }
        }
      }
    }
  }
}
Run one of the following commands to roll back data:
Roll back specific nodes:
Remove the IP addresses of nodes you want to roll back from the
exclude._iplist, keeping others that should remain excluded.PUT _cluster/settings { "transient": { "cluster": { "routing": { "allocation": { "exclude": { "_ip": "192.168.xx.xx,192.168.xx.xx" } } } } } }Roll back all migrated nodes:
Set
_iptonullto roll back all nodes.PUT _cluster/settings { "transient": { "cluster": { "routing": { "allocation": { "exclude": { "_ip": null } } } } } }
Verify the data rollback is complete:
GET _cluster/settingsIf the result no longer contains the IP addresses of the rolled-back nodes in the
exclude._iplist, the rollback is complete.You can also run
GET _cat/shards?vto see if shards are being reallocated back to those nodes.NoteDuring data migration or rollback,
GET _cat/shards?vcan be used to view the task status.