Use DataWorks Data Integration to batch-synchronize large volumes of data from PolarDB for Xscale (PolarDB-X) to Alibaba Cloud Elasticsearch (ES) in minutes.
How it works
DataWorks Data Integration uses an exclusive resource group as the execution engine. The resource group connects to your PolarDB-X instance and Elasticsearch cluster over a virtual private cloud (VPC), retrieves records from the source table, and writes them to the target ES index in a single batch run. All three components — the PolarDB-X instance, the ES cluster, and the DataWorks workspace — must share the same region and time zone so the resource group can reach both endpoints without cross-region latency or timestamp skew.
Limitations
-
Only Alibaba Cloud Elasticsearch clusters are supported as sync targets. Self-managed Elasticsearch clusters are not supported.
-
The PolarDB-X instance, ES cluster, and DataWorks workspace must be in the same region.
-
The PolarDB-X instance, ES cluster, and DataWorks workspace must be in the same time zone. A time zone mismatch causes timestamp fields in the synced data to shift.
Prerequisites
Before you begin, make sure you have:
-
A PolarDB-X instance with source data
-
An Alibaba Cloud Elasticsearch cluster with Auto Indexing enabled. See Create an Alibaba Cloud Elasticsearch cluster and Configure the YML file
-
A DataWorks workspace. See Create a workspace
Billing
-
For Elasticsearch cluster pricing, see Elasticsearch billable items.
-
For exclusive resource group pricing, see Billing of exclusive resource groups for Data Integration (subscription).
Step 1: Prepare source data
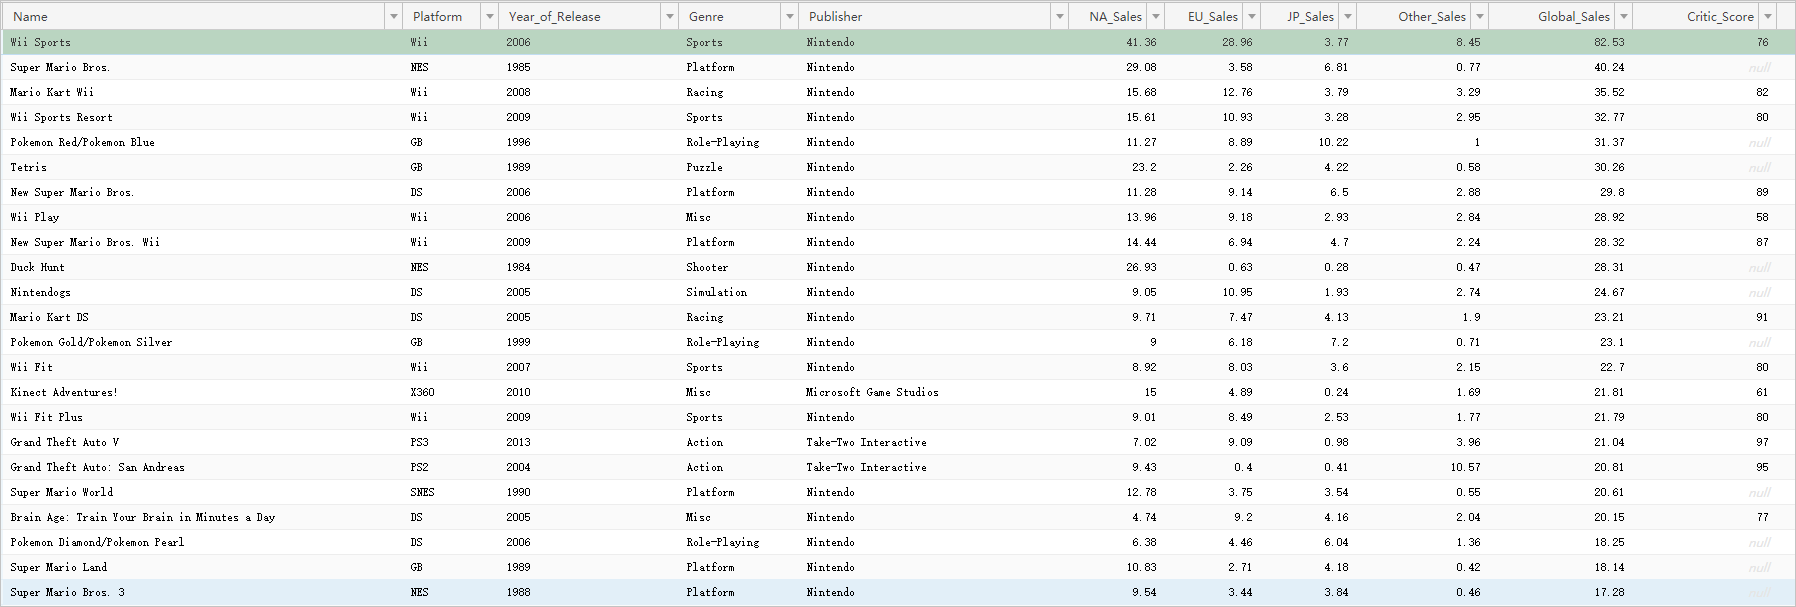
Insert the data you want to sync into the PolarDB-X 1.0 instance. For SQL syntax, see Basic SQL operations.
The following figure shows the test data used in this tutorial.Basic SQL operations
Step 2: Purchase and create an exclusive resource group
An exclusive resource group runs the batch sync job and ensures fast, stable data transfer. After purchasing the resource group, attach it to the VPCs of both the PolarDB-X and Elasticsearch instances, then associate it with your DataWorks workspace.
-
Log on to the DataWorks consoleDataWorks console.
-
In the top menu bar, select a region. In the left navigation pane, click Resource Group.
-
On the Resource Groups tab, click Create Resource Group > Data Integration Resource Group.
-
On the DataWorks Exclusive Resources (Subscription) page, set Resource Type to Exclusive Resource Group For Data Integration, enter a name, and click Buy Now. For details, see Step 1: Create an exclusive resource group for Data Integration.
-
In the Actions column of the resource group you created, click Network Settings to attach a VPC. The resource group must connect to the VPCs of both the PolarDB-X and Elasticsearch instances. Attach the resource group to the VPC, Zone, and vSwitch of each instance. To look up VPC details for an instance, see View the basic information of an Elasticsearch instance. For details, see Attach a VPC.
ImportantAfter attaching the VPC, add the CIDR block of the vSwitch to the private access whitelists of both the PolarDB-X and Elasticsearch instances. See Configure a public or private access whitelist for an Elasticsearch instance.
This tutorial uses a VPC connection. To sync over the Internet instead, see Configure an IP address whitelist.
-
In the upper-left corner, click the back icon to return to the Resource Groups page.
-
Find the resource group and click Attach Workspace in the Actions column to associate it with your target workspace. For details, see Step 2: Associate the exclusive resource group for Data Integration with a workspace.
Step 3: Add data sources
Add the PolarDB-X and Elasticsearch data sources in DataWorks Data Integration.
-
Go to the Data Integration page.
-
Log on to the DataWorks consoleDataWorks console.
-
In the left navigation pane, click Workspace.
-
Find your workspace and choose Shortcuts > Data Integration in the Actions column.
-
-
In the left navigation pane, click Data Source.
-
Click Add Data Source.
-
Search for and select DRDS.
-
On the Add DRDS Data Source page, fill in the connection parameters and run the connectivity test. After the test passes, click Complete. For parameter details, see Add a PolarDB-X data source.
-
Add the Elasticsearch data source the same way. See Add an Elasticsearch data source.
Step 4: Configure and run a batch synchronization task
The batch sync task runs on the exclusive resource group. The resource group reads data from the PolarDB-X source and writes it to the Elasticsearch index.
This tutorial uses the codeless UI in legacy Data Development (DataStudio). To use the code editor instead, see Configure a batch synchronization task using the code editor and Elasticsearch Writer.
-
Go to the Data Development page.
-
Log on to the DataWorks consoleDataWorks console.
-
In the left navigation pane, click Workspaces.
-
In the Actions column of your workspace, choose Quick Access > Data Development.
-
-
Create a batch synchronization task.
-
In the left navigation pane, go to the Data Development tab. Click the
 icon and choose New > Business Flow. Create a business flow as prompted.
 -
Right-click the business flow and choose Create Node > Batch Synchronization.
-
In the Create Node dialog box, enter a name and click Confirm.
-
-
Configure the network and resources.
-
In the Source section, set Source to DRDS and Data Source to the name of your PolarDB-X data source.
-
In the Resource Group section, select the exclusive resource group you created.
-
In the Destination section, set Destination to Elasticsearch and Data Source to the name of your Elasticsearch data source.
-
-
Click Next.
-
Configure the sync task.
-
In the Source section, select the source table.
-
In the Destination section, configure the destination parameters.
-
In the Field Mapping section, map Source Fields to Target Fields. In this example, the source fields are kept as-is and only the destination fields are customized. To the right of Destination Field, click the
 icon and enter the field definitions:
{"name":"Name","type":"text"}
{"name":"Platform","type":"text"}
{"name":"Year_of_Release","type":"date"}
{"name":"Genre","type":"text"}
{"name":"Publisher","type":"text"}
{"name":"na_Sales","type":"float"}
{"name":"EU_Sales","type":"float"}
{"name":"JP_Sales","type":"float"}
{"name":"Other_Sales","type":"float"}
{"name":"Global_Sales","type":"float"}
{"name":"Critic_Score","type":"long"}
{"name":"Critic_Count","type":"long"}
{"name":"User_Score","type":"float"}
{"name":"User_Count","type":"long"}
{"name":"Developer","type":"text"}
{"name":"Rating","type":"text"}
For the full list of destination parameters, see Configure an offline sync task in codeless UI.
-
In the Channel Control section, configure the channel parameters.
-
-
Run the task. When the task completes successfully, the log contains the message
Shell run successfully!.-
(Optional) Click Scheduling Configuration on the right side of the page to set up a recurring schedule. See Scheduling Configuration.
-
In the toolbar, click the Save icon.
-
Click the Submit icon to submit the task.
-
If you configured a schedule, the task runs automatically at the scheduled times.
-
To run the task immediately, click the Run icon in the toolbar.
-
-
Step 5: Verify the sync results
-
Log on to the Kibana console of your Elasticsearch instance. See Log on to the Kibana console.
-
In the left navigation pane, click Dev Tools.
-
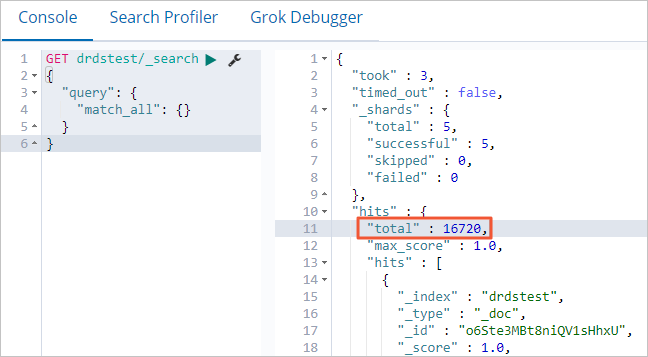
In the Console, run the following query to count the synced documents. Compare this number against the row count in your source table to confirm all records were transferred.
GET drdstest/_search
{
  "query": {
    "match_all": {}
  }
}
If the command is successful, the following result is returned.
-
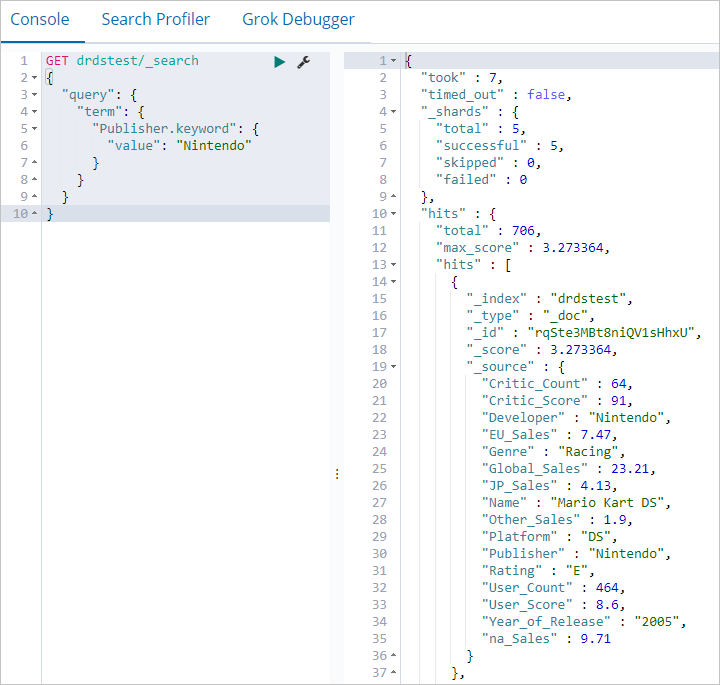
Run the following query to filter documents by a specific field value:
GET drdstest/_search
{
  "query": {
    "term": {
      "Publisher.keyword": {
        "value": "Nintendo"
      }
    }
  }
}
If the command runs successfully, the following output is returned.
What's next
-
To sync data incrementally or in real time, see Create a real-time synchronization task to synchronize data to Elasticsearch.
-
To sync an entire database at once, see Create a batch synchronization task to synchronize all data in a database to Elasticsearch.