This tutorial shows you how to use DataWorks to synchronize data from a Hive table in your Hadoop cluster to an Alibaba Cloud Elasticsearch cluster. You configure an exclusive resource group for Data Integration to handle the transfer over a VPC network connection, register both clusters as data sources, and then create and run a batch synchronization task. By the end of this tutorial, your Elasticsearch cluster will contain the synchronized data, which you can verify using the Kibana console.
In this tutorial, you complete the following steps:
Background information
DataWorks is an end-to-end big data development and governance platform built on top of big data compute engines. It provides data development, task scheduling, and data management capabilities. You can create synchronization tasks in DataWorks to move data from a wide range of sources to Alibaba Cloud Elasticsearch.
Supported data sources (Alibaba Cloud managed):
ApsaraDB RDS for MySQL, ApsaraDB RDS for PostgreSQL, ApsaraDB RDS for SQL Server
ApsaraDB for MongoDB and ApsaraDB for HBase
Alibaba Cloud PolarDB for Xscale (PolarDB-X) (formerly DRDS)
Alibaba Cloud MaxCompute
Alibaba Cloud Object Storage Service (OSS)
Alibaba Cloud Tablestore
Supported data sources (self-managed):
HDFS, Oracle, FTP, Db2, MySQL, PostgreSQL, SQL Server, MongoDB, and HBase
Billing
For information about the billing of Alibaba Cloud Elasticsearch clusters, see Elasticsearch billable items.
For information about the billing of exclusive resource groups for Data Integration, see Billing of exclusive resource groups for Data Integration (subscription).
Prerequisites
Before you begin, make sure the following resources and conditions are in place:
Account and services
-
DataWorks workspace: A workspace is created in DataWorks. For more information, see Create a workspace.
Source cluster
-
Hadoop cluster: A Hadoop cluster exists and contains the data you want to synchronize.
Target cluster
-
Alibaba Cloud Elasticsearch cluster: An Elasticsearch cluster is created with the Auto Indexing feature enabled. For more information, see Create an Alibaba Cloud Elasticsearch cluster and Configure the YML file.
NoteYou can synchronize data only to an Alibaba Cloud Elasticsearch instance. Self-managed Elasticsearch clusters are not supported.
Network
-
The Hadoop cluster, Elasticsearch instance, and DataWorks workspace must all be in the same region and the same time zone. A time zone mismatch causes time-related fields to differ between the source and destination after synchronization.
Step 1: Purchase and create an exclusive resource group
An exclusive resource group for Data Integration provides the isolated compute capacity that handles your synchronization jobs. In this step, you purchase the exclusive resource group, attach it to the VPC shared by your Hadoop and Elasticsearch clusters, and then associate it with your DataWorks workspace.
-
Log on to the DataWorks console.
-
In the top navigation bar, select a region. In the left navigation pane, click Resource Group.
-
On the Exclusive Resource Groups tab, click .
-
On the DataWorks Exclusive Resources (Subscription) purchase page, set Exclusive Resource Type to Exclusive Data Integration Resources, enter a resource group name, and click Buy Now.
For more information, see Step 1: Create an exclusive resource group for Data Integration.
-
In the Actions column of the resource group you created, click Network Settings to attach a virtual private cloud (VPC) to the exclusive resource group.
NoteIn this example, an exclusive resource group for Data Integration is used to synchronize data over a VPC. For information about how to use an exclusive resource group for Data Integration to synchronize data over the Internet, see Configure an IP address whitelist.
The exclusive resource group must be connected to the VPC where the Hadoop cluster resides and the VPC where the Elasticsearch cluster resides. Therefore, you must associate the exclusive resource group with the VPC, Zone, and vSwitch of the Hadoop cluster and the Elasticsearch cluster. For information about how to view the VPC, zone, and vSwitch of the Elasticsearch cluster, see View the basic information of a cluster.
ImportantAfter attaching the VPC, add the vSwitch CIDR block to the internal-facing access whitelists of both the Hadoop cluster and the Elasticsearch instance. For more information, see Attach a VPC.
-
In the Actions column of the exclusive resource group, click Attach Workspace to associate the resource group with your DataWorks workspace.
Step 2: Add data sources
Register your Hadoop and Elasticsearch clusters as data sources in DataWorks so the synchronization task can connect to them. You must add both an HDFS data source and an Elasticsearch data source.
-
In the left navigation pane, click Data Source.
-
Add a Hadoop Distributed File System (HDFS) data source.
-
On the Data Sources page, click Add Data Source.
-
In the Add Data Source dialog box, search for and select HDFS.
-
On the Add HDFS Data Source page, configure the data source parameters. For more information, see Add an HDFS data source.
-
Click Test Connectivity. A status of Connected confirms the connection is successful.
-
Click Complete.
-
-
Add an Elasticsearch data source using the same process. For more information, see Add an Elasticsearch data source.
Step 3: Configure and run a batch synchronization task
A batch synchronization task uses the exclusive resource group to retrieve data from your HDFS source and write it to your Elasticsearch instance. In this step, you create a workflow, configure the task, assign the exclusive resource group, and run the task.
-
You can use the codeless UI or code editor to configure the batch synchronization task. In this example, the codeless UI is used. For information about how to use the code editor to configure the batch synchronization task, see Configure a batch synchronization task using the code editor and Elasticsearch Writer.
-
This topic uses legacy Data Development (DataStudio) as an example to demonstrate how to create an offline sync task.
-
Create a batch synchronization task.
-
In the left navigation pane, choose Create > Create Workflow to create a workflow.
-
Right-click the name of the newly created workflow and choose Create Node > Offline synchronization.
-
In the Create Node dialog box, configure the Name parameter and click Confirm.
-
-
Configure the data source, destination, and resource group.
-
In the Data Source section, set Data Source to HDFS and Data Source Name to the HDFS data source you added in Step 2.
-
In the Data Destination section, set Data Source to Elasticsearch and Data Source Name to the Elasticsearch data source you added in Step 2.
-
Set My Resource Group to the exclusive resource group you created in Step 1.
-
-
In the Field Mapping section, map the Source Fields from your Hive table columns to the Destination Fields in your Elasticsearch index.
For more information about configuring Elasticsearch Writer parameters, see Elasticsearch Writer.
-
Run the task.
-
Click the Run icon to execute the task immediately, or configure a scheduling policy in Scheduling Configuration to run it at a specified interval.
-
After the task runs, open the run log and verify that it contains the message
Shell run successfully!. If theShell run successfully!message appears in the run log, the task ran successfully.
-
Step 4: Verify the data synchronization result
After the batch synchronization task completes, use the Kibana console to confirm that your data has been written to the Elasticsearch index.
-
Log on to the Kibana console for your Alibaba Cloud Elasticsearch instance.
For more information, see Log on to the Kibana console.
-
In the left navigation pane, click Dev Tools and then open Console.
-
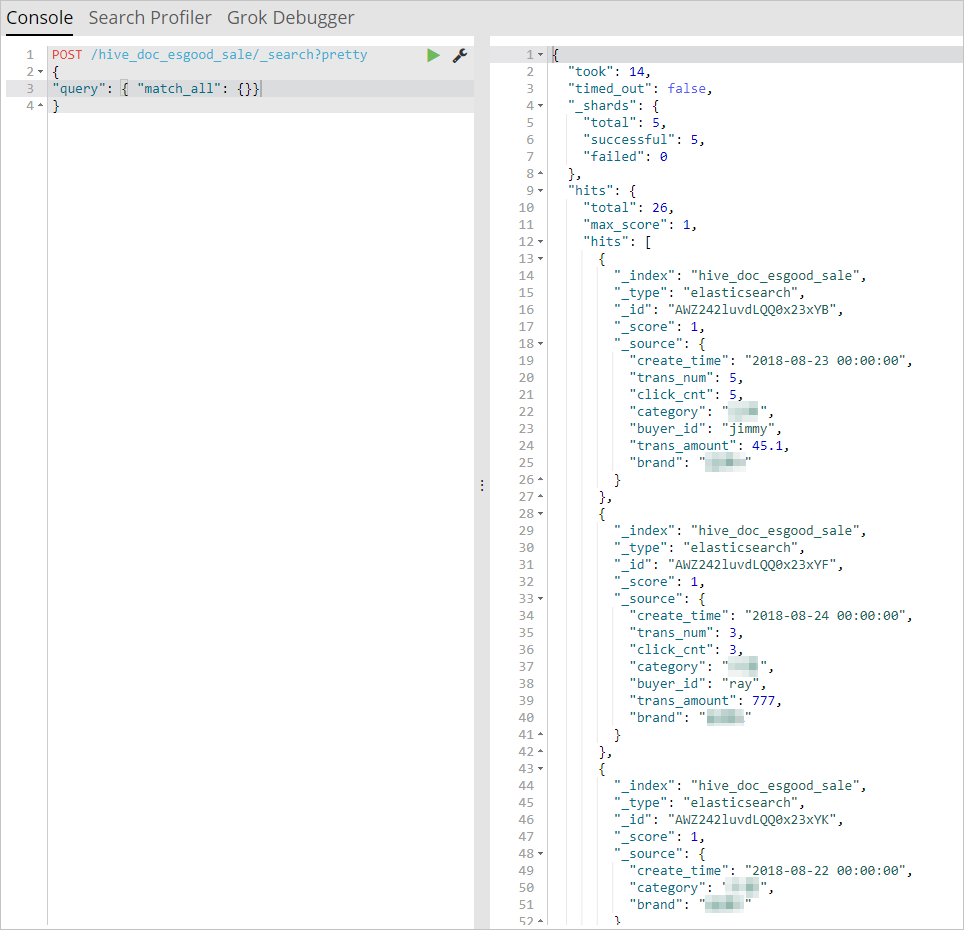
Run the following query to retrieve records from the index created by your synchronization task:
POST /hive_esdoc_good_sale/_search?pretty { "query": { "match_all": {}} }Notehive_esdoc_good_saleis the value set for theindexfield in the data synchronization script. Replace it with your actual index name if you used a different value.Confirm that the response returns your synchronized records. If the query returns data, the synchronization was successful.
Next steps
After completing this tutorial, you can explore the following synchronization scenarios: