If you encounter slow queries when you use a PolarDB for MySQL database, you can use Data Transmission Service (DTS) to synchronize production data from the database to an Alibaba Cloud Elasticsearch cluster in real time. Then, you can search for and analyze the synchronized data in the cluster. This solution is suitable for scenarios in which you require high performance of real-time synchronization from a relational database.
Background information
The following cloud services are used:
DTS is a data transmission service that integrates data migration, data subscription, and real-time data synchronization. You can use DTS to synchronize data generated by the following SQL statements: INSERT, DELETE, and UPDATE. For more information, see DTS and Overview of data synchronization scenarios.
PolarDB is a next-generation relational database service developed by Alibaba Cloud. It is compatible with MySQL, PostgreSQL, and Oracle database engines. A PolarDB cluster can provide a maximum of 100 TB of storage space and can be scaled to a maximum of 16 nodes. PolarDB provides superior performance in storage and computing to meet diverse requirements of enterprises. For more information, see PolarDB for MySQL overview.
Elasticsearch is a Lucene-based, distributed, real-time search and analytics engine. It allows you to store, query, and analyze large amounts of datasets in near real time. In most cases, it is used as a basic engine or technology to accommodate complex queries and high application performance. For more information, see What is Alibaba Cloud Elasticsearch?
Precautions
DTS does not synchronize data changes generated by DDL operations. If a DDL operation is performed on a table in the source database during data synchronization, you must perform the following operations: Remove the table from the data synchronization task, remove the index for the table from the Elasticsearch cluster, and then add the table to the data synchronization task again. For more information, see Remove an object from a data synchronization task and Add an object to a data synchronization task.
If you want to add columns to the source table, modify the mappings of the index that corresponds to the table. Then, perform the related DDL operation on the source table, pause the data synchronization task, and start the task again.
DTS uses read and write resources of the source and destination during initial full data synchronization. This may increase the loads of the source and destination. If the performance of the source or destination is unfavorable, the specifications of the source or destination are low, or the data volume is large, the source or destination may become unavailable. For example, DTS occupies a large number of read and write resources in the following cases: a large number of slow SQL queries are performed on the source, one or more tables do not have primary keys, or a deadlock occurs on the destination. To prevent this issue, you must evaluate the impact of data synchronization on the performance of the source and destination before data synchronization. We recommend that you synchronize data during off-peak hours. For example, you can synchronize data when the CPU utilization of the source and destination is less than 30%.
If you synchronize full data during peak hours, the synchronization may fail. In this case, restart the synchronization task.
If you synchronize incremental data during peak hours, data synchronization latency may occur.
Process
To synchronize data, perform the following steps:
Make preparations: Add the data to be synchronized to the source PolarDB for MySQL database, create an Alibaba Cloud Elasticsearch cluster, and enable the Auto Indexing feature for the Elasticsearch cluster.
Create and run a data synchronization task: Create and run a data synchronization task in the DTS console. Then, full and incremental data is automatically synchronized.
Step 1: Make preparations
In this example, a PolarDB for MySQL 8.0.1 cluster of Enterprise Edition and an Alibaba Cloud Elasticsearch V7.10 cluster are prepared.
Prepare the source database and the data to be synchronized
Create a PolarDB for MySQL 8.0.1 cluster of Enterprise Edition. For more information, see Purchase an Enterprise Edition cluster.
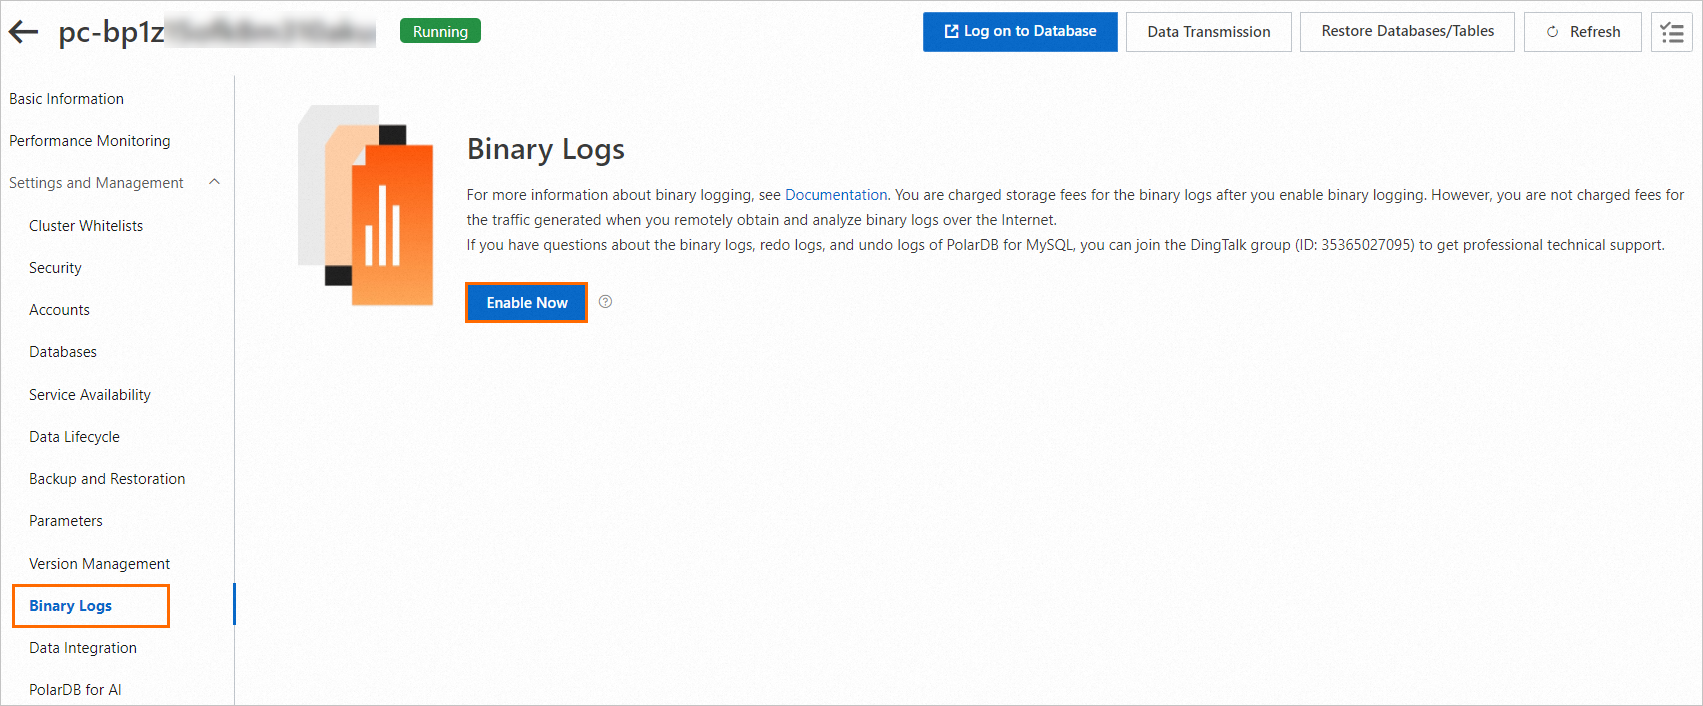
The binary logging feature is enabled for the PolarDB for MySQL cluster. For more information, see Enable binary logging.
Create an account and a database named
test_polardb. For more information, see Create and manage a database account and Database management operations.In the
test_polardbdatabase, create a table namedproductand insert data into the table.Create a table
CREATE TABLE `product` (
    `id` bigint(32) NOT NULL AUTO_INCREMENT,
    `name` varchar(32) NULL,
    `price` varchar(32) NULL,
    `code` varchar(32) NULL,
    `color` varchar(32) NULL,
    PRIMARY KEY (`id`)
) ENGINE=InnoDB
DEFAULT CHARACTER SET=utf8;
Insert test data into the table
INSERT INTO `test_polardb`.`product` (`id`,`name`,`price`,`code`,`color`) VALUES (1,'mobile phone A','2000','amp','golden');
INSERT INTO `test_polardb`.`product` (`id`,`name`,`price`,`code`,`color`) VALUES (2,'mobile phone B','2200','bmp','white');
INSERT INTO `test_polardb`.`product` (`id`,`name`,`price`,`code`,`color`) VALUES (3,'mobile phone C','2600','cmp','black');
INSERT INTO `test_polardb`.`product` (`id`,`name`,`price`,`code`,`color`) VALUES (4,'mobile phone D','2700','dmp','red');
INSERT INTO `test_polardb`.`product` (`id`,`name`,`price`,`code`,`color`) VALUES (5,'mobile phone E','2800','emp','silvery');
Prepare the destination Elasticsearch cluster
Create an Alibaba Cloud Elasticsearch V7.10 cluster. For more information, see Create an Alibaba Cloud Elasticsearch cluster.
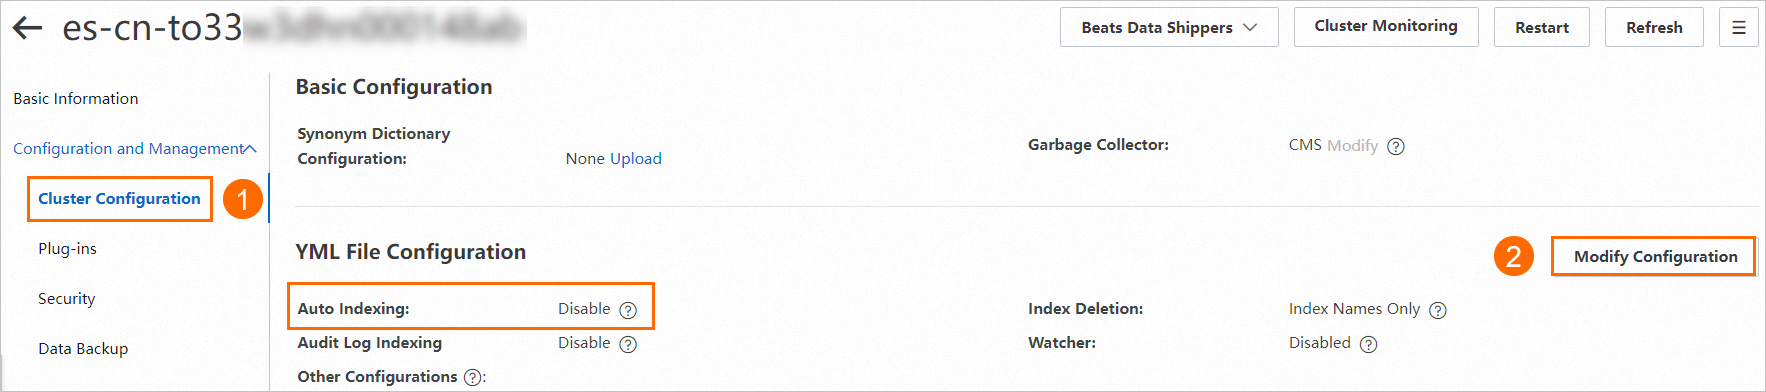
Enable the Auto Indexing feature for the Elasticsearch cluster. For more information, see Configure the YML file.
Step 2: Create and run a data synchronization task
Click Create Task.
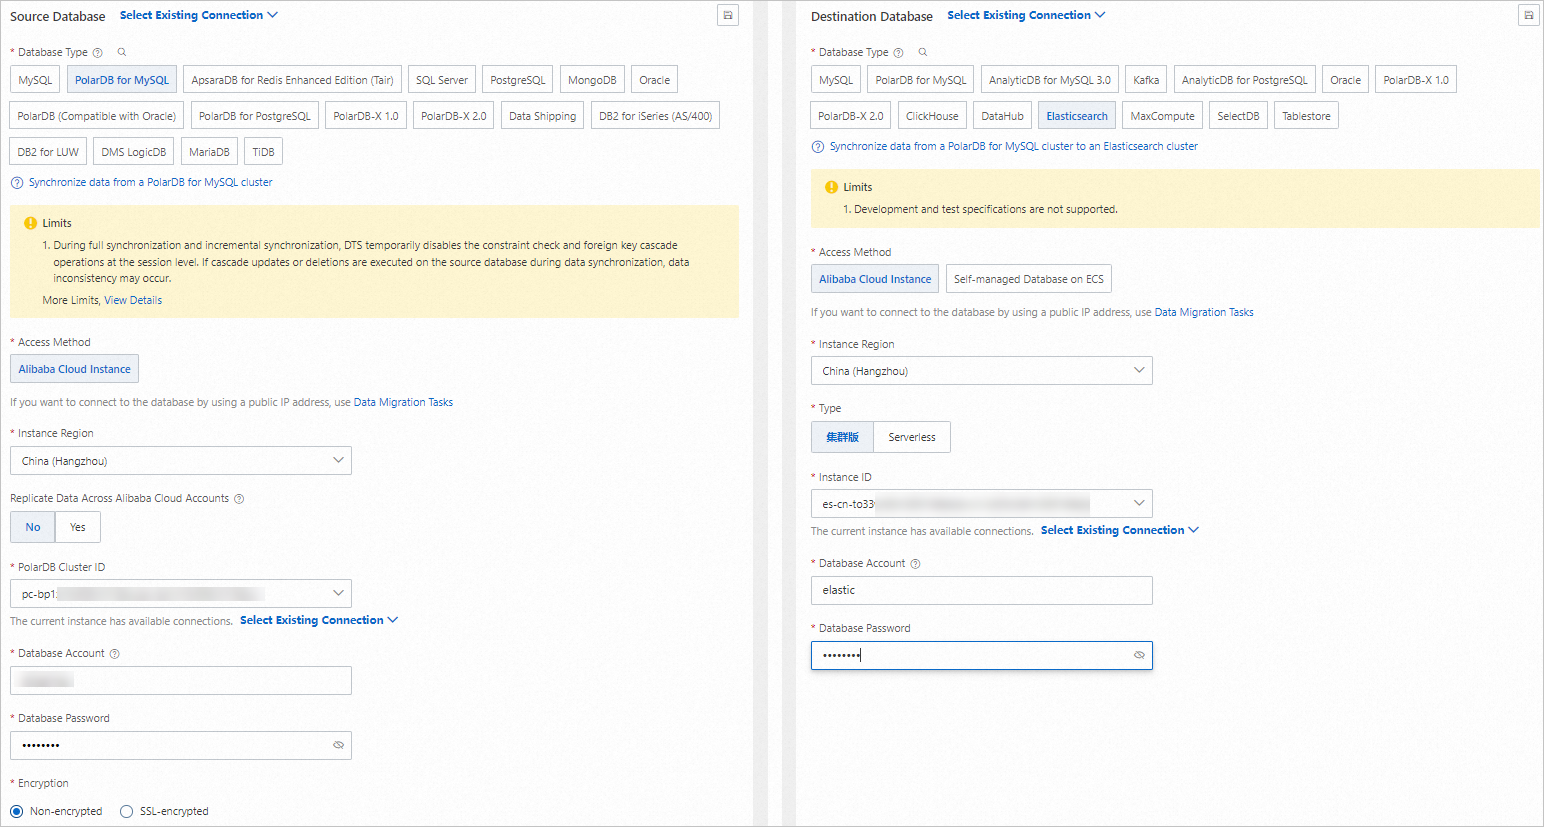
On the page that appears, create and configure a data synchronization task as prompted.
For information about the parameters that are involved in the following steps, see Synchronize data from a PolarDB for MySQL cluster.
Configure the source and destination. In the lower part of the page, click Test Connectivity and Proceed.
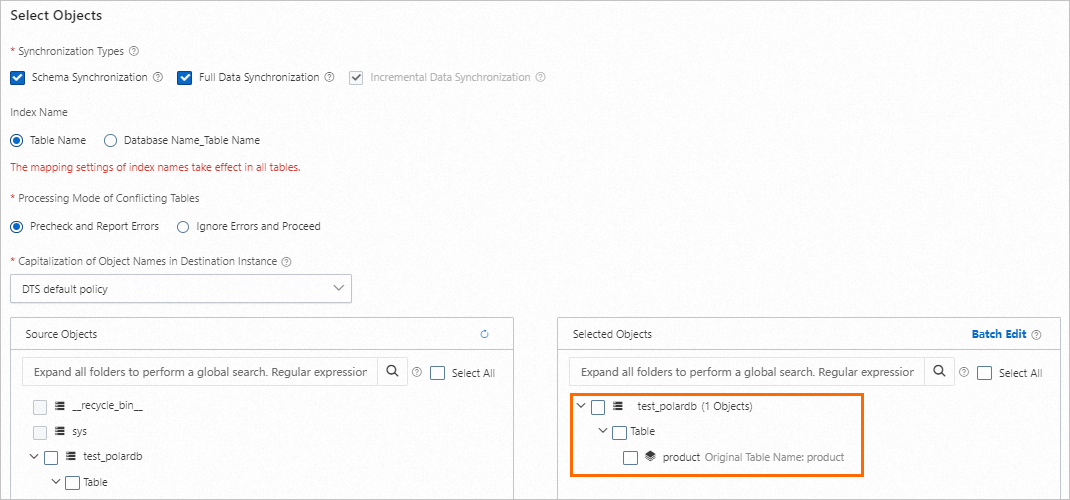
Configure the objects from which you want to synchronize data.
Configure advanced settings. In this example, the default advanced settings are used.
In the Data Verification substep, select Apply _routing Policy to No Tables.
NoteIf the destination Elasticsearch cluster is of V7.X, you must select Apply _routing Policy to No Tables.
After the configuration is complete, save the data synchronization task, perform a pre-check on the task, and purchase a DTS instance to start the data synchronization task.
After the DTS instance is purchased, the data synchronization task starts to run. You can view the data synchronization progress of the task on the Data Synchronization page. After the full data is synchronized, you can view the full data in the Elasticsearch cluster.

Step 3: (Optional) Verify the data synchronization results
Log on to the Kibana console of the Elasticsearch cluster.
For more information, see Log on to the Kibana console.
In the upper-left corner of the Kibana console, choose
 > Management > Dev Tools. On the page that appears, click the Console tab.
 Verify the synchronization result of full data.
Run the following command:
GET /product/_searchIf the command is successfully run, the following result is returned:
{
  "took" : 3,
  "timed_out" : false,
  "_shards" : {
    "total" : 5,
    "successful" : 5,
    "skipped" : 0,
    "failed" : 0
  },
  "hits" : {
    "total" : {
      "value" : 5,
      "relation" : "eq"
    },
    "max_score" : 1.0,
    "hits" : [
      {
        "_index" : "product",
        "_type" : "product",
        "_id" : "3",
        "_score" : 1.0,
        "_source" : {
          "id" : 3,
          "name" : "mobile phone C",
          "price" : "2600",
          "code" : "cmp",
          "color" : "black"
        }
      },
      {
        "_index" : "product",
        "_type" : "product",
        "_id" : "5",
        "_score" : 1.0,
        "_source" : {
          "id" : 5,
          "name" : "mobile phone E",
          "price" : "2800",
          "code" : "emp",
          "color" : "silvery"
        }
      },
      {
        "_index" : "product",
        "_type" : "product",
        "_id" : "4",
        "_score" : 1.0,
        "_source" : {
          "id" : 4,
          "name" : "mobile phone D",
          "price" : "2700",
          "code" : "dmp",
          "color" : "red"
        }
      },
      {
        "_index" : "product",
        "_type" : "product",
        "_id" : "2",
        "_score" : 1.0,
        "_source" : {
          "id" : 2,
          "name" : "mobile phone B",
          "price" : "2200",
          "code" : "bmp",
          "color" : "white"
        }
      },
      {
        "_index" : "product",
        "_type" : "product",
        "_id" : "1",
        "_score" : 1.0,
        "_source" : {
          "id" : 1,
          "name" : "mobile phone A",
          "price" : "2000",
          "code" : "amp",
          "color" : "golden"
        }
      }
    ]
  }
}
Verify the synchronization result of incremental data.
Execute the following statement to insert a data record into the source table:
INSERT INTO `test_polardb`.`product` (`id`,`name`,`price`,`code`,`color`) VALUES (6,'mobile phone F','2750','fmp','white');After the data record is synchronized, run the
GET /product/_searchcommand.If the command is successfully run, the following result is returned:
{
  "took" : 439,
  "timed_out" : false,
  "_shards" : {
    "total" : 5,
    "successful" : 5,
    "skipped" : 0,
    "failed" : 0
  },
  "hits" : {
    "total" : {
      "value" : 6,
      "relation" : "eq"
    },
    "max_score" : 1.0,
    "hits" : [
      {
        "_index" : "product",
        "_type" : "product",
        "_id" : "3",
        "_score" : 1.0,
        "_source" : {
          "id" : 3,
          "name" : "mobile phone C",
          "price" : "2600",
          "code" : "cmp",
          "color" : "black"
        }
      },
      {
        "_index" : "product",
        "_type" : "product",
        "_id" : "5",
        "_score" : 1.0,
        "_source" : {
          "id" : 5,
          "name" : "mobile phone E",
          "price" : "2800",
          "code" : "emp",
          "color" : "silvery"
        }
      },
      {
        "_index" : "product",
        "_type" : "product",
        "_id" : "4",
        "_score" : 1.0,
        "_source" : {
          "id" : 4,
          "name" : "mobile phone D",
          "price" : "2700",
          "code" : "dmp",
          "color" : "red"
        }
      },
      {
        "_index" : "product",
        "_type" : "product",
        "_id" : "2",
        "_score" : 1.0,
        "_source" : {
          "id" : 2,
          "name" : "mobile phone B",
          "price" : "2200",
          "code" : "bmp",
          "color" : "white"
        }
      },
      {
        "_index" : "product",
        "_type" : "product",
        "_id" : "6",
        "_score" : 1.0,
        "_source" : {
          "code" : "fmp",
          "color" : "white",
          "price" : "2750",
          "name" : "mobile phone F",
          "id" : 6
        }
      },
      {
        "_index" : "product",
        "_type" : "product",
        "_id" : "1",
        "_score" : 1.0,
        "_source" : {
          "id" : 1,
          "name" : "mobile phone A",
          "price" : "2000",
          "code" : "amp",
          "color" : "golden"
        }
      }
    ]
  }
}