After you install Cloud Native Kit (CNKIT), access its web UI through one of three methods: an NGINX Ingress, an Internet-facing Server Load Balancer (SLB), or a local proxy agent.
Choose an access method
| Method | Network exposure |
|---|---|
| NGINX Ingress | Cluster-external via Ingress (Internet-facing or internal SLB) |
| Internet-facing SLB | Internet-facing SLB |
| CNKIT agent (local proxy) | Local only (localhost:8090) |
Access CNKIT through an NGINX Ingress
By default, CNKIT creates an Ingress resource during installation. This Ingress routes external traffic to the CNKIT service through the NGINX Ingress controller in your Container Service for Kubernetes (ACK) cluster.
Prerequisites
Before you begin, make sure that:
CNKIT is installed in your ACK cluster
The NGINX Ingress controller is installed in the same cluster. For details, see Install the NGINX Ingress controller
To verify whether the NGINX Ingress controller is installed:
Log on to the ACK console. In the left-side navigation pane, click Clusters.
On the Clusters page, find the target cluster and choose in the Actions column.
On the Add-ons page, click the Networking tab and check whether the NGINX Ingress controller is listed.
Procedure
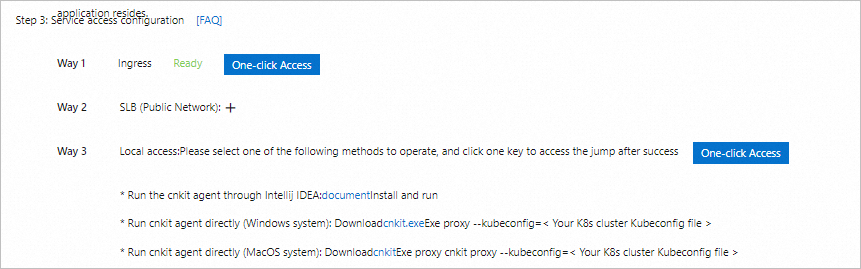
After you install CNKIT, refresh the page.
When Ready appears next to Ingress, click One-click Access to open the CNKIT web UI.
By default, the NGINX Ingress is attached to an Internet-facing SLB instance, which exposes the CNKIT service to the Internet. To restrict access to internal traffic only, switch the NGINX Ingress to an internal-facing SLB instance.
Troubleshoot Ingress access exceptions
Changes to the NGINX Ingress controller can cause access failures. If CNKIT becomes unreachable through the Ingress, rebind the testing domain:
Log on to the ACK console.
In the left-side navigation pane, click Clusters. On the Clusters page, find the target cluster and click Details in the Actions column.
On the Basic Information tab, locate the Cluster Information section and click Rebind Domain Name next to the Testing Domain parameter.
Wait 10 minutes, then try accessing CNKIT again.
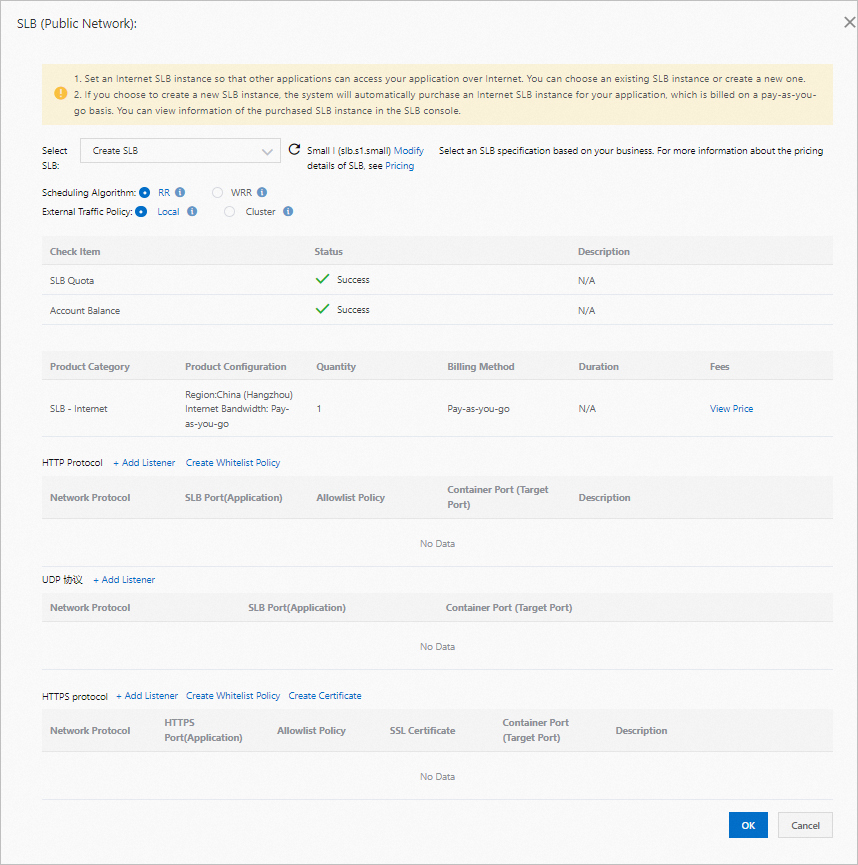
Access CNKIT through an Internet-facing SLB
Expose the CNKIT service directly through an Internet-facing SLB instance with an HTTP or HTTPS listener, without using an Ingress.
Procedure
From the Select SLB drop-down list, select an existing SLB instance or create a new one.
Add a listener to the selected SLB instance:
HTTP listener: Specify an external access port and add a whitelist through an access control list (ACL).
HTTPS listener: Specify an external access port, add a whitelist through an ACL, and select an SSL certificate.
NoteThe Container Port (Target Port) is automatically set to 8090 and cannot be changed.
Click OK, then click One-click Access to open the CNKIT web UI.
Access CNKIT from an on-premises machine
Run the CNKIT agent on your on-premises machine to create a port-forward proxy to the CNKIT service in your cluster. The CNKIT web UI is then available at http://127.0.0.1:8090/. Access is restricted to the machine where the agent is running.
Two options are available:
IntelliJ IDEA plug-in: Run the CNKIT agent through the IntelliJ IDEA plug-in. For details, see Locally access CNKIT by using the IntelliJ IDEA plug-in.
Standalone agent: Run the CNKIT agent binary directly from the command line.
The steps below use the macOS standalone agent as an example. A Windows agent is also available.
Prerequisites
Before you begin, make sure that:
CNKIT is installed in your ACK cluster
The Kubeconfig file for your cluster is saved to your on-premises machine. Download it from the Connection Information tab of the cluster in the ACK console. For details, see View connection information
The CNKIT agent binary is downloaded from the CNKIT module on the application details page in the EDAS console
Procedure
Open a terminal and navigate to the directory where the CNKIT agent binary is saved:
cd ~/DownloadsGrant execute permission to the agent:
sudo chmod +x ./cnkitStart the agent proxy:
./cnkit proxy --kubeconfig=<path-to-kubeconfig>Replace
<path-to-kubeconfig>with the absolute path to your cluster's Kubeconfig file.When the following output appears, the proxy is running:
select pod: cnkit-78b9dbd88d-w7r72 as port-forward endpoint.
Forwarding from [::1]:8090 -> 8090
proxy successfully, you can visit by http://127.0.0.1:8090/
Click One-click Access in the EDAS console to open the CNKIT web UI.

Unblock the agent on macOS
On macOS, the system may block the CNKIT agent because the developer is not verified. To resolve this:
When the "developer cannot be verified" message appears, click Cancel.
Open System Settings and go to Security and Privacy.
Click Allow to unblock the CNKIT agent.
Run the agent again:
./cnkit proxy --kubeconfig=<path-to-kubeconfig>When prompted to confirm, click Open.