Cloud Native Kit (CNKIT) connects your local IntelliJ IDEA environment to a CNKIT instance running in a Kubernetes cluster. The CNKIT agent runs on your local machine and establishes a connection to the cluster, allowing you to open the CNKIT page to develop, deploy, and debug code directly from your IDE.
Prerequisites
Before you begin, make sure that you have:
The CNKIT plugin installed in your Kubernetes cluster
A kubeconfig file for the target Kubernetes cluster on your local machine. If you manage multiple clusters, confirm that the file points to the cluster where CNKIT is installed
Step 1: Install the Alibaba Cloud Toolkit plugin
The Alibaba Cloud Toolkit plugin enables IntelliJ IDEA to communicate with CNKIT. Install it from a local ZIP package.
This plugin supports IntelliJ IDEA versions released between January 2020 and January 2022. Verify your IDE version before you proceed.
Download the Alibaba Cloud Toolkit plugin package. Do not extract the ZIP file.
In IntelliJ IDEA, choose File > Settings.
In the left-side navigation pane, click Plugins.
Click the
 icon and select Install Plugin from Disk....
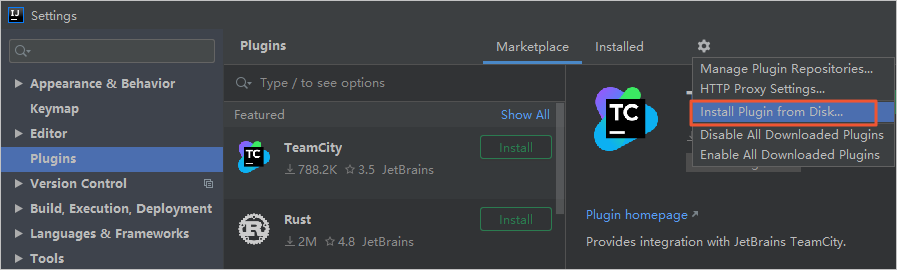
In the Choose Plugin File dialog box, select the ZIP package you downloaded in step 1.
Restart IntelliJ IDEA to load the plugin.
Step 2: Configure your Alibaba Cloud account
After the plugin is installed, configure your Alibaba Cloud Toolkit account with your AccessKey ID and AccessKey secret.
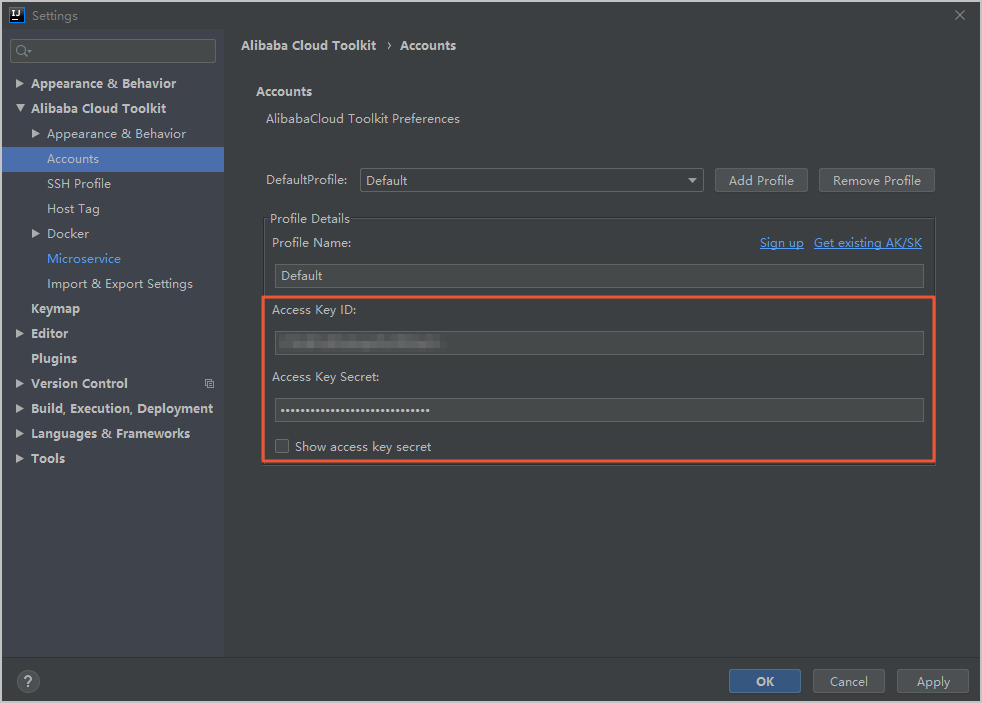
Choose Tools > Alibaba Cloud > Preferences....
In the Settings dialog box, navigate to Alibaba Cloud Toolkit > Accounts.
Enter your AccessKey ID and AccessKey secret, then click OK.
To retrieve your AccessKey credentials:
If you already have an Alibaba Cloud account, click Get existing AK/SK on the Accounts page. Log on with your Alibaba Cloud account. On the Security Management page, locate your AccessKey ID and AccessKey secret.
If you do not have an Alibaba Cloud account, click Sign up on the Accounts page to create one. Then retrieve your credentials by using the preceding method.
Step 3: Configure and start the CNKIT agent
The CNKIT agent runs locally and establishes a connection between your IDE and the CNKIT instance in your Kubernetes cluster.
Choose Tools > Alibaba Cloud > Preferences....
In the Settings dialog box, navigate to Alibaba Cloud Toolkit > Microservice > CNKIT.
Configure the following parameters:
Parameter
Description
KubeConfig
The kubeconfig file that is used to access a Kubernetes cluster.
Operation
Select Start to launch the CNKIT agent and connect to the cluster. Select Stop to disconnect and shut down the agent.
One-click Access
After the agent starts, click this button to open the CNKIT page in your browser.
Click OK to save the configuration. These settings persist across sessions, so you only need to configure them once.
What's next
Use the CNKIT page to develop, deploy, and debug your code.
If the agent fails to start, verify that your kubeconfig file is valid and that the CNKIT plugin is running in the target cluster.