This topic describes how to use CryptPilot to protect data at rest on confidential computing instances. CryptPilot performs trusted measurement on the root file system to prevent software tampering, and encrypts disk data to ensure data confidentiality at rest.
Confidential computing instances, such as TDX instances and heterogeneous confidential instances, protect runtime data through hardware capabilities such as register encryption and memory encryption. However, program code and processed data are typically still stored on cloud disks and require additional mechanisms for data-at-rest protection. This topic describes how to use CryptPilot to implement disk measurement and encryption protection in confidential computing instances, with self-managed encryption keys for cloud disks.
There are two approaches for disk protection of confidential computing instances. They can be used independently or in combination:
Confidential system disk measurement and encryption: Introduces dm-verity measurement during the system disk image creation phase, with optional LUKS2 encryption. During system startup, the rootfs undergoes integrity verification, and the decryption key is obtained from the trust management service through remote attestation. This approach is suitable for scenarios that require trusted measurement of the entire machine environment, and can also encrypt the system disk on top of that.
Confidential data disk encryption: Performs LUKS2 encryption on individual data disk partitions on a running confidential computing instance. This approach is suitable for scenarios where you have existing business instances and want to encrypt only specific data disks without recreating the image.
Choose the section based on your scenario: for creating a measurable, trusted-boot system image for a confidential instance, see Confidential system disk measurement and encryption; for encrypting only specific data disks on a running instance, see Confidential data disk encryption.
Confidential system disk measurement and encryption
Confidential system disk composition and protection
A confidential system disk processed by CryptPilot is organized by volume and contains two key volumes:

rootfs volume: A read-only root file system. During startup, the Linux kernel's dm-verity mechanism builds a complete hash tree for the rootfs volume. The root hash value is stored in secure memory and recorded in the CC Eventlog of the confidential instance for verifying boot chain integrity through remote attestation. The kernel verifies the hash value of each data block against the pre-stored root hash value layer by layer. Any unauthorized tampering is detected in real time and blocks the system from starting. To maintain business compatibility, a writable overlay layer is placed on top of the read-only rootfs, with the overlay's backend storage carried by the delta volume. Temporary writes do not affect the measurement results.
Encrypting this volume is optional. If enabled, encryption uses LUKS2 (AES-256). The device randomly generates a Master Key for data encryption and decryption. A user-provided Passphrase is processed through a key derivation algorithm to generate a KEK, which encrypts the Master Key and stores it in the volume header. During startup, the KEK is obtained through remote attestation to decrypt the Master Key. All encryption and decryption operations are performed in the secure memory of the confidential instance.
delta volume: An encrypted volume that consists of the remaining space on the system disk. It is always encrypted with LUKS2 and carries the backend data for the rootfs writable overlay layer. All write operations on the rootfs are eventually encrypted and stored in the delta volume.
Usage flow

Step 1: Prepare a trusted environment
The trusted environment must meet the following conditions:
Alibaba Cloud Linux 3 operating system: The CryptPilot tool for creating confidential system disks depends on Alibaba Cloud Linux 3.
Public IP address enabled: The confidential computing instance must access the Trustee server to obtain the decryption key during startup.
Sufficient space: The required space depends on the size of the system disk image file that you want to create. We recommend that your environment has more than 40 GiB of free space.
Step 2: Create a confidential system disk image
Prepare the source disk image.
Before you create a confidential system disk, you must prepare a disk image file with your business deployed. You can obtain this image in one of the following two ways:
Export a system image from an existing ECS instance
Deploy and configure your business environment on an existing Alibaba Cloud ECS instance, then export the system image of the instance as a qcow2 file through the console or API.
Customize an official base image
Download the latest Alibaba Cloud Linux 3 base image from the official Alibaba Cloud website and use the virt-customize tool to customize the image content (such as installing software packages, configuring services, and adding your business applications) to meet your business needs.
You can visit the Alibaba Cloud Linux 3 On-premise Image page to obtain the download link for the latest distribution. For example, run the following command to download a specific version of the QCOW2 image file:
curl -O -L -C - https://alinux3.oss-cn-hangzhou.aliyuncs.com/aliyun_3_x64_20G_nocloud_alibase_20250117.qcow2NoteOnly
.qcow2and.vhdformat Alibaba Cloud Linux 3 operating system disk image files are supported.After an image is processed by cryptpilot-convert, its content can no longer be modified. Ensure that you complete all necessary configurations and customizations before processing.
(Optional) Harden the image.
For instances running in a confidential computing environment, hardening can effectively reduce the attack surface and prevent unnecessary services or components from introducing security risks, thereby improving overall security.
You can refer to the Image hardening section below to complete the relevant operations during the image customization phase before performing encryption.
Install CryptPilot and prepare the configuration file.
Install CryptPilot.
Install the host package in the trusted build environment (which provides tools such as cryptpilot-convert, cryptpilot-enhance, and cryptpilot-fde-host for creating confidential system disk images):
sudo yum install -y cryptpilot-fde-hostCheck the CryptPilot version.
cryptpilot-fde-host --version
Create a directory for CryptPilot configuration files.
mkdir -p ./config_dirWrite the system disk configuration.
CryptPilot supports configuring the encryption settings for the rootfs volume and delta volume of the confidential system disk separately. Choose the configuration based on two dimensions: whether to encrypt the rootfs volume and whether the delta data needs to be persisted. The following four combinations are available for the
fde.tomlcontent. Write the content of the selected option to./config_dir/fde.toml:rootfs volume unencrypted + delta volume non-persistent
[rootfs]
delta_location = "disk"

[delta]
integrity = true
[delta.encrypt.otp]
rootfs volume unencrypted + delta volume persistent
[rootfs]
delta_location = "disk-persist"

[delta]
integrity = true
[delta.encrypt.kbs]
kbs_url = "http://<trustee-ip>:8081/api"
key_uri = "kbs:///default/local-resources/delta"
rootfs volume encrypted + delta volume non-persistent
[rootfs]
delta_location = "disk-persist"
[rootfs.encrypt.kbs]
kbs_url = "http://<trustee-ip>:8081/api"
key_uri = "kbs:///default/local-resources/rootfs"

[delta]
integrity = true
[delta.encrypt.otp]
rootfs volume encrypted + delta volume persistent
[rootfs] delta_location = "disk-persist" [rootfs.encrypt.kbs] kbs_url = "http://<trustee-ip>:8081/api" key_uri = "kbs:///default/local-resources/rootfs" [delta] integrity = true [delta.encrypt.kbs] kbs_url = "http://<trustee-ip>:8081/api" key_uri = "kbs:///default/local-resources/delta"NoteWhen using OTP, the delta volume automatically generates a new random key on each startup. Data is lost after shutdown, and no key backend deployment is required. For more information about OTP, see One-time password (OTP).
When using a persistent key backend such as Trustee, replace
<trustee-ip>in the configuration with the public IP address of the instance where you deployed the Trustee service (if you have configured HTTPS access for Trustee, replacehttp://withhttps://inkbs_url). For detailed configuration of each key retrieval method, see Trust management service (Trustee).
Create the confidential system disk image file.
Create the confidential system disk image file.
If your configuration does not encrypt the rootfs volume:
sudo cryptpilot-convert --uki --in ./aliyun_3_x64_20G_nocloud_alibase_20250117.qcow2 --out ./confidential-disk.qcow2 --config-dir ./config_dir/ --rootfs-no-encryptionIf your configuration encrypts the rootfs volume:
sudo cryptpilot-convert --uki --in ./aliyun_3_x64_20G_nocloud_alibase_20250117.qcow2 --out ./confidential-disk.qcow2 --config-dir ./config_dir/ --rootfs-passphrase "<rootfs_volume_encryption_key>"Note<rootfs_volume_encryption_key>must be the same as the encryption key uploaded to the key backend for the rootfs volume.Because the delta volume is encrypted during instance startup, you do not need to specify the delta volume password when creating the confidential system disk image file.
If you need to install additional RPM packages on the system disk, you can use the
--packageoption to specify the name or path of the RPM package.
Check the generated image.
The confidential system disk image is created at
./confidential-disk.qcowby default.file ./confidential-disk.qcow2
Step 3: Import the custom image and create a confidential instance
Upload the custom image to OSS.
Upload the local image file to OSS and obtain the file URL. For more information, see Upload files.
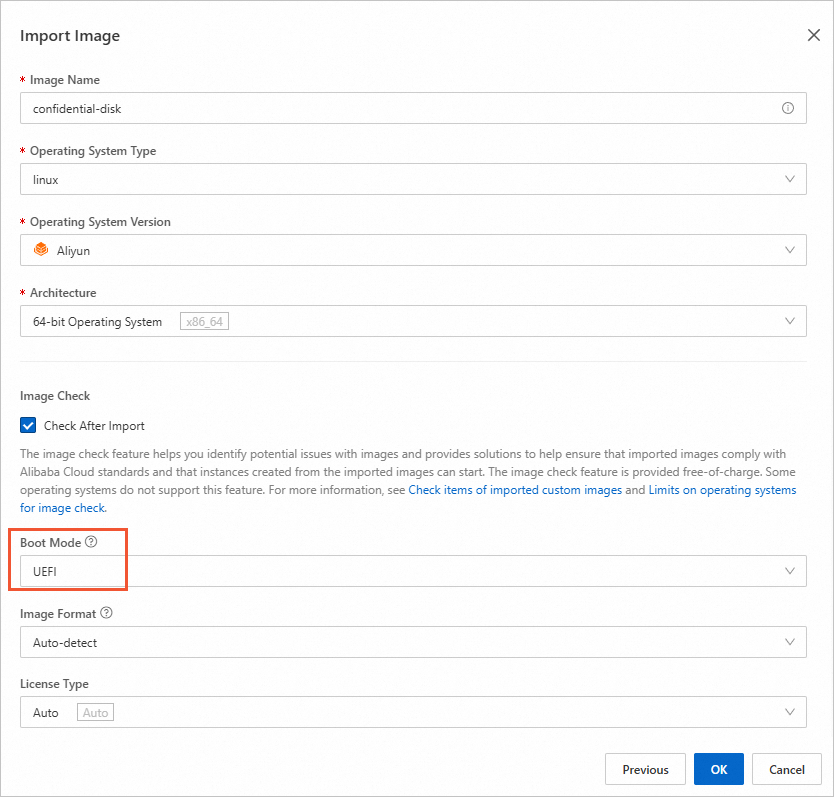
When you import the custom image, Boot Mode must be set to UEFI.
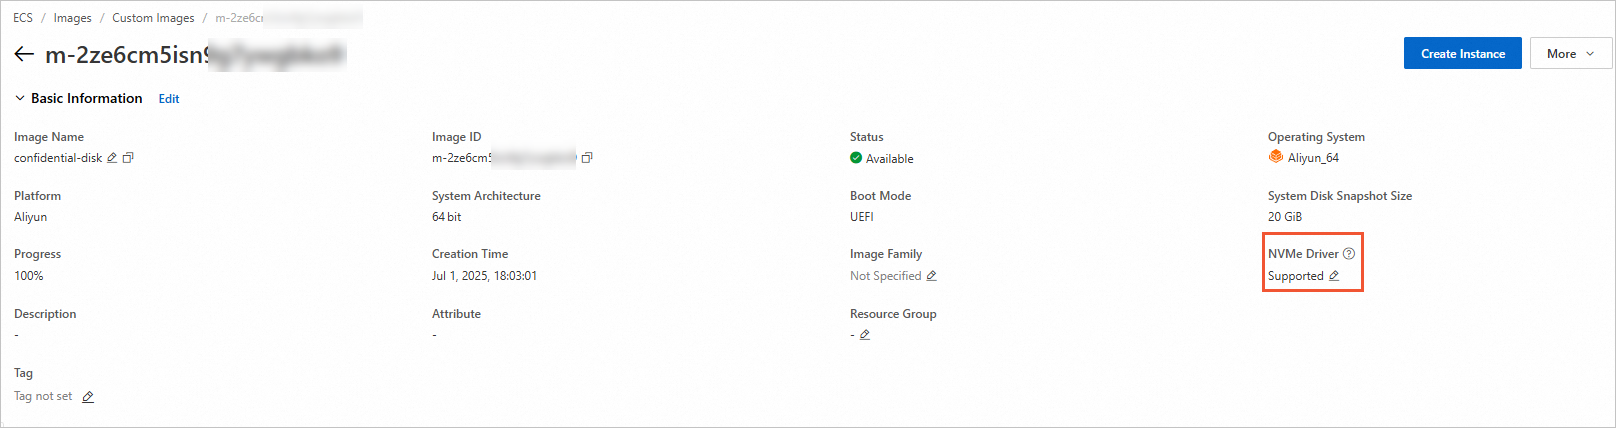
After the image is successfully imported, go to the image details page and set the NVMe driver to Enabled.
Step 4: Use the imported custom image to create a confidential computing instance
Use the imported custom image to create a TDX confidential computing instance or a heterogeneous confidential computing instance.
When you create the instance, take note of the following parameters:
Image: Select the imported custom image and select Confidential VM.

Public IP Address: Select Assign Public IPv4 Address to enable your instance to access the Trustee service and obtain the key through remote attestation.
Logon Credentials: Select Key Pair.
Confidential system disks created with CryptPilot do not currently support password-based logon.
(Optional) If you have deployed the Trustee service, add an inbound rule in the security group of the Trustee instance to allow access to port 8081 from the public IP address of the confidential instance.

Connect to the confidential computing instance using the Workbench terminal.
If you can connect to the instance, the instance can access the Trustee service and obtain the key through remote attestation.
Step 5: (Optional) Register reference values in the Trustee service
If you have configured Trustee as the key storage backend, the instance sends a request to the Trustee service during startup to obtain the disk decryption key. The Trustee service verifies the instance environment through remote attestation to check whether it is running in a TEE instance. On top of that, if you also want to verify the running image, you must first register the reference values of the image in Trustee.
Use CryptPilot to calculate the reference values of the confidential system disk image and save them to
reference-value.json.sudo cryptpilot-fde-host show-reference-value --disk ./confidential-disk.qcow2 | tee ./reference-value.jsonThe following is an example output, where
466713bf9b2dacca6cd15ff4acd050712e29b4164628e01bd2495411766f36d7ba4560f62537926cf16e08480f1c1804is the reference value of the image:
Import the reference values into the Trustee service.
provenance=$(cat ./reference-value.json | base64 --wrap=0)
cat << EOF > ./register-request.json
{
    "version" : "0.1.0",
    "type": "sample",
    "payload": "$provenance"
}
EOF

rvps-tool register --path ./register-request.json
Image hardening
In a confidential computing environment, the security configuration of the image directly affects overall trustworthiness. We recommend hardening the image before encryption:
Attack surface minimization: Pre-installed cloud service components (such as Cloud Assistant and monitoring agents) expand the attack surface in confidential computing scenarios. Removing them reduces the risk of exploitation.
Data isolation assurance: Unclosed management services may become channels for data leakage. Hardening ensures that only necessary services are running.
Access control: Disabling SSH and other remote access prevents unauthorized logon and ensures the closed nature of the computing environment.
Hardening tool description
To simplify the hardening process, we provide the cryptpilot-enhance tool, which integrates best practices for image security hardening.
If you use an image exported from an ECS instance snapshot instead of an Alibaba Cloud Linux 3 base image obtained from the official source, Cloud Assistant or Security Center (Aegis) may be pre-installed. The cryptpilot-enhance tool automatically detects and uninstalls these components.
Images generated by cryptpilot-convert have finalized content and cannot be modified. Therefore, you must run cryptpilot-enhance before cryptpilot-convert.
cryptpilot-enhance supports two hardening modes:
full: Full hardening. Removes the SSH service and enforces the strictest access control.partial: Partial hardening. Retains the SSH service but enforces key-based authentication. Suitable for production environments that require remote maintenance.
The hardening includes the following items:
Hardening mode | Items |
Common hardening items (executed in both modes) |
|
|
|
|
|
Hardening tool examples
Perform full hardening on the image:
cryptpilot-enhance \
  --mode full \
  --image ./os-disk.qcow2
Perform partial hardening on the image and inject an SSH public key:
cryptpilot-enhance \
  --mode partial \
  --image ./os-disk.qcow2 \
  --ssh-key ~/.ssh/id_rsa.pub
Confidential data disk encryption
In confidential computing scenarios, in addition to protecting the entire system disk, you can also encrypt only specific data disk partitions on a running confidential instance. This section describes how to implement LUKS2 encryption for data disks within a confidential computing instance with self-managed keys.
Encryption principles
Confidential cloud disks are based on the Linux platform's LUKS2 technology, providing block storage-level data encryption protection. The process includes initialization and opening:
Initialization: Select a block device (such as
/dev/nvme1n1p1). A device-unique Master Key is generated by a secure random number algorithm for AES-256 encryption. The Master Key itself is encrypted by a KEK derived from the user-provided Passphrase through a key derivation algorithm and stored in the volume header.ImportantThe initialization process erases existing data on the block device. Proceed with caution to avoid accidental data loss.
Opening: The KEK is re-derived from the user-provided Passphrase to decrypt the Master Key and unlock the volume. The system creates a virtual block device at the
/dev/mapper/<volume_name>path. All data written to this device is automatically encrypted before being written to the disk, and data is automatically decrypted when read. The encryption and decryption are performed in the Linux kernel, effectively preventing plaintext from leaking outside the instance.

The encrypted instance uses the CPU's built-in AES hardware acceleration to reduce encryption and decryption overhead. Confidential data disks support integrity protection through AEAD encryption mode, which prevents attackers from tampering with ciphertext data. This is suitable for scenarios such as large language model weight storage and training dataset storage. The Passphrase used for encryption is managed outside the instance and supports multiple key retrieval methods. For details, see Appendix: Key retrieval methods.
Only data disks of TDX instances or heterogeneous confidential instances are supported for encryption.
When a cloud disk is rolled back, because the integrity and confidentiality of the data are not compromised, the confidential cloud disk solution cannot help you identify such potential attacks. We recommend that you perform data version checks at the application level to address this issue based on your security requirements.
Usage flow
Step 1: Prepare the environment
Create a confidential computing instance.
Only TDX confidential instances or heterogeneous confidential instances are supported.
Connect to the confidential computing instance remotely.
For more information, see Log on to a Linux instance using Workbench.
Install CryptPilot.
sudo yum install -y cryptpilot-crypt
Step 2: Create and mount a cloud disk
Encrypting a cloud disk erases existing data on the block device. We recommend that you create a new data disk for this operation.
When initializing the data disk, create only partitions and file systems without mounting the file system. The file system must be mounted after encryption.
View the attached disk and partition information.
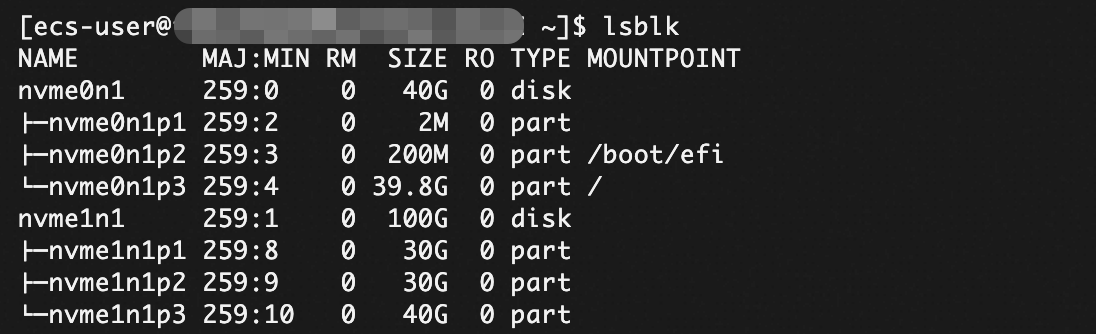
lsblkThe output shows that the current ECS instance has two cloud disks attached:
/dev/nvme0n1: The existing system disk./dev/nvme1n1: The newly added data disk, with 2 new empty partitions (/dev/nvme1n1p1and/dev/nvme1n1p2).
Step 3: Create a volume with an ext4 file system
First, you need to write a configuration file
/etc/cryptpilot/volumes/data0.toml. This file defines a data volume nameddata0.NoteThe configuration file uses the TOML format. The file name can be any text file ending with
.tomland is not required to match the volume name.The following are some typical configuration examples for different scenarios. Modify the configuration fields as needed.
Temporary volume
# Volume configuration
dev = "/dev/nvme1n1p1"    # Specify the block device, i.e., the empty partition of the cloud disk. In this example, /dev/nvme1n1p1 uses the first partition of the data disk.
volume = "data0"          # Specify the volume name. In this example, it is named data0.
auto_open = false         # true means the volume opens automatically on system startup; false means manual opening is required.
makefs = "ext4"           # Specify the file system type to create. In this example, ext4.
integrity = true          # true enables data integrity support; false disables it.

# Key configuration
[encrypt.otp]             # Specify the key storage type. Here, one-time password (OTP) is selected.
Persistent volume (using Trustee)
# Volume configuration
dev = "/dev/nvme1n1p2"        # Specify the block device, i.e., the empty partition of the cloud disk. In this example, /dev/nvme1n1p2 uses the second partition of the data disk.
volume = "data0"              # Specify the volume name. In this example, it is named data0.
auto_open = false             # true means the volume opens automatically on system startup; false means manual opening is required.
makefs = "ext4"               # Specify the file system type to create. In this example, ext4.
integrity = true              # true enables data integrity support; false disables it.

# Key configuration (retrieved from Trustee KBS)
[encrypt.kbs]
kbs_url = "http://<trustee-ip>:8081/api"               # Replace <trustee-ip> with the public IP address of the Trustee instance
key_uri = "kbs:///default/local-resources/data0"       # The resource URI for the data0 volume key stored in KBS
Persistent volume (using Alibaba Cloud KMS)
# Volume configuration
dev = "/dev/nvme1n1p2"        # Specify the block device, i.e., the empty partition of the cloud disk. In this example, /dev/nvme1n1p2 uses the first partition of the data disk.
volume = "data0"              # Specify the volume name. In this example, it is named data0.
auto_open = false             # true means the volume opens automatically on system startup; false means manual opening is required.
makefs = "ext4"               # Specify the file system type to create. In this example, ext4.
integrity = true              # true enables data integrity support; false disables it.

# Key configuration
[encrypt.kms]                 # Specify the key storage type. Here, Key Management Service (KMS) is selected.
secret_name = "confidential_cloud_disk_passphrase"   # The name of the secret stored in the KMS instance, i.e., confidential_cloud_disk_passphrase in the example above.
# Content of the application identity credential file (clientKey_****.json)
client_key = '''
{
  "KeyId": "KAAP.b183152a-c3bf-43ae-9399-a101607b****",
  "PrivateKeyData": "MIIJ0wIBAzCCCZ8GCSqGSIb3DQE****"
}
'''
client_key_password = "258372e962f5204ce648bc66243f****"    # Content of the credential password file (clientKey_****_Password.txt)
kms_instance_id = "kst-bjj67d004a85ykq80****"               # KMS instance ID
# Content of the KMS instance CA certificate file (PrivateKmsCA_kst-******.pem)
kms_cert_pem = """
-----BEGIN CERTIFICATE-----
MIIDuzCCAqOgAwIBAgIJALTKwWAjvbMiMA0GCSqGSIb3DQEBCwUAMH****
-----END CERTIFICATE-----
-----BEGIN CERTIFICATE-----
MIID3zCCAsegAwIBAgIJAO8qnQyTy8/kMA0GCSqGSIb3DQEBCwUAMH****
-----END CERTIFICATE-----
"""
View the volume status.
sudo cryptpilot-crypt show data0You can see the configuration information of the
data0volume:Initialized column: Shows whether the volume needs initialization. Temporary volumes do not need initialization, while persistent volumes do.
Opened column: Shows that the volume is not open.

Initialize the volume.
sudo cryptpilot-crypt init data0Open the volume.
sudo cryptpilot-crypt open data0Check the virtual device of the volume.
sudo file -Ls /dev/mapper/data0After the volume is opened, a virtual block device is created at the path:
/dev/mapper/<volume_name>.
Mount the file system and check the mount result.
Mount the
data0volume to the/mnt/data0path.sudo mkdir -p /mnt/data0 sudo mount -t ext4 /dev/mapper/data0 /mnt/data0Check the mount result.
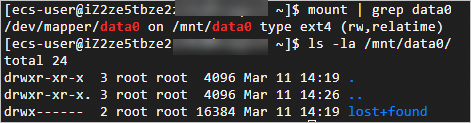
mount | grep data0
ls -la /mnt/data0/
The following output indicates that the volume was successfully mounted with an empty ext4 file system.
Close the volume.
ImportantThis example uses the one-time password (OTP) model. After the volume is closed, the confidential data stored in it is permanently lost.
Before closing the volume, stop all business processes that are reading from or writing to the volume, unmount the file system on the volume, and ensure the volume is not in use.
Unmount the file system.
sudo umount /mnt/data0Close the volume.
sudo cryptpilot-crypt close data0
Step 4: Configure the volume to open automatically on startup
Modify the configuration file.
For volumes that need to open automatically, change the
auto_openfield value totruein the configuration file.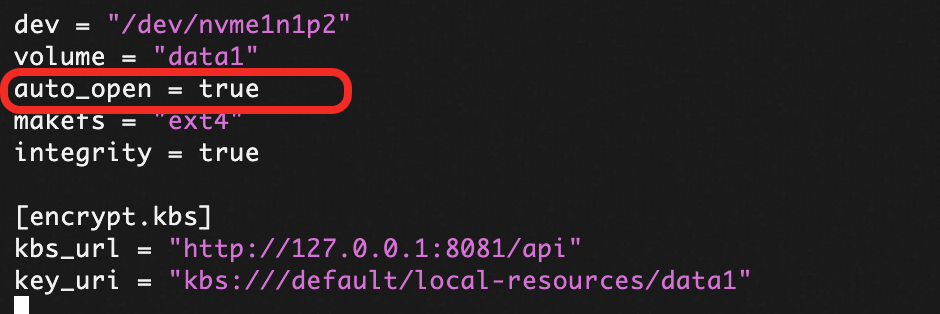
(Conditional) For persistent volumes, you must manually run
sudo cryptpilot-crypt init <volume_name>to initialize the volume before it can be opened automatically on startup.Start and enable the cryptpilot service to start on boot.
ImportantAfter each modification of the cryptpilot configuration, you must start and enable the cryptpilot service to ensure the auto-open volume feature takes effect.
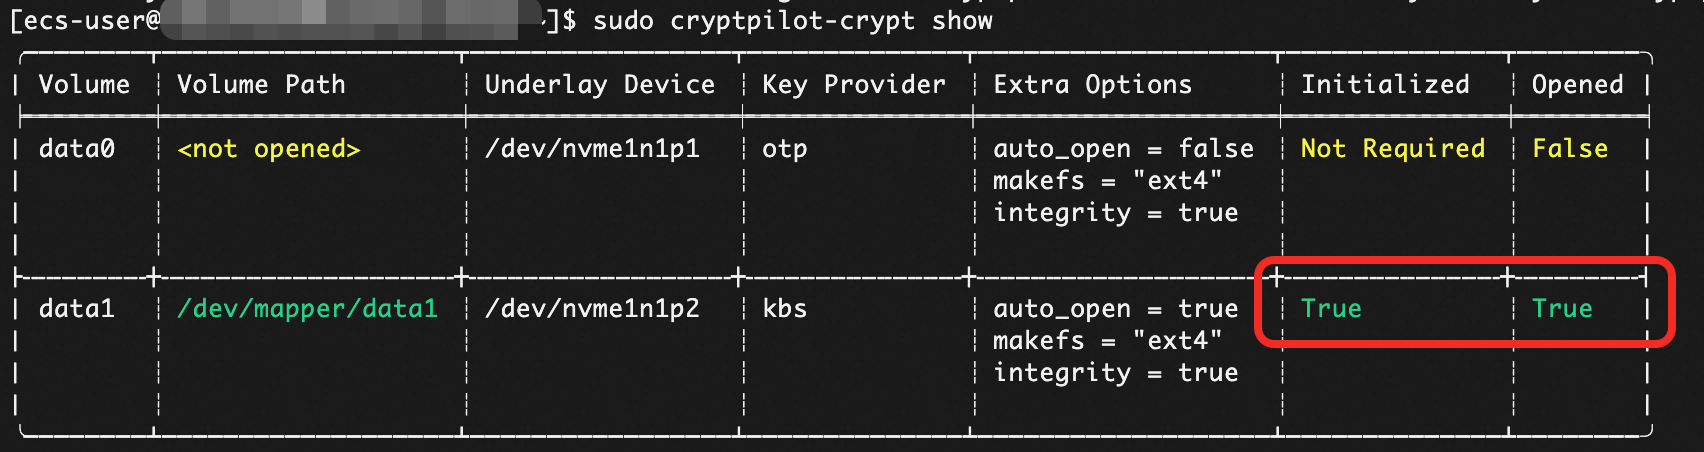
sudo systemctl enable --now cryptpilot.serviceView the volume status.
sudo cryptpilot-crypt showThe following output indicates that the volume was opened automatically.
Appendix: Key retrieval methods
CryptPilot uses a Provider mechanism to integrate with different key sources, decoupling "how to encrypt/decrypt the disk" from "where to get the key." This section describes the four methods: OTP, Trustee (KBS), Alibaba Cloud KMS, and external program (exec), referenced by the confidential system disk and confidential data disk sections above.
Key retrieval method | Provider type | Persistence | Remote attestation required | Typical scenarios |
OTP (One-time password) |
| No (lost on shutdown) | No | Temporary data disks, swap partitions |
Trustee |
| Yes | Yes (releases key based on TEE remote attestation) | Self-hosted key backend + strong trusted computing requirements |
Alibaba Cloud KMS |
| Yes | No | Cloud-managed key management capability |
exec (External program) |
| Depends on the external program | Depends on the external program | Advanced users with custom key retrieval workflows |
In the volume configuration examples above, you can replace the [encrypt.xxx] section with one of the Provider configurations described in this section based on your actual needs.One-time password (OTP)
Applicable scope
Confidential data disk - temporary volume: Each time the volume is reopened, a different random key is generated. Data in the volume is permanently lost after shutdown. Suitable for temporary data disks or swap partitions.
Not applicable to confidential system disks or any persistent volume that needs to retain data after shutdown.
Configuration example
Add the following to the volume's toml configuration:
[encrypt.otp]No additional parameters are required. CryptPilot automatically generates a secure temporary key when opening the volume for initialization and decryption.
Trust management service (Trustee)
Trustee is an open-source trust management service that consists of the Attestation Service (AS), Reference Value Provider Service (RVPS), and Key Broker Service (KBS). In this approach, encryption keys are stored in KBS. CryptPilot retrieves the key from KBS when opening a volume. KBS initiates remote attestation of the instance based on preset policies and only releases the key after successful attestation.
Trustee is suitable for both confidential system disks (as the recommended key backend in strong trusted computing scenarios) and persistent volumes of confidential data disks.
Step 1: Deploy the Trustee service
Install the Trustee package in a trusted environment (such as a separate ECS instance):
sudo yum install -y trustee(Optional) Configure HTTPS access. If HTTPS access is required, edit
/etc/trustee/gateway.ymland add your TLS certificate configuration:server: insecure_http: false tls: cert_file: "<path_to_https_certificate.pem>" key_file: "<path_to_https_certificate_private_key>" # Other configurations...On an Alibaba Cloud Linux 3 instance, you can start the Trustee service through systemd:
sudo systemctl restart trusteeAfter Trustee is running, it listens on port 8081 on the local machine.
Step 2: Configure the remote attestation verification policy
Trustee inspects the TEE hardware environment, file system, programs, and configurations of the confidential instance and produces the inspection results. You need to configure the release policy in /opt/trustee/kbs/policy.rego based on your security requirements.
Confidential system disk scenario (recommended: strict policy): Requires that the trustworthiness values of all four dimensions (hardware, configuration, executables, file system) from remote attestation are
<= 32. For specific policy and reference value generation, see "Step 3: Create a confidential system disk image" (registering reference values in the Trustee service) in the confidential system disk usage flow above.Confidential data disk scenario (simplest policy: hardware-only verification): For simplified usage, you can verify only the hardware dimension among the four dimensions to check whether the environment is a valid TEE hardware environment. Modify
/opt/trustee/kbs/policy.regoto the following default configuration:
For more strict multi-dimensional verification, check /opt/trustee/attestation-service/policies/opa/default.rego and refer to the reference value configuration documentation and remote attestation configuration documentation to set up the reference values.
Step 3: Upload volume encryption keys to KBS
Create the key storage directory (KBS uses
/opt/trustee/kbs/repository/default/by default):sudo mkdir -p /opt/trustee/kbs/repository/default/local-resources/Generate the encryption key.
sudo yum install -y openssl
openssl rand -base64 40
Write the generated random key to a local resource file. For example, for a volume named
data0:sudo sh -c 'echo -n "<data0_volume_encryption_key>" > /opt/trustee/kbs/repository/default/local-resources/data0'Replace
<data0_volume_encryption_key>with the random key generated above. The corresponding KBS resource identifier iskbs:///default/local-resources/data0, which is referenced by this URI in the CryptPilot volume configuration.
Step 4: Reference KBS in the volume configuration
[encrypt.kbs]
# HTTP(S) URL of the Trustee instance
kbs_url = "http://<trustee-ip>:8081/api"
# Resource URI in KBS, format: `kbs:///<repo>/<type>/<tag>`
key_uri = "kbs:///default/local-resources/data0"
# (Optional) Root certificate for KBS HTTPS access, PEM format; uses system root CA if not specified
kbs_root_cert = """
-----BEGIN CERTIFICATE-----
XXXXXXXXXXXXXXXXXXXXXXXXXXXXXXXXXXXXXXXXXXXXX
XXXXXXXXXXXXXXXXXXXXXXXXXXXXXXXXXXXXXXXXXXXXX
-----END CERTIFICATE-----
"""
Step 5: Install the remote attestation dependency on the confidential instance
To enable remote attestation on the confidential instance and access Trustee for key retrieval, ensure that the attestation-agent component for the corresponding hardware is installed on the confidential instance:
yum install -y attestation-agent

systemctl enable attestation-agent
systemctl start attestation-agent
Alibaba Cloud KMS
Alibaba Cloud KMS is a cloud-based key management service, suitable for scenarios where you want to host keys in Alibaba Cloud without building a self-hosted key backend. In this approach, the encryption key is stored as a "generic secret" in KMS. CryptPilot retrieves the key from the KMS instance when opening a volume.
Step 1: Create an Alibaba Cloud KMS instance and a generic secret
There are no restrictions on the Key Management Type of the KMS instance for confidential cloud disks. You can choose based on your security requirements. This example uses a Software Key Management type KMS instance.
The KMS instance must be in the same VPC as the ECS instance.
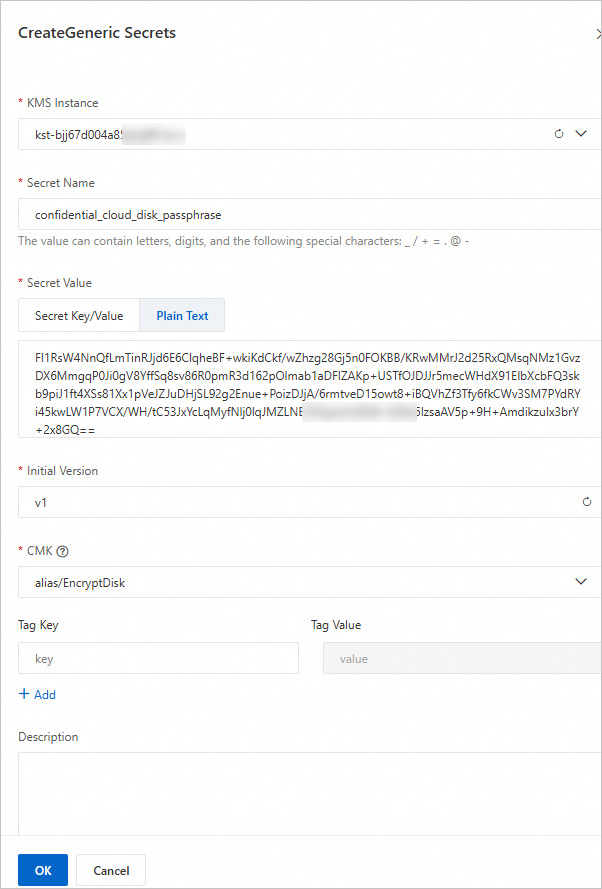
Secret Name: Fill in based on your instance. In this example,
confidential_cloud_disk_passphrase.Set Secret Value: Select plain text and enter the random key generated in the previous step.
Encryption Key: Select the software key created in the previous step.
Create an application access point and obtain the KMS instance CA certificate.
Ensure that you have obtained the following:
Application identity credential content (ClientKeyContent): The default file name is clientKey_****.json.
Credential password (ClientKeyPassword): The default file name is clientKey_****_Password.txt.
KMS instance CA certificate: The default file name is PrivateKmsCA_kst-******.pem.
Step 2: Reference KMS in the volume configuration
Modify the configuration information in the following configuration file based on your actual setup.
[encrypt.kms]
# KMS instance ID
kms_instance_id = "kst-bjj67d004a85ykq80****"
# Name of the generic secret in the KMS instance
secret_name = "confidential_cloud_disk_passphrase"
# Content of the application identity credential file clientKey_****.json
client_key = '''
{
  "KeyId": "KAAP.XXXXXXXXX",
  "PrivateKeyData": "XXXXXXXXX"
}'''
# Content of the credential password file clientKey_****_Password.txt
client_key_password = "258372e962f5204ce648bc66243f****"
# Content of the KMS instance CA certificate PrivateKmsCA_kst-******.pem
kms_cert_pem = """
-----BEGIN CERTIFICATE-----
XXXXXXXXXXXXXXXXXXXXXXXXXXXXXXXXXXXXXXXXXXXXX
XXXXXXXXXXXXXXXXXXXXXXXXXXXXXXXXXXXXXXXXXXXXX
-----END CERTIFICATE-----
"""
External program (exec)
The exec Provider allows CryptPilot to call any external program when opening a volume and use the standard output of that program as the volume's decryption key. This method is for advanced users and can be used for custom key retrieval workflows, such as integrating with enterprise HSMs, Vault, custom KMS systems, or remote key delivery services.
Because the security of key retrieval depends entirely on the external program and its runtime environment, ensure that the program itself has adequate access control and comes from a trusted source.
Configuration example
The following example uses the echo program to generate a fixed password, for demonstration purposes only. Do not use a fixed password in production environments:
[rootfs]
delta_location = "disk"

[rootfs.encrypt.exec]
command = "echo"
args = ["-n", "AAAaaawewe222"]

[delta]
integrity = true

[delta.encrypt.exec]
command = "echo"
args = ["-n", "AAAaaawewe222"]
CryptPilot executes the program specified by command (with args parameters) when opening a volume and uses the standard output as the volume's decryption key.