You may encounter image-related issues when you use ECS instances, such as slow startup, high system load, and problems with kernel compilation. This topic describes these issues and provides solutions.
Windows image issues
Manually update virtio drivers for Windows
Windows Server Semi-Annual Channel image and instance management
Resolution issues for Windows UEFI instances over VNC
"This copy of Windows is not genuine" error
You must activate Windows. For more information, see Activate a genuine Windows Server system for an ECS instance by using a KMS domain name.
System time inaccuracies from timeBeginPeriod API calls
On Windows Server 2008, frequent calls to the
timeBeginPeriodAPI may cause the system time to drift. To resolve this issue, perform the following steps:NoteFor more information about system functions that can affect system time precision, see the official Microsoft documentation.
Remotely connect to the ECS instance.
For more information, see Connect to a Windows instance by using Workbench.
Download the diagnostic tool.
Decompress the CheckTimeBeginPeriod.zip file.
Decompress the bin.zip file, go to the bin directory, and then double-click the .exe file.
For a 64-bit operating system, double-click InjectDllx64.exe.
For a 32-bit operating system, double-click InjectDllx86.exe.
The processes that call the timeBeginPeriod function are displayed.
Stop or update the program that calls the
timeBeginPeriodAPI based on your business requirements.
If the issue persists, submit a ticket.
"Internet Explorer Enhanced Security Configuration" error
When you use Internet Explorer to open a website on an ECS instance or a Simple Application Server that runs a Windows operating system, the "Content from the website listed below is being blocked by the Internet Explorer Enhanced Security Configuration" error message appears. For information about how to resolve this issue, see What to do if the "Content from the website listed below is being blocked by the Internet Explorer Enhanced Security Configuration" error message appears when I use Internet Explorer on a Windows instance to open a website?
User data not executed after system disk change
Cause
After a Windows ECS instance starts up properly, a cache file is created in the
C:\ProgramData\aliyun\vminit\INSTANCE_{Instance_ID}\METASERVERpath. This file is used to mark whether the instance has been initialized. If you create a custom image from this ECS instance and use this custom image to reinitialize or replace the system disk, a cache file that matches the ID of the current instance is found in theC:\ProgramData\aliyun\vminit\INSTANCE_ID\METASERVERpath. The Vminit component determines whether an ECS instance is starting for the first time based on the existence of the cache file. If a cache file that matches the ID of the current instance is found, the Vminit component determines that the instance is not on its first startup and will not automatically run the userdata script.NoteThe Vminit component is automatically installed when you create a Windows instance. It provides initialization capabilities during the instance startup phase, similar to the cloud-init service for Linux. For more information about the Vminit component, see Initialization tools.
Solution
Before you create a custom image from the ECS instance, check for and delete the cache file in the
C:\ProgramData\aliyun\vminit\INSTANCE_{InstanceID}\METASERVERdirectory.
CentOS and Red Hat image issues
DNS resolution timeouts in CentOS
Cause
Due to a change in the DNS resolution mechanism of CentOS 6 and CentOS 7, DNS resolution timeouts may occur on CentOS 6 and CentOS 7 instances created before February 22, 2017, or on instances created from custom images that were created before February 22, 2017.
Solution
To resolve this issue, perform the following steps:
Download the fix_dns.sh script.
Place the downloaded script in the /tmp directory of your CentOS system.
Run the bash /tmp/fix_dns.sh command to execute the script.
The following section describes the purpose and logic of the script:
Checks whether the instance is running CentOS.
If the instance is not running a CentOS system (for example, Ubuntu or Debian), the script stops.
If the instance is running a CentOS system, the script continues.
Queries the /etc/resolv.conf file for the
optionsconfiguration.If no
optionsconfiguration exists:The default Alibaba Cloud
optionsconfigurationoptions timeout:2 attempts:3 rotate single-request-reopenis used.
If an
optionsconfiguration exists:If the
single-request-reopenoption does not exist, the script appends it to theoptionsconfiguration.If the
single-request-reopenoption exists, the script stops and does not change the DNS nameserver configuration.
Missing IP addresses in CentOS 7 and Windows
For information about the cause and solution, see Check for and fix missing IP addresses on CentOS 7 and Windows instances.
Cannot generate crash dump on CentOS 7.9 Arm
Symptoms
After a CentOS 7.9 Arm system experiences downtime, you run the
ls /var/crashcommand to query for dump files, but novmcorefile is generated.
Cause
The kernel of the CentOS 7.9 Arm system has the
CONFIG_ARM64_USER_VA_BITS_52=yfeature. The version of the native makedumpfile software is incompatible with the kernel version. As a result, a dump file cannot be generated.Solution
ImportantThis solution applies only to systems where the kdump service is properly enabled. If the kdump service is not enabled and you follow the steps in this topic to fix the issue, you must manually configure the
crashkernelparameter in theproc/cmdlinefile.Run the following command to download the kexec-tools package:
wget http://mirrors.aliyun.com/centos-vault/7.9.2009/os/Source/SPackages/kexec-tools-2.0.15-51.el7.src.rpmRun the following command to install the RPM package:
rpm -ivh kexec-tools-2.0.15-51.el7.src.rpmRun the following commands to download the patch file:
cd /root/rpmbuild/SOURCES
wget https://ecs-image-tools.oss-cn-hangzhou.aliyuncs.com/patch/rhelonly-kexec-tools-2.0.20-makedumpfile-arm64-Add-support-for-ARMv8.2-LVA-52-bi.patch
Modify the kexec-tools.spec file.
Open the kexec-tools.spec file.
cd /root/rpmbuild/SPECS/
vi kexec-tools.spec
Press the
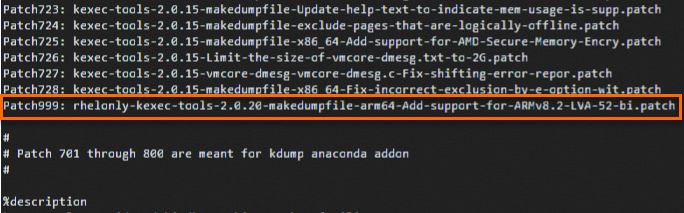
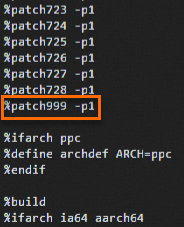
ikey to enter Insert mode and add the following two lines to the file:Patch999: rhelonly-kexec-tools-2.0.20-makedumpfile-arm64-Add-support-for-ARMv8.2-LVA-52-bi.patch %patch999 -p1The following figures show the positions where the content must be added.
Press the
Esckey to exit Insert mode, and then enter:wqto save and exit.
Run the following command to check for installation dependencies:
yum-builddep kexec-tools.specRun the following commands to build the RPM package:
yum -y install rpm-build
rpmbuild -ba kexec-tools.spec
Run the following commands to install the modified RPM package:
cd /root/rpmbuild/RPMS/aarch64
rpm -ivh kexec-tools-2.0.15-51.el7.aarch64.rpm
If downtime occurs again, you can run the
ls -lh /var/crashcommand to check for dump files. If avmcorefile is generated, the issue is resolved.
Convert CentOS 7 to RHEL 7
CentOS 7 will reach its end of life (EOL) on June 30, 2024, and Alibaba Cloud will stop supporting it on the same date. To avoid disruptions from the OS reaching EOL, you can convert CentOS 7 to RHEL 7. The following steps describe how to convert CentOS 7 to RHEL 7 on Alibaba Cloud. You can also refer to the official Red Hat documentation for the conversion.
ImportantBefore the conversion, we recommend that you stop critical applications, database services, and data storage services and create a snapshot to back up important data. This helps prevent data loss from accidental operations.
(If applicable) If Server Guard is installed on your Alibaba Cloud server, you must first uninstall Server Guard.
For more information, see Uninstall the agent.
NoteServer Guard is the default security enhancement tool for CentOS, whereas RHEL 7 uses security tools provided by Red Hat. Server Guard may have incompatibilities and conflicts with the tools in RHEL 7. Therefore, you must uninstall Server Guard during the conversion to ensure system stability and compatibility.
Run the following commands to upgrade the system packages to the latest version:
sudo wget -O /etc/yum.repos.d/CentOS-Base.repo https://mirrors.aliyun.com/repo/Centos-7.repo
sudo wget -O /etc/yum.repos.d/epel.repo https://mirrors.aliyun.com/repo/epel-7.repo
Run the following commands to update the system packages and restart the system:
sudo yum -y update
sudo reboot
Run the following commands to download and install the convert2rhel tool from the official Red Hat website:
sudo curl -o /etc/pki/rpm-gpg/RPM-GPG-KEY-redhat-release https://www.redhat.com/security/data/fd431d51.txt
sudo curl --create-dirs -o /etc/rhsm/ca/redhat-uep.pem https://ftp.redhat.com/redhat/convert2rhel/redhat-uep.pem
sudo curl -o /etc/yum.repos.d/convert2rhel.repo https://ftp.redhat.com/redhat/convert2rhel/7/convert2rhel.repo
sudo yum -y install convert2rhel
Purchase an RHEL subscription on Alibaba Cloud and obtain the URL of the RHEL 7 repo RPM package.
For assistance, submit a ticket.
Run the following commands to install the RHEL 7 repo source package:
sudo rpm -ivh --replacefiles <repo_rpm_package_url>
sudo sed -i 's/enabled=1/enabled=0/g' /etc/yum.repos.d/rh-cloud.repo
Replace
<repo_rpm_package_url>with the actual URL of the RHEL 7 repo RPM package, which you can obtain when you purchase the RHEL subscription.Run the following command to convert CentOS 7 to RHEL 7:
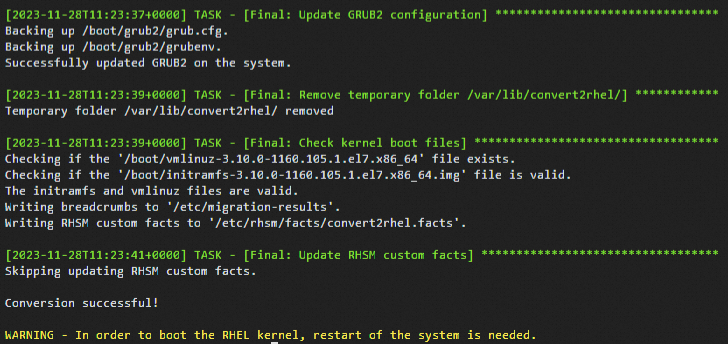
sudo convert2rhel -y --no-rhsm --enablerepo rhui-rhel-7-server-rhui-rpms --enablerepo rhui-rhel-7-server-rhui-extras-rpms --enablerepo rhui-rhel-7-server-rhui-optional-rpmsThe conversion process takes some time. When the process is complete, an output similar to the following one appears, indicating a successful conversion.
Run the following command to restart the system:
After the conversion, the system prompts you to restart. Restarting boots the new RHEL kernel, and you can then verify that the OS was successfully converted.
sudo rebootNoteAfter you convert CentOS 7 to RHEL 7, if you need to upgrade RHEL 7 to RHEL 8, see Upgrade Red Hat Enterprise Linux.
Slow startup of Red Hat 8.1/8.2 on bare metal instances
On an ECS Bare Metal Instance, a Red Hat 8.1 or 8.2 image takes one to two minutes longer to start than a Red Hat 7 image. To resolve this issue, in the /boot/grub2/grubenv file of your Red Hat 8.1/8.2 system, change the kernel startup parameter from
console=ttyS0 console=ttyS0,115200n8toconsole=tty0 console=ttyS0,115200n8, and then restart the server for the change to take effect.
Ubuntu image issues
High system load from Server Guard on Ubuntu
On an ECS instance that runs a specific version of Ubuntu, such as Ubuntu 18.04, the average system load becomes high after the Server Guard (AliYunDun) process is started.
FreeBSD image issues
Patch and compile the FreeBSD kernel
The Alibaba Cloud FreeBSD public images have been patched to meet the startup requirements of instances that belong to series-V or later instance families. You can call the DescribeInstanceTypeFamilies operation and check the value of the
Generationparameter to query the instance families.In the following cases, the system may fail to start. You can apply a patch to the FreeBSD kernel source code and compile the kernel to prevent or resolve startup failures.
If you use a FreeBSD image not provided by Alibaba Cloud, or a custom image based on it, to create a series-V or later ECS instance, the instance may fail to start.
When you use a FreeBSD public image to create an ECS instance and use freebsd-update or a similar tool to update the kernel patch, an ECS instance that belongs to a series-V or later instance family may fail to start.
You do not need to apply a patch for FreeBSD 13 or later. This section uses FreeBSD 12.3 as an example to describe how to use the FreeBSD kernel source code to apply a patch and compile the kernel.
Download and decompress the FreeBSD kernel source code.
wget https://mirrors.aliyun.com/freebsd/releases/amd64/12.3-RELEASE/src.txz -O /src.txz
cd /
tar -zxvf /src.txz
Download the patch package.
In this example, the patch package
0001-virtio.patchis applied to the virtio driver.cd /usr/src/sys/dev/virtio/ wget https://ecs-image-tools.oss-cn-hangzhou.aliyuncs.com/0001-virtio.patch patch -p4 < 0001-virtio.patchCopy the kernel files, and then compile and install the kernel.
make -j<N>specifies the number of parallel compilation jobs, which should be determined based on your compilation environment's configuration. For example, for a 1 vCPU environment, we recommend that you set-j2. This means the ratio of vCPU cores to the variable N is1:2.cd /usr/src/ cp ./sys/amd64/conf/GENERIC . make -j2 buildworld KERNCONF=GENERIC make -j2 buildkernel KERNCONF=GENERIC make -j2 installkernel KERNCONF=GENERICAfter the compilation is complete, delete the source code.
rm -rf /usr/src/*
rm -rf /usr/src/.*
System disk not found for FreeBSD in KVM
Symptoms
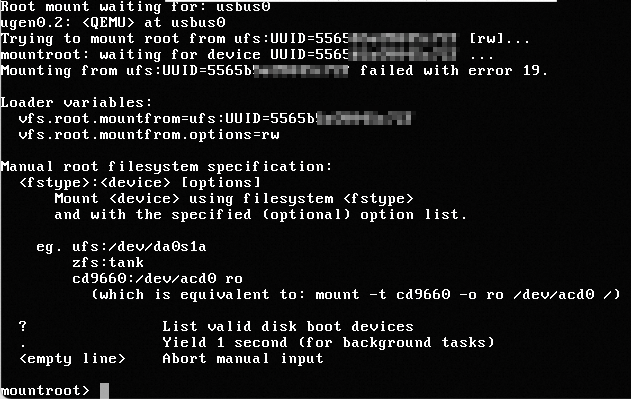
When you use VNC to log on to a FreeBSD system in a KVM virtualized environment, the system disk cannot be found and you cannot enter the system, as shown in the following figure.
Solution
In the VNC window, enter ? to view the ufsid of the related root file system (rootfs).
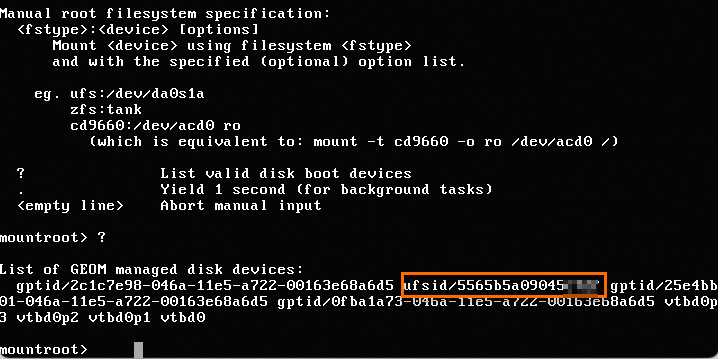
Enter
ufs:/dev/ufsid/5565b5a09045****and press Enter to access the operating system.Enter the username and password to log on to the system.
Run the following command to view the
/etc/fstabconfiguration:cat /etc/fstabAs shown in the following figure, the
/etc/fstabconfiguration uses the UUID-based mounting method. However, FreeBSD systems do not support this mounting method. You must change it to the ufsid method.
Change the mounting method of the FreeBSD system to ufsid.
Run the following command to open the
/etc/fstabfile:vi /etc/fstabPress the i key to enter Insert mode.
Change
UUID=5565b5a09045****to/dev/ufsid/5565b5a09045****.After you make the change, press the Esc key, enter
:wq, and then press the Enter key to save and exit.
Run the following command to restart the system for the configuration to take effect:
reboot
Fedora image issues
Cannot connect to Fedora 33 with ssh-rsa keys
When you use an ECS instance that runs the Fedora 33 64-bit operating system, if your logon credential is an SSH key pair with the ssh-rsa signature algorithm, you may fail to remotely connect to the instance over SSH. You can use one of the following methods to resolve this issue:
Replace the SSH key pair that uses the ssh-rsa signature algorithm with an SSH key pair that uses another signature algorithm, such as the Elliptic Curve Digital Signature Algorithm (ECDSA).
Run the update-crypto-policies --set LEGACY command on the system to change the cryptographic
POLICYtoLEGACY. This allows you to continue using the SSH key pair with the ssh-rsa signature algorithm.
CPU count halved on Fedora CoreOS instances
After you create an instance of a specific instance family, such as g5, from a Fedora CoreOS image, you can run the lscpu command to view CPU information. The total number of online CPUs in the
On-line CPU(s) listis only half of the actual CPU specification of the instance. For example, if you select 2 vCPUs when you create the instance, theOn-line CPU(s) listshows only one CPU, as shown in the following figure.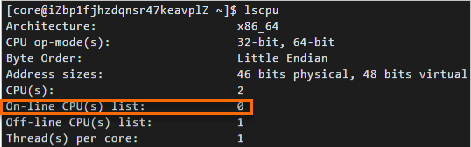 Note
NoteThe value of the
On-line CPU(s) listparameter represents the CPU number. In the example figure, only CPU 0 is available.This is because the kernel of the Fedora CoreOS image is configured with the
mitigations=auto,nosmtboot parameter by default. This parameter automatically disables Simultaneous Multi-Threading (SMT) for vulnerable systems, which halves the number of available CPUs. You can run the cat /proc/cmdline command to view themitigations=auto,nosmtparameter.For more information about SMT, see Automatically disable SMT when needed to address vulnerabilities and Policy for disabling SMT.
Other issues
Linux time and time zones
Install NVMe driver for custom images
Downtime after instance migration
Install GRUB on a Linux server
Collect kernel crash dump after downtime
CPU frequency inconsistency in /proc/cpuinfo
Logon issues with RSA keys
Crash dump failure on bare metal instances
For information about the cause and solution, see What to do if some ECS instances fail to generate crash dump files?
Softlockup error during kernel writeback
In some earlier versions of the Linux operating system, a softlockup error may occur when the kernel writes back file caches. For the solution, see Solution to the softlockup error that occurs during kernel writeback in a Linux operating system.
Softlockup error when deleting a cgroup
For the solution, see Solution to the softlockup error that occurs when a cgroup is deleted within an ECS instance.
ECS instance downtime
FTP service in public images
No. You must install and configure the FTP service yourself. For more information, see Build an FTP site on a Windows instance and Build an FTP site on a Linux instance.
Virtual memory and swap partitions disabled by default
A swap partition or virtual memory file is a mechanism used by the system memory manager. When the physical memory is insufficient, the memory manager temporarily saves memory data that has been inactive for a long time to the swap partition or virtual memory file to increase the available memory.
However, this mechanism can have the opposite effect if memory usage is already high and I/O performance is poor. Alibaba Cloud ECS cloud disks use a distributed file system for storage and create multiple, strongly consistent replicas of each piece of data. While this mechanism ensures data security, the resulting threefold increase in I/O operations can degrade storage and I/O performance compared to local disks.
To avoid degrading the I/O performance of ECS cloud disks when system resources are low, virtual memory is disabled by default on Windows instances, and swap partitions are not configured by default on Linux instances.
Enable kdump in public images
By default, the kdump service is disabled in public images. If you want an instance to generate a core file during downtime for root cause analysis, perform the following steps to enable the kdump service. This section uses the CentOS 7.2 public image as an example. The actual steps may vary based on your operating system.
Set the directory for generating the core file.
Run vim /etc/kdump.conf to open the kdump configuration file.
Set path to the directory where the core file is generated. In this example, the core file is generated in the /var/crash directory. Therefore, the path is set as follows:
path /var/crashSave and close the /etc/kdump.conf file.
Enable the kdump service.
Select a method to enable the service based on the commands supported by your operating system.
Method 1: Run the following commands in sequence to enable the kdump service.
systemctl enable kdump.servicesystemctl start kdump.serviceMethod 2: Run the following commands in sequence to enable the kdump service.
chkconfig kdump onservice kdump startMethod 3: If Cloud Assistant is installed on your server, see How to resolve downtime issues after instance migration to enable the kdump service.
NTP service fails to sync after configuring IPv6
Symptoms
When you run the
ntpq -pcommand on the server to synchronize time, a timeout is returned, as shown in the following figure.
Solution
NoteThis method is applicable to operating systems such as CentOS 7 and earlier, Ubuntu 20.04 and earlier, Anolis OS (ANCK/RHCK), Alibaba Cloud Linux, and Debian.
Remotely connect to the Linux instance.
For more information, see Connect to a Linux instance by using Workbench.
Run the following command to modify the /etc/ntp.conf configuration file:
vi /etc/ntp.confPress the i key to enter Insert mode.
Add the
restrict -6 ::1content to the file, as shown in the following figure.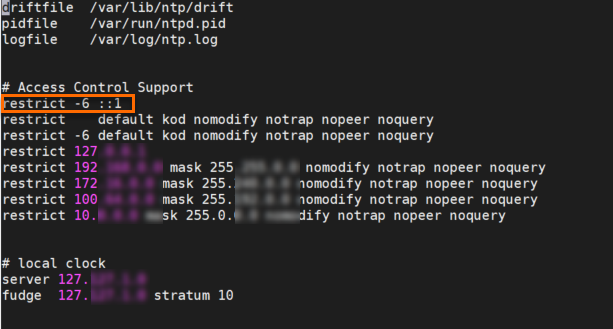
After you make the change, press the Esc key, enter
:wq, and then press the Enter key to save and exit.Run the following command to restart the NTP service:
systemctl restart ntp
Hot-swapping failure on instances from custom images
Symptoms
Hot-swapping a cloud disk means attaching or detaching a cloud disk while an instance is in the Running state. Hot-swapping a network card means attaching or detaching an elastic network interface while an instance is in the Running state.
Alibaba Cloud supports hot-swapping for cloud disks and elastic network interfaces, but the operation's success depends on operating system kernel support. If the kernel does not support hot-swapping, the following issues may occur:
After you attach a cloud disk or bind an elastic network interface, the corresponding device is not visible within the operating system.
You fail to detach a cloud disk or unbind an elastic network interface.
Solution
The kernel features required for hot-swapping differ between standard ECS instances and ECS Bare Metal Instances. We recommend that the kernel supports both Peripheral Component Interconnect (PCI) and Advanced Configuration and Power Management Interface (ACPI) hot-swap features. These are typically enabled by default on most systems, except for older versions such as CentOS 5. You can perform the following steps to check whether the PCI and ACPI hot-swap features are enabled in the kernel.
Remotely connect to the Linux instance.
For more information, see Connect to a Linux instance by using Workbench.
Run the following command to check the current kernel version of the instance:
uname -rThe following response indicates that the current kernel version is
3.10.0-1127.19.1.el7.x86_64.
Run the following command to view the files in the
/bootdirectory:ll /bootThe following response shows that
config-3.10.0-1127.19.1.el7.x86_64is the kernel configuration file of the system.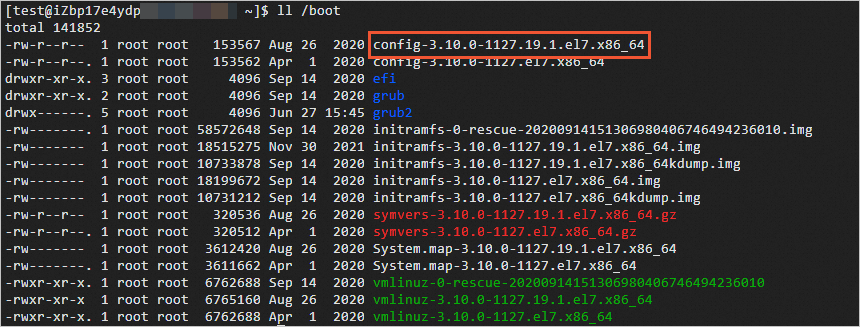
Run the following command to view the kernel configuration file of the system:
cat /boot/config-3.10.0-1127.19.1.el7.x86_64If the following configuration items are all set to
y, the features are compiled into the kernel, and the operating system supports the corresponding hot-swap operations.CONFIG_HOTPLUG_PCI_PCIE=y CONFIG_HOTPLUG_PCI=y CONFIG_HOTPLUG_PCI_ACPI=yIf a configuration item is marked as
is not set, the kernel was not compiled with this feature. You must recompile the kernel to add support.If a configuration item is set to
m, it is compiled as a module. For example, ifCONFIG_HOTPLUG_PCI_ACPIis compiled as a module, you need to load the corresponding module.CONFIG_HOTPLUG_PCI_PCIE=y CONFIG_HOTPLUG_PCI=y CONFIG_HOTPLUG_PCI_ACPI=mFor a CentOS 5.x operating system with a 2.6 kernel, the module corresponding to
CONFIG_HOTPLUG_PCI_ACPIis acpiphp.ko. To load it, run themodprobe acpiphpcommand. If the module fails to load, you can upgrade to a higher kernel version or perform a cold-swap by stopping the instance.ImportantWe do not recommend that you arbitrarily upgrade the kernel or operating system of your server. If you need to upgrade the kernel, see Methods to prevent system startup failures after a kernel upgrade on a Linux instance.
Instance shutdown after a kernel panic
Symptoms
When an unexpected kernel error (kernel panic) occurs in the operating system, a second kernel (capture kernel) is loaded to perform a memory dump and generate a Kdump log. However, due to compatibility issues with certain ECS Bare Metal Instance families, the second kernel fails to recognize the disk during startup. This failure prevents Kdump log collection, causes the second kernel to fail, and stops the instance. You must then restart the instance from the console.
For more information about ECS Bare Metal Instance families, see Instance families.
Cause
An ECS Bare Metal Instance may fail to generate a dump file by using the Kdump service that comes with the operating system.
For ebm*6-generation series ECS Bare Metal Instances, this issue occurs when the following images are used:
CentOS 8.3 and earlier CentOS versions
Ubuntu 16.04 and 18.04
Debian 10
Alibaba Cloud Linux 2 with a kernel version earlier than
4.19.91-24.al7(The issue is fixed in version4.19.91-24.al7and later.)
For ebm*7-generation series ECS Bare Metal Instances, this issue occurs when a Debian 10 image is used.
Solution
For CentOS and other images
We recommend that you switch to a later version of the operating system. For more information, see Change the operating system (system disk).
For Alibaba Cloud Linux 2 images
We recommend that you upgrade the kernel to version
4.19.91-24.al7or later by following these steps.Remotely log on to the ECS instance.
For more information, see Connect to a Linux instance by using Workbench.
Run the following command to query the kernel version:
uname -rRun the following command to upgrade the kernel version:
sudo yum update kernelRun the following command to restart the ECS instance for the new kernel version to take effect:
sudo reboot